Microsoft SQL Server 2008 R2 Unleashed- P45 pps
Bạn đang xem bản rút gọn của tài liệu. Xem và tải ngay bản đầy đủ của tài liệu tại đây (325.41 KB, 10 trang )
ptg
384
terms of server overhead because every transaction is captured and retained in the transac-
tion log so that they can be recovered in the event of a failure.
TIP
A common problem in SQL Server environments involves a database that is set to full
recovery but whose transaction log is never backed up. In this scenario, the transaction
log can grow to the point that it fills up the drive on which the transaction log is locat-
ed. You need to ensure that you have regularly scheduled backups of the transaction
log if you have set your database to full recovery. The transaction log backups allow
you to recover from a media failure and also remove the inactive portion of the transac-
tion log so that it does not need to grow.
Bulk-Logged Recovery
The bulk-logged recovery model is similar to full recovery, but it differs in the way that
bulk operations are captured in the transaction log. With full recovery mode, SQL Server
writes every row to the transaction log that is inserted with BCP or BULK INSERT. Bulk-
logged recovery keeps track of the extents that have been modified by a bulk load opera-
tion but does not write each row to the transaction log. This reduces the overall size of the
transaction log during bulk load operations and still allows the database to recover after a
bulk load operation has occurred.
The biggest downside to setting a database to bulk-logged recovery is that the log backups
for the databases can be large. The log backups are large because SQL Server copies all the
data extents that have been affected by bulk load operations since the last backup of the
transaction log. Remember that data extents consist of eight data pages each, and each
page is 8KB in size. This may not seem like much by today’s standards, but it can be
significant when you’re bulk loading a large table. For example, consider a table occupy-
ing 1GB of space that is truncated each week and reloaded with a bulk insert. The bulk
insert operation goes relatively fast because the rows are not being written to the transac-
tion log, but the backup of the transaction log is much larger.
NOTE
In testing we did on a table with approximately 2.4 million rows (that occupied 500MB
of space), the log file grew over 2GB during a bulk insert operation that reloaded all
rows in a full recovery mode database. In contrast, the same bulk insert operation on
the database with bulk-logged recovery grew the log by only 9MB. However, the backup
of the 9MB transaction log was approximately 500MB. This is much larger than the
actual log itself because the bulk operation caused all the modified extents from the
bulk insert operation to be stored in the log backup as well.
The other downside to bulk-logged recovery is that with it, you may sacrifice the ability to
restore to the most recent point in time. This situation occurs if a bulk insert operation
CHAPTER 14 Database Backup and Restore
Download from www.wowebook.com
ptg
385
Backup Devices
14
has occurred since the last database backup and a media failure occurs. In this case, the
restores can occur for any backups that were taken that do not contain a bulk insert opera-
tion, but any outstanding changes that were retained in the transaction log cannot be
applied. The reason is that bulk operations are not written to the log directly in this model
and cannot be recovered. Only bulk operations captured in a backup can be restored.
If transactions have occurred in a database since the last backup, and no bulk insert opera-
tions have occurred, you can recover those pending transactions as long as the media
containing the transaction log is still available. The tail of the transaction log can be
backed up and applied during a restore operation. The tail of the log and other restore
scenarios are discussed in the “Restore Scenarios” section, later in this chapter.
Simple Recovery
The simple recovery model is the easiest to administer, but it is the option that has the
greatest possibility for data loss. In this mode, your transactions log is truncated automati-
cally based on a checkpoint in the database. These checkpoints happen often, and they
cause the data in the transaction log to be truncated frequently.
NOTE
Prior to SQL Server 2000, the trunc. log on checkpoint database option was
used to truncate the log on a checkpoint and produce the same type of behavior as
simple recovery. This database option and the equivalent backup options NO_LOG and
TRUNCATE_ONLY are no longer supported. The only supported method for truncating
the transaction log in SQL Server 2008 is to switch the database to use the simple
recovery model.
The most important point to remember about the simple recovery model is that with it,
you cannot back up the transaction log that captures changes to your database. If a media
failure occurs, you are not able to recover the database activity that has occurred since the
last database backup. This is a major exposure, so simple recovery is not recommended for
production databases. However, it can be a good option for development databases where
the loss of some transactions is acceptable. In these types of environments, simple recov-
ery can equate to saved disk space because the transaction log is constantly truncated. The
administration in these environments is reduced as well because the transaction log
backups are not an option and thus do not need to be managed.
For a more detailed discussion of the transaction log, see Chapter 31, “Transaction
Management and the Transaction Log.”
Backup Devices
A backup device is used to provide a storage destination for the database backups created
with SQL Server. Backups can be written to logical or physical devices. A logical device is
essentially an alias to the physical device and makes it easier to refer to the device when
Download from www.wowebook.com
ptg
386
performing database backups. The physical backup devices that SQL Server can write to
include files on local disks, tape, and network shares.
Disk Devices
A disk device is generally stored in a folder on a local hard drive. This should not be the
same hard drive where your data is stored! Disk devices have several advantages, including
speed and reliability. If you have ever had a backup fail because you forgot to load a tape,
you can appreciate the advantage of disk backups. On the other hand, if backups are
stored on a local disk and the server is destroyed, you lose your backups as well.
NOTE
Disks have become increasingly popular media as the prices have fallen. Storage area
networks (SANs) and other large-scale disk solutions have entered mainstream usage
and offer a large amount of storage at a relatively inexpensive price. They also offer
redundancy and provide fault tolerance to mitigate the chance of losing data on a disk.
Finally, increased network bandwidth across LANs and WANs has allowed for the move-
ment of backups created on disk to alternate locations. This is a simple way to achieve
additional fault tolerance.
Tape Devices
Tape devices are used to back up to tape. Tape devices must be directly connected to the
server, and parallel backups to multiple drives are supported to increase throughput. Tape
backups have the advantage of being scalable, portable, and secure. Scalability is impor-
tant as a database grows; available disk space often precludes the use of disk backups for
large databases. Because tapes are removable media, they can easily be transported offsite,
where they can be secured against theft and damage.
SQL Server supports the Microsoft Tape Format (MTF) for backup devices, which means
that SQL Server backups and operating system backups can share the same tape. This capa-
bility is convenient for small sites with shared use servers and only one tape drive. You
can schedule your SQL Server backups and file backups without having to be onsite to
change the tape.
Network Shares
SQL Server 2008 allows the use of both mapped network drives and Universal Naming
Convention (UNC) paths in the backup device filename. A mapped network drive must be
mapped as a network drive in the session in which SQL Server is running. This is prone to
error and generally not recommended. UNC paths are much simpler to administer. With
UNC backup devices, the SQL Server service account must be able to see the UNC path on
the network. This is accomplished by granting the service account full control permission
on the share or by making the service account a member of the Administrators group on
the remote computer.
Keep in mind that backups performed on a network share should be done on a dedicated
or high-speed network connection, and the backup should be verified to avoid potential
CHAPTER 14 Database Backup and Restore
Download from www.wowebook.com
ptg
387
Backup Devices
14
corruption introduced by network error. The time it takes a backup to complete over the
network depends on network traffic, so you need to take this factor into consideration
when planning your backups.
Media Sets and Families
When you’re backing up to multiple devices, the terms media set and media family are used
to describe the components of the backup. A media set is the target destination of the
database backup and comprises several individual media. All media in a media set must be
of the same type (for example, all tape or all disk). A media family is the collection of
media associated with an individual backup device. For example, a media family could be
a collection of five tapes contained in a single tape device.
The first tape in the media family is referred to as the initial media, and the subsequent
tapes are referred to as continuation media. All the media families combined are referred to
as the media set. If, for example, a backup is written to 3 backup devices (each with 4
tapes), the media set would contain 3 media families and consist of a total of 12 tapes. It
is recommended to use the
MEDIANAME parameter of the BACKUP command to specify a
name for the media set. This parameter associates the multiple devices as members of the
media set. The MEDIANAME parameter can then be referenced in future backup operations.
Creating Backup Devices
You can create logical backup devices by using T-SQL or SSMS. The T-SQL command for
creating these logical backup devices is sp_addumpdevice, which has the following syntax:
sp_addumpdevice [ @devtype = ] ‘device_type’
, [ @logicalname = ] ‘logical_name’
, [ @physicalname = ] ‘physical_name’
[ , { [ @cntrltype = ] controller_type |
[ @devstatus = ] ‘device_status’ }
]
The following sample script demonstrates the creation of the different types of backup
devices:
Local Disk
EXEC sp_addumpdevice ‘disk’, ‘diskdev1’,
‘c:\mssql2008\backup\AdventureWorks2008.bak’
Network Disk
EXEC sp_addumpdevice ‘disk’, ‘networkdev1’,
‘\\myserver\myshare\AdventureWorks2008.bak’
Tape
EXEC sp_addumpdevice ‘tape’, ‘tapedev1’, ‘\\.\tape0’
To create backup devices with SSMS, you navigate to the Server Objects node in the
Object Explorer and right-click Backup Devices and then New Backup Device; the Backup
Download from www.wowebook.com
ptg
388
FIGURE 14.2 The Back Up Database window in SSMS.
Device screen appears. This screen includes a text box for the device name, along with a
section to select the destination for the device. This is the physical location, and you can
select either Tape or File.
Backing Up a Database
Now that you know the types of backups, the recovery models they relate to, and the
devices you can write to, you are ready to back up your database. You can create backups
with SQL Server 2008 by using either the SSMS or T-SQL. Some backups are supported
only through T-SQL, but the vast majority can be accomplished with either tool.
Creating Database Backups with SSMS
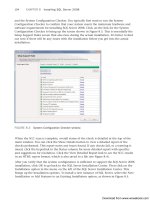
The backup options in SSMS are accessible through the Object Explorer. For example, you
can right-click the AdventureWorks2008 database in the SSMS Object Explorer, select Tasks
and Backup, and a backup window like the one shown in Figure 14.2 appears.
CHAPTER 14 Database Backup and Restore
The Source section on the Back Up Database window contains information relative to the
database that will be backed up. The target database is displayed in the first drop-down,
along with the recovery model set for the database. The backup types available in the
drop-down are dependent on the recovery model. For simple recovery, only full and differ-
Download from www.wowebook.com
ptg
389
FIGURE 14.3 The Back Up Database Options page in SSMS.
Backing Up a Database
14
ential backup types are available. For full recovery and bulk-logged recovery models, all
backup types are available in the drop-down.
The Backup Set section allows you to give the backup a meaningful name and specify
when the backup set will expire. When the backup set expires, the backup can be overwrit-
ten and is no longer retained. If the backup is set to expire after 0 days, it will never expire.
The Destination section identifies the disk or tape media that will contain the backup. You
can specify multiple destinations in this section by clicking the Add button. For disk
media, you can specify a maximum of 64 disk devices. The same limit applies to tape
media. If multiple devices are specified, the backup information is spread across those
devices. All the devices must be present for you to be able to restore the database. If no
tape devices are attached to the database server, the Tape option is disabled.
You can select several different types of options for a database backup. Figure 14.3 shows
the options page available when you back up a database by using SSMS.
The Overwrite Media section allows you to specify options relative to the destination
media for the backup. Keep in mind that a given media set can contain more than one
backup. This can occur if the Append to the Existing Backup Set options is selected. With
this option, any prior backups contained on the media set are preserved, and the new
backup is added to it. With the Overwrite All Existing Backup Sets option, the media set
contains only the latest backup, and no prior backups are retained.
Download from www.wowebook.com
ptg
390
CHAPTER 14 Database Backup and Restore
You can use the options in the Reliability section to ensure that the backup that has been
created can be used reliably in a restore situation. Verifying the backup when finished is
highly recommended, but doing so causes the backup time to be extended during the veri-
fication. Similarly, the Perform Checksum Before Writing to Media option helps ensure
that you have a sound backup, but again, it causes the database backup to run longer.
The options in the Transaction Log section are available for databases in the full recovery
or bulk-logged model. These options are disabled in the simple recovery model. The
Truncate the Transaction Log option causes any inactive portion of the transaction log to
be removed after the database backup is complete. The inactive portion of the log and
other detail of the transaction log are discussed in more detail in Chapter 30 “Transaction
Management and the transaction log”. This option, the default, helps keep the size of the
transaction log manageable. The Back Up the Tail of the Log option is related to point-in-
time restores and is discussed in more detail in the “Restore Scenarios” section later in
this chapter.
The set of options in the Tape Drive section are enabled only when tape has been selected
for the destination media. Selecting the Unload the Tape After Backup option causes the
media tape to be ejected when the backup completes. This option can help identify the
end of a backup and prevent the tape from being overwritten the next time the backup
runs. The Rewind the Tape Before Unloading option is self-explanatory; it causes the tape
to be released and rewound before you unload the tape. The last set of options relate to
compressed database backups. The options for compressed backups are discussed in detail
in the Compressed Backup secion later in this chapter.
NOTE
Keep in mind that all backups can be performed while the database is in use. SQL
Server is able to keep track of the changes occurring during the backup and can main-
tain transactional consistency as of the end of the backup. You need to consider some
performance overhead during the actual backup, but the backup can occur during active
database hours. However, it is still a good idea to schedule your database backups
during off-hours, when database activity is at a minimum.
Creating Database Backups with T-SQL
The T-SQL BACKUP command offers a myriad of options to perform all the backup opera-
tions available in SSMS. However, SSMS does not support some backup operations that can
be performed only with T-SQL.
The BACKUP command comes in three different flavors. The first flavor involves the backup
of a database. The command syntax starts with BACKUP DATABASE, followed by the relevant
parameters and options. The second flavor involves the backup of a file or filegroup that is
part of the database. The command syntax for this type of backup also utilizes the BACKUP
Download from www.wowebook.com
ptg
391
Backing Up a Database
14
DATABASE command, but a file or filegroup is specified after the database name to identify
which parts of the database should be backed up. The last flavor involves the backup of
the database’s transaction log. The syntax for backing up the transaction log starts with
BACKUP LOG. Each flavor shares many of the same options. The basic syntax for backing up
a database follows:
BACKUP DATABASE { database_name | @database_name_var }
TO < backup_device > [ , n ]
[ [ MIRROR TO < backup_device > [ , n ] ] [ next-mirror ] ]
[ WITH
[ BLOCKSIZE = { blocksize | @blocksize_variable } ]
[ [ , ] { CHECKSUM | NO_CHECKSUM } ]
[ [ , ] COMPRESSION | NO_COMPRESSION]
[ [ , ] COPY_ONLY ]
[ [ , ] { STOP_ON_ERROR | CONTINUE_AFTER_ERROR } ]
[ [ , ] DESCRIPTION = { ‘text’ | @text_variable } ]
[[,] DIFFERENTIAL ]
[ [ , ] EXPIREDATE = { date | @date_var }
| RETAINDAYS = { days | @days_var } ]
[ [ , ] PASSWORD = { password | @password_variable } ]
[ [ , ] { FORMAT | NOFORMAT } ]
[ [ , ] { INIT | NOINIT } ]
[ [ , ] { NOSKIP | SKIP } ]
[ [ , ] MEDIADESCRIPTION = { ‘text’ | @text_variable } ]
[ [ , ] MEDIANAME = { media_name | @media_name_variable } ]
[ [ , ] MEDIAPASSWORD = { mediapassword | @mediapassword_variable } ]
[ [ , ] NAME = { backup_set_name | @backup_set_name_var } ]
[ [ , ] { NOREWIND | REWIND } ]
[ [ , ] { NOUNLOAD | UNLOAD } ]
[ [ , ] RESTART ]
[ [ , ] STATS [ = percentage
] ]
]
The number of options is extensive, but many of them are optional. A BACKUP DATABASE
command can be as simple as the following example:
BACKUP DATABASE [AdventureWorks2008]
TO DISK = N’C:\mssql2008\backup\AdventureWorks2008_COPY.bak’
The first part of the BACKUP command is related to the database you want to back up
(database_name), followed by the location to which you want to write the backup
(backup_device). The remainder of the syntax relates to the options that can be specified
following the WITH clause. These options determine how your backup will be created and
the properties of the resulting backup. Table 14.1 outlines these options.
Download from www.wowebook.com
ptg
392
CHAPTER 14 Database Backup and Restore
TABLE 14.1 BACKUP DATABASE Options
Option Description
BLOCKSIZE
The physical block size that will be used to create the backup.
The default is 64KB.
CHECKSUM | NO_CHECKSUM When CHECKSUM is specified, a checksum is calculated before
the backup is written to validate that the backup is not corrupt.
The default is NO_CHECKSUM.
COMPRESSION |
NO_COMPRESSION
This new option in SQL Server 2008, available only with the
Enterprise or Developer Edition, causes the backup file to be
compressed. The default is NO_COMPRESSION.
STOP_ON_ERROR |
CONTINUE_AFTER_ERROR
This option is used in conjunction with the CHECKSUM option. The
STOP_ON_ERROR option, which is the default, causes the backup
to fail if the checksum cannot be validated.
DESCRIPTION
This is a 255-character description of the backup set.
DIFFERENTIAL
This option causes a differential backup to occur, which captures
changes only since the last backup.
EXPIREDATE
This option specifies the date on which the backup set will expire
and be overwritten.
RETAINDAYS
This option specifies the number of elapsed days before the
backup set can be overwritten.
PASSWORD
This is a password that must be specified when restoring the
backup set.
FORMAT | NOFORMAT FORMAT causes the existing media header and backup set to be
overwritten. The default is NOFORMAT.
INIT | NOINIT The INIT option causes a backup set to be overwritten. The
backup set is not overwritten if the backup set has not expired or
if it does not match the media name specified with the NAME
option. NOINIT, which is the default, causes the backup set to
be appended to the existing media.
NOSKIP | SKIP NOSKIP, which is the default, allows backup sets to be overwrit-
ten if they have expired. The SKIP option skips expiration and
media name checks and is used to prevent the overwriting of
backup sets.
MEDIADESCRIPTION
This is a 255-character description for the entire backup media
containing the backup sets.
Download from www.wowebook.com
ptg
393
Backing Up the Transaction Log
14
TABLE 14.1 BACKUP DATABASE Options
Option Description
MEDIANAME
This is a 128-character name for the backup media. If it is speci-
fied, the target media must match this name.
MEDIAPASSWORD
This is a password for the media set. When media is created
with this password, the password must be supplied to be able to
create a backup set on that media or to restore from that media.
NAME
This is a 128-character name for the backup set.
NOREWIND | REWIND This option is used for tape operations. REWIND, which is the
default, causes the tape to be released and rewound after it fills.
NOUNLOAD | UNLOAD This option is used for tape operations. NOUNLOAD, which is the
default, causes the tape to remain in the tape drive after a
backup completes. UNLOAD causes the tape to be rewound and
unloaded when the backup completes.
RESTART
This option has no effect and is in place only for backward
compatibility.
STATS
This option causes completion statistics to be displayed at the
specified interval to assess progress.
COPY_ONLY
This option allows a backup to be made without affecting the
normal sequence of backups.
The “Backup Scenarios” section, later in this chapter, provides some examples of how to
use these options.
Backing Up the Transaction Log
As discussed, the full and bulk-logged recovery models cause transactions to be written to
the database’s transaction log. These transactions should be backed up periodically for two
main reasons. First, the transaction log backups can be used in case of a media failure to
restore work completed in the database. These backups limit your exposure to data loss
and enable you to reapply changes that have occurred.
The second reason for backing up the transaction log is to keep the size of the log
manageable. Keep in mind that SQL Server is a write-ahead database management system
(DBMS) and thus writes most changes to the transaction log first, before it updates the
actual data files. This type of DBMS is great for recovery purposes, but it can be a real
headache if you do not periodically clear those transactions from the log. Without a
Download from www.wowebook.com