Windows Admin Scripting Little Black Book- P14 pptx
Bạn đang xem bản rút gọn của tài liệu. Xem và tải ngay bản đầy đủ của tài liệu tại đây (355.51 KB, 10 trang )
common schema, global catalog, and replication information, but do not share a common DNS namespace. This
allows you to combine the resources of two completely separate Internet domains (for example,
www.mydomain.com and www.yourdomain.com). Through trees and forests, Windows 2000 automatically
establishes two-way trusts between all domains.
Objects
Windows 2000 treats all resources as objects. These objects can consist of any of the various resources on a
network, such as users, computers, printers, and shares. Each object contains its own set of attributes, functions,
and properties as set by the schema. Whenever you access a resource, the schema sets which properties and
features are presentable. For example, a user account has a lockout property but a share does not, as instructed by
the schema.
Organizational Units
Windows 2000 allows you to organize network objects into logical containers called Organizational Units (OUs). OUs
can contain any network resource, such as accounts, groups, queues, shares, and even other OUs. Through OUs,
you can delegate administration and assign permissions to the OU or the individual objects within. The most common
use of organizational units is to organize company resources by department.
Global Catalog
Windows 2000 stores information about the objects in a tree or forest in a common database, called a global catalog.
Global catalog servers reduce network searches and object query time by processing these requests directly. The
first domain controller within a forest stores the global catalog, and is called a global catalog server. You can assign
additional global catalog servers to help network queries.
Warning
Global catalog servers synchronize their information through replication. A large quantity of
catalog servers can cripple a network with replication traffic.
ADSI
Active Directory Services Interfaces (ADSI), previously OLE Directory Services, is Microsoft’s implementation of a
directory service that organizes an enterprise into a tree-like structure. A directory service provides a standard
consistent method to manage and locate network resources. Directory services are actually databases that store
information about all the resources on your network. Whenever a request for a network resource is made, the
directory service interprets and processes the request. ADSI comes packaged with Windows 2000 Server and is
available as a free, separate download from Microsoft for Windows 9x/NT.
The ADSI Process
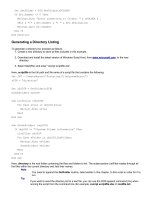
When a script or application issues a call to ADSI, the call is first sent to the ADSI client, as shown in Figure 8.1. The
ADSI client is included in all versions of Windows 2000 and is available as a download for Windows 9x/NT systems.
Do not confuse the ADSI client with the Active Directory Services Interface. The client is used to access a directory
service, whereas the Active Directory Services Interface is the directory service itself.
Figure 8.1: The ADSI process.
Note
Windows 2000 Server contains both the Active Directory Services Interfaces and the ADSI client.
Once the client receives the call, it passes it to the object model, called a router. The router interprets the request
and passes it to the appropriate provider. The provider is then responsible to take the appropriate action based on
the request.
Providers
ADSI provides a common interface to manage the network, regardless of directory service type. ADSI uses
components called providers to communicate with other directory services. These providers are stored in DLL files
and are loaded when ADSI is installed. The various providers included with ADSI are as follows:
IIS (Adsiis.dll)—Provider for Internet Information Server
LDAP (Adsldp.dll, Adsldpc.dll, and Adsmext.dll)—Provider for Windows 2000 Server and other LDAP-compliant
applications
NWCompat (Adsnw.dll)—Provider to Netware Bindery servers
NDS (Adsnds.dll)—Provider for Novell NDS servers
WinNT (Adsnt.dll)—Provider for Windows NT domains and Windows 2000 local resources
Note
The provider names, specified in parentheses above, are case-sensitive.
The next section
will give you a brief overview of the two main Windows providers: LDAP and WinNT.
The LDAP Provider
Lightweight Directory Access Protocol (LDAP) was developed in 1990 as a simple alternative to the complex X.500
directory standard. The LDAP provider is used to manage Windows 2000 Active Directory servers, Exchange 5.5 or
higher servers, Lotus Notes servers, Netscape directory servers, and other LDAP-compliant applications or servers.
The basic syntax to bind to the LDAP provider is:
Set variable = GetObject("LDAP:OU=orgunit, DC=Domain")
Here, variable is an arbitrary variable that you can use to access the LDAP provider; orgunit is the name of the
organizational unit; and domain is the name of the domain you want to connect to.
Windows 2000 uses Internet domain names, such as marketing. jesseweb.com. Each of the domain levels must be
separated by commas and in descending hierarchy, as follows:
Set variable = GetObject("LDAP:OU=orgunit, DC=marketing,
DC=jesseweb, DC=com")
Note
The code above must be placed on one line.
With LDAP, you can avoid specifying domain names by binding to the directory tree directly:
Set Variable = GetObject("LDAP://rootDSE")
The WinNT Provider
The WinNT provider is used to manage Windows NT domain resources and Windows 2000 local resources. This
provider is provided for backward compatibility with Windows NT domains and cannot access Windows 2000 Internet
domain names. Through this provider, you can manage your NT domain without having to upgrade to Windows
2000. The basic syntax to bind to the WinNT provider is:
Set variable = GetObject("WinNT://Domain/Computer/
Object,Class")
Note
The code above must be placed on one line.
Here, variable is an arbitrary variable that you can use to access the WinNT provider; domain is the name of the
domain you want to connect to; computer is the name of the system to connect to; object is the object that you want
to connect to; and class is the class type you want to connect to (for example, user, group, computer). Any
parameters specified after the provider name, in this case WinNT:, are optional.
If you are working outside your domain or need to use a different account to access the domain, you must use the
OpenDSObject function:
Set NTObj = GetObject("WinNT:")
Set variable = NTObj.OpenDSObject("WinNT://Domain/Server/
Object, username, password, ADS_SECURE_CREDENTIALS")
Note
The highlighted code above must be placed on one line.
Here, password is the password of the username to connect with.
Managing Computer Accounts from the Command Line
Computer accounts, like user accounts, allow the system to be part of the domain and access its resources. When a
computer joins a domain, a computer account is created on the PDC SAM establishing a one-way trust and allowing
the computer to access the domain. Although computer account management is usually done through the
administrative tools of the operating system, computer account management can be scripted from the command line.
Managing Computer Accounts with the NET Command
The built-in NET.EXE command allows you to manage computer accounts from the command line on any domain
controller. The basic syntax of the NET command to add computer accounts is:
NET COMPUTER \\compname/commands
Here, compname is the computer account to manage, and the available commands are:
/ADD—Adds a computer account to the domain
/DELETE—Removes a computer account from the domain
Tip
You can use one of the remote management methods discussed in Chapter 7
to run this command on
a remote domain controller.
Managing Computer Accounts with the NETDOM Utility
NETDOM is an NT resource kit utility to manage computer accounts from the command line. The basic syntax of
NETDOM is:
NETDOM MEMBER \\computer /D:domain /U:domain\user
/P:password /commands
Note
The code above must be placed on one line.
Here, computer is the computer account to manage; password is the password of the domain\user account with
privileges to manage computer accounts on the specified domain; and the available commands are as follows:
/ADD—Adds a computer account to the domain
/DELETE—Removes a computer account from the domain
/JOINDOMAIN—Joins the computer to the domain
/QUERY—Retrieves information on an existing computer account
To connect to the domain and add a computer account, you would enter:
NETDOM MEMBER \\computer /D:domain /U:domain\user
/P:password /JOINDOMAIN
NETDOM MEMBER \\computer /D:domain /U:domain\user
/P:password /ADD
Note
The code above must be placed on one line.
To connect to the domain and remove a computer account, you would enter:
NETDOM MEMBER \\computer /D:domain /U:domain\user
/P:password /JOINDOMAIN
NETDOM MEMBER \\computer /D:domain /U:domain\user
/P:password /DELETE
Note
The code above must be placed on one line.
Managing User Accounts from the Command Line
User accounts allow users to access domain and local system resources with a valid username and password.
Although user management is mostly done through the administrative tools of the operating system, scripting user
account management from the command line is significantly faster when dealing with remote systems and multiple
modifications.
Managing Computer Accounts with the NET Command
One of the most unused command-line utilities to manage user accounts is the NET command. The basic syntax of
the NET command to manage user accounts is:
NET USER USERNAME PASSWORD /commands
Here, username is the user account to manage; password is either the password of the account or an asterisk (*) to
be prompted for a password; and the available commands are as follows:
/ACTIVE:X—Controls the activation of an account where X is YES or NO.
/ADD—Adds a user account.
/DELETE—Removes a user account.
/DOMAIN—Creates the account in the currently active domain.
/COMMENT: “X” —Sets the account description where X is the comment.
/COUNTRYCODE:X—Sets the account’s country code.
/USERCOMMENT: “X”—Sets the user comment where X is the comment.
/EXPIRES:X—Sets the expiration date of the account where X is either NEVER or a date in the format of
MM/DD/YY. This format may differ depending on your country code.
/FULLNAME: “X”—Sets the full account name where X is the name.
/HOMEDIR:X—Sets the home directory where X is the path.
/PASSWORDCHG:X—Controls the user’s ability to change the password where X is YES or NO.
/PASSWORDREQ:X—Sets whether a password is required where X is YES or NO.
/PROFILEPATH:X—Sets the profile directory where X is the path.
/SCRIPTPATH:X—Sets the logon script directory where X is the path.
/TIMES:X—Sets the hours a user may log on where X is either ALL or days and times separated by commas.
Here is an example showing how to add an account using the NET command:
NET USER "Tyler" TEMPPASSWORD /ADD /COMMENT:"Project Account"
/ACTIVE:NO /EXPIRES:12/31/03 /FULLNAME:"Tyler Durden"
/HOMEDIR:C:\ /PASSWORDCHG:NO /PASSWORDREQ:YES
/PROFILEPATH:C:\PROFILES\TD /USERCOMMENT:"Corporate Sponsor"
/WORKSTATIONS:STATION1 /SCRIPTPATH:SOMEWHERE\OUTTHERE
/TIMES:MONDAY-THURSDAY,8AM-5PM
Note
The code above must be placed on one line.
Managing Computer Accounts with the ADDUSERS Utility
ADDUSERS.EXE is a resource kit utility to manage user accounts from the command line. This utility reads
command-delimited text files and can create or delete user accounts. The basic syntax of ADDUSERS to manage
user accounts is:
ADDUSERS \\computer commands file
Here, computer is the computer account to manage; file is the name of the comma-delimited text file to use; and the
available commands are as follows:
/C—Creates user accounts or groups specified in the file
/D—Dumps the user account or group information to the file
/E—Deletes user account specified in the file
/P:X—If combined with /C, specifies the creating parameters where X is:
C—User cannot change password
D—Account disabled
E—Password never expires
L—Do not change password at next logon
Tip
To add a user account to the local computer, omit the computer name from the command line.
The basic syntax of the comma-delimited file is:
[User]
UserName,FullName,Password,Comment,Home,Profile,Script,
Here, Comment is the account description; Home is the path to the user home directory; Profile is the path to the
user’s profile; Script is the name of the logon script to use; and UserNames are the user names (separated by
commas) to add to the groups.
The following example adds a user called JFROST to the computer BOB:
ADDUSERS \\BOB/C file
Here, file is the full path and file name of a text file that contains the following:
[User]
JFROST,Jack E. Frost,Password,Project Manager,\\SERVER\HOME\
JFROST,\\SERVER\PROFILE\JFROST,LOGON.KIX,
Note
The highlighted code above must be placed on one line.
Managing User Accounts with the CURSMGR Utility
CURSMGR.EXE is a resource kit utility to modify current account or group properties. This utility supports many
switches, all of which are case-sensitive. The basic syntax of CURSMGR is:
CURSMGR –u username –m \\computer commands
Here, username is the user account to manage; computer is the computer name on which to perform management;
and the available commands are as follows:
-C—Sets user comment
-D—Deletes a user account
-F—Sets user full name
-h—Sets the path to the user’s home directory
-H—Sets the drive letter to map the user’s home directory
-n—Sets the path to the logon script’s directory
-p—Sets a random password
-P—Sets the password to Password
+-S—Use the +S or -S to set or reset the following properties
AccountLockout—Locks/unlocks a user account
MustChangePassword—Sets/resets the User Must Change Password At Next Logon option
CanNotChangePassword—Sets/resets the User Cannot Change Password option
PasswordNeverExpires —Sets/resets the Password Never Expires option
AccountDisabled—Disables/enables an account
RASUser—Enables/disables remote access dial-in
-U—Sets the path to the user’s profile directory
Here is an example of how to modify a user account:
CUSRMGR -u name -m \\computer -h \\server\homeshare -f
"fullname" -c "description" -H Q
Note
The code above must be placed on one line.
Here, name is the user name; computer is the system that holds the account; \\server\homeshare is where the
user’s home directory resides; fullname is the user’s fullname; and description is the account description.
Managing Groups from the Command Line
Groups allow administrators a method of organizing and assigning user account privileges. Groups are also helpful
when attempting to identify a collection of users with a common trait (for example, temporary employees). You can
script group management from the command line to automate your daily tasks.
Managing Groups with the NET Command
The built-in NET.EXE command allows you to manage local and global groups from the command line. The basic
syntax of the NET command to manage global groups is:
NET type name commands
Here, type is the keyword GROUP for global or LOCALGROUP for local group management; name is the group to
manage, and the available commands are as follows:
/ADD—Adds user accounts to the specified group where multiple user accounts are separated by spaces
/COMMENT:"X"—Sets the group comment
/DELETE—Deletes a group or removes the user account from the specified group
/DOMAIN—Performs the operation on the primary domain controller
username—Specifies a user account to add or remove from the group
Managing Groups with the ADDUSERS Utility
Earlier in this chapter, you learned how to use the resource kit utility ADDUSERS.EXE to manage user accounts
from the command line. This utility can also be used to add groups and group members from the command line. The
basic syntax of ADDUSERS to add groups is:
ADDUSERS \\computer /C file
Here, computer is the computer account to manage, and file is the name of the comma-delimited text file to use.
The basic syntax of the comma-delimited file is:
[Global]
Name,Comment,UserNames,
[Local]
Name,Comment,UserNames,
Here, the [GLOBAL] sections add global groups; name is the name of the group to add; comment is the group
description; and usernames are the users, separated by commas, to add to the group.
Managing Groups with the USRTOGRP Utility
USRTOGRP.EXE is a resource kit utility to add user accounts to groups from the command line. The basic syntax of
the USRTOGRP utility is:
USRTOGRP file
Here, file is a text file with the following format:
DOMAIN: computer grouptype: group users
Here, computer is the name of the system or domain that contains the specified group; grouptype specifies the
group type as either LOCALGROUP or GLOBALGROUP; group is the name of the group; and users are the
usernames, separated by spaces, to add to the group.
Here is a quick example to add two users to the Domain Admins group in the PROJECT domain:
USRTOGRP file
Here, file is the full path and file name of a text file that contains the following:
DOMAIN: PROJECT GLOBALGROUP: Domain Admins JACK TYLER
Managing the Enterprise with ADSI
Prior to ADSI, your only alternatives to manage network resources were command-line utilities and administrative
tools. Through ADSI, you can create simple scripts to control all the resources of your network.
Listing a Share
To list shares using ADSI, proceed as follows:
1. Create a new directory to store all files included in this example.
2. Download and install the latest version of ADSI and Windows Script Host, from www.microsoft.com
, to the
new directory.
3. Select Start|Run and enter “cscript scriptfile.vbs”.
Here, scriptfile is the full path and file name of a script file that contains the following:
On Error Resume Next
Set DomObj = GetObject("WinNT://Domain/Computer/lanmanserver,
FileService")
For each Share in DomObj
List = List + Share.Name & VBlF
Next
Wscript.echo List
Note
The highlighted code above must be placed on one line.
Here, domain is the name of the domain, and computer is the computer name containing the shares to list.
Related solution: Found on page:
Listing Shares 159
Creating a Share
To create a share using ADSI, proceed as follows:
1. Create a new directory to store all files included in this example.
2. Download and install the latest version of ADSI and Windows Script Host, from www.microsoft.com
, to the
new directory.
3. Select Start|Run and enter “cscript scriptfile.vbs”.
Here, scriptfile is the full path and file name of a script file that contains the following:
On Error Resume Next
Set DomObj = GetObject("WinNT://Domain/Computer/
lanmanserver")
Set Share = DomObj.Create("fileshare", "ShareName")
Share.Path = "SharePath"
Share.Description = "ShareDescribe"
Share.MaxUserCount = maxnum
Share.SetInfo
Note
The highlighted code above must be placed on one line.
Here, domain is the name of the domain; computer is the computer name on which you want to create shares;
sharename is the name of the share to create; sharepath is the path to the new share; sharedescribe is the share
comment; and maxnum is the maximum number of simultaneous connections to the share.
Related solution: Found on page:
Listing Shares 159
Deleting a Share
To delete a share using ADSI, proceed as follows:
1. Create a new directory to store all files included in this example.
2. Download and install the latest version of ADSI and Windows Script Host, from www.microsoft.com
, to the
new directory.
3. Select Start|Run and enter “cscript scriptfile.vbs”.
Here, scriptfile is the full path and file name of a script file that contains the following:
On Error Resume Next
Set DomObj = GetObject("WinNT://Domain/Computer/lanmanserver")
DomObj.Delete "fileshare", "ShareName"
Here, domain is the name of the domain; computer is the computer name on which you want to create shares; and
sharename is the name of the share to delete.
Related solution: Found on page:
Removing Shares 160
Creating a Computer Account
To create a computer account using ADSI, proceed as follows:
1. Create a new directory to store all files included in this example.
2. Download and install the latest version of ADSI and Windows Script Host, from www.microsoft.com
, to the
new directory.
3. Select Start|Run and enter “cscript scriptfile.vbs”.
Here, scriptfile is the full path and file name of a script file that contains the following:
On Error Resume Next
Set DomObj = GetObject("WinNT://Domain")
Set Computer = DomObj.Create("Computer", "name")
Computer.SetInfo
Here, domain is the name of the domain, and name is the computer name to assign to the computer account.
Deleting a Computer Account
To delete a computer account, proceed as follows:
1. Create a new directory to store all files included in this example.
2. Download and install the latest version of ADSI and Windows Script Host, from www.microsoft.com
, to the
new directory.
3. Select Start|Run and enter “cscript scriptfile.vbs”.
Here, scriptfile is the full path and file name of a script file that contains the following:
On Error Resume Next
Set DomObj = GetObject("WinNT://Domain")
DomObj.Delete "Computer", "name"
Here, domain is the name of the domain, and name is the name of the computer account to delete.
Setting a User’s Domain Password
To set a user’s domain password using ADSI, proceed as follows:
1. Create a new directory to store all files included in this example.
2. Download and install the latest version of ADSI and Windows Script Host, from www.microsoft.com
, to the
new directory.
3. Select Start|Run and enter “cscript scriptfile.vbs”.
Here, scriptfile is the full path and file name of a script file that contains the following:
On Error Resume Next
Set DomObj = GetObject("WinNT://Domain/Name,user")
DomObj.SetPassword "pswd"
Here, domain is the name of the domain; name is the user account to modify; and pswd is the new password to
assign.
Changing the Local Administrator Password