Windows Admin Scripting Little Black Book- P21 docx
Bạn đang xem bản rút gọn của tài liệu. Xem và tải ngay bản đầy đủ của tài liệu tại đây (348.75 KB, 10 trang )
3. Select Start|Run and enter “cscript scriptfile.vbs”.
Here, scriptfile is the full path and file name of a script file that contains the following:
On Error Resume Next
Dim Name(2)
Name(0) = "emailaddress1"
Name(1) = "emailaddress2"
Dim File(2)
File(0) = "file1"
File(1) = "file2"
SUB = "subject"
MSG = "message"
Set Outlook = CreateObject("Outlook.Application")
Set MAPI = Outlook.GetNameSpace("MAPI")
Set NewMail = Outlook.CreateItem(0)
NewMail.Subject = SUB
NewMail.Body = MSG
For X = 0 to (UBound(Name)-1)
NewMail.Recipients.Add Name(X)
Next
For X = 0 to (UBound(File)-1)
NewMail.Attachments.Add(file(X))
Next
MAPI.Logon "profile", "password"
NewMail.Send
MAPI.Logoff
Here, name is the array that holds the email addresses to email; file is the array that holds the file names to attach
to the message; SUB is the email subject; MSG is the message to send; and profile and password are the logon
credentials to send the email.
Tip
You can omit the highlighted lines above if you do not need to log on to a mail server or if your
information is cached.
Chapter 12: Logon Scripts
In Brief
A logon script is a script that runs automatically each time a user logs on to the network. This script can contain
various commands or programs that process on the local station, such as mapping printers or updating the local
system time. In this chapter, you will learn how to create logon scripts to easily standardize and update your
environment automatically.
Tip
Although this chapter discusses tasks specifically geared toward logon scripts, you can use any of the
scripts within this book in a logon script.
Common Logon Script Tasks
The difference between a regular script and a logon script is that a logon script performs its functions when the user
logs on. Logon scripts are not limited in functionality, but actually contain the same functionality as any other script.
Although logon scripts can perform many different tasks, several tasks are commonly performed in logon scripts:
Synchronize the local time
Manage network printers and drives
Update drivers or settings
Access or modify the registry
Perform hardware or software inventory
Set or modify environment variables
Update antivirus files
Synchronizing the Local Time
Time synchronization is essential when planning to perform enterprise-wide tasks simultaneously, such as remote
updates. Windows NT/2000 uses a service called time synchronization to update the local system time with that of a
network time source. A time source is any object providing the time to another object.
Time Source Hierarchy
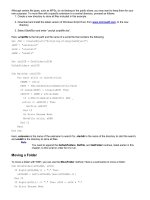
Time synchronization is performed in a hierarchal format (see Figure 12.1). At the top of the hierarchy is the top-level
time source that contains the accurate, universal time, such as the Atomic Clock. Primary time sources, usually a
PDC or BDC, synchronize their local time with the top-level time source. Below the primary time sources are
secondary time sources and clients. Secondary time sources are basically backup primary time sources that obtain
their time from a primary time source. Secondary time sources are typically resource domain controllers that obtain
their time from the master domain. Underneath the time sources are the clients that synchronize their local time with
a secondary or primary time source.
Figure 12.1: The time synchronization hierarchy.
Environment Variables
Environment variables are basically keyword shortcuts that the system and users use to easily access files,
directories, and values. You can use these variables in your logon scripts to easily identify the operating system,
computer name, domain name, and more. Generally there are two types of environment variables: user and system.
User environment variables are set per user, whereas system environment variables are set to the system level and
affect all users who log on to the system. These variables are called static variables and are actually stored as
registry entries: HKEY_CURRENT_USER\Environment for user variables and
HKEY_LOCAL_MACHINE\System\CurrentControlSet\Control\Session Manager\Environment for system variables.
Dynamic variables, created by the SET command, are stored in memory and are applicable for the current
command-prompt session. Table 12.1
is a list of common environment variables.
Table 12.1: Registry data types.
Variable Name Description
ComputerName
Specifies the name of the local system
HomeDrive
Specifies the drive letter to map the userÕs home directory
HomePath
Specifies the local path to the userÕs home directory
HomeShare
Specifies the share path to the userÕs home directory
OS
Specifies the operating system
UserDomain
Specifies the name of the domain the user is currently logged on to
UserName
Specifies the user ID of the currently logged on user
WinDir
Specifies the directory where the operating system is installed
Tip
To see the current environment variables from the command prompt, enter SET.
Norton Antivirus
Although most antivirus products include auto-updating features, updating antivirus files through a logon script
provides a backup mechanism to ensure your clients are always up to date. Norton Antivirus is an advanced antivirus
utility from Symantec (www.symantec.com), designed for both home and corporate use. This utility’s antivirus
signature files can be easily updated with an executable called Intelligent Updater. This executable supports the
following command-line switches:
/EXTRACT location—Extracts files from the executable to the location specified
/Q—Undocumented switch, specifies to install the update silently
/TEMP=path—Specifies the temporary directory to use
McAfee VirusScan
McAfee VirusScan is a popular antivirus utility from NAI (www.nai.com), for both home and corporate use. NAI
releases updates to their antivirus engine and signature files (.DAT extension) in a self-extracting executable (for
example, sdat9999.exe) called SuperDAT. They also release a version of the SuperDAT without the engine update
(for example, 9999xdat.exe) to reduce the size of the update file and to supply updated signature files simply. These
files provide an easy way to update antivirus software because they first stop running antivirus services, update the
antivirus files, and then restart the antivirus services.
The two executables just described support the following command-line switches:
/E location—Extracts files from the executable to the specified location
/F—Forces an updating of existing files
/LOGFILE textfile—Logs the status to a text file
/PROMPT—Displays a prompt dialog before reboot
/REBOOT—Reboots if necessary
/SILENT—Runs the executable in silent mode, with no prompting
/V—Displays information about the executable
The Windows NT Logon Process
The logon sequence is initiated on a Windows NT machine when the user enters the secure command sequence
(SCS), better known as Ctrl+Alt+Del. The WINLOGON.EXE awakes and displays the logon dialog box through the
Microsoft Graphical Identification and Authentication library (MSGINA), stored in %windir%\system32\msgina.dll.
Windows NT allows you to create or purchase a third-party GINA to customize the logon dialog box to meet your
needs. The user then enters the username, password, and domain name, and GINA passes it to the Local Security
Authority Subsystem (LSASS), stored in %windir%\system32\lsass.exe.
The user’s password is doubly encrypted through a one-way function (OWF) and stored in the user’s section of the
registry (HKEY_USERS\SID). The first method of encryption uses the DES (Data Encryption Standard)algorithm, and
is used for compatibility with LAN Manager. The second method of encryption uses the RSA MD-4 algorithm (Rivest
Shamir Adelman Message Digest 4), and is the default method for Windows NT. The user’s relative ID (RID) is also
encrypted.
The LSASS then checks the domain name and determines whether to log on locally or to find a domain controller.
Once the authenticating machine has been located, it passes that request to the SAM. If the logon request is for a
domain controller, the DC confirms whether the local system has a computer account in that domain. Once
authentication has been approved, the user is granted a security access token, describing the rights and groups of
the specified user.
The Windows 2000 Logon Process
The logon sequence is initiated on a Windows 2000 machine when the user enters the secure command sequence
(SCS), better known as Ctrl+Alt+Del. After the user enters the username and password, the Kerberos client encrypts
the password through a one-way function (OWF) using the DES-CBC-MD5 algorithm (Data Encryption Standard
Cipher Block Channel Message Digest 5). The client then converts the password to an encryption key.
The Kerberos client then sends the encryption key, username, a time stamp, and the authentication request to the
Key Distribution Center (KDC), which is a service running on the authenticating server. The user name is then
checked for a valid name stored in the active directory database, the password is verified, and the time stamp is
checked to ensure the request is not old or falsified.
Once the user account has been validated, the KDC then sends back a Kerberos authentication response. This
response is called a ticket granting number (TGT) and includes an encrypted copy of the KDC’s encryption key. The
client finally stores this ticket into memory and is allowed into the domain.
Windows NT/2000 Replication
Replication helps to easily distribute logon scripts to all your servers based on a regular schedule. The purpose of
replication is to synchronize the contents of one file location with the contents of another. Replication is a service that
performs one-way transfers, ensuring that all child locations are synchronized with the parent location. This
synchronization includes file additions, modifications, and deletions.
Windows NT
Windows NT uses a replication engine called LAN Manager replication to replicate system policies and logon scripts
among other network servers. This replication engine replicates files on a regular schedule, usually set to five
minutes. When a user logs on, he or she connects to the NETLOGON share, which is mapped to the
%windir%\system32\repl\import\scripts directory. This is the default replication location for logon scripts. These
scripts are replicated to this directory from the master replication server’s %windir%\system32 \repl\export\scripts
directory. Although the LAN Manager replication engine works well for logon scripts and policies, it was not intended
and does not work well with regular data replication.
Note
The master replication server replicates files to itself, from the export to the import directory.
Windows 2000
Windows 2000 no longer supports the LAN Manager replication engine, and alternately uses the file replication
service (FRS) to perform file replication. FRS is a replication service that is used to replicate system policies and
logon scripts to the System Volume directory (SYSVOL). FRS is a more robust replication engine and can be used to
replicate files in addition to policies and logon scripts. Unlike the LAN Manager replication engine, the FRS
synchronizes immediately within sites and synchronizes on a schedule between sites. File replication service is a
robust replication service that works well for all types of data files.
Creating Logon Scripts with Shell Scripting
Shell scripting is the original source of logon scripting for Windows. Although it may lack some of the more complex
features of other scripting languages, its main advantage is compatibility. Unlike KiXtart or Windows Script Host, shell
scripting does not require any installed client files to run (other than the operating system). Shell scripting provides a
simple, logon script solution for quick and easy deployment.
Setting the Window Title
Windows NT/2000 supports the title command to change the title of a shell prompt window. The basic syntax of the
title command is as follows:
Title name
Here, name is the name to give the current command-prompt window. Here is an example to change the shell
prompt title to “Logon Script”:
If "%OS%"= ="Windows_NT" Title Logon Script
Here, %OS% is an environment variable that indicates the operating system type.
Changing the Background and Foreground Colors
Windows NT/2000 supports the color command to change the background and foreground in a shell prompt. The
basic syntax of the color command is as follows:
COLOR BF
Here, B is the background color value and F is the foreground color value. The color command supports the
following color values:
0—Black
1—Blue
2—Green
3—Aqua
4—Red
5—Purple
6—Yellow
7—White
8—Gray
9—Light Blue
A—Light Green
B—Light Aqua
C—Light Red
D—Light Purple
E—Light Yellow
F—Bright White
Here is an example to change the shell prompt colors to bright white text on a blue background:
IF "%OS%"= ="Windows_NT" COLOR 1F
Here, %OS% is an environment variable that indicates the operating system type.
Synchronizing the Local System Time
Synchronizing the local system to a central time source allows you to perform enterprise-wide tasks simultaneously.
The basic syntax to synchronize the local clock with a specified time source is as follows:
Net Time \\server /commands
Here, \\server is the name of the time source server to sync with. This parameter is only necessary when syncing
with a specific server. If this parameter is omitted (Net Time), the system will search the local domain for a time
source server. /commands are any of the following parameters:
/SET—Sets the local time to the time source server
/Y—Forces to sync the time with the server specified, regardless of whether the server is a time source server
or not
/DOMAIN:domainname—Searches the specified domain for a time source server
The following script attempts to sync the local system time with the server named servername. If this fails, the
domain will be searched for a time source to sync with. To execute this script, proceed as follows:
1. Create a new directory to store all files included in this example.
2. Select Start|Run and enter “scriptfile.bat”.
Here, scriptfile is the full path and file name of a script file that contains the following:
@Echo Off
CLS ; Clears the screen
Set TServer=ServerName
Echo Syncing the time with %TServer%…
Net Time \\%TServer% /set /yes
If %errorlevel% NEQ 0 CLS && Goto Domain
CLS && Echo Sync Successful
Goto End
:Domain
Echo Searching the local domain for a time-server…
Net Time /set /yes
If %errorlevel% EQU 0 CLS && Echo Sync Successful && Goto End
CLS && Echo Time Sync Error
:End
Here, tserver is a variable containing the name of the time source server; NEQ is the “not equal to” operator; and &&
allows you to run a second command after the first has completed.
Mapping Universal Drives
Mapping common drives for all users allows you to present a central resource location for applications or data. In
Chapter 7, you learned how to map network drives from within Windows and the command prompt. To map a
network drive and display the status from the command prompt, proceed as follows:
1. Create a new directory to store all files included in this example.
2. Select Start|Run and enter “scriptfile.bat”.
Here, scriptfile is the full path and file name of a script file that contains the following:
@Echo Off
CLS ; Clears the screen
Set Drive=DriveLetter
Set Share=\\server\sharename
Echo Mapping drive %Drive% to %Share%
Net Use %Drive%: /Delete && CLS
Net Use %Drive%: %Share%
If %errorlevel% EQU 0 CLS && Echo Map Successful && Goto End
CLS && Echo Error mapping drive %Drive% to %Share%
:End
Here, driveletter is the drive letter to map a share to, and server contains the sharename you want to map to.
Mapping Drives by Group
Mapping drives by group membership allows you to control which drives and resources will be available to which
users. The resource kit utility IfMember allows you to determine a user’s group membership from the command line.
The basic syntax of the IfMember utility is as follows:
IfMember /Commands Groups
Here, Groups are any group, separated by spaces, whose membership you want to check. An errorlevel of 1
indicates the user is a member of the specified group. The available commands are as follows:
/List—Lists all groups the user belongs to
/Verbose—Displays all group matches
To map a network drive according to group membership and display the status from the command prompt, proceed
as follows:
1. Create a new directory to store all files included in this example.
2. Select Start|Run and enter “scriptfile.bat”.
Here, scriptfile is the full path and file name of a script file that contains the following:
@Echo Off
CLS ; Clears the screen
Fullpath\IfMember GroupName > Nul
If Not %errorlevel% EQU 1 Goto End
Set Drive=DriveLetter
Set Share=\\server\sharename
Echo Mapping drive %Drive% to %Share%
Net Use %Drive%: /Delete && CLS
Net Use %Drive%: %Share%
If %errorlevel% EQU 0 CLS && Echo Map Successful && Goto End
CLS && Echo Error mapping drive %Drive% to %Share%
:End
Here, fullpath is the full path where the IfMember utility is located; GroupName is the name of the group to check
membership; driveletter is the drive letter to map a share to; NEQ is the “not equal to” operator; EQU is the “equal
to” operator; server contains the sharename you want to map to; and && allows you to run a second command after
the first has completed.
Mapping Printers Using Con2PRT
Mapping printers through a logon script provides an easy method to remotely update printer connections. Con2PRT
(Connect To Port) is a utility, found in the Zero Administration Kit (ZAK) and Windows 2000 Resource Kit, to control
printer connections from the command line. The basic syntax of the con2PRT utility is as follows:
Con2prt /commands \\server\printer
Here, server is the name of the printer server containing the shared printer to map. The available commands are:
/F—Removes all printer connections
/C—Connects to the printer specified
/CD—Connects to the printer specified and marks it as the default printer
To remove all current printer connections and map a default printer using con2PRT, proceed as follows:
1. Create a new directory to store all files included in this example.
2. Select Start|Run and enter “scriptfile.bat”.
Here, scriptfile is the full path and file name of a script file that contains the following:
@Echo Off
Set Pserver=server
Set DPrinter=Printer
fullpath\con2prt /F
fullpath\con2prt /CD \\%server%\%printer%
Here, pserver is the variable holding the printer server name; dprinter is the variable holding the name of the
printer share; and fullpath is the full path where con2prt is located.
Checking for Remote Access
Determining whether a client is logging in through the network or remote access helps you specify which parts of the
script to run. CheckRAS is a command-line, SMS resource kit utility to determine whether a user is using remote
access. To determine whether the current user is using remote access during a logon script, proceed as follows:
1. Create a new directory to store all files included in this example.
2. Select Start|Run and enter “scriptfile.bat”.
Here, scriptfile is the full path and file name of a script file that contains the following:
@Echo Off
CLS ; Clears the screen
Set RAS=NO
fullpath\CheckRAS > Nul
If %errorlevel% EQU 1 Set RAS=YES
Here, fullpath is the full path where the CheckRAS utility is located, and RAS indicates whether the current user is
using remote access or not.
Displaying Time-Based Greetings
Although it’s not essential, many administrators like to display a greeting to the user depending on the time of day. To
display a time-based greeting from the command line, proceed as follows:
1. Create a new directory to store all files included in this example.
2. Select Start|Run and enter “scriptfile.bat”.
Here, scriptfile is the full path and file name of a script file that contains the following:
@Echo Off
CLS
For /F "Delims=: Tokens=1" %%I in ('Time /T') Do Set Hour=%%I
For /F "Delims=: Tokens=2" %%I in ('Time /T') Do Set Min=%%I
For /F "Delims=0,1,2,3,4,5,6,7,8,9 Tokens=2" %%I in
('Set Min') Do Set AP=%%I
If %AP% EQU p Goto PM
Set Greet=Good Morning
Goto End
:PM
If %Hour% EQU 12 Set Hour=0
If %Hour% LSS 12 Set Greet=Good Evening
If %Hour% LSS 6 Set Greet=Good Afternoon
:End
Echo %Greet%
Set Hour=
Set Min=
Set AP=
Note
The highlighted code above should be placed on one line.
Here, the Time /T command indicates the local system time.
Updating McAfee Antivirus Files
To update your McAfee antivirus engine and/or signature files with shell scripting, proceed as follows:
1. Create a new directory to store all files included in this example.
2. Select Start|Run and enter “scriptfile.bat”.
Here, scriptfile is the full path and file name of a script file that contains the following:
@Echo Off
CLS
Set SDAT="superdat"
Set DAT="datfile"
Set NAILOG="textlog"
Set DDAY="DOTW"
For /F "Tokens=1" %%I in ('Date /T') Do Set Day=%%I
If %DAY% EQU %DDAY% Goto UENGINE
%DAT% /F /PROMPT /REBOOT /SILENT /LOGFILE %NAILOG%
GOTO END
:UENGINE
%SDAT% /F /PROMPT /REBOOT /SILENT /LOGFILE %NAILOG%
GOTO END
:END
Set SDAT=
Set DAT=
Set NAILOG=
Set DAY=