Microsoft Visual C# 2010 Step by Step (P12) pot
Bạn đang xem bản rút gọn của tài liệu. Xem và tải ngay bản đầy đủ của tài liệu tại đây (542.55 KB, 50 trang )
520 Part IV Working with Windows Applications
Add properties to validate the privilege level and number of tickets
1. Switch to the Code and Text Editor window displaying the TicketOrder.cs file.
2. Add the PrivilegeLevel enumeration shown next in bold type to the file, above the
TicketOrder class:
enum PrivilegeLevel { Standard, Premium, Executive, PremiumExecutive }
class TicketOrder
{
}
You will use this enumeration to specify the type of the PrivilegeLevel property in the
TicketOrder class.
3. Add the privilegeLevel and numberOfTickets private fields to the TicketOrder class, as
shown in bold type here:
class TicketOrder
{
private string eventName;
private string customerReference;
private PrivilegeLevel privilegeLevel;
private short numberOfTickets;
}
4. Add the private checkPrivilegeAndNumberOfTickets Boolean method to the TicketOrder
class as shown in bold type here:
class TicketOrder
{
private bool checkPrivilegeAndNumberOfTickets(
PrivilegeLevel proposedPrivilegeLevel,
short proposedNumberOfTickets)
{
bool retVal = false;
switch (proposedPrivilegeLevel)
{
case PrivilegeLevel.Standard:
retVal = (proposedNumberOfTickets <= 2);
break;
case PrivilegeLevel.Premium:
retVal = (proposedNumberOfTickets <= 4);
break;
case PrivilegeLevel.Executive:
retVal = (proposedNumberOfTickets <= 8);
break;
Chapter 24 Performing Validation 521
case PrivilegeLevel.PremiumExecutive:
retVal = (proposedNumberOfTickets <= 10);
break;
}
return retVal;
}
}
This method examines the values in the proposedPrivilegeLevel and
proposedNumberOfTickets parameters and tests them for consistency according to the
business rules described earlier in this chapter. If the values are consistent, this method
returns true; otherwise, it returns false.
5. Add the public PrivilegeLevel and NumberOfTickets properties shown next in bold
type to the TicketOrder class. Note that the type of the PrivilegeLevel property is the
PrivilegeLevel enumeration:
class Customer
{
public PrivilegeLevel PrivilegeLevel
{
get { return this.privilegeLevel; }
set
{
this.privilegeLevel = value;
if (!this.checkPrivilegeAndNumberOfTickets(value, this.numberOfTickets))
{
throw new ApplicationException(
"Privilege level too low for this number of tickets");
}
}
}
public short NumberOfTickets
{
get { return this.numberOfTickets; }
set
{
this.numberOfTickets = value;
if (!this.checkPrivilegeAndNumberOfTickets(this.privilegeLevel, value))
{
throw new ApplicationException(
"Too many tickets for this privilege level");
}
if (this.numberOfTickets <=0)
{
throw new ApplicationException(
"You must buy at least one ticket");
}
}
}
}
522 Part IV Working with Windows Applications
The set accessors of these properties call the CheckPrivilegeAndNumberOfTickets
method to verify that the privilegeLevel and the numberOfTickets fields match, and they
raise an exception if the fields do not match.
Additionally, the set accessor for the NumberOfTickets property verifies that the user
has specified at least one ticket. You do not need to verify that the user has specified
a value for the PrivilegeLevel property because it defaults to Standard (the first item in
the PrivilegeLevel enumeration).
6. Add the ToString method shown next in bold type to the TicketOrder class:
class TicketOrder
{
public override string ToString()
{
string formattedString = String.Format("Event: {0}\tCustomer: {1}\tPrivilege:
{2}\tTickets: {3}",
this.eventName, this.customerReference,
this.privilegeLevel.ToString(), this.numberOfTickets.ToString());
return formattedString;
}
}
You will use this method to display the details of ticket orders to verify that the data is
correct.
The next step is to bind the privilegeLevel combo box and the numberOfTickets slider control
on the form to these new properties. However, if you stop and think for a moment, you
will realize that there is a small problem with the PrivilegeLevel property. You need to bind
the Text property of the privilegeLevel combo box to the PrivilegeLevel property of the
TicketOrder object created by the form. The type of the Text property is string. The type of
the PrivilegeLevel property is PrivilegeLevel (an enumeration). You must convert between
string and PrivilegeLevel values for the binding to work. Fortunately, with the binding mecha-
nism implemented by WPF, you can specify a converter class to perform actions such as this.
Note A WPF binding can automatically convert between an enumeration and a string if the
string values are identical to the names of each element in the enumeration. In the Ticket Order
application, the first three items in the privilegeLevel combo box (Standard, Premium, and
Executive) correspond directly to elements with the same names in the PrivilegeLevel enumera-
tion. However, the final item in the combo box is Premium Executive (with a space), but the cor-
responding element in the enumeration is called PremiumExecutive (without a space). The WPF
binding cannot convert between these two values, so a converter class is required.
Converter methods reside in their own classes that must implement the IValueConverter
interface. This interface defines two methods: Convert, which converts from the type used by
the property in the class that is providing the data for the binding to the type displayed on
Chapter 24 Performing Validation 523
the form, and ConvertBack, which converts the data from the type displayed on the form to
the type required by the class.
Create the converter class and methods
1. In the TicketOrder.cs file, add the following using statement to the list at the top of the
file:
using System.Windows.Data;
The IValueConverter interface is defined in this namespace.
2. Add the PrivilegeLevelConverter class shown next to the end of the file, after the
Customer class:
[ValueConversion(typeof(string), typeof(PrivilegeLevel))]
public class PrivilegeLevelConverter : IValueConverter
{
}
The text in brackets directly above the class is an example of an attribute. An attribute
provides descriptive metadata for a class. The ValueConversion attribute is used by
tools such as the WPF designer in the Design View window to verify that you are apply-
ing the class correctly when you reference it. The parameters to the ValueConversion
attribute specify the type of the value displayed by the form (string) and the type of
the value in the corresponding property in the class (PrivilegeLevel). You will see more
examples of attributes in later chapters in this book.
3. In the PrivilegeLevelConverter class, add the Convert method shown here in bold type:
[ValueConversion(typeof(string), typeof(PrivilegeLevel))]
public class PrivilegeLevelConverter: IValueConverter
{
public object Convert(object value, Type targetType, object parameter,
System.Globalization.CultureInfo culture)
{
PrivilegeLevel privilegeLevel = (PrivilegeLevel)value;
string convertedPrivilegeLevel = String.Empty;
switch (privilegeLevel)
{
case PrivilegeLevel.Standard:
convertedPrivilegeLevel = "Standard";
break;
case PrivilegeLevel.Premium:
convertedPrivilegeLevel = "Premium";
break;
case PrivilegeLevel.Executive:
convertedPrivilegeLevel = "Executive";
break;
524 Part IV Working with Windows Applications
case PrivilegeLevel.PremiumExecutive:
convertedPrivilegeLevel = "Premium Executive";
break;
}
return convertedPrivilegeLevel;
}
}
The signature of the Convert method is defined by the IValueConverter interface. The
value parameter is the value in the class that you are converting from. (You can ignore
the other parameters for now.) The return value from this method is the data bound
to the property on the form. In this case, the Convert method converts a PrivilegeLevel
value to a string. Notice that the value parameter is passed in as an object, so you need
to cast it to the appropriate type before attempting to use it.
4. Add the ConvertBack method shown next in bold type to the PrivilegeLevelConverter
class:
[ValueConversion(typeof(string), typeof(PrivilegeLevel))]
public class PrivilegeLevelConverter: IValueConverter
{
public object ConvertBack(object value, Type targetType, object parameter,
System.Globalization.CultureInfo culture)
{
PrivilegeLevel privilegeLevel = PrivilegeLevel.Standard;
switch ((string)value)
{
case "Standard":
privilegeLevel = PrivilegeLevel.Standard;
break;
case "Premium":
privilegeLevel = PrivilegeLevel.Premium;
break;
case "Executive":
privilegeLevel = PrivilegeLevel.Executive;
break;
case "Premium Executive":
privilegeLevel = PrivilegeLevel.PremiumExecutive;
break;
}
return privilegeLevel;
}
}
The ConvertBack method is also part of the IValueConverter interface. In the
ConvertBack method, the value parameter is now the value from the form that you
Chapter 24 Performing Validation 525
are converting back to a value of the appropriate type for the class. In this case, the
ConvertBack method converts the data from a string (displayed in the Text property in
the combo box) to the corresponding Title value.
5. On the Build menu, click Build Solution. Verify that the solution compiles correctly, and
correct any errors and rebuild the solution if necessary.
Bind the combo box and slider controls on the form to the properties in the
TicketOrder class
1. Return to the Design View window displaying the TicketForm.xaml file.
2. In the XAML pane, add a PrivilegeLevelConverter object as a resource to the window,
and specify a key value of privilegeLevelConverter, as shown in bold type here:
<Window.Resources>
<ticketOrder:TicketOrder x:Key="orderData" />
<ticketOrder:PrivilegeLevelConverter x:Key="privilegeLevelConverter" />
</Window.Resources>
3. Locate the definition of the privilegeLevel combo box control, and style the control by
using the errorStyle style. After the list of combo box items, add the XAML code shown
next in bold type to bind the Text property of the combo box to the Title property in
the orderData object, specifying the titleConverter resource as the object providing the
converter methods:
<ComboBox Style="{StaticResource errorStyle}" Name="privilegeLevel" >
<ComboBox.Text>
<Binding Source="{StaticResource orderData}" Path="PrivilegeLevel"
Converter="{StaticResource privilegeLevelConverter}" >
<Binding.ValidationRules>
<ExceptionValidationRule />
</Binding.ValidationRules>
</Binding>
</ComboBox.Text>
<ComboBox.Items>
</ComboBox.Items>
</ComboBox>
4. Modify the definition for the numberOfTickets slider control .Apply the errorStyle style,
and bind the Value property to the NumberOfTickets property of the orderData object,
as shown here in bold type:
<Slider Style="{StaticResource errorStyle}" Height="22"
HorizontalAlignment="Left" Margin="156,171,0,0", Name="numberOfTickets"
VerticalAlignment="Top" Width="205" SmallChange="1"
TickPlacement="BottomRight" Maximum="10" IsSnapToTickEnabled="True" >
<Slider.Value>
<Binding Source="{StaticResource orderData}" Path="NumberOfTickets">
<Binding.ValidationRules>
526 Part IV Working with Windows Applications
<ExceptionValidationRule />
</Binding.ValidationRules>
</Binding>
</Slider.Value>
</Slider>
5. On the View menu, click Code to switch to the Code and Text Editor window displaying
the TicketForm.xaml.cs file.
6. Change the code in the purchaseTickets_Click method, as shown here in bold type:
private void purchaseTickets_Click(object sender, RoutedEventArgs e)
{
Binding ticketOrderBinding =
BindingOperations.GetBinding(privilegeLevel, ComboBox.TextProperty);
TicketOrder ticketOrder = ticketOrderBinding.Source as TicketOrder;
MessageBox.Show(ticketOrder.ToString(), "Purchased");
}
This code displays the details of the order in the message box. (It still does not actually
save the ticket order anywhere.) The static GetBinding method of the BindingOperations
class returns a reference to the object to which the specified property is bound. In this
case, the GetBinding method retrieves the object bound to the Text property of the title
combo box. This should be the same object referred to by the orderData resource. In
fact, the code could have queried any of the bound properties of the eventList, custom-
erReference, privilegeLevel, or numberOfTickets controls to retrieve the same reference.
The reference is returned as a Binding object. The code then casts this Binding object
into a TicketOrder object before displaying its details.
You can now run the application again and see how the validation performs.
Run the application, and test the validation
1. On the Debug menu, click Start Without Debugging to build and run the application.
2. In the Privilege Level combo box, click Premium.
3. Set the Tickets slider to 5.
The CheckPrivilegeAndNumberOfTickets method in the TicketOrder class generates
an exception because the privilege level and the number of tickets do not match. The
Tickets slider is highlighted with a red border. Rest the mouse pointer on the Tickets
slider, and verify that the ScreenTip text “Too many tickets for this privilege level”
appears.
4. In the Privilege Level combo box, click Executive.
Although the privilege level is now sufficient to enable the customer to order 5 tickets,
the slider remains highlighted.
5. Set the Tickets slider to 6.
Chapter 24 Performing Validation 527
Verify that the red highlighting disappears. The validation occurs only when you
change the value in a control, not when you change the value of a different control.
6. In the Privilege Level combo box, click Standard.
The combo box is highlighted. If you hover the mouse cursor over the combo box, it
should display the message “Privilege level too low for this number of tickets.”
7. Set the Tickets slider to 5.
The slider control is now also highlighted.
8. On the File menu, click Purchase.
A message box appears, displaying the privilege level (Standard) and the number
of tickets (5) for the order. Additionally, the event and customer reference are both
blank. Although the form contains erroneous and missing data, you can still make the
purchase!
9. Click OK, and then type C1234 in the customerReference text box, but do not click away
from this text box.
10. On the File menu, click Purchase again.
The message box does not include the customer reference. This happens because the
customerReference text box on the form has not lost the focus. Remember from earlier
that data binding validation for a text box occurs only when the user clicks another
control on the form. The same applies to the data itself; by default, it is copied to the
orderDetails object only when the text box loses the focus. In fact, it is the act of copy-
ing the data from the form to the orderDetails object that triggers the validation.
11. Click OK, and then click the Event combo box and select Little Mudford Festival.
12. On the File menu, click Purchase.
This time, the message box displays all the details from the form.
13. Click OK, close the application, and return to Visual Studio 2010.
You can see from this exercise that although the validation successfully cross-checks the
Privilege Level and Tickets controls, there is still more work to be done before the application
is usable.
Changing the Point at Which Validation Occurs
The issues with the application are that the validation is performed at the wrong time, is in-
consistently applied, and does not actually prevent the user from providing inconsistent data.
You just need an alternative approach to handling the validation. The solution is to check
the user’s input only when the user attempts to make the purchase. This way, you can ensure
the user has finished entering all the data and that it is consistent. If there are any problems,
528 Part IV Working with Windows Applications
you can display an error message and prevent the data from being used until the problems
have been corrected. In the following exercise, you will modify the application to postpone
validation until the user attempts to purchase tickets.
Validate data explicitly
1. Return to the Design View window displaying TicketForm.xaml. In the XAML pane,
modify the binding for the privilegeLevel combo box and set the UpdateSourceTrigger
property to “Explicit”, as shown in bold type here:
<ComboBox Name="privilegeLevel" >
<ComboBox.Text>
<Binding Source="{StaticResource orderData}" Path="PrivilegeLevel"
Converter="{StaticResource privilegeLevelConverter}"
UpdateSourceTrigger="Explicit" >
</Binding>
</ComboBox.Text>
</ComboBox>
The UpdateSourceTrigger property governs when the information entered by the user
is sent back to the underlying TicketOrder object and validated. Setting this property to
“Explicit” postpones this synchronization until your application explicitly performs it by
using code.
2. Modify the bindings for the eventList, customerReference, and numberOfTickets controls
to set the UpdateSourceTrigger property to “Explicit”:
<ComboBox Name="eventList" >
<ComboBox.Text>
<Binding Source="{StaticResource orderData}" Path="EventName"
UpdateSourceTrigger="Explicit" >
</Binding>
</ComboBox.Text>
</ComboBox>
<TextBox Name="customerReference" >
<TextBox.Text>
<Binding Source="{StaticResource orderData}" Path="CustomerReference"
UpdateSourceTrigger="Explicit" >
</Binding>
</TextBox.Text>
</TextBox>
<Slider Name="numberOfTickets" >
<Slider.Value>
<Binding Source="{StaticResource orderData}" Path="NumberOfTickets"
UpdateSourceTrigger="Explicit" >
Chapter 24 Performing Validation 529
</Binding>
</Slider.Value>
</Slider>
3. Display the TicketForm.xaml.cs file in the Code and Text Editor window. In the
purchaseTickets_Click method, add the statements shown next in bold type to the start
of the method:
private void purchaseTickets_Click(object sender, RoutedEventArgs e)
{
BindingExpression eventBe =
eventList.GetBindingExpression(ComboBox.TextProperty);
BindingExpression customerReferenceBe =
customerReference.GetBindingExpression(TextBox.TextProperty);
BindingExpression privilegeLevelBe =
privilegeLevel.GetBindingExpression(ComboBox.TextProperty);
BindingExpression numberOfTicketsBe =
numberOfTickets.GetBindingExpression(Slider.ValueProperty);
}
These statements create BindingExpression objects for each of the four controls with
binding validation rules. You will use these objects in the next step to propagate the
values on the form to the TicketOrder object and trigger the validation rules.
4. Add the statements shown next in bold type to the purchaseTickets_Click method after
the code you added in the preceding step:
private void purchaseTickets_Click(object sender, RoutedEventArgs e)
{
eventBe.UpdateSource();
customerReferenceBe.UpdateSource();
privilegeLevelBe.UpdateSource();
numberOfTicketsBe.UpdateSource();
}
The UpdateSource method of the BindingExpression class synchronizes data in an object
with the controls that reference the object through bindings. It sends the values in the
bound properties of controls on the form back to the TicketOrder object. When this oc-
curs, the data is also validated.
The statements you added in the step update the properties in the TicketOrder object
with the values entered by the user on the form, and they validate the data as they
do so. The BindingExpression class provides a property called HasError that indicates
whether the UpdateSource method was successful or whether it caused an exception.
530 Part IV Working with Windows Applications
5. Add the code shown next in bold type to the purchaseTickets_Click method to test the
HasError property of each BindingExpression object and display a message if the valida-
tion fails. Move the original code that displays the customer details to the else part of
the if statement.
private void purchaseTickets_Click(object sender, RoutedEventArgs e)
{
if (eventBe.HasError || customerReferenceBe.HasError ||
privilegeLevelBe.HasError || numberOfTicketsBe.HasError)
{
MessageBox.Show("Please correct errors", "Purchase aborted");
}
else
{
Binding ticketOrderBinding =
BindingOperations.GetBinding(privilegeLevel, ComboBox.TextProperty);
TicketOrder ticketOrder = ticketOrderBinding.Source as TicketOrder;
MessageBox.Show(ticketOrder.ToString(), "Purchased");
}
}
Test the application again
1. On the Debug menu, click Start Without Debugging to build and run the application.
2. When the Ticket Orders form appears, on the File menu, click Purchase.
Verify that the Purchase aborted message box appears with the text “Please correct
errors” and that the Event, Customer Reference, and Tickets controls are highlighted.
Note The Privilege Level is not highlighted because it defaults to Standard, as described
earlier in this chapter.
3. Click OK and return to the Ticket Orders form. Hover the mouse cursor over each high-
lighted control in turn, and verify that the messages thrown by the ApplicationException
exception for each property in the underlying TicketOrder object appear as ToolTips.
4. In the Event combo box, select Little Mudford Festival. In the Customer Reference text
box, type C1234. In the Privilege Level combo box, select Premium. Set the Tickets slider
to 8, and then on the File menu click Purchase.
Verify that the Purchase aborted message box appears again, but that this time only the
Tickets slider is highlighted.
5. Click OK, and hover the mouse cursor over the Tickets control.
Verify that the ToolTip displays the message “Too many tickets for this privilege level”.
Chapter 24 Performing Validation 531
6. In the Privilege Level combo box, select Premium Executive, and then on the File menu
click Purchase.
Verify that a Purchased message box now appears displaying the text “Event: Little
Mudford Festival Customer: C1234 Privilege: PremiumExecutive Tickets: 8” and
that none of the controls on the form are highlighted. The data is now complete and
consistent.
7. Experiment with other combinations of values, and verify that the validation works as
expected. When you have finished, close the form and return to Visual Studio.
In this chapter, you saw how to perform basic validation by using the default exception
validation rule processing provided by using data binding. You learned how to define your
own custom validation rules if you want to perform more complex checks.
n
If you want to continue to the next chapter
Keep Visual Studio 2010 running, and turn to Chapter 25.
n
If you want to exit Visual Studio 2010 now
On the File menu, click Exit. If you see a Save dialog box, click Yes and save the project.
Chapter 24 Quick Reference
To Do this
Use data binding to bind a
property of a control on a form
to a property of another control
on the same form
In the XAML code for the property of the control, create a binding.
Reference the control containing the property to bind to by using the
ElementName tag, and the property to bind to by using the Path tag.
For example:
<TextBox >
<TextBox.Text>
<Binding ElementName="numberOfTickets"
Path="Value" />
</TextBox.Text>
</TextBox>
Use data binding to bind a
property of a control on a form
to a property of an object
In the XAML code for the property of the control, specify a binding
source identifying the object and the name of the property in the object
to bind to. For example:
<TextBox >
<TextBox.Text>
<Binding Source="{StaticResource orderData}"
Path="ForeName" />
</TextBox.Text>
</TextBox>
532 Part IV Working with Windows Applications
To Do this
Enable a data binding to validate
data entered by the user
Specify the Binding.ValidationRules element as part of the binding. For
example:
<Binding Source="{StaticResource orderData}"
Path="ForeName" />
<Binding.ValidationRules>
<ExceptionValidationRule/>
</Binding.ValidationRules>
</Binding>
Display error information in a
nonintrusive manner
Define a style that detects a change to the Validation.HasError property
of the control, and then set the ToolTip property of the control to the
message returned by the exception. Apply this style to all controls that
require validation. For example:
<Style x:Key="errorStyle" TargetType="Control">
<Style.Triggers>
<Trigger Property="Validation.HasError"
Value="True">
<Setter Property="ToolTip"
Value="{Binding RelativeSource=
{x:Static RelativeSource.Self},
Path=(Validation.Errors)[0].ErrorContent}" />
</Trigger>
</Style.Triggers>
</Style>
Validate all the controls on a
form under programmatic control
rather than when the user moves
from control to control
In the XAML code for the binding, set the UpdateSourceTrigger property
of the binding to “Explicit” to defer validation until the application re-
quests it. To validate the data for all controls, create a BindingExpression
object for each bound property of each control and call the UpdateSource
method. Examine the HasError property of each BindingExpression object.
If this property is true, the validation failed.
Microsoft Visual C# 2010 Step by Step
533
Part V
Managing Data
In this part:
Querying Information in a Database . . . . . . . . . . . . . . . . . . . . . . . . . . . . . . . . . . . . 535
Displaying and Editing Data by Using the Entity Framework
and Data Binding. . . . . . . . . . . . . . . . . . . . . . . . . . . . . . . . . . . . . . . . . . . . . . . . . . . . . 565
Chapter 25
Querying Information in a Database
After completing this chapter, you will be able to:
n
Fetch and display data from a Microsoft SQL Server database by using Microsoft
ADO.NET.
n
Define entity classes for holding data retrieved from a database.
n
Use LINQ to SQL to query a database and populate instances of entity classes.
n
Create a custom DataContext class for accessing a database in a typesafe manner.
In Part IV of this book, “Building Windows Presentation Foundation Applications,” you
learned how to use Microsoft Visual C# to build user interfaces and present and validate in-
formation. In Part V, you will learn about managing data by using the data access functional-
ity available in Microsoft Visual Studio 2010 and the Microsoft .NET Framework. The chapters
in this part of the book describe ADO.NET, a library of objects specifically designed to make
it easy to write applications that use databases. In this chapter, you will also learn how to
query data by using LINQ to SQL—extensions to LINQ based on ADO.NET that are designed
for retrieving data from a database. In Chapter 26, “Displaying and Editing Data by Using the
Entity Framework and Data Binding,” you will learn more about using ADO.NET and LINQ to
SQL for updating data.
Important To perform the exercises in this chapter, you must have installed Microsoft SQL
Server 2008 Express. This software is available on the retail DVD with Microsoft Visual Studio
2010 and Visual C# 2010 Express and is installed by default.
Important It is recommended that you use an account that has Administrator privileges to
perform the exercises in this chapter and the remainder of this book.
Querying a Database by Using ADO.NET
The ADO.NET class library contains a comprehensive framework for building applications
that need to retrieve and update data held in a relational database. The model defined by
ADO.NET is based on the notion of data providers. Each database management system (such
as SQL Server, Oracle, IBM DB2, and so on) has its own data provider that implements an
abstraction of the mechanisms for connecting to a database, issuing queries, and updating
data. By using these abstractions, you can write portable code that is independent of the
536 Part V Managing Data
underlying database management system. In this chapter, you will connect to a database
managed by SQL Server 2008 Express, but the techniques that you will learn are equally
applicable when using a different database management system.
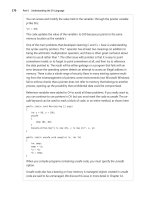
The Northwind Database
Northwind Traders is a fictitious company that sells edible goods with exotic names.
The Northwind database contains several tables with information about the goods that
Northwind Traders sells, the customers it sells to, orders placed by customers, suppliers from
whom Northwind Traders obtains goods to resell, shippers that it uses to send goods to cus-
tomers, and employees who work for Northwind Traders. The following image shows all the
tables in the Northwind database and how they are related to one another. The tables that
you will be using in this chapter are Orders and Products.
Creating the Database
Before proceeding further, you need to create the Northwind database.
Create the Northwind database
1. On the Windows Start menu, click All Programs, click Accessories, right-click Command
Prompt, and then click Run as administrator.
If you are logged in using an account that has administrator rights, in the User Account
Control dialog box, click Yes.
Chapter 25 Querying Information in a Database 537
If you are logged in using an account that does not have administrator rights, in the
User Account Control dialog box enter the administrator password and then click Yes.
The command prompt window appears, running as Administrator.
2. In the command prompt window, type the following command:
sqlcmd -S.\SQLExpress -E
This command starts the sqlcmd utility to connect to your local instance of SQL Server
2008 Express. A “1>” prompt should appear.
Tip Ensure that SQL Server 2008 Express is running before you attempt to run the sqlcmd
utility. (It is set to start automatically by default. You will simply receive an error message
if it is not started when you execute the sqlcmd command.) You can check the status of
SQL Server 2008 Express, and start it running if necessary, by using the SQL Configuration
Manager tool available in the Configuration Tools folder of the Microsoft SQL Server 2008
program group.
3. At the 1> prompt, type the following command including the square brackets, and
then press Enter. Replace computer with the name of your computer, and replace login
with the name of the account you used to log in to Windows.
CREATE LOGIN [computer\login] FROM WINDOWS
A “2>” prompt should appear.
4. At the 2> prompt, type GO and then press Enter.
SQL Server attempts to create a login for your user account so that you can create the
Northwind database. If the command is successful, the “1>” prompt should reappear.
If the command displays the message “The server principal ‘computer\login’ already
exists.”, you already have a SQL Server login and you can ignore the message. If the
command displays any other message, check that you have specified the correct values
for computer and login and repeat steps 3 and 4.
5. At the 1> prompt, type the following command and the press Enter (and as before,
replace computer with the name of your computer, and replace login with the name of
the account you used to log in to Windows):
GRANT CREATE DATABASE TO [computer\login]
6. At the 2> prompt, type GO and then press Enter.
7. At the 1> prompt, type EXIT and then press Enter.
This command quits the sqlcmd utility, and you return to the Windows
command prompt.
8. Close the command prompt window.
538 Part V Managing Data
9. On the Windows Start menu, click All Programs, click Accessories, and then click
Command Prompt.
This action opens a command prompt window using your own credentials rather than
that of an administrator.
10. In the command prompt window, type the following command to go to the \Microsoft
Press\Visual CSharp Step By Step\Chapter 25 folder under your Documents folder.
Replace Name with your user name.
cd "\Users\Name\Documents\Microsoft Press\Visual CSharp Step By Step\Chapter 25"
11. In the command prompt window, type the following command:
sqlcmd -S.\SQLExpress -E -iinstnwnd.sql
This command uses the sqlcmd utility to run the instnwnd.sql script. This script contains
the SQL commands that create the Northwind Traders database and the tables in the
database, and it fills them with some sample data.
12. When the script finishes running, close the command prompt window.
Note You can run the command you executed in step 11 at any time if you need to reset
the Northwind Traders database. The instnwnd.sql script automatically drops the database
if it exists and then rebuilds it. See Chapter 26 for additional information.
Using ADO.NET to Query Order Information
In the following set of exercises, you will write code to access the Northwind database and
display information in a simple console application. The aim of the exercise is to help you
learn more about ADO.NET and understand the object model it implements. In later exercis-
es, you will use LINQ to SQL to query the database. In Chapter 26, you will see how to use the
wizards included with Visual Studio 2010 to generate code that can retrieve and update data
and display data graphically in a Windows Presentation Foundation (WPF) application.
The first application you are going to create will produce a simple report displaying informa-
tion about customers’ orders. The program will prompt the user for a customer ID and then
display the orders for that customer.
Connect to the database
1. Start Visual Studio 2010 if it is not already running.
2. Create a new project called ReportOrders by using the Console Application template.
Save it in the \Microsoft Press\Visual CSharp Step By Step\Chapter 25 folder under your
Documents folder.
Chapter 25 Querying Information in a Database 539
Note Remember, if you are using Visual C# 2010 Express, you can specify the location
for saving your project when you save your project by using Save ReportOrders on the File
menu.
3. In Solution Explorer, right-click the file Program.cs and rename it Report.cs. In the
Microsoft Visual Studio message, click Yes to change all references of the Program class
to Report.
4. In the Code and Text Editor window, add the following using statements to the list at
the top of the Report.cs file:
using System.Data;
using System.Data.SqlClient;
The System.Data namespace contains many of the types used by ADO.NET. The
System.Data.SqlClient namespace contains the SQL Server data provider classes for
ADO.NET. These classes are specialized versions of the ADO.NET classes, optimized for
working with SQL Server.
5. In the Main method of the Report class, add the following statement shown in bold
type, which creates a SqlConnection object:
static void Main(string[] args)
{
SqlConnection dataConnection = new SqlConnection();
}
SqlConnection is a subclass of an ADO.NET class called Connection. It is designed to
handle connections to SQL Server databases.
6. After the variable declaration, add a try/catch block to the Main method as shown
next in bold. All the code that you will write for gaining access to the database goes
inside the try part of this block. In the catch block, add a simple handler that catches
SqlException exceptions.
static void Main(string[] args)
{
try
{
// You will add your code here in a moment
}
catch (SqlException e)
{
Console.WriteLine("Error accessing the database: {0}", e.Message);
}
}
A SqlException is thrown if an error occurs when accessing a SQL Server database.
540 Part V Managing Data
7. Replace the comment in the try block with the code shown in bold here:
try
{
SqlConnectionStringBuilder builder = new SqlConnectionStringBuilder();
builder.DataSource = ".\\SQLExpress";
builder.InitialCatalog = "Northwind";
builder.IntegratedSecurity = true;
dataConnection.ConnectionString = builder.ConnectionString;
}
To connect to a SQL Server database, you must construct a connection string that
specifies the database to connect to, the instance of SQL Server holding this data-
base, and how the application will identify itself as a valid user of the database to SQL
Server. The simplest way to do this is to use a SqlConnectionStringBuilder object. The
SqlConnectionStringBuilder class exposes properties for each of the elements of a con-
nection string. You can then read a complete connection string that combines all of
these elements in the correct format from the ConnectionString property.
This code uses a SqlConnectionStringBuilder object to build a connection string for ac-
cessing the Northwind database running on the instance of SQL Server Express on your
computer. The code specifies that the connection will use Windows Authentication
to connect to the database. This is the preferred method of access because you do
not have to prompt the user for any form of user name or password, and you are not
tempted to hard-code user names and passwords into your application.
The connection string is stored in the ConnectionString property of the SqlConnection
object, which you will use in the next step.
You can also encode many other elements in the connection string by using the
SqlConnectionStringBuilder class—the properties shown in this example are a minimal
but sufficient set. See the documentation supplied with Visual Studio 2010 for more
details.
8. Add the following statement shown in bold to the code in the try block:
try
{
dataConnection.Open();
}
This statement uses the connection string specified by the ConnectionString property
of the dataConnection object to open a connection to the database. If the connection
is successful, you can use the dataConnection object to perform database commands
and queries. If the connection is unsuccessful, the statement throws a SqlException
exception.
Chapter 25 Querying Information in a Database 541
Using SQL Server Authentication
Windows Authentication is useful for authenticating users who are all members of a
Windows domain. However, there might be occasions when the user accessing the da-
tabase does not have a Windows account—for example, if you are building an applica-
tion designed to be accessed by remote users over the Internet. In these cases, you can
use the User ID and Password parameters instead, like this:
string userName = ;
string password = ;
// Prompt the user for his name and password, and fill these variables
string connString = String.Format(
"User ID={0};Password={1};Initial Catalog=Northwind;" +
"Data Source=YourComputer\\SQLExpress", username, password);
myConnection.ConnectionString = connString;
At this point, I should offer a sentence of advice: never hard-code user names and pass-
words into your applications. Anyone who obtains a copy of the source code (or who
reverse-engineers the compiled code) can see this information, and this renders the
whole point of security meaningless.
The next step is to prompt the user for a customer ID and then query the database to find all
of the orders for that customer.
Query the Orders table
1. Add the statements shown here in bold type to the try block after the dataConnection.
Open(); statement:
try
{
Console.Write("Please enter a customer ID (5 characters): ");
string customerId = Console.ReadLine();
}
These statements prompt the user for a customer ID and read the user’s response in
the string variable customerId.
542 Part V Managing Data
2. Type the following statements shown in bold type after the code you just entered:
try
{
SqlCommand dataCommand = new SqlCommand();
dataCommand.Connection = dataConnection;
dataCommand.CommandType = CommandType.Text;
dataCommand.CommandText =
"SELECT OrderID, OrderDate, ShippedDate, ShipName, ShipAddress, " +
"ShipCity, ShipCountry " +
"FROM Orders WHERE CustomerID = @CustomerIdParam";
}
The first statement creates a SqlCommand object. Like SqlConnection, this is a special-
ized version of an ADO.NET class, Command, that has been designed for performing
queries against a SQL Server database. An ADO.NET Command object is used to ex-
ecute a command against a data source. In the case of a relational database, the text of
the command is a SQL statement.
The second line of code sets the Connection property of the SqlCommand object to the
database connection you opened in the preceding exercise. The next two statements
specify that the SqlCommand object contains the text of a SQL statement (you can also
specify the name of a stored procedure or the name of a single table in the database)
and populate the CommandText property with a SQL SELECT statement that retrieves
information from the Orders table for all orders that have a specified CustomerID. The
text @CustomerIdParam is a placeholder for a SQL parameter. (The @ symbol indicates
to the data provider that this is a parameter and not the name of a column in the data-
base.) The value for the CustomerID will be passed as a SqlParameter object in the next
step.
3. Add the following statements shown in bold to the try block, after the code you en-
tered in the previous step:
try
{
SqlParameter param = new SqlParameter("@CustomerIdParam", SqlDbType.Char, 5);
param.Value = customerId;
dataCommand.Parameters.Add(param);
}
These statements create a SqlParameter object that can be substituted for the @
CustomerIdParam when the SqlCommand object is executed. The parameter is marked
as a database Char type (the SQL Server equivalent of a fixed-length string), and the
length of this string is specified as 5 characters. The SqlParameter is populated with the
string entered by the user in the customerId variable and then added to the Parameter
collection of the SqlCommand. When SQL Server runs this command, it will examine
the Parameters collection of the command for a parameter named @CustomerIdParam
and then substitute the value of this parameter into the text of the SQL statement.
Chapter 25 Querying Information in a Database 543
Important If you are new to building database applications, you might be wondering
why the code creates a SqlParameter object and does not just build a simple SQL state-
ment that embeds the value of the customerId variable, like this:
dataCommand.CommandText =
"SELECT OrderID, OrderDate, ShippedDate, ShipName, ShipAddress, " +
"ShipCity, ShipCountry " +
"FROM Orders WHERE CustomerID = '" + customerId + "'";
This approach is phenomenally bad practice because it renders your application vulner-
able to SQL injection attacks. Do not write code such as this in your production applica-
tions. For a description of what a SQL injection attack is and how dangerous it can be, see
the SQL Injection topic in SQL Server Books Online, available at rosoft.
com/en-us/library/ms161953.aspx.
4. Add the following statements shown in bold type after the code you just entered:
try
{
Console.WriteLine("About to find orders for customer {0}\n\n", customerId);
SqlDataReader dataReader = dataCommand.ExecuteReader();
}
The ExecuteReader method of a SqlCommand object constructs a SqlDataReader object
that you can use to fetch the rows identified by the SQL statement. The SqlDataReader
class provides the fastest mechanism available (as fast as your network allows) for re-
trieving data from a SQL Server.
The next task is to iterate through all the orders (if there are any) and display them.
Fetch data and display orders
1. In the Report.cs file, add the while loop shown next in bold type after the statement
that creates the SqlDataReader object:
try
{
while (dataReader.Read())
{
// Code to display the current row
}
}
The Read method of the SqlDataReader class fetches the next row from the database. It
returns true if another row was retrieved successfully; otherwise, it returns false, usually
because there are no more rows. The while loop you have just entered keeps reading
rows from the dataReader variable and finishes when there are no more rows available.
544 Part V Managing Data
2. Add the statements shown in bold type here to the body of the while loop you created
in the preceding step:
while (dataReader.Read())
{
int orderId = dataReader.GetInt32(0);
DateTime orderDate = dataReader.GetDateTime(1);
DateTime shipDate = dataReader.GetDateTime(2);
string shipName = dataReader.GetString(3);
string shipAddress = dataReader.GetString(4);
string shipCity = dataReader.GetString(5);
string shipCountry = dataReader.GetString(6);
Console.WriteLine(
"Order: {0}\nPlaced: {1}\nShipped: {2}\n" +
"To Address: {3}\n{4}\n{5}\n{6}\n\n", orderId, orderDate,
shipDate, shipName, shipAddress, shipCity, shipCountry);
}
This block of code shows how you read the data from the database by using a
SqlDataReader object. A SqlDataReader object contains the most recent row retrieved
from the database. You can use the GetXXX methods to extract the information from
each column in the row—there is a GetXXX method for each common type of data. For
example, to read an int value, you use the GetInt32 method; to read a string, you use
the GetString method; and you can probably guess how to read a DateTime value. The
GetXXX methods take a parameter indicating which column to read: 0 is the first col-
umn, 1 is the second column, and so on. The preceding code reads the various columns
from the current Orders row, stores the values in a set of variables, and then prints out
the values of these variables.
Firehose Cursors
One of the major drawbacks in a multiuser database application is locked data.
Unfortunately, it is common to see applications retrieve rows from a database and keep
those rows locked to prevent another user from changing the data while the applica-
tion is using them. In some extreme circumstances, an application can even prevent
other users from reading data that it has locked. If the application retrieves a large
number of rows, it locks a large proportion of the table. If there are many users run-
ning the same application at the same time, they can end up waiting for one another to
release locks and it all leads to a slow-running and frustrating mess.
The SqlDataReader class has been designed to remove this drawback. It fetches rows
one at a time and does not retain any locks on a row after it has been retrieved. It is
wonderful for improving concurrency in your applications. The SqlDataReader class
is sometimes referred to as a firehose cursor because it pours data out as quickly as
possible. (The term cursor is an acronym that stands for “current set of rows.”)