Easy PHP Websites with the Zend Framework (phần 3) ppsx
Bạn đang xem bản rút gọn của tài liệu. Xem và tải ngay bản đầy đủ của tài liệu tại đây (1.49 MB, 50 trang )
81CHAPTER 4 • INTRODUCING MYSQL
Because signed integer values are the default, there's no need to explicitly dene integers as such.
Incidentally, identifying an integer-related column as unsigned will result in a shift of its range to be
entirely positive. For instance, a signed TINYINT has a range of -128 to 127, whereas an unsigned
TINYINT has a range of 0 to 255.
Assigning Default Values
Suppose you might not necessarily wish to rate a game at the time it's added to your collection. After
all, it's entirely likely you will eventually purchase a game but not be able to immediately spend
adequate time playing it and so feel uncomfortable assigning a rating at the time it's inserted into the
database. However you don't just want to assign a value in the range of 1-10 because it could mislead
your friends into thinking you've already rated the game. Therefore you could assign the column a
default value of 0:
CREATE TABLE games (
title VARCHAR NOT NULL,
release_date DATE NOT NULL,
price DECIMAL(4,2) NOT NULL,
rating TINYINT UNSIGNED NOT NULL DEFAULT 0
);
Creating Primary Keys
As you learned earlier in this chapter, a successful relational database implementation is dependent
upon the ability for table rows to reference each other using some unique value. This value which
uniquely identies each row is known as a primary key, and it absolutely must be unique for each and
every row, no matter how large the table grows. As an example, if you're building a product catalog
using of the Amazon Associates Web Service (discussed in Chapter 10), you might consider using
the unique codes Amazon.com uses to identify every product, known as the ASIN (Amazon Standard
Identication Number):
CREATE TABLE games (
asin CHAR(10) NOT NULL PRIMARY KEY,
title VARCHAR NOT NULL,
release_date DATE NOT NULL,
price DECIMAL(4,2) NOT NULL,
rating TINYINT UNSIGNED NOT NULL DEFAULT 0
);
However, there's actually a much easier way to create primary keys: the automatically incrementing
integer. If when adding a new row you increment the previously inserted row's primary key by one,
you're guaranteed to never repeat an existing value. This is such a common strategy that MySQL, like
all other mainstream databases, supports the ability to identify an integer-based column as an auto-
matically incrementing primary key:
CREATE TABLE games (
id INTEGER UNSIGNED NOT NULL AUTO_INCREMENT PRIMARY KEY,
asin CHAR(10) NOT NULL,
Download at Boykma.Com
82 CHAPTER 4 • INTRODUCING MYSQL
title VARCHAR NOT NULL,
release_date DATE NOT NULL,
price DECIMAL(4,2) NOT NULL,
rating TINYINT UNSIGNED NOT NULL DEFAULT 0
);
You're free to name the primary key anything you please, however for purposes of consistency I
always identify mine using the term id. In the next section, why I use this particular term will become
more apparent.
NOTE. As you'll see later in this chapter, when inserting a new row into a table which contains an
automatically incrementing primary key, you don't actually specify a value for that column. Instead,
depending on the format of the query used (MySQL supports several), you either identify it as
NULL, or ignore the column altogether.
Creating Table Relations
Video games are often released for play on multiple platforms, and as an avid gamer it's entirely
likely you could own the same game for both the Xbox 360 and Nintendo DS. Of course, each of
these games must be treated separately despite having identical titles, and so you'll need to record
each, along with their respective platform, in the games table.
The easy solution would be to add this column to the games table and proceed to type the platform
name in each time you add a game:
platform VARCHAR(100) NOT NULL
However, over time it's a given you'll wind up with numerous variations of the platform name, for
instance Xbox 360, XBox 360, and 360. You might even be particularly lazy one day and enter simply
Xbox, which could lead your friends to believe you purchased an original Xbox rather than the newer
360 model. The result is a database rife with inconsistency, leading not only to user confusion, but
also hindering the possibility of being able to lter the collection according to platform.
Instead, the proper way to track platform information is to create a new table consisting of just a pri-
mary key and platform name:
CREATE TABLE platforms (
id INTEGER UNSIGNED NOT NULL AUTO_INCREMENT PRIMARY KEY,
title VARCHAR(100) NOT NULL
);
Then, you'll refer to the appropriate platform's primary key within the
games table:
CREATE TABLE games (
id INTEGER UNSIGNED NOT NULL AUTO_INCREMENT PRIMARY KEY,
asin CHAR(10) NOT NULL,
platform_id INTEGER UNSIGNED NOT NULL,
title VARCHAR NOT NULL,
Download at Boykma.Com
83CHAPTER 4 • INTRODUCING MYSQL
release_date DATE NOT NULL,
price DECIMAL(4,2) NOT NULL,
rating TINYINT UNSIGNED NOT NULL DEFAULT 0
);
Now, instead of typing the platform name each time a game is created, you'll retrieve the list of
platforms found in the games table, and use an HTML form control such as the select box to choose
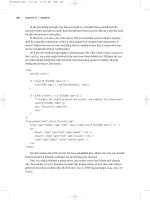
the desired platform. You'll learn how to do this later in this chapter. Figure 4-1 depicts the HTML
form evolution from one requiring you to manually enter the platform name to one drawing from the
platforms table to produce a select box.
Figure 4-1. Revising the game insertion form to use a platform select box
Step #3. Introducing phpMyAdmin
MySQL is packaged with a number of command-line tools which help you to manage all aspects of
your database, from the users to the actual databases, tables, and data. However, many developers
prefer to use graphically-oriented applications, allowing them to point and click rather than have to
memorize often obscure commands and options. MySQL users are in luck, because a fantastic Web-
based MySQL manager named phpMyAdmin has long been freely available.
NOTE. If you're on Windows and would like to experiment with or use MySQL's command-line
utilities, consider downloading Console ( Con-
sole is a great alternative to Windows' cumbersome command prompt, offering a resizable window,
multiple tabs, simple text-selection, and many more features. Like PHP and MySQL, Console is
released under an open source license, meaning it's free to download and use.
You can experiment with a live phpMyAdmin demo server by navigating to
ar.
com/STABLE/
.
Download at Boykma.Com
84 CHAPTER 4 • INTRODUCING MYSQL
VIDEO. Getting Acquainted with phpMyAdmin
phpMyAdmin is the world's most popular web-based MySQL administration utility, useful for man-
aging nearly every aspect of a MySQL installation. This video introduces you to several of the util-
ity's most useful features. Watch the video at />Installing phpMyAdmin
To install phpMyAdmin, head over to and download the latest stable
release. You'll see each release offers numerous variations, however ultimately these variations are
grouped into two distinct categories: English and other languages. Presuming you're a native English
speaker, choose the english.zip (Windows) or english.tar.gz (Linux) download.
Once downloaded, extract the les to a directory with a convenient name (I suggest
phpmyadmin).
Open the le named cong.sample.inc.php found in phpMyAdmin's root directory, and save it as
cong.inc.php. This is phpMyAdmin's sample conguration le, and it contains several congura-
tion directives for controlling phpMyAdmin's behavior. To begin using phpMyAdmin however you
only need to modify one directive, namely $cfg['blowsh_secret'], which is used in the password
encryption process:
$cfg['blowsh_secret'] = '';
I suggest simply inserting a string of random characters, as you'll never need to refer to this value
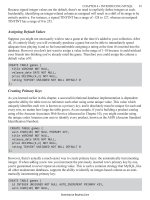
again. Once complete, head over to your phpMyAdmin login page by navigating to the installation di-
rectory. Presuming you're working with a fresh MySQL installation, you can login using the username
root and an empty password.
Figure 4-2. phpMyAdmin's login page
Download at Boykma.Com
85CHAPTER 4 • INTRODUCING MYSQL
NOTE. Don't fret if the login page displays an error message regarding the inability to load the
mcrypt extension. This extension is only required for 64-bit systems, so chances are the message
will be irrelevant. If you'd rather the message did not appear, you can congure this extension, a
topic out of the scope of this book but easily done after searching Google for instructions.
Creating a New MySQL User
Once logged in, you'll be presented with a summary screen, including pointers to high-level manage-
ment tasks such as viewing MySQL's conguration information and currently running processes.
On the left side of the screen you'll see a list of available databases, including at least one named
mysql (if you're using a version of phpMyAdmin installed by your hosting provider, this won't be the
case). This database contains information regarding which users can access the MySQL server, and
denoting what tasks they can perform. The root user has default access to all installed databases, and
can perform every available task, including shutting down the database server! Because of this data-
base's important role, you should never delete it or directly modify its tables. Given such power, it's
not wise to use the root user for general interaction, and so we're going to create a new user which
we'll subsequently use within the GameNomad application.
Download at Boykma.Com
86 CHAPTER 4 • INTRODUCING MYSQL
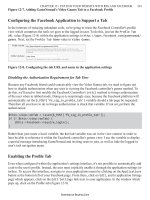
Figure 4-3. Creating a new MySQL user
To create a new user, click on the "Privileges" link located on the phpMyAdmin home page. You'll be
presented with a tabulated list of users. To create a new user, click the
Add a new User link. You'll
be rst prompted to create a new user by specifying a user name, host (the user's originating location),
and a password.
Regarding the username, for this project I suggest using
domainname_prod, (I tend to create several
users to interact with a website database, typically calling them domainname_dev, for the develop-
ment site, and domainname_prod, for the production site. While it's out of the scope of this book to
discuss logistical matters such as how to manage development and production stages, these are none-
theless matters you should start considering as your project grows in size) as this is the same name
we'll use for the database.
Regarding the Host value, I'll presume you'll be running phpMyAdmin from the same computer in
which the server is installed, so set this to
Local. You do however have the ability to set this to a
remote IP address or hostname (or even wildcard-based IP addresses or hostnames if you were con-
necting from one of several clients in a network), should you happen to run your database on one
server and your website on another. Chances are you're running everything on a single machine, and
so setting this to Local will likely sufce.
Finally, create a password, or click the Generate button to have one created for you. If you choose the
latter option, be sure to also click the Copy button so the password is copied into the respective pass-
word elds. If you choose the former, be sure to choose a password of sufcient strength, preferably
consisting of a combination of letters, numbers, and symbols (such as !, %, and ^).
Next select the "Create database with same name and grant all privileges" option. Once the
Go button
is pressed, this will result in a new database named domainname_prod being created, and will grant
the domainname_prod user with all of the privileges necessary to effectively manage the database.
Test the newly created user account by logging out of phpMyAdmin (click the Exit button at the top
left of the screen), and logging in anew with the domainname_prod account.
Step #4. Moving Your Data to MySQL
You'll need to create the games and platforms tables used earlier in this chapter, and then migrate
your spreadsheet data into the database. While you could manually insert the data into the newly cre-
ated table, in this section you'll learn how to import the spreadsheet data directly into the table.
Creating the games Table
For the purposes of the exercises found in the remainder of this chapter, the nal version of the games
table looks like this:
Download at Boykma.Com
87CHAPTER 4 • INTRODUCING MYSQL
CREATE TABLE games (
id INTEGER UNSIGNED NOT NULL AUTO_INCREMENT PRIMARY KEY,
platform_id TINYINT UNSIGNED NOT NULL,
title VARCHAR(255) NOT NULL,
release_date DATE NOT NULL,
price DECIMAL(4,2) NOT NULL,
created_on TIMESTAMP NOT NULL
);
Let's create this table using phpMyAdmin. To begin, click on the domainname_prod link located on
the left side of phpMyAdmin to enter that database. You'll be greeted with a prompt similar to the one
shown in Figure 4-4. Enter the name games and specify six elds (one for each column as dened in
the above table denition), subsequently clicking the Go button to continue.
Figure 4-4. Creating a new table in phpMyAdmin
Next you'll be prompted to dene the six elds. Figure 4-5 shows you the values and attributes I've
assigned to each. Once you're done, click the Save button to complete the table creation process.
Figure 4-5. Creating the games table's elds
Congratulations! You've just created your rst MySQL table. Repeat the process to create the
plat-
forms table, which looks like this:
CREATE TABLE platforms (
id INTEGER UNSIGNED NOT NULL AUTO_INCREMENT PRIMARY KEY,
title VARCHAR(100) NOT NULL
);
Download at Boykma.Com
88 CHAPTER 4 • INTRODUCING MYSQL
Once you've added the platforms table, take some time to familiarize yourself with other phpMy-
Admin features. It's a great MySQL management solution, and the more familiar you are with it, the
better off you'll be.
Step #5. Connecting Your Website to MySQL
While phpMyAdmin presents a great solution for creating users, databases, tables, and performing
other administrative functions, our ultimate goal is to create a series of custom interfaces for not only
managing the game collection, but allowing our friends to view it. In this nal step I'll introduce you
to all that's involved in creating these interfaces.
Connecting to the MySQL Server
Before you can begin doing anything with the domainname_prod database, a successful connection
must rst be made. In fact, this connection is repeatedly made each time you attempt to perform a
database action, whether it involves selection, updating, deleting, or inserting data. This is because
MySQL's security model is twofold: rst, it wants to make sure you're allowed to even connect to the
database server, conrmed by examining the credentials you provide (namely the username, pass-
word, and address from which you are connecting). If it conrms you are indeed authorized to con-
nect, it next determines whether you have adequate privileges to execute the action.
You might recall when creating the
domainname_prod user that we chose the option "Create database
with same name and grant all privileges". This resulted in domainname_prod being granted what es-
sentially amounts to root-level privileges for the namesake database, giving you the power to perform
all manner of administrative tasks. However, returning to that user creation screen, you'll see you can
actually selectively determine exactly what the user can do. If you were creating a much more com-
plex application which dealt with sensitive information such as consumer's private data, you might
create several accounts: one account which possessed all privileges, used to manage the database's
operation, another account which possessed just the select, insert, update, and delete privileges, used
to manage the database's data, and nally, an account possessing just the select privilege, used to view
the data over a secure web interface.
TIP. This introduction to MySQL's security model really only scratches the surface of what's pos-
sible. I cover this topic in great detail in Chapter 29 of "Beginning PHP and MySQL, Third Edi-
tion". You can buy this book at />Presuming you followed my advice when creating the
domainname_prod user and granted the ac-
count all available privileges when working with the domainname_prod database, you will be able to
both connect to the database and execute any possible action. But how is this connection even carried
out? If you recall, in the rst chapter we mentioned PHP's MySQLi extension. This extension pro-
vides PHP developers with the ability to talk to MySQL from inside PHP scripts, not only in terms of
retrieving data for display within the browser, but also offering the ability to insert, update, and delete
data among other tasks. A procedural and object-oriented interface are available, although we'll be
discussing solely the latter for the remainder of this chapter as I believe it produces more succinct,
better organized code.
Download at Boykma.Com
89CHAPTER 4 • INTRODUCING MYSQL
Creating the Connection
To connect to MySQL, you'll create a new mysqli object, passing along the database's hostname,
username, password, and database:
$db = new mysqli('localhost', 'domainname_prod', 'secret', 'gamenomad_prod');
It's always a good idea to verify the connection was successful before attempting to query the data-
base. You can do so by making sure the mysqli object exists with a simple if statement:
$db = new mysqli('localhost', 'domainname_prod', 'secret', 'domainname_prod');
if (! $db) {
echo 'My game collection is currently ofine. Please come back later.';
exit;
}
Although PHP will automatically close open database connections and return other resources to the
server once a script completes execution, it's nonetheless good programming practice to explicitly
close the database connection once your script is nished with it. To do so, call the
close() method:
$db = new mysqli('localhost', 'domainname_prod', 'secret', 'domainname_prod');
if (! $db) {
echo 'My game collection is currently ofine. Please come back later.';
exit;
}
// Perform various database-related tasks
// Close the connection
$db->close();
Creating a Conguration File
Because the MySQL connection must occur prior to executing any database-related tasks, you'll need
to instantiate the mysqli class within each script. Because the ultimate goal is to eliminate redundan-
cy, it wouldn't make sense to manually embed the connection parameters into each script. Doing so
would make maintenance difcult should you later need to change the username or password.
The easy solution is to create a conguration le containing connection parameters and class instan-
tiator, and then use the
require_once() statement to include this code within each desired page. It's
common practice to call these conguration les
cong.inc.php:
Download at Boykma.Com
90 CHAPTER 4 • INTRODUCING MYSQL
<?php
$dbHost = 'localhost';
$dbUsername = 'domainname_prod';
$dbPassword = 'secret';
$dbDatabase = 'domainname_prod';
$db = new mysqli($dbHost, $dbUsername, $dbPassword, $dbDatabase);
if (! $db) {
echo 'My game collection is currently ofine. Please come back later.';
exit;
}
?>
Place this le within your website's home directory and subsequently reference it within your scripts
using:
require_once('cong.inc.php');
No matter what you call the le, it is important you use the .php extension when naming it, because
it will hinder any malicious attempts to view this le's contents. If somebody navigated to http://
www.example.com/cong.inc.php they would see a blank page since the PHP code found in the le
would execute. However, if this le was named just cong.inc, and the user navigated to http://
www.example.com/cong.inc, the le's contents would be displayed within the browser window!
Creating the Platform Manager
Before we can begin moving games into the games table, the platforms table entries must be logi-
cally added. So let's begin by creating the form and scripts used to add, view, and update this table.
The rst script, titled platform-add.php, handles the insertion of platforms into the platforms table.
The form, shown in Figure 4-6, consists of nothing more than a text eld and submit button.
Figure 4-6. The platform insertion form
However, before moving onto the code, let's take some time to understand how queries are created
and sent from PHP to MySQL.
Introducing Queries
Even if you're not familiar with structured query language (SQL), the language used to talk to re-
lational databases such as MySQL, you'll immediately understand the basic syntax. The following
query inserts a new gaming platform into the platforms table:
Download at Boykma.Com
91CHAPTER 4 • INTRODUCING MYSQL
INSERT INTO platforms VALUES(NULL, 'Xbox 360')
The NULL value tells MySQL to increment the primary key to one value higher than the last inserted
row. Because this is our rst row, this value will be 1. MySQL also supports an alternative INSERT
syntax which looks like this:
INSERT INTO platforms SET title = 'Xbox 360'
In this case, MySQL recognizes the id column is an automatically incrementing primary key, mean-
ing you don't have to explicitly set it, therefore MySQL will handle the increment by default. So how
would this data be subsequently retrieved? Using the SELECT statement. To retrieve all columns of all
rows, you would use this query:
SELECT * FROM platforms
To retrieve just the titles, you'd specify the column in the query:
SELECT title FROM platforms
To retrieve a specic row, you'd use the WHERE clause. For example, use the following query to re-
trieve the row having the primary key of 1:
SELECT * FROM platforms WHERE id = 1
Of course, if you don't specify a unique value in the WHERE clause, it's possible you'll retrieve sev-
eral rows. Consider a situation where several games have a purchase price of $59.99. You can use the
following query to retrieve them:
SELECT * FROM games WHERE price = 59.99;
You can also perform wildcard searches. Suppose the platforms "Playstation 2" and "Playstation 3"
were added to the table. You can use the LIKE clause to retrieve all rows with the word "Playstation"
in the title:
SELECT * FROM platforms WHERE title LIKE "Playstation%"
The % following "Playstation" acts as a wildcard, telling MySQL to match anything following the
term.
You now know how to insert and select rows. How do you update and delete them? Logically, using
the
UPDATE and DELETE queries. Suppose you misspelled "Nintendo Wii" as "Nintendo We" when
adding it to the platforms table. You can x the problem like this:
UPDATE platforms SET title = "Nintendo Wii" WHERE id = 3
In this particular case you could have also used the following query:
UPDATE platforms SET title = "Nintendo Wii" WHERE title = "Nintendo We"
Download at Boykma.Com
92 CHAPTER 4 • INTRODUCING MYSQL
Typically though you'll want to use the primary key when identifying a row for modication or dele-
tion purposes. This ensures you'll modify the intended row, rather than multiple rows should they
meet the specication of the
WHERE clause. An even more unfortunate outcome can be expected if you
neglect to include the
WHERE clause altogether. If you executed the following query you'll change the
title of every row in the platforms table:
UPDATE platforms SET title = "Nintendo Wii"
Deleting a row works in the same manner as updating it:
DELETE FROM platforms WHERE id = 3
Like UPDATE, make sure you use a unique identier, otherwise multiple rows could be deleted. Ne-
glecting to include the WHERE clause altogether will result in all rows being deleted!
Prepared Statements and PHP
You've by now learned how to connect to MySQL from within a PHP script, and are familiar with
SQL syntax, so how are SQL queries sent from PHP to MySQL? Once connected to MySQL, sending
a query to the database is as simple as passing it to the
query() method, like so:
<?php
// Connect to MySQL
$db = new mysqli("localhost", "domainname_prod", "secret", "domainname_prod");
// Select some data
$result = $db->query("SELECT * FROM games ORDER BY title");
Do something with the data
?>
Many of your queries will however be dynamic, based on some sort of user interaction or input. As
an example, a user might wish to retrieve information about a specic game, in which case the above
query would depend upon a WHERE clause:
$id = $_GET['id'];
$query = "SELECT * FROM games WHERE id = $id";
$result = $db->query($query);
echo "COUNT: {$result->num_rows}";
Logically, because the
id is a primary key, only one row should be returned. And in a perfect world
devoid of malcontents and troublemakers, this might be a perfectly suitable approach. However, in
our particular world, this approach is a recipe for disaster, because it gives users the ability to modify
the query in a variety of ways. For instance, in SQL there's a strange syntactical construct known as
Download at Boykma.Com
93CHAPTER 4 • INTRODUCING MYSQL
1=1 which will return all rows in the table. Here's an example:
SELECT * FROM games WHERE 1=1
With this in mind, what's to prevent somebody from modifying the incoming
id parameter to read
'4' OR 1=1 so the resulting query looks like this:
SELECT * FROM games WHERE id = '4' OR 1=1
This will result in all rows being retrieved from the database! In our particular above example, all
that will be retrieved is a count of all rows in the database. However picture a scenario where you
provided users with a search interface for nding friends. A malicious user might be able to use this
approach (incidentally called an SQL injection) to obtain a list of all users in your database! SQL
injections can do much more damage than allow for unwarranted access to data. They can be used
to modify and even delete data, so you'd be well served to eliminate any such possibility of this sort
of attack. Fortunately, there's an easy way to do so using a feature known as the prepared statement.
Prepared statements greatly enhance the security of an SQL statement requiring user-provided data
by properly accounting for any characters which could potentially modify the intended purpose of the
query. Let's reconsider the above example:
// Prepare query, identifying one dynamic parameter (identied by the ?)
$query = $db->prepare("SELECT * FROM games WHERE id = ?");
// Tell MySQL the provided variable will be an integer
$query->bind_param('i', $_GET['id']);
// Execute the query
$query->execute();
In this case, the parameter we're passing to the query has been declared (or bound) to be an integer.
Anything else found in that parameter will be properly accounted for to ensure it doesn't interfere with
the query! Other commonly used type declarations include s for strings, and d for doubles (oats).
Don't worry if the concept of prepared statements hasn't completely resonated, as we'll be using them
repeatedly in the remaining examples. By the conclusion of this chapter, you'll be entirely familiar
with how to properly use them.
NOTE. Later in this chapter I'll introduce you to another type of prepared statement, used to
retrieve data from the database. Using prepared statements in this manner results in a signicant
performance increase.
You now possess enough SQL knowledge to begin performing useful tasks. SQL statements can be-
come decidedly more complex than what is presented here, however you'll have plenty of time to ease
into the more complicated statements as the gaming site continues to expand. Next, let's move on to
the code used to add new gaming platforms to the database.
Adding a New Platform
The script (platform-add.php) handles both the form display and the insertion of submitted form
Download at Boykma.Com
94 CHAPTER 4 • INTRODUCING MYSQL
contents. The code is presented next, followed by a breakdown of the relevant lines.
01 <?php
02
03 require_once('cong.inc.php');
04 require_once 'gamenomad_validator.php';
05
06 // If the form has been submitted, process it
07 if (isset($_POST['submit'])) {
08
09 // Create array for storing error messages
10 $messages = array();
11
12 // Make sure a platform title was provided
13 if (isBlank($_POST['title'])) {
14 $messages[] = 'Please provide the platform title.';
15 }
16
17 // If no error messages, add platform to the database
18 if (count($messages) == 0) {
19
20 try {
21
22 $stmt = $db->prepare("INSERT INTO platforms VALUES(NULL, ?)");
23
24 // Bind the $_POST['title'] parameter
25 $stmt->bind_param('s', $_POST['title']);
26
27 // Execute the query
28 $stmt->execute();
29
30 } catch (Exception $e) {
31 $messages[] = 'Could not insert the platform.';
32 }
33
34 }
35
36 // Report results to user
37 if (count($messages) == 0) {
38
39 echo "<p>The platform {$_POST['title']} has been inserted.</p>";
40
41 } else {
42 echo "<ul>";
43 foreach ($messages AS $message) {
44 echo '<li>{$message}</li>';
45 }
46 echo '</ul>';
47 }
48
Download at Boykma.Com
95CHAPTER 4 • INTRODUCING MYSQL
49 }
50
51 ?>
52
53 <h1>Add a Gaming Platform</h1>
54 <form id="form" method="post" action="platform-add.php">
55 <p>
56 Platform name: <br />
57 <input name="title" type="text" size="35" value="" />
58 </p>
59 <p>
60 <input type="submit" name="submit" value="Add platform!" />
61 </p>
62 </form>
Although a longer script than what you've seen so far, there's actually little to it you haven't already
encountered:
• Lines 03 and 04 pull the conguration le and validation script (introduced in the previous
step) into the script.
• Line 07 determines whether the form (lines 52-60) has been submitted. If so, the submit-
ted contents will be validated and ltered. We rst verify (lines 13-15) the submitted
$_
POST['title'] variable isn't blank.
• Presuming the validator doesn't determine the
$_POST['title'] value to be blank, lines 18-
34 are responsible for inserting the platform into the platforms table.
• Line 22 creates what the prepared statement, specifying the query, and a placeholder (identi-
ed by the question mark) for the user-provided parameter. As we discussed earlier, creating
the query in this way provides the most secure way possible to ensure malicious input isn't
passed into the database. Although you'll presumably be the only person using this particular
script, it's nonetheless sound programming practice to secure input at every opportunity.
• Line 25 binds the
$_POST['title'] input parameter to the placeholder, identifying the pa-
rameter as a string (dened by the "s").
• Finally, line 28 executes the query, inserting the platform into the database.
Go ahead and execute this script a few times, and check the
platforms table contents from within
phpMyAdmin. For purposes of this exercise I added the following platforms: Xbox 360, Xbox, Play-
station 2, Playstation 3, Nintendo Wii, and Nintendo DS.
Listing the Platforms
To retrieve a list of all platforms found in the platforms table, you'll use a SELECT query coupled
with a looping statement to retrieve each row in the result. The following example will retrieve all of
the platforms in alphabetical order, outputting each to the browser:
Download at Boykma.Com
96 CHAPTER 4 • INTRODUCING MYSQL
01 <?php
02
03 require_once('cong.inc.php');
04
05 $sql = 'SELECT id, title FROM platforms ORDER BY title';
06
07 $query = $db->prepare($sql);
08
09 $query->execute();
10
11 $query->store_result();
12
13 $query->bind_result($id, $title);
14
15 while($query->fetch()) {
16 echo "{$id}: {$title}<br />";
17 }
18
19 $query->free_result();
20 $query->close();
21
22 ?>
A breakdown follows:
• Line 05 species the query, which retrieves all platforms in alphabetical order.
• Line 07 and 09 prepares and executes the query, respectively. You'll notice this process is
identical to that used when preparing queries dependent upon user input (as discussed earlier
in this chapter).
• Line 11 stores the query results within server memory. This is known as buffering the result
set, which is in contrast to working with an unbuffered result set. Throughout this chapter
we'll use the former approach, which is ne when working with small and medium-sized
query results, and comes with the bonus of a few additional features which you'll learn about
later. See the below sidebar, "Buffered vs. Unbuffered Results" for more information about
this topic.
• Line 13 assigns (or binds) two variables to the corresponding columns retrieved from the
query (Line 05).
• Line 15 retrieves each row from the returned result set, assigning the column values in that
row to the
$id and $title variables, respectively. Line 16 in turn outputs the $id and $title
variables to the browser.
• Lines 19 and 20 returns the memory used to store the result, and closes the statement. These
calls are not strictly required, since PHP will automatically perform these tasks once the script
completes execution. However if your script includes several prepared statements, you should
explicitly complete these tasks at the appropriate locations.
Download at Boykma.Com
97CHAPTER 4 • INTRODUCING MYSQL
Executing this script produces output similar to the following:
6: Nintendo DS
3: Nintendo Wii
5: Playstation 2
2: Playstation 3
4: Xbox
1: Xbox 360
Buffered vs. Unbuffered Queries
You may occasionally send a query to MySQL which returns a particularly large result set, insomuch
that storing the results within server memory (buffering the results) could conceivably affect perfor-
mance. Alternatively you may opt to instead work with an unbuffered result set, meaning the results
will be maintained within MySQL and returned to the PHP script one row at a time. While the unbuf-
fered approach will indeed improve performance when working with large result sets, it comes at
the cost of being unable to determine matters such as how many results were returned (see the later
section "Determining the Number of Rows Returned and Affected").
Updating a Platform Name
Chances are you won't need to change the names of any platforms once they're inserted into the da-
tabase, however for purposes of illustrating how to modify existing information let's create a mecha-
nism for doing so. For starters, modify Line 14 of the previous example to read:
14 echo "<a href='platform-edit.php?id={$id}'>{$title}<br />";
Clicking on one of the links will pass each platform's primary key to a script named
platform-edit.
php. Like the platform addition script, a form will be rendered but this time prepopulated with the
contents of the row associated with the primary key. You'll then be able to change the contents and
send them back to the database for modication purposes. The script (
platform-edit.php) follows:
01 <?php
02
03 require_once('cong.inc.php');
04 require_once('gamenomad_validator.php');
05
06 // If the form has been submitted, process it
07 if (isset($_POST['submit'])) {
08
09 // Retrieve the POSTed id and title
10 $id = $_POST['id'];
11 $title = $_POST['title'];
12
13 // Create array for storing error messages
14 $messages = array();
15
16 // Make sure a platform title was provided
17 if (isBlank($_POST['title'])) {
Download at Boykma.Com
98 CHAPTER 4 • INTRODUCING MYSQL
18 $messages[] = 'Please provide the platform title.';
19 }
20
21 // If no error messages, add platform to the database
22 if (count($messages) == 0) {
23
24 try {
25
26 // Create the SQL statement
27 $sql = "UPDATE platforms SET title = ? WHERE id = ?";
28
29 // Prepare the statement
30 $query = $db->prepare($sql);
31
32 // Bind the parameters
33 $query->bind_param('si', $title, $id);
34
35 // Execute the query
36 $query->execute();
37
38 } catch (Exception $e) {
39 $messages[] = 'Could not update the platform.';
40 }
41
42 }
43
44 // Report results to user
45 if (count($messages) == 0) {
46 echo "<p>The platform {$title} has been updated.</p>";
47 } else {
48 echo '<ul>';
49 foreach ($messages AS $message) {
50 echo "<li>{$message}</li>";
51 }
52 echo '</ul>';
53 }
54
55 } else {
56 $id = $_GET['id'];
57 }
58
59 // Whether we've just modied a row or are accessing this
60 // page for the rst time, we want to populate the form
61 $sql = "SELECT id, title FROM platforms WHERE id = ?";
62
63 $query = $db->prepare($sql);
64
65 $query->bind_param('i', $id);
66
Download at Boykma.Com
99CHAPTER 4 • INTRODUCING MYSQL
67 $query->execute();
68
69 $query->bind_result($id, $title);
70
71 $query->fetch();
72
73 ?>
74
75 <h1>Modify a Gaming Platform</h1>
76 <form id="form" method="post" action="platform-edit.php">
77 <input type="hidden" name="id" value="<?php echo $id; ?>" />
78 <p>
79 Platform title: <br />
80 <input name="title" type="text" size="35" value="<?= $title; ?>" />
81 </p>
82 <p>
83 <input type="submit" name="submit" value="Modify platform!" />
84 </p>
85 </form>
The breakdown follows:
• Like the platform insertion script, lines 07-54 will deal with posted form data, in this case
retrieving the ID and title, ensuring the title isn't blank, and carrying out the update.
• If the platform modication script is being accessed for the rst time, Line 56 will retrieve the
platform ID from the URL. Lines 61-71 retrieve the relevant row from the platform table.
• Lines 75-85 display the form, including the platform ID in a hidden eld, and the title in a
text eld.
You might consider creating a hybrid version of the platform list and update scripts which makes
it easy for you to scan the list and update them with a few simple clicks and keystrokes. Figure 4-7
presents a screenshot of what this might look like.
Figure 4-7. Mockup of a streamlined platform update interface
Download at Boykma.Com
100 CHAPTER 4 • INTRODUCING MYSQL
Deleting a Platform
Because the net result of deleting a row is the destruction of potentially valuable data, typically users
will be greeted with a conrmation dialog before the process is nalized. There seem to be countless
variations of how the conrmation dialog is presented, however I've found a simple JavaScript conr-
mation window to be about as practical as any. Figure 4-8 displays a typical such window.
Figure 4-8. A JavaScript conrmation dialog window
Because the deletion process is nearly identical to the processes explained in the previously discussed
insertion and modication scripts, I'll forego a complete code breakdown and instead concentrate
solely upon the conrmation dialog. JavaScript, being an event-based language, is capable of re-
sponding to user actions such as the clicking of a link or submission of a form. Regarding the latter,
to initiate some sort of JavaScript action when a link is clicked, all you need to do is embed a call to
JavaScript's
onClick() event handler:
while ($query->fetch()) {
echo "<a href='platform-delete.php?id={$id}'
onclick=\"return conrm('Really delete the platform {$title}?');\">
{$title}<br />";
}
When the user selects a platform for deletion, he'll be presented with the conrmation dialog. Click-
ing OK will cause the
platform-delete.php script to be requested anew, but this time with the id
parameter and appropriate value attached, thereby carrying out the deletion process. Clicking Cancel
will merely close the conrmation dialog and return the user back to the page.
Dealing with Orphaned Records
There's a secondary matter you need to keep in mind when deleting records from certain tables: or-
phaned records. That is, records from other tables which relate to the row you're trying to delete. Sup-
pose you removed the Nintendo Wii platform from the table, which happens to be the platform you've
assigned to several games in your collection. With the platform deleted, the corresponding
id found
in the
games' table's platform_id column is no longer tied to a row in the platforms table. What to
do? There are actually several solutions to choose from, depending upon the particular situation:
• Prevent platform deletion from proceeding: If it is absolutely essential that the
games table
be tied to a particular row in the platforms table, you could always rst check to determine
whether any rows in the games table have been assigned the platform ID in question, and if
so, prevent the user from deleting the platform.
• Remove all games tied to that platform: If the only conceivable reason for removing a
Download at Boykma.Com
101CHAPTER 4 • INTRODUCING MYSQL
platform is due to the removal of it and its games (because you sold the console and games to
a friend), you could perform an additional step which deletes all games tied to that platform.
• Platform reassignment: Although an unlikely choice in this particular situation, you might
also reassign the platform ID for any game currently assigned the soon-to-be deleted plat-
form. One approach would be to assign the value 0 (which will never be used in an auto-
matically-incrementing primary key sequence) and within your programming logic display
"No platform assigned" in any case where a game's platform is set to 0. Again, this approach
doesn't make sense in the case of the game collection application, but in the case of a human
resources application, it might make sense to set an employee's department to "Currently be-
ing reassigned" in the case of reorganization.
Creating the Game Manager
Now that you know how to create the various interfaces for managing the gaming platforms, chances
are you already have a fairly clear idea of how the game interfaces should be constructed. In fact,
given the similarities I'm going to focus solely on the game addition interface, as it requires you to
enhance a simple web form by giving the user the ability to also assign a platform to the game being
inserted. Of course, code for all of the required management actions is found in the code download.
Adding a New Game
As mentioned, the game addition interface is really no different from that used to add a platform, with
one key difference: we need to offer a means for allowing the user to assign a platform to the game
being inserted. This is generally done using a drop-down select box such as that shown in Figure 4-9.
Figure 4-9. Adding a new game to your collection
As you might imagine, retrieving the platform information is no different from what you've seen so
far. Just create a prepared statement, and bind the results:
Download at Boykma.Com
102 CHAPTER 4 • INTRODUCING MYSQL
$sql = 'SELECT id, title FROM platforms ORDER BY title';
$platform = $db->prepare($sql);
$platform->execute();
$platform->bind_result($platformID, $platformTitle);
Next, within the form, add this code to create the select box:
<p>
Platform:<br />
<select name="platform_id">
<option value="">Choose a platform:</option>
<?php
while ($platform->fetch()) {
echo "<option value='{$platformID}'>{$platformTitle}</option>";
}
?>
</select>
</p>
Be sure to check out the code bundle to review the complete code for the game addition script (game-
add.php), in addition to the modication (game-edit.php) and deletion (game-delete.php) scripts.
Determining the Number of Rows Returned and Affected
The bulk of our attention has been devoted to creating interfaces for adding, editing, deleting, and
listing games and platforms. But the MySQLi extension offers quite a few other features which can
enhance your application's usability, such as determining the number of rows returned from a SE-
LECT query, and the number of rows affected from an INSERT, UPDATE, or DELETE operation. In
this section I'll show you how to do both.
Counting the Number of Returned Rows
It's often useful to give users an overview of the number of records in a table, such as the number of
games in your collection. To do so using the MySQLi extension, call the num_rows property:
$sql = 'SELECT id FROM platforms ORDER BY title';
$platform = $db->prepare($sql);
$platform->execute();
$platform->store_result();
// Retrieve the number of returned rows
$rows = $platform->num_rows;
echo "There are {$rows] platforms in the database.";
Download at Boykma.Com
103CHAPTER 4 • INTRODUCING MYSQL
While this code is self-explanatory, there are two matters worth noting. First, you must call the
store_result() method prior to retrieving the number of returned rows, because otherwise MySQL
will not have returned all of the rows back to the server (remember the buffered vs. unbuffered
queries discussion?), meaning PHP will be unable to discern how many rows are available. Second,
notice how
num_rows is an object property rather than a method. Attempting to call this as a method
(concluding with parentheses) will result in an error.
Counting the Number of Affected Rows
Particularly when creating interfaces capable of inserting, modifying, or deleting numerous rows in
a table, it's useful to determine the number of rows which have been affected as a result of the opera-
tion. To make this determination, refer to the affected_rows property:
$sql = 'DELETE FROM platforms WHERE 1=1';
$platform = $db->prepare($sql);
$platform->execute();
$platform->store_result();
// Retrieve the number of affected rows
$rows = $platform->affected_rows;
echo "{$rows] platforms have been deleted.";
Step #6. Restricting Access
You'll want to restrict access to the game collection management scripts, otherwise anybody could po-
tentially access and modify or even destroy your data. Numerous strategies exist for limiting access,
although the easiest involves relying on the authentication mechanism built directly into the same
communication protocol (known as HTTP) used to power the Web. This mechanism requires users to
provide a username and password via a pop-up authentication window (Figure 4-10). If the username
and password matches the predened values, the user is granted access. Otherwise, access is denied.
Figure 4-10. The default authentication window
Adding this sort of authentication feature to your site can be done in just a few lines of code, present-
ed below:
Download at Boykma.Com
104 CHAPTER 4 • INTRODUCING MYSQL
<?php
if (($_SERVER['PHP_AUTH_USER'] != 'gamenomad') ||
($_SERVER['PHP_AUTH_PW'] != 'secret')) {
header('WWW-Authenticate: Basic Realm="GameNomad Website"');
header('HTTP/1.0 401 Unauthorized');
echo 'You must provide the proper credentials!';
exit;
}
?>
As you can see, the username and password (gamenomad and secret, respectively) are embedded
within the code, and are compared to the $_SERVER['PHP_AUTH_USER'] and $_SERVER['PHP_AUTH_
PW'] variables, respectively. If the username and password matches, the if-conditional body is by-
passed altogether. Otherwise, the authentication window is displayed. If at any point the user presses
the Cancel button, the error message found in the if-conditional body is displayed.
Keep in mind code involving calls to the
header() function must execute before anything is output to
the browser. Neglecting to follow this important rule will result in an error.
Of course, there's nothing to prevent you from revising this code to determine whether the provided
username and password exist in a database table, opening up the possibility for a multi-user authenti-
cation solution.
If you're looking for a more robust authentication solution which can plug into several preexisting
authentication implementations such as LDAP, Samba, and Kerberos, check out the PEAR Auth pack-
age.
Conclusion
In just three chapters, you've gone from a Web development neophyte to one capable of building a
fairly robust, secure Web application capable of managing your gaming collection. I think congratula-
tions are in order!
But in light of this sudden success, your aspirations are growing. Suddenly, you've taken a liking to
suspenders and greasing your hair back in the spirit of Gordon Gecko. You stare in the bathroom mir-
ror each morning screaming, "The world is mine!". You initially plotted to take over the universe but
decided against it because frankly, it just isn't big enough. So instead, you're going to create the best
darned gaming website ever. Read on to learn how.
Download at Boykma.Com
CHAPTER 5
Introducing the Zend Framework
The steps you've taken in the rst four chapters have no doubt been tremendous. In a short time
you've gone from the hassle of updating and e-mailing a spreadsheet around to your friends to pub-
lishing a database-driven website which encourages users to not only peruse your game collection,
but also participate by offering you feedback and pointers to other games through a simple web form.
But in making this transition you've been exposed to a number of challenges faced by all Web devel-
opers, including:
• Writing custom validation code for ltering user-provided data such as names, phone num-
bers, and e-mail addresses
• Managing page layouts within multiple les, namely
header.php and footer.php.
• Figuring out how to manage conguration information such as database connection param-
eters and mail server addresses.
• Mixing substantial amounts of PHP and HTML together which tends to make it difcult for
you to easily update the layout, and almost impossible for you to hire a Web designer to im-
prove the website's look-and-feel for fear of mistakenly broken code.
And this is to say nothing of the issues you'll undoubtedly encounter as the website grows, such as:
• Implementing a multi-user authentication system which plays a key role in granting friends
the ability to manage their own game collections
• Expanding the Web site's capabilities by integrating third-party Web services such as You-
Tube, Flickr, and Amazon
• Going overseas with localized versions of the website tailored to the user's native language,
currency, and other customs.
What if I were to tell you there's a solution which will greatly reduce, if not altogether eliminate these
issues, along the way making you a faster, more efcient, less error-prone Web developer? This solu-
tion is called a Web framework, and much of the rest of this book is devoted to showing you how to
use a best-of-class PHP framework known as the Zend Framework.
Chapter Steps
The goals of this chapter are accomplished in nine steps:
• Step #1. What is a Web Framework?: The rst four chapters have gone so well that you
might wonder why we're switching strategies at this point in the book. This step explains how
a framework can greatly reduce the time and effort you'd otherwise spend dealing with these
issues when building a website from scratch.
Download at Boykma.Com