Easy PHP Websites with the Zend Framework (phần 6) ppsx
Bạn đang xem bản rút gọn của tài liệu. Xem và tải ngay bản đầy đủ của tài liệu tại đây (1.78 MB, 50 trang )
CHAPTER 10
Introducing the Amazon Associates Web Service
Regardless of whether your site discusses books, DVDs, fantasy football teams, or video games,
you're going to be judged by the quality of the data you keep. For instance, chances are GameNomad
users aren't going to stick around for long if game titles are misspelled, prices are incorrect, or cata-
loged games aren't properly matched with their supported platforms. At the same time, part of your
success is going to hinge upon how quickly you can build a large content catalog; after all, prospec-
tive users aren't going to be particularly compelled to register if there's not much to read or otherwise
use on your website. So your dilemma is really two-fold. Not only do you need to assemble a large ar-
ray of content as quickly as possible, but you also need to ensure its accuracy. To be certain, this isn't
an easy task, particularly when you're already spending the bulk of your time developing the website.
Thankfully, there are numerous services which can help you accomplish both goals, no matter what
your website's particular product focus may be. These services, better known as web services, open
vast troves of highly-organized data to developers interested in mining, analyzing, or presenting this
data in new and interesting ways. In fact, in the last chapter you were using a web service and perhaps
didn't even know it. The Google Maps API gives developers access to Google's massive store of geo-
graphical data, and will even present that data via it's by now abundantly familiar interface.
With some knowledge and creativity, you can integrate web services into your own websites, building
your own compelling services which can rely upon and even enhance these organizations' data stores.
Want to build a movie review website? Look to the Netix API (
ix.com/)
to seed your movie catalog. Dreamed up a compelling way to submit and monitor items for auction
on eBay? Check out the eBay API at Think you can help music lov-
ers more effectively explore the latest releases? The Last.fm API ( might
be exactly what you need to get started.
In this chapter I'm going to introduce you to the web service that makes GameNomad games database
tick. The Amazon Associates Web Service is Amazon.com's eponymous web service which opens up
the company's enormous database to developers interested in advertising new and used products on
their own websites. Developers can use this solution to build custom catalogs around their favorite
product category, be it books, toys, groceries, shoes, or video games! By linking these products to
Amazon.com, developers can earn a referral fee for every product sold as a result of a user clicking
through and purchasing the product on Amazon.com.
CAUTION. You might be wondering why organizations go through the trouble of giving third-par-
ty developers access to what most would consider the corporate golden goose, namely the enormous
store of well-manicured data. The answer is simple: prot generation. These organizations often
require your website to be primarily concerned with sending customers their way, either due to your
website raising awareness about a particular product (such as a newly released DVD) or due to an
afliate link clicked upon by an interested user. That said, be sure you're adhering to the API's usage
guidelines by seeking out and carefully reading its Terms of Use policy.
Download at Boykma.Com
232 CHAPTER 10 • INTRODUCING AMAZON ASSOCIATES WEB SERVICE
Chapter Steps
The goals of this chapter are accomplished in four steps:
• Step #1. Introducing the Amazon Associates Web Service: In the chapter's opening step
we'll talk more about the Amazon Associates Web Service, and discuss the advantages of
creating an Amazon afliate account. To round out the step, I'll show you how to create an
Amazon Associates Web Service account, Amazon Associates Account, and ready your Zend
Framework-powered website to begin accessing the Amazon Associates Database.
• Step #2. Introducing the Zend_Services_Amazon Component: In this step I'll show you
how query the Amazon database using the Zend Framework's Zend_Services_Amazon
component. You'll learn how to retrieve product attributes such as prices, images, sales ranks,
descriptions, and other data crucial to building a great afliate service.
• Step #3. Searching for Products: In the third step we'll build upon what was learned in Step
#2, building more complex queries to mine the Amazon database in new and interesting ways.
• Step #4. Customer Reviews: Unbiased customer reviews can hold tremendous sway over
a prospective buyer's purchasing decisions. In the fourth and nal step of this chapter you'll
learn how to retrieve and sort a product's reviews. Along the way we'll create a view helper
for turning an integer-based rating value into a string of star icons.
VIDEO: A Tour of Amazon's Web Services
The Amazon Associates Web Service is just one of the several fascinating web ser-
vices offered by Amazon.com and used by thousands of organizations large and small
around the globe. This video introduces you to these services. Watch the video at
/>Step #1. Introducing the Amazon Associates Web Service
Having launched their Associates program back in 1996, before much of the world had even heard of
the Internet, Amazon.com founder Jeff Bezos and his colleagues clearly grasped at a very early point
the power of Web linking. By providing motivated third-parties, known as associates, with an easy
way to promote Amazon products on their own websites and earn a percentage of any sales occurring
as a result of their efforts, Amazon gured they could continue to grow market share in the edgling
e-commerce market. Some 13 years later, the Amazon Associates program is a true online juggernaut,
with everybody from large corporations to occasional bloggers taking advantage of the program to
enhance revenues.
With over a decade of experience under their belts, Amazon has had plenty of time and opportunities
to nurture their Associates program. Early on in the program's lifetime, associates' options were limit-
ed to the creation of banners and other basic links, however presently options abound, with associates
provided with a wealth of tools for linking to Amazon products using links, banners, widgets, search
engines. Users are also provided with powerful sales analysis tools which help them understand what
efforts are working and what aren't.
Download at Boykma.Com
233CHAPTER 10 • INTRODUCING AMAZON ASSOCIATES WEB SERVICE
Along the way, they also unveiled the shining gem of the associates program: the Amazon Associates
Web Service. This service opened up Amazon's enormous product database to developers, giving them
the wherewithal to retrieve and manipulate this data in new and creative ways. What's particularly
impressive about this service is that Amazon didn't make a half-hearted effort at opening up the data-
base, for instance allowing access to only the product titles and descriptions. Developers have access
to all of the data they could conceivably need to build a fascinating new solution for perusing Ama-
zon products. Among other things, developers have access to product titles, ASINs (Amazon's internal
version of the UPC code), product release dates, prices, manufacturer names, Amazon sales ranks,
customer and editorial reviews, product relations (products identied as being similar to one another),
images, and much more!
Access to the database is provided by way of a Web Service, which is just a fancy way of calling an
API over the Internet. As mentioned, the Google Maps API introduced in the last chapter is an exam-
ple of a Web service which exposed Google's mapping data via a programmatic interface. Likewise,
the Amazon Associates Web Service exposes their product listings through a similar interface. Later
in this chapter we'll communicate with that interface using the Zend Framework's Zend_Service_Am-
azon component.
But before you can begin taking advantage of this fantastic service, you'll need to register for two ac-
counts: an Amazon Associates account and an Amazon Associates Web Service account. I'll show you
how to do this next.
Joining the Amazon Associates Program
Joining the Amazon Associates Program is free, and only requires you to complete a short registration
form in which you'll provide your payment and contact information, web site name, URL and descrip-
tion, in addition to declare agreement to the Amazon Associates operating agreement. To register for
the program, head over to https://afliate-program.amazon.com/ and click on the Join now
for FREE! button to start the process.
There's no waiting period following registration, and in fact you'll be immediately provided with your
unique Associate ID following submission of the registration form. As you'll soon learn, you'll attach
this associate ID to the product URLs so Amazon knows to what account they should credit the po-
tential purchase. At this point you'll also be prompted to identify how you'd like to be paid, either by
direct deposit, check, or Amazon gift card.
Creating an Amazon Associates Web Service Account
To gain access to Amazon's database and begin building your catalog, you'll need to create an ac-
count. The end result of this free registration process is the provision of an access key, which you'll
use to communicate with the service. To obtain this key, head over to and
click the Create an AWS Account link located at the top right of the page. You'll be asked to sign in
to your existing Amazon.com account, and provide contact information, your company name or web-
site, and the web site URL where you'll be invoking the service. You'll also be asked to read and agree
to the AWS Customer Agreement. Once done, Amazon will send a conrmation e-mail. You can then
retrieve your key by heading back to and clicking on the Access Identi-
Download at Boykma.Com
234 CHAPTER 10 • INTRODUCING AMAZON ASSOCIATES WEB SERVICE
ers menu item located within the Your Account tab found at the top of the page. Copy the identier
named Your Access Key ID and paste it into your cong.ini le, along with your associate ID:
; Amazon
amazon.key = 12345678ABCDEFGHIJK
amazon.associate_id = gamenomad
We'll use this access key to connect to Amazon using the
Zend_Service_Amazon component, intro-
duced in the next step.
Creating Your First Product Link
Although the point of this chapter is to show you how to dynamically create product links tied to your
Amazon Associate account, it's worth taking a moment to understand the components of these links
so you'll understand why we're doing this in a particular way later in this chapter. Proper function-
ing of your Amazon Associate's account is dependent upon the proper inclusion of your Associate ID
within the product link. When using Amazon's automated wizards for creating product links (head
over to https://afliate-program.amazon.com/ to learn more about these) you'll nd these links
to be extremely long and decidedly not user-friendly. However, they support a shortcut which allows
you to create succinct alternative versions. For instance, the following link will point users to Ama-
zon's product detail page for the video game Halo 3 for the Xbox 360, tying the link to GameNomad's
afliate account:
/>
As you can see, this link consists of just two pieces of dynamic information: the product's ASIN,
and the associate identier. Don't believe it's this easy? Head on over to the Amazon Associates Link
Checker (
https://afliate-program.amazon.com/gp/associates/network/tools/link-
checker/main.html
) and test it out. Enter the link into the form (you'll need to swap out my Associ-
ate ID with your own), and press the Load Link button. The page will render within an embedded
frame, conrming you're linking to the appropriate product. Once rendered, click the Check Link
button to conrm the page is linked to your associate identier.
Of course, you'll probably want to include much more than a mere link. Using the Amazon Associates
Web Service, we can do this on a large scale. This topic is the focus of the remainder of this chapter.
Step #2. Introducing the Zend_Service_Amazon Component
The Zend_Service_Amazon component offers a convenient way to talk to the Amazon Associates
Web Service using an object-oriented interface. Using this component, you'll be able to query Ama-
zon.com's database for product information such as descriptions, images, manufacturer names, and
prices. You'll also be able to perform more sophisticated queries capable of retrieving users' product
reviews, related products, and even users' Listmania! lists.
Interestingly, this component actually includes two separate APIs, which the Zend Framework de-
velopers refer to as the Traditional API and the Query API. While equally capable in terms of their
Download at Boykma.Com
235CHAPTER 10 • INTRODUCING AMAZON ASSOCIATES WEB SERVICE
ability to query the Amazon database, I prefer the Query API due to its particularly intuitive syntax.
Accordingly, we'll be using solely the Query API throughout this chapter, although I invite you to at
least get acquainted with the Traditional API's syntax by checking out the Zend_Service_Amazon
documentation at .
Per usual, my preferred methodology for learning a technology is by actively experimenting with it.
Let's work through a variety of examples involving querying the Amazon product database using this
component.
Retrieving a Single Video Game
Amazon.com has long used a custom product identication standard known as the Amazon Stan-
dard Identication Number, or ASIN. We can use these 10-digit alphanumerical strings to retrieve a
specic product. Of course, you need to know what the product's ASIN is in order to perform such
a query, but how do you nd it? You can either locate it within the product's URL, or by scrolling
down the product's page where it will be identied alongside other information such as the current
Amazon sales rank and manufacturer name. For instance, the ASIN for Halo 3 on the Xbox 360 is
B000FRU0NU. With that in hand, we can use the Zend_Services_Amazon component to query Ama-
zon. Within an appropriate controller action add the following code:
01 $amazon = new Zend_Service_Amazon_Query($this->cong->amazon->key);
02 $amazon->Asin('B000FRU0NU');
03 $this->view->item = $amazon->search();
04 echo "Title: {$this->view->item->Title}<br />";
05 echo "Publisher: {$this->view->item->Manufacturer}<br />";
06 echo "Category: {$this->view->item->ProductGroup}";
Although I'd venture a guess this code is self-explanatory, let's nonetheless expand upon some of its
ner points:
• Line 01 creates the connection to the Amazon Web Services service, authenticating the user
by passing in the assigned access key. Note how the key is retrieved from the conguration
le.
• Line 02 indicates we're searching for a specic item as identied by the ASIN
B000FRU0NU.
As you'll see later in this chapter, we can also perform open-ended searches using criteria
such as product title and manufacturer.
• Line 03 performs the search, returning an object which you can subsequently parse and dis-
play in the view, or use as the basis for further manipulation in the action.
• Lines 04-06 output the returned product's title, manufacturer, and product group. You can
think of the product group as an organizational attribute, like a category. Amazon has many
such product groups, including Books, Video Games, and Sporting Goods.
Executing this code returns the following output:
Download at Boykma.Com
236 CHAPTER 10 • INTRODUCING AMAZON ASSOCIATES WEB SERVICE
Title: Halo 3
Publisher: Microsoft
Category: Video Games
Creating the Afliate URL
By default, an attribute named DetailPageURL was returned along with the other attributes demon-
strated in the previous example. However, this URL is not only decidedly user-unfriendly, but it logi-
cally does not include your Associate ID. However creating your own custom URL based on the URL
template shown earlier in this chapter is easy. Just use the ASIN attribute and the amazon.associ-
ate_id conguration parameter to construct the URL:
echo "
{$this->cong->amazon->associate_id}";
Executing this line will produce the following URL:
/>Setting the Response Group
To maximize efciency both in terms of bandwidth usage and parsing of the returned object, Amazon
empowers you to specify the degree of product detail you'd like returned. When it comes to querying
for general product information, typically you'll choose from one of three levels:
• Small: The Small group (set by default) contains solely the most fundamental product at-
tributes, including the ASIN, creator (author or manufacturer, for instance), manufacturer,
product group (book, video game, or sporting goods, for instance), title, and Amazon.com
product URL.
• Medium: The Medium group contains everything found in the Small group, in addition to at-
tributes such as the product's price, editorial review, current sales rank, the availability of this
item in terms of the number of new, used, collectible, and refurbished units made available
through Amazon.com, and links to the images.
• Large: The Large group contains everything found in the Medium group, in addition to data
such as a list of similar products, the names of tracks if the product group is a CD, a list of
product accessories if relevant, and a list of available offers (useful if a product is commonly
sold by multiple vendors via Amazon.com). Hopefully it goes without saying that if you're in-
terested in retrieving just the product's fundamental attributes such as the title and price, you
should be careful to choose the more streamlined Medium group , as the Large group comes
at the cost of signicant extraneous bandwidth for such purposes.
If you're interested in retrieving only a specic set of attributes, such as the image URLs or customer
reviews, then you might consider one of the many specialized response groups at your disposal.
Among these response groups include
Images, SalesRank, CustomerReviews, and EditorialRe-
view. As an example, if you'd like to regularly keep tabs of solely a product's latest Amazon sales
rank, there's logically no need to retrieve anything more than the rank. To forego retrieving superu-
ous data, use the SalesRank response group:
Download at Boykma.Com
237CHAPTER 10 • INTRODUCING AMAZON ASSOCIATES WEB SERVICE
$amazon = new Zend_Service_Amazon_Query($this->cong->amazon->key);
$amazon->Asin('B000FRU0NU')->ResponseGroup('SalesRank');
$this->view->item = $amazon->search();
echo "The latest sales rank is: {$this->view->item->SalesRank}";
NOTE. Determining which attributes are available to the various response groups can be a tedious
affair. To help sort through the details, consider downloading the documentation from http://aws.
amazon.com/documentation/. Also, I've found the AWS Zone website (zone.
com/) to be very useful, as you can use a Web-based tool to experiment with the various groups and
review the results in XML format.
Displaying Product Images
Adding an image to your product listings can greatly improve the visual appeal of your site. If your
queries are congured to return a
Medium or Large response group, URLs for three different image
sizes (available via the SmallImage, MediumImage, and LargeImage objects) are included in the re-
sponse. Of course, unless you require something else only available within the
Large response group,
use the Medium group, as demonstrated here:
$amazon = new Zend_Service_Amazon_Query($this->cong->amazon->key);
$amazon->Asin('B000FRU0NU')->ResponseGroup('Medium');
$this->view->item = $amazon->search();
echo $this->view->item->SmallImage->Url;
Executing this code returns the following URL:
/>
Of course, you'll want to include the image within the view. To do so, all you need to do is pass the
URL into an
<img> tag, like so:
<img src="<?= $this->item->SmallImage->Url; ?>" />
You might be tempted to save some bandwidth by retrieving and storing these images locally. I
suggest against doing so unless you're dealing with a particularly high trafc website, for two rea-
sons. First and most importantly, caching the image is not allowed according to the terms of service.
Second, as the above example indicates, the image lenames are created using a random string which
will ensure the outdated images aren't cached and subsequently used within a browser or proxy server
should a new image be made available by Amazon. Of course, the implication here is that the URLs
shouldn't be cached either, since they're subject to change. In fact, the terms of service indicate you
can only store image URLs for 24 hours because of the potential for change. The easiest way to deal
with this issue is to create a daily cron job which cycles through each item and updates the URL ac-
cordingly.
Download at Boykma.Com
238 CHAPTER 10 • INTRODUCING AMAZON ASSOCIATES WEB SERVICE
Putting it All Together
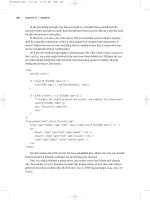
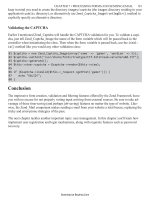
Believe it or not, by now you've learned enough to create a pretty informative product interface. Let's
recreate the layout shown in Figure 10-1, which makes up part of the GameNomad website.
Figure 10-1. Displaying Halo 3 product details
Let's start by creating the action, which will contact the web service and retrieve the desired game.
Assume the URL is a custom route of the format
/>B000FRU0NU. This code is really nothing you haven't seen before:
public function showAction()
{
// Retrieve the ASIN
$asin = $this->_request->getParam('asin');
// Query AWS
$amazon = new Zend_Service_Amazon_Query($this->cong->ws->amazon_key);
$amazon->Asin($asin)->ResponseGroup('Medium');
$this->view->item = $amazon->search();
// Assign the Associate ID to the view for later use
$this->view->amazonAssociateID = $this->cong->ws->amazonAfliateAccount;
}
Once the query has been returned, all that's left to do is populate the data into the view, as is demon-
strated here:
01 <span id="game-prole-left">
02
03 <p>
04 <img src="<?= $this->item->MediumImage->Url; ?>" class="gamecover" />
05 </p>
06
07 <p>
08 <a href=" $this->item->ASIN; ?>/
09 <?= $this->amazonAssociateID; ?>">
10 <img src="/images/buy_from_amazon_button.gif" />
Download at Boykma.Com
239CHAPTER 10 • INTRODUCING AMAZON ASSOCIATES WEB SERVICE
11 </a>
12 </p>
13
14 </span>
15
16 <span id="game-prole-right">
17 <h1><?= $this->item->Title; ?></h1>
18 <p>
19 <b>Platform</b>: <?= $this->item->Platform; ?><br />
20 <b>Release date</b>:
21 <?= date("F d, Y", strtotime($this->item->ReleaseDate)); ?>
22 <br />
23 <b>Latest Price</b>: <?= $this->item->FormattedPrice; ?><br />
24 <b>Latest Sales Rank</b>: <?= number_format($this->item->SalesRank); ?>
25 </p>
26 </span>
Like the controller, we're really just connecting the dots regarding what's been learned here and in
other chapters. Let's highlight a few key lines in this view:
• Line 04 renders the video game's medium image. Remember you also have a small and large
image at your disposal.
• Lines 08-11 create the Amazon Associate-enhanced Amazon.com product link.
• Lines 19-24 output information regarding the game, including the title, platform, release date,
price, and sales rank. Note how we're using PHP functions to format this data in more user-
friendly terms; the
strtotime() function converts the date into a format capable of being
recognized by the date() function, which subsequently converts the value into a user-friend-
ly date. Finally, the number_format() function will format a number by grouping it into
thousands and placing commas accordingly.
Of course, GameNomad being a live website, I don't actually actively query the web service every
time a user would like to learn more about a game. Much of this data is cached locally, and regularly
updated in accordance with the terms of service. Nonetheless, the above example nicely demonstrates
how to use the web service to pull this data together.
Step #3. Searching for Products
All of the examples provided thus far presume you've an ASIN handy. But manually navigating
through the Amazon.com website to nd them is a tedious process. In fact, you might not even know
the product's specic title, and instead just want to retrieve all products having a particular keyword in
the title, or made by a particular manufacturer. In this step you'll learn how to perform searches which
help you to learn more about the many products available via Amazon.com.
Download at Boykma.Com
240 CHAPTER 10 • INTRODUCING AMAZON ASSOCIATES WEB SERVICE
Searching for Products by Title
What if you wanted to nd products according to a particular keyword found in the product title? To
do so, you'll need to identify the product category, and then specify the keyword you'd like to use as
the basis for searching within that category. The following example demonstrates how to search the
VideoGames (note the lack of spaces) category for any product having the keyword Halo in its title:
$amazon = new Zend_Service_Amazon_Query($this->cong->ws->amazon_key);
$amazon->Category('VideoGames')->Keywords('Halo');
$this->view->item = $amazon->search();
foreach($this->view->item AS $item) {
echo "{$item->Title}<br />";
}
At the time of this writing (the contents of the Amazon.com catalog are of course subject to change at
any time), executing this code produced the following output:
Halo: Combat Evolved
Halo 3
Halo, Books 1-3 (The Flood; First Strike; The Fall of Reach)
Halo: Combat Evolved
Halo Wars
Halo 2
Ghosts of Onyx (Halo)
Halo Wars Limited
Halo 2
The Halo Graphic Novel
It's worth pointing out that the ten products found in the listing aren't all video games, as the dened
category might lead you to believe. For instance, The Halo Graphic Novel is a graphic novel (comic
book). Why these sorts of seeming inconsistencies occur isn't apparent, although one would presume
it has to do with making the product more easily ndable on the Amazon.com website and through
other outlets.
Incidentally,
VideoGames is just one of more than 40 categories at your disposal. Try doing searches
using categories such as
Music, DigitalMusic, Watches, SportingGoods, Photo, and OutdoorLiv-
ing for some idea of what's available!
Executing a Blended Search
If you were creating a website dedicated to the Halo video game series, chances are you'd want to
list much more than just the games! After all, there are Halo-specic books, soundtracks, toys, action
gures, and even an animated series. But not all of these items are necessarily categorized within
VideoGames, so how can you be sure to capture them all? You might be tempted to do this:
Download at Boykma.Com
241CHAPTER 10 • INTRODUCING AMAZON ASSOCIATES WEB SERVICE
$amazon->Category('VideoGames')->Category('Music')->Keywords('Halo');
While logical, the behavior isn't what you'd expect, because the Music category designation will
just overwrite VideoGames rather than be coupled with it. You can however use what's known as a
blended search. Setting Category to Blended will result in a combined search of the categories Ap-
parel, Books, DVD, Electronics, GourmetFood, Kitchen, PCHardware, Software, SportingGoods,
Tools, Toys, and VideoGames. Although not perfect (at the time of writing performing a blended
search using the keyword Halo turns up among other things a listing for Nissan Maxima fog lights).
Revising the previous line, here's how you'd perform the blended search:
$amazon->Category('Blended')->Keywords('Halo');
Performing the search anew turns up almost 50 items with Halo in the title, the vast majority of which
are clearly related to the popular video game brand.
Step #4. Customer Reviews
Amazon's customer reviews undoubtedly have enormous sway over prospective buyers, not to men-
tion can be a great catalyst in terms of sparking debate and springboards for further research among
interested readers. You can retrieve the latest ve reviews for a particular product simply by identify-
ing the ASIN and the Review response group:
$amazon = new Zend_Service_Amazon_Query($this->cong->ws->amazon_key);
$amazon->ASIN('B000FRU0NU')->ResponseGroup('Reviews');
$this->view->reviews = $amazon->search();
The corresponding view looks like this:
<h1>The Latest Halo 3 (Xbox 360) Reviews</h1>
<?php foreach($this->reviews->CustomerReviews AS $review) { ?>
<h3><?= $review->Summary; ?></h3>
<p>
<?= $review->Rating; ?> stars<br />
Posted on <?= date("F d, Y", strtotime($review->Date)); ?><br />
<?= $review->Content; ?>
</p>
<?php } ?>
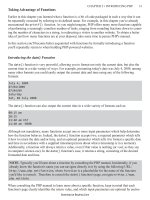
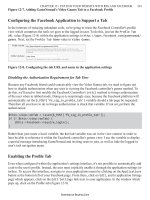
Executing this code produces output similar to that shown in Figure 10-2.
Download at Boykma.Com
242 CHAPTER 10 • INTRODUCING AMAZON ASSOCIATES WEB SERVICE
Figure 10-2. Displaying the latest Amazon customer product reviews
Paging Reviews
If you ran the code in the previous example, you noticed only ve reviews were returned, regard-
less of how many actually appear on the product's corresponding Amazon.com page. This is because
the query by only returns ve items per request. To retrieve additional reviews, you'll need to page
through these results using the ReviewPage() method, like so (this example will return the second
page of results):
$amazon->ASIN('B000FRU0NU')->ResponseGroup('Reviews')->ReviewPage(2);
To determine how many pages are available, reference the TotalReviews attribute:
echo "Total reviews: {$this->view->reviews->TotalReviews}";
Although you can't change the number of reviews returned per page, there's an easy workaround.
Because no more than ve items can be returned per request, just divide TotalReviews by 5. You'll
be able to use this number as an upper boundary when navigating from one page to the next.
Sorting Reviews
When querying for product reviews, the default order is descending according to the most recently
posted review. You can however change this sort order using other criteria. For instance, to sort re-
turned reviews in descending order according to the highest number of helpful votes received, use this
command:
$amazon->ASIN('B000FRU0NU')->ResponseGroup('Reviews')->
ReviewSort('-HelpfulVotes');
Download at Boykma.Com
243CHAPTER 10 • INTRODUCING AMAZON ASSOCIATES WEB SERVICE
To sort according to least helpful votes, just remove the minus sign from the front of HelpfulVotes.
You can also sort according to rating (OverallRating) and submission date (SubmissionDate).
Creating a View Helper for Rendering Stars
As you saw in the previous two examples, each reviewer's rating is identied by an integer value. But
surely there is a more visually appealing way we can represent the ratings? As you learned in Chapter
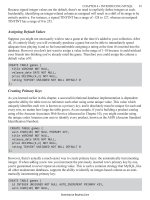
5, a view helper can do a tremendous amount of work with surprisingly little code. Using the Stars
helper shown below, we can convert this boring integer value into a string of star icons which consid-
erably improve the page's design, as shown in Figure 10-3.
Figure 10-3. Using a view helper to enhance the page
The revised view code follows:
<h1>The Latest <?= $this->reviews->Title; ?> (Xbox 360) Reviews</h1>
<?php foreach($this->reviews->CustomerReviews AS $review) { ?>
<h3><?= $this->Stars($review->Rating); ?> <?= $review->Summary; ?></h3>
<p>
Posted on <?= date("F d, Y", strtotime($review->Date)); ?><br />
<?= $review->Content; ?>
</p>
<?php } ?>
Next you'll nd the
Stars view helper, which translates the Rating value into the corresponding
number of star icons.
01 class My_View_Helper_Stars extends Zend_View_Helper_Abstract
02 {
03
Download at Boykma.Com
244 CHAPTER 10 • INTRODUCING AMAZON ASSOCIATES WEB SERVICE
04 /**
05 * Converts rating integer to star icons
06 *
07 * @param integer $rating
08 * @param string $stars
09 */
10 public function Stars($rating)
11 {
12 $star = "<img src='/images/icons/star.png' />";
13 $stars = "";
14
15 for($i=1; $i <= $rating; $i++)
16 {
17 $stars .= $star;
18 }
19 return $stars;
20 }
21
22 }
Let's break down some code:
• Line 12 denes the location of the star icon. This icon happens to be part of the spectacular
FAMFAMFAM Mini icon set, available at
Of course, for organizational reasons you might consider storing the image path in the con-
g.ini le.
• Lines 15-18 cycle through the
for loop a number of times equivalent to the value of the $rat-
ing input parameter. Each time it loops, another <img> tag containing the star.png path will
be appended to the $stars variable.
• Line 19 returns the
$stars variable to the calling view.
I think this is an ideal example of the power of view helpers because such a small amount of code
adds so much to the website.
Conclusion
Although a fair bit of ground was covered, this chapter provided but a mere introduction to what's
possible using the powerful Amazon Associates Web Service. To learn more about this excellent tech-
nology, download the documentation at and browse the
forums at />The next chapter discusses how you can enhance your website with Ajax, a modern web development
technique used to create highly interactive interfaces.
Download at Boykma.Com
CHAPTER 11
Enhancing the User Interface with Ajax
There's no use hiding it; I hate JavaScript. Over the years, its frightful syntax and difcult debugging
procedures have brought me to the sheer edge of insanity countless times. I'm not alone; the language
is widely acknowledged for its ability to cause even the most level-headed of programmers to spew
profanity. To put the scope of the frustration brought about by this language another way, consider the
impressive record of non-violence espoused by the likes of John Lennon. I speculate his penchant for
pacism was at least in part attributed to his unfamiliarity with JavaScript.
Yet today there is really no way to call yourself a modern Web developer and not regularly use Ja-
vaScript. In fact, while you might over the course of time alternate between several Web frameworks
such as Zend Framework, Grails (
and Rails (yon-
rails.org/), it's almost a certainty that JavaScript will be the common thread shared by all projects.
This is because JavaScript is the special sauce behind the techniques used to create highly interactive
web pages collectively known as AJAX.
AJAX makes it possible to build websites which behave in a manner similar to desktop applications,
which have traditionally offered a far more powerful and diverse array of user interface features such
as data grids, autocomplete, interactive graphs, and drag-and-drop. Indeed, users of popular services
such as Gmail, Flickr, and Facebook have quickly grown accustomed to these sorts of cutting-edge
features. Accordingly, you'll want to integrate similar features into your websites as soon as possible
in order to help attract and maintain an audience who has come to consider rich interactivity a re-
quirement rather than a novelty.
This puts us in a bit of a quandary: coding in JavaScript is a drag, but we really need it. Further,
because these days we need to use JavaScript to some degree within practically every website, we're
tasked with guring out how to maintain often large bits of code for subsequent reuse. Doesn't this
sound a bit like the problems we've encountered in the early chapters of the book, which were subse-
quently resolved by looking to a framework? Perhaps not surprisingly, the answer to our JavaScript
woes is… a JavaScript framework!
In this chapter I'll introduce you JavaScript and the Ajax development paradigm, focusing on the
popular Prototype and Script.aculo.us JavaScript libraries, two solutions which are so easy to use
they (almost) make JavaScript development fun! Along the way, we'll review several examples which
demonstrate JavaScript's ability to perform tasks such as forms validation and visual effects.
Chapter Steps
The goals of this chapter are broken down just two steps:
• Step #1. Introducing JavaScript: In this opening step I'll introduce you to the JavaScript
language. Rather than endure an exhaustive review of basic syntax, we'll instead focus on key
JavaScript features which help you to quickly begin implementing modern interactive fea-
tures into your website.
Download at Boykma.Com
246 CHAPTER 11 • ENHANCING THE USER INTERFACE WITH AJAX
• Step #2. Introducing Ajax: In order to implement these features, I'll introduce you to Proto-
type, a powerful JavaScript framework which although not ofcially supported by the Zend
Framework, integrates very well nonetheless. In this step I'll also introduce you to Script.
aculo.us, which is a set of user interface-oriented JavaScript libraries which extend the Pro-
totype framework in fascinating ways. In this step I'll show you why organizations such as
NASA, Gucci, and Apple have embraced Script.aculo.us, and show you how to integrate it
into the Zend Framework.
Step #1. Introducing JavaScript
Because JavaScript is interpreted and executed by the browser, you need to make that code available
to the browser, done by either embedding it directly within the web page, or referencing a separate
le much as you've done with CSS or images. The cleanest way to do so is using the latter approach,
allowing you to maintain and reuse the code separate from the HTML le. The following example
demonstrates how an external JavaScript can be referenced:
01 <html>
02 <head>
03 <script type="text/javascript" src="/javascript/myjavascript.js"></script>
04 </head>
05 <body>
06
07 </body>
08 </html>
In the context of the Zend Framework, the javascript directory referenced in line 03 would reside
within the /public/javascript/ directory, so if this directory doesn't exist, go ahead and create it
now. Next create the
myjavascript.js le, and place it in the directory. Within that le, add just a
single line:
alert("This is my rst JavaScript script!");
Load the page into the browser, and you'll see the message appear over the browser window, as shown
in Figure 11-1.
Figure 11-1. Creating a JavaScript alert window
While the approach of referencing an external script is recommended, for testing purposes you might
prefer to just directly embed the JavaScript into the HTML like so:
01 <html>
02 <head>
Download at Boykma.Com
247CHAPTER 11 • ENHANCING THE USER INTERFACE WITH AJAX
03 <script type="text/javascript">
04 alert("I love video games!");
05 </script>
06 </head>
07 <body>
08
09 </body>
10 </html>
Basic Syntax
JavaScript is a vast language sporting countless features, leading me to believe any attempt to cover
even the fundamentals within a single chapter, let alone a single section, would be rather self-delu-
sional (see the note for a list of my two favorite JavaScript books). For instance, within the JavaScript
language you'll nd support for variables, arrays, looping mechanisms, mathematical calculations,
string manipulation, and much more. Accordingly, I've given this section quite a bit of thought, and
in fact have since cut out a great deal of original draft material in an attempt to provide you with only
what's necessary to make the most of this chapter's ultimate goal, which is to show you how to take
advantage of a JavaScript framework within the context of the Zend Framework. From there, consider
continuing your learning through the numerous online JavaScript tutorials, or by picking up one of
the books mentioned in the below note.
NOTE. I've long kept two JavaScript books close to the desk. The rst is "Beginning JavaScript",
currently in its third edition and co-authored by Paul Wilton and Jeremy McPeak. The second is a
more recent title called "Beginning JavaScript with DOM Scripting and Ajax", authored by Chris-
tian Heilmann.
Creating and Using Variables
Like PHP, you'll want to regularly create and reference variables within JavaScript. You can formally
dene variables by declaring them using the
var statement, like so:
var message;
JavaScript is a case-sensitive language, meaning that
message and Message are treated as two sepa-
rate variables. You can also assign the newly declared variable a default value at creation time, like
so:
var message = "I love video games!";
Alternatively, JavaScript will automatically declare variables simply by the act of assigning a value to
one, like so:
message = "I love video games!";
I suggest using the former approach, declaring your variables at the top of the script when possible,
perhaps accompanied by a JavaScript comment, which looks like this:
Download at Boykma.Com
248 CHAPTER 11 • ENHANCING THE USER INTERFACE WITH AJAX
// Declare the default message
var message = "I love video games!";
Creating Functions
For the typical organizational reasons, you'll want to segment JavaScript code into reusable functions.
Like PHP these functions can accept parameters and return results. For instance, let's create a reusable
function which displays the above-declared message:
01 <html>
02 <head>
03 <script type="text/javascript">
04
05 // Displays a message via an alert box
06 function message()
07 {
08 // Declare the default message
09 var message = "I love video games!";
10
11 // Present the alert box
12 alert(message);
13
14 }
15 </script>
16 </head>
17 <body>
18
19 </body>
20 </html>
As you can see, the function's declaration and enclosure look very similar to standard PHP syntax. Of
course, like PHP the message() function won't execute until called, so insert the following line after
line 14:
message();
Reloading the page will produce the same result shown in Figure 11-1.
You can pass input parameters into a JavaScript function just as you do with PHP; when dening the
function just specify the name of the variable as it will be used within the function body. For instance,
let's modify the
message() method to pass along a revised statement:
01 // Displays a message via an alert box
02 function message(user, pastime)
03 {
04 // Present the alert box
05 alert(user + " is the " + pastime + " player of the year!");
06 }
Download at Boykma.Com
249CHAPTER 11 • ENHANCING THE USER INTERFACE WITH AJAX
You can then pass along a user's name and their favorite pastime to create a custom message:
message("Jason", "Euchre");
Reloading the browser window produces an alert box identical to that shown in Figure 11-2.
Figure 11-2. Using a custom function
TIP. Like PHP, JavaScript comes with quite a few built-in functions. You can peruse a directory of
these functions here: />
Working with Events
Much of your time working with JavaScript will be spent guring out how to make it do something in
reaction to a user action, for instance validating a form when a user presses a submit button. In fact, in
Chapter 9 you learned how to make JavaScript do something simply by loading the page by embed-
ding the onload() event handler into the page. For instance, you can tell our custom message()
function to execute when the page is loaded by modifying the <body> element:
01 <html>
02 <head>
03 <script type="text/javascript">
04
05 // Displays a message via an alert box
06 function message()
07 {
08 // Declare the default message
09 var message = "I love video games!";
10
11 // Present the alert box
12 alert(message);
13 }
14 </script>
15 </head>
16 <body onload="message()">
17
18 </body>
19 </html>
Reload this example, and you'll see the alert window immediately appear, just as it did when you
explicitly called the message() function from within the embedded JavaScript section.
So how do you cause JavaScript to execute based on some other user action, such as clicking a submit
Download at Boykma.Com
250 CHAPTER 11 • ENHANCING THE USER INTERFACE WITH AJAX
button? In addition to onload(), JavaScript supports numerous other event handlers such as on-
click(), which will cause a JavaScript function to execute when an element attached to the event
handler is clicked. Add the following code within the
<body> tag (and remove the onload() function
from the
<body> element) for an example:
<input type="submit" name="submit" value="Click Me!" onclick="message();">
The button and window which pops up once the button is clicked is shown in Figure 11-3.
Figure 11-3. Executing an action based on some user event
The same behavior occurs when using a simple hyperlink, an image, or almost any other element. For
instance, try adding the following lines to the page and clicking on the corresponding elements:
<a href="#" onclick="message();">Click me right now!</a><br />
<h1 onclick="message();">I'm not a link but click me anyway!</h1>
See Table 11-1 for a list of other useful JavaScript handlers. Try swapping out the onclick handler
used in the previous examples with handlers found in this table to watch their behavior in action.
Table 11-1. Useful JavaScript Event Handlers
Event Handler Description
onblur
Executes when focus is removed from a select, text, or textarea form eld.
onchange
Executes when the text in an input form eld is changed.
onclick
Executes when the element is clicked upon.
onfocus
Executes when the element is placed into focus (typically an input form eld)
onload
Executes when the element is loaded
onmouseover
Executes when the mouse pointer is moved over an element.
onmouseout
Executes when the mouse pointer is moved away from an element.
onselect
Executes when text within a text or textarea form eld is selected.
onsubmit
Executes when a form is submitted.
onunload
Executes when the user navigates away or closes the page.
Incidentally, in the unlikely case you're planning on using JavaScript in a specic location, with no
plans of reusing the JavaScript elsewhere, there's no need to go to the trouble of creating a custom
function. Instead, you can just embed the JavaScript directly into the HTML, like so:
Download at Boykma.Com
251CHAPTER 11 • ENHANCING THE USER INTERFACE WITH AJAX
<h1 onclick="alert('I love video games!');">Click me!</h1>
Forms Validation
Let's consider one more example involving an HTML form. Suppose you wanted to ensure the user
doesn't leave any elds empty when posting a video game review to your website. According to
what's available in Table 11-1, it sounds like the onsubmit event handler will do the trick nicely. But
rst we have to create the JavaScript function to ensure the form eld isn't blank upon submission:
01 function isNotEmpty(formeld)
02 {
03 if (formeld == "")
04 {
05 return false;
06 } else {
07 return true;
08 }
09 }
This function is in many ways practically identical to the simple validation functions we rst created
back in Chapter 3. In short, if the formeld parameter is blank, false is returned, otherwise true is
returned.
From here, you can reuse this function as many times as you please by referencing it within another
function, which we'll call
validate():
01 function validate()
02 {
03 // Retrieve the form's title eld
04 title = document.getElementById("title").value;
05
06 // Retrieve the form's review eld
07 review = document.getElementById("review").value;
08
09 // Verify neither eld is empty
10 if (isNotEmpty(title) && isNotEmpty(review))
11 {
12 return true;
13 } else {
14 alert("All form elds are required.");
14 return false;
15 }
16 }
As this is the most complex example we've encountered thus far, let's break down the code:
• Lines 04 and 06 use something called the Document Object Model (DOM) to retrieve the
values of the elements identied by the
title and review identiers. The DOM is a very
powerful tool, and one I'll introduce in detail in the next section.
Download at Boykma.Com
252 CHAPTER 11 • ENHANCING THE USER INTERFACE WITH AJAX
• Line 10 uses the custom isNotEmpty() function to examine the contents of the title and
review variables. If both variables are indeed not empty, true is returned which will cause the
form's designated action to be requested. Otherwise an error message is displayed and FALSE
is returned, causing the form submission process to halt.
Finally, construct the HTML form, attaching the
onsubmit event handler to the <form> element:
<form action="/reviews/post" method="POST" onsubmit="return validate();">
<p>
<label name="title">Please title your review:</label><br />
<input type="text" id="title" name="title" value="" size="50" />
</p>
<p>
<label name="review">Enter your review below</label><br />
<textarea name="review" id="review" rows="10" cols="35"></textarea>
</p>
<p>
<input type="submit" name="submit" value="Post review" />
</p>
</form>
Should the user neglect to enter one or both of the form elds, output similar to that shown in Figure
11-4 will be presented.
Figure 11-4. Validating form elds with JavaScript
The use of the Document Object Model (DOM) to easily retrieve parts of an HTML document, as
well as user input, is a crucial part of today's JavaScript-driven features. In the next section I'll for-
mally introduce this feature.
Introducing the Document Object Model
Relying upon an event handler to display an alert window can be useful, however events can do so
much more. Most notably, we can use them in conjunction with a programming interface known as
the Document Object Model (DOM) to manipulate the HTML document in interesting ways. The
DOM is a standard specication built into all modern browsers which makes it trivial for you to
Download at Boykma.Com
253CHAPTER 11 • ENHANCING THE USER INTERFACE WITH AJAX
reference a very specic part of a web page, such as the <title> tag, an <input> tag with an id of
email, or all <ul> tags. You can also refer to properties such as innerHTML to retrieve and replace the
contents of a particular tag. Further, it's possible to perform all manner of analytical and manipulative
tasks, such as determining the number of <li></li> entries residing within a <ul></ul> enclosure.
JavaScript provides an easy interface for interacting with the DOM, done by using a series of built-
in methods and properties. For instance, suppose you wanted to retrieve the contents of a
<p> tag
(known as an element in DOM parlance) having an id of message. The element and surrounding
HTML might look something like this:
01
02 <p id="message">Your prole has been loaded.</p>
03 <h1 id="gamertag">wjgilmore</h1>
04 Location: <b id="city">Columbus</b>, <b id="state">Ohio</b>
05
To retrieve the text found within the <p> element (line 02), you would use the following JavaScript
command:
<script type="text/javascript">
message = document.getElementById("message").innerHTML;
</script>
You can prove the text was indeed retrieved by passing the message variable into an alert box in a line
that follows:
alert("Message retrieved: " + message);
Adding the alert() function produces the alert box containing the message "Your prole has been
loaded.".
Retrieving the text is interesting, but changing the text would be even more so. Using the DOM and
JavaScript, doing so is amazingly easy. Just retrieve the element ID and assign new text to the
in-
nerHTML property!
document.getElementById("message").innerHTML = "Your prole has been updated!";
Simply adding this to the embedded code doesn't make sense, because doing so will change the text
from the original to the updated version before you really have a chance to see the behavior in action.
Therefore let's tie this to an event by way of creating a new function:
function changetext()
{
document.getElementById("message").innerHTML = "Your prole has been updated!";
}
Next, within the HTML body just tie the function to an
onclick event handler as done earlier:
<a href="#" onclick="changetext();">Click here to change the text</a>
Download at Boykma.Com
254 CHAPTER 11 • ENHANCING THE USER INTERFACE WITH AJAX
Everything you've learned so far lays the foundation for integrating Ajax-oriented features into your
website. In the next step I'll show you how to query the server and update a webpage with new data,
all without having to actually reload the page!
Step #2. Introducing Ajax
You might be wondering why I chose to name this section title "Introducing Ajax". After all, haven't
we been doing Ajax programming in many of the prior examples? Actually, what we've been do-
ing is fancy JavaScript programming involving HTML, CSS and the DOM. As dened by the
coiner of the term Ajax Jesse James Garrett ( />chives/000385.php), several other requisite technologies are needed to complete the picture: XML,
XSLT, and the XMLHttpRequest object. With the additional technologies thrown into the mix, we're
able to harness the true power of this programming technique, which involves being able to commu-
nicate with the Web server in order to retrieve and even update data found or submitted through the
existing web page, without having to reload the entire page!
By now you've seen the power of Ajax in action countless times using popular websites such as
Facebook, Gmail, and Yahoo!, so I don't think I need to belabor the advantages of this feature. At the
same time, it's doubtful an in-depth discussion regarding how all of these technologies work together
is even practical, particularly because we can take advantage of them without having to understand
what's under the covers, much in the same way we can use for example the Zend_Db component
without being privy to the gory implementational details. The facility in which we can implement
Ajax-driven features can be attributed to the many JavaScript frameworks which were borne out of
developers' need to do so quickly and efciently. In this step I'll introduce you to two of my favorite
such solutions, namely Prototype and Script.aculo.us, along the way demonstrating several useful
examples.
NOTE. The Zend Framework team has already adopted an ofcial Ajax toolkit known as Dojo
( However this move was primarily made to provide those users
not interested in evaluating the various existing solutions with one which will integrate well with
the Zend Framework ( />Partnership-Announcement). This does not however prevent you from adopting any other of the
existing solutions! In fact, one of the reasons I decided to discuss Prototype and Script.aculo.us
rather than Dojo was precisely to show you just how easy it is to adopt another solution.
Introducing Prototype
Prototype ( is a particularly powerful JavaScript framework of-
fering a wide array of tools capable of interacting with the DOM, performing Ajax tasks, and much,
much more. It also greatly streamlines the amount of code required to perform various tasks. For
instance earlier in this chapter we used the following command to retrieve the contents of an element
having the ID of message:
message = document.getElementById("message").innerHTML;
Using Prototype, you can retrieve the same data using the following command:
Download at Boykma.Com
255CHAPTER 11 • ENHANCING THE USER INTERFACE WITH AJAX
message = $('message').getValue();
This interesting behavior extends in a variety of fascinating ways. For example, suppose you wanted
to hide a particular div element when the user clicks upon it, a feature which might be useful for
displaying a news ash on the home page. Once read, the user can click on the news ash to make
it disappear. To create this feature, all you need to do is tie the div's event handler to the following
function:
function hideNewsFlash()
{
$('message').hide();
}
Now that's easy!
Prototype also supports another great shortcut for interacting with form elds. Just as
$() is useful for
retrieving elements by their ID, you can use $F() to return the values of form input elements (you can
also use $() to retrieve form input elements, but using $F() helps to further clarify the coder's intent).
For example, suppose you wanted to use Prototype to validate an e-mail address prior to submitting
the form. If this e-mail address eld's ID is email, you can retrieve it with the following function:
$F('email');
Later in the section we'll build full-blown validation and Ajax-driven examples using Prototype. But
you'll need to integrate Prototype into your Zend Framework-powered website, which we'll do rst.
VIDEO: Introducing Prototype
Want to implement complex Ajax features but hate JavaScript? The Prototype framework abstracts
many of these features, leaving you to focus solely upon creating a great website rather than dealing
with frustrating JavaScript syntax. This video introduces several of Prototype's key features. Watch
the video at
/>
Installing Prototype
To download Prototype, head over to and right click on the lat-
est version, saving the le to your Zend Framework-powered website's
/public/javascript/ direc-
tory. Because all of Prototype's code is found within a single le, the download link points directly to
the raw JavaScript le (
.js extension) rather than the typical zip le found with other downloads.
Once the
prototype.js le is in place, to begin using Prototype within the Zend Framework, all you
need to do is add the following line to your layout.phtml le:
<script type="text/javascript" src="/javascript/prototype.js"></script>
Determining Whether a Registrant's User Name is Already Taken
Popular online services such as Twitter require users to create a unique user name, ensuring each user
Download at Boykma.Com