Easy PHP Websites with the Zend Framework (phần 7) pdf
Bạn đang xem bản rút gọn của tài liệu. Xem và tải ngay bản đầy đủ của tài liệu tại đây (2.65 MB, 42 trang )
281CHAPTER 12 • EXTEND YOUR WEBSITE WITH RSS AND FACEBOOK
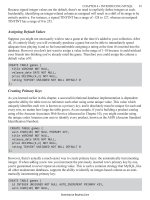
Figure 12-7. Adding GameNomad's Video Games Tab to a Facebook Prole
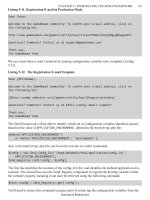
Conguring the Facebook Application to Support a Tab
In the interests of reducing redundant code, we're going to reuse the Facebook Controller's prole
view which comprises the tools we gave to the logged-in user. To do this, just set the Prole Tab
URL value (Figure 12-8) within the application settings to />games. Next, set the Prole Tab Name value to Video Games.
Figure 12-8. Conguring the tab URL and name in the application settings
Disabling the Authorization Requirement for Tab View
Because any Facebook friend could conceivably view the Video Games tab, we need to gure out
how to disable authorization when any user is viewing the Facebook controller's games method. To
do this, we'll need to rst modify the Facebook Controller's init() method to forego authorization
of the user when in tabbed mode. Doing so is surprisingly easy, because the Facebook platform will
automatically set the $_POST['fb_sig_in_prole_tab'] variable should a tab page be requested.
Therefore all you have to do to forego authorization is check that variable. If not set, perform the
authorization:
$this->view->onTab = isset($_POST['fb_sig_in_prole_tab']);
if (! $this->view->onTab) {
$this->facebook->require_login();
}
Rather than just create a local variable, the $onTab variable was set in the view context in order to
later be able to reference it within the Facebook controller's games view. I use the variable to display
a special message introducing GameNomad and inviting users to join, as well as hide the logged-in
user's tool navigation menu.
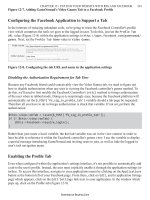
Enabling the Prole Tab
Even when congured within the application's settings interface, it's not possible to automatically add
a tab to the user's prole. Instead, the user must explicitly enable it through the application settings in-
terface. To access this interface, navigate to your applications menu by clicking on the Applications
button at the bottom left of your Facebook page. From there, click on Edit, and in application listings
page which appears, click on the Edit Settings link next to your application. In the window which
pops up, click on the Prole tab (Figure 12-9).
Download at Boykma.Com
282 CHAPTER 12 • EXTEND YOUR WEBSITE WITH RSS AND FACEBOOK
Figure 12-9. Tab addition authorization takes place in the application settings interface
Within this tab the user will rst need to rst specify the tab should be added to your prole page, and
in the Privacy drop-down, he can set an appropriate visibility level, specifying the Video Games tab
be visible to on the user, only select users (Custom), only friends, all friends and their friends, or all
of the user's networks and friends. Once added, the tab and its contents will be immediately visible to
the allowed parties.
Incidentally, when creating the application, it's useful to set the
Privacy setting to Custom, and select
from your friends a list of fellow developers and other friends interested in testing the application.
This way you can safely test the prole tab and its contents without opening up the application to oth-
ers before it's complete.
Step #7. Sending a Facebook User Notication
It might be useful to send notications to a user's Facebook friends who are also members of
GameNomad whenever the user performs some sort of newsworthy action, such as adding a new
game to his collection. An example of such a notication is shown in Figure 12-10.
Figure 12-10. Notifying a user of a friend's game collection addition
To send these notications, call the Facebook client's
notications_send() method. For instance,
the following call will send a notication about a new addition to Scott's game collection to my Face-
book account:
$this->facebook->api_client->notications_send('501632489',
'Scott added Call of Duty: World at War (Xbox 360) to his collection',
'user_to_user');
To incorporate this feature, all you need to do is add the method call at the appropriate location.
Download at Boykma.Com
283CHAPTER 12 • EXTEND YOUR WEBSITE WITH RSS AND FACEBOOK
Of course, sending out too many notications could turn this informative feature into an annoying
one, so consider reserving this feature for only the most important of updates. Facebook makes it
possible for users to disable notications altogether for a specic application through the notications
manager, and in cases of perceived abuse of the system, can identify an application as a spammer.
Step #8. Adding Facebook Status Updates
One of Facebook's killer features is the status update, used to let friends know what's currently going
on in your life. These days, there seems to be no more effective way to keep tabs on what avored
coffees your network is drinking, or whose children are currently suffering a bout of pinkeye. Face-
book's status update feature can serve somewhat more practical purposes though, such as letting your
network know about a new game you're currently playing.
Granting Permissions
Because posting an update on a user's behalf has such visible repercussions, the user must explicitly
grant GameNomad permission to perform this task. GameNomad does this via the Facebook control-
ler's privacy method, but what's so convenient about Facebook permissions is that we don't have to
bother with managing the permissions because Facebook will manage them for us. In fact, using a
bit of FBML, we can dynamically include a link prompting the user to grant GameNomad permis-
sion to post status updates. What's particularly nice about using FBML is that if the user has already
granted permission, Facebook will automatically override rendering the FBML! What's more, using a
Facebook client call, you can determine whether the user has already granted the permission, and if so
display a message explaining how to disable the permission. The following listing demonstrates these
concepts:
01 <?php
02 if (! $this->facebook->api_client->users_hasAppPermission('status_update')) {
03 ?>
04
05 <p>
06 You've granted permission to GameNomad to post status updates on your behalf.
07 To remove this permission, navigate to your GameNomad
08 <a href=' settings</a>.
09 </p>
10
11 <?php } ?>
12
13 <fb:prompt-permission perms="status_update">
14 Grant permission for status updates
15 </fb:prompt-permission>
A breakdown of the above listing follows:
• Line 02 determines whether the user has already granted the application permission to per-
form status updates on the user's behalf. This is just one of several available permissions;
Download at Boykma.Com
284 CHAPTER 12 • EXTEND YOUR WEBSITE WITH RSS AND FACEBOOK
check the Facebook documentation for more information. If the user has granted permission,
lines 05-09 are output. Note this method doesn't exist in the ofcial client! Later in this sec-
tion I'll show you how to add it to the class.
• Lines 13-15 display a link prompting the user to grant permission to GameNomad to perform
status updates. If the user has already granted this permission, Facebook will conveniently
forego displaying the link altogether!
When the user decides to enable updates, he'll be greeted with a prompt asking him to conrm this
request (Figure 12-11).
Figure 12-11. Enabling Status Updates
If the user does later decide to disable status updates, he'll have to navigate to
and edit GameNomad's settings. The application's set-
tings window will appear (Figure 12-12). From there, he can click the Additional Permissions tab, and
disable status updates.
Figure 12-12. Disabling Status Updates
Publishing Status Updates
Oddly, the Facebook PHP client does not currently support the ability to post status updates. How-
ever, modifying the client to support this ability is easy! Open up the facebookapi_php5_restlib.
php
le residing in the Facebook client directory, and add the following two methods at an appropri-
ate location.
/**
* Sets a user's Facebook status
*
* @param string $status The status update to post
* @param boolean $clear Clear an existing message matching $status
Download at Boykma.Com
285CHAPTER 12 • EXTEND YOUR WEBSITE WITH RSS AND FACEBOOK
* @return boolean
*/
public function users_setStatus($status,$clear)
{
return $this->call_method('facebook.users.setStatus',
array('status' => $status,'clear' => $clear));
}
/**
* Determines whether a user has granted a particular Facebook permission
*
* @param string $permission The permission in question
* @return boolean
*/
public function users_hasAppPermission($permission)
{
return $this->call_method('facebook.users.hasAppPermission',
array('ext_perm' => $permission));
}
The code comments should be sufce to explain the purpose of each new method. So how do you
subsequently send an update to the user's Facebook prole? The following example shows how:
if (! $this->facebook->api_client->users_hasAppPermission('status_update')) {
$this->facebook->api_client->users_setStatus('added Halo 3 to his game
collection.', FALSE);
}
Step #9. Deploying Your Facebook Application
You've thoroughly tested your new application, braced your Web server for the onslaught of new
users, and told your family they won't be seeing you for a few days. It must be application launch
time! Launching your Facebook application is a very easy process; just navigate to http://www.
facebook.com/developers/, choose the application you'd like to launch under the "My Applica-
tion" section, and click the submit button! Before the application is added to the Facebook directory
though, you're required to provide ve pieces of information if you haven't already done so, including
the application name, contact e-mail address, a short application description, logo, and whether the
application uses Facebook's mobile platform.
Furthermore, your application must have at least ve users before Facebook will accept it. I'd imagine
this provides at least a modicum of proof that you're serious about the application, and have recruited
friends and fellow developers to thoroughly test the project before launching it.
Once launched, it's time to get the word out! Be sure to update your Facebook status to point your
Facebook network to the new venture/feature, not to mention let your existing website community
know about the new feature. Ask your friends and colleagues to mention the application on their
respective Facebook networks. Before you know it, the users will be streaming in!
Download at Boykma.Com
286 CHAPTER 12 • EXTEND YOUR WEBSITE WITH RSS AND FACEBOOK
Conclusion
This chapter introduced RSS and the Facebook Platform, two very hot technologies which each play
a major role in connecting with your users. In fact, in terms of establishing a long term relationship
with your community, the topics discussed in this chapter may be the most important in the entire
book.
Speaking of maintaining connections, the next chapter discusses the Google Analytics trafc analysis
service, and the Google AdWords and Google AdSense advertising services. These crucial technolo-
gies which will no doubt have a signicant impact on your website's operations, both from a techno-
logical and business standpoint.
Download at Boykma.Com
CHAPTER 13
Monitor Trafc and Manage Ads with Google
Sales and marketing guru Orvel Ray Wilson famously opined, "Customers buy for their reasons, not
yours." Your challenge is to gure out what those reasons are, and then construct, communicate, and
rene a message that echoes those reasons. As applied to the web, you'll specically need to conduct
online marketing campaigns and measure the effectiveness of website content by monitoring visitor
trafc and navigation behavior. To help businesses carry out these important tasks, numerous utilities
and services have been created for helping companies effectively undertake these complex tasks.
In this chapter I'll introduce you to Google Analytics and Google AdWords, two de facto solutions for
analyzing visitor trafc and managing online advertising. I'll also show you how you can start earn-
ing revenue by publishing advertisements on your own website using the popular Google AdSense
advertising service.
Chapter Steps
The goals of this chapter are accomplished in three steps:
• Step #1. Monitoring Trafc with Google Analytics: In this opening step you'll learn how to
analyze website trafc using the powerful Google Analytics package.
• Step #2. Advertising with Google AdWords: You'll eventually want to begin spreading the
word about your website in an effort to increase trafc. One of the most effective ways for
doing so is by advertising online through the Google AdWords network, and in this step you'll
learn all about it.
• Step #3: Earn Money Using Google AdSense: Google's AdSense service offers a simple and
effective solution for publishing ads on your website, and in this step you'll learn how.
Step #1: Monitoring Trafc with Google Analytics
The philosopher George Santayana once observed, "Those who cannot remember the past are con-
demned to repeat it." The same reasoning applies to your website trafc; if you are unable to monitor
and analyze the successes and failures of your website content, how can you plan for the future?
For instance, if you launch a new website feature such as a downloadable PDF newsletter, you'll logi-
cally want to actively monitor visitors' interest in the newsletter, most notably by tracking the number
of times it's downloaded. However, even this raw number is limited in utility. Wouldn't it be fantastic
to know what parts of the world these visitors hailed from, even broken down to the state and city?
How about what languages they speak? The number of times these visitors return over a dened time
range? Using Google's trafc analysis service, known as Google Analytics, you can do all of this and
much, much, more. Once congured, you'll have one of the most powerful trafc analysis solutions in
the world at your ngertips, capable of quantifying nearly every measurable aspect of your user traf-
c. For instance, using Google Analytics you can track:
Download at Boykma.Com
288 CHAPTER 13 • MONITOR TRAFFIC AND MANAGE ADS WITH GOOGLE
• Overall trafc trends: Keep tabs on the total number of visitors, page views, pages navi-
gated per visit, and average time visiting the site according to numerous temporal ranges,
including all-time, per-month, per-week, and per-day basis.
• Visitor locales: Know where your visitors are coming from by sifting through trafc records
according to content, country, continental regions, U.S. states, and cities. Analytics will also
examine the users' browser character encoding to determine their preferred language. See
Figure 13-1 for a screenshot of a website's recent trafc broken down according to city.
• Visitor technical proles: Visitors are segmented by technical characteristics such as brows-
er type, screen resolution, connection speed, operating system, and whether their computer
supports Java and Flash.
• Visitor loyalty trends: Learn about rst time and returning visitors, the length of visitation,
and the number of pages visited.
• Trafc sources: Identify the origin of your trafc by monitoring search keywords resulting in
visitation, as well as top referrers. See Figure 13-2 for a screenshot.
• Content popularity: Know what content works and what doesn't by monitoring the visitation
frequency of every page on your site.
NOTE. Google Analytics can tie into another popular Google service, Google AdWords. By tak-
ing advantage of this possibility, you can measure the effectiveness of your advertising campaigns
taking place over the Web, print, radio, and television. You can also congure and monitor sophisti-
cated conversion goals, determining whether and how often a visitor completes a specic task such
as making a purchase or downloading a le.
Figure 13-1. Identifying your visitors' locations by city
Download at Boykma.Com
289CHAPTER 13 • MONITOR TRAFFIC AND MANAGE ADS WITH GOOGLE
Figure 13-2. Understanding Inbound Trafc Sources
Although Analytics' features are so vast that an entire book could be written on the topic, this section
should provide you with enough information to not only convince you of the solution's merits, but
also help you to quickly begin exploiting several of Analytics' compelling options.
VIDEO. A Tour of Google Analytics
After all the time you put into building a great website, you're going to want to effectively monitor
important matters such as site trafc and user demographics. There's perhaps no better available tool
to do so than Google Analytics. This video introduces this fantastic service, showing you how to
plug it into your website in just minutes, and guiding you through its key features. Watch the video
at />Conguring Google Analytics
Beyond the valuable features, one reason for Google Analytics enormous popularity is the incredibly
easy installation process. In this section I'll show you how to integrate Analytics into your website in
mere minutes.
Creating a Google Account
Google requires you to create an account before using many of its services, Google Analytics includ-
ed. If you don't yet have an account, navigate to
to create one. You'll have to conrm your e-mail address by clicking on a conrmation link sent to
you following registration, so be sure to provide a valid address. Once your account has been created
and conrmed, proceed to the next section.
Adding Your Website to Google Analytics
To begin monitoring your website trafc with Google Analytics, head over to gle.
Download at Boykma.Com
290 CHAPTER 13 • MONITOR TRAFFIC AND MANAGE ADS WITH GOOGLE
com/analytics/ and login with your Google account. Once logged in, you'll be prompted to create
a new Google Analytics account by providing key information such as your website's URL, a desired
account name, your name, country, and time zone. Finally, you'll be prompted to read and accept the
terms of service, before being presented with a block of JavaScript code. This code is what Google
uses to track and analyze user trafc, and so must be present on every page of your website!
Of course, the easy solution is to just paste the code into your website's
layout.phtml le. I tend to
place the code right before the closing HTML tag, like so:
<script type="text/javascript">
var gaJsHost = (("https:" == document.location.protocol) ? "https://ssl." :
"http://www.");
document.write(unescape("%3Cscript src='" + gaJsHost +
"google-analytics.com/ga.js' type='text/javascript'%3E%3C/script%3E"));
</script>
<script type="text/javascript">
try {
var pageTracker = _gat._getTracker("UA-XXXXXXX-X");
pageTracker._trackPageview();
} catch(err) {}
</script>
</body>
</html>
Once inserted, it will take up to 24 hours before data collection will begin, so don't fret if your reports
are initially blank. If you're copying directly from the book, be sure to replace the
UA-XXXXXXX-X with
your unique analytics code.
Using Google Analytics
The Google Analytics' interface is very user-friendly, and frankly you're going to quickly become
procient simply by logging in and playing around with the service. There are however a few features
which you'll probably want to begin exploiting immediately, yet how to do so might not initially be so
obvious. In this section I'll introduce several of these features, and show you how to implement each.
Granting Access to Your Colleagues
Particularly when working in a team environment, you're probably not going to be the only one wish-
ing to view the Analytics data. You can give other users access to the service in just a few steps:
1. Login to Analytics
2. Choose the desired account by clicking on its name within the Accounts table.
3. Click the
User Manager link, located at the bottom of the page.
Download at Boykma.Com
291CHAPTER 13 • MONITOR TRAFFIC AND MANAGE ADS WITH GOOGLE
4. Click the User Manager link at the bottom of the page. On the page that appears, click the
Add User link located at the top right of the Existing Access table.
5. Insert the user's e-mail address, and select view-only or administrator access. This e-mail ad-
dress must be tied to a Google account.
6. Grant the user access to the desired website proles by highlighting their names and clicking
the
Add button. If you've identied the user as an account administrator, he will be automati-
cally granted administrator access to all reports in this account.
7. Click the
Save Changes button
Next, direct the user to
where he can login and begin access-
ing the reports in accordance with the level of privilege granted by you.
Exporting Reports
Analytics supports exporting the data found on any page using a variety of formats, including PDF,
XML, CSV (comma-separated values), and TSV (tab-separated values). These alternative formats are
useful if you'd like to pass the data to your own custom reporting programs for further processing.
To export a page's data, click on the ubiquitous
Export button located at the top of each page, and
choose the appropriate format, as shown in Figure 13-3.
Figure 13-3. Selecting an export format
Once the data has been exported, your browser's download prompt will appear. From here you can
choose to open or save the le.
Emailing Reports
If you're dealing with the pointy-headed boss, chances are you're going to e-mail an exported report.
Analytics takes this inevitability into account by providing you with a mechanism for e-mailing an
exported le directly from the website. To e-mail an exported le, click the ubiquitous E-mail button
located at the top of each page, and complete the form (shown in Figure 13-4).
Download at Boykma.Com
292 CHAPTER 13 • MONITOR TRAFFIC AND MANAGE ADS WITH GOOGLE
Figure 13-4. Emailing an exported le
You can also schedule reports to be emailed on a daily, weekly, monthly or quarterly basis. To do so,
click the aforementioned
Email button to retrieve the e-mail interface. From there, click the Sched-
ule tab located at the top of the interface. Complete the form (shown in Figure 13-5) and press the
Schedule button to schedule the e-mail.
Figure 13-5. Scheduling an e-mail for weekly delivery
Download at Boykma.Com
293CHAPTER 13 • MONITOR TRAFFIC AND MANAGE ADS WITH GOOGLE
Blocking Your IP Address
Because you'll logically regularly peruse your own website to ensure everything is working properly,
surng with such frequency could skew Analytics' trafc analysis. I recommend ltering your IP or
ofce's IP range from the results. To do so, follow these instructions:
1. Login to Analytics
2. Choose the desired account by clicking on its name within the Accounts table.
3. Click the
Filter Manager link, located at the bottom right of the page
4. Click the
Add Filter link
5. Create a lter name (for instance "Jason Home IP Address") and set the lter type to "Exclude
all trafc from an IP address". Insert your external IP address, and then specify which web-
sites should heed the lter.
NOTE. These days you'll rarely be operating a computer having a direct connection to the Inter-
net, meaning your computer will likely be assigned an IP address belonging to an internal network,
such as 192.168.1.101. You can however easily determine your external IP address by navigating to
.
Tracking Download Frequencies
Suppose your marketing team created a downloadable brochure highlighting a new array of products.
By default Analytics doesn't track downloads, but can do so with a simple modication to the down-
loadable le's hyperlink. This modication involves creating a custom pageview title which Google
will use as the placeholder for monitoring trafc to that download. For instance, suppose the brochure
was titled whizbang.pdf and located at To begin
tracking the download frequency, you would modify the PDF download link to look like this:
<a href="/les/whizbang.pdf"
onClick="javascript:pageTracker._trackPageview('/downloads/whizbang')"; />
Of course, the Analytics tracking code must also be present on this page.
Tracking Outbound Clicks
Many websites partner with others in a collaborative effort to build trafc by trading links. You can
track the frequency in which visitors access these links by modifying the URL to include a custom
pageview title, using the same syntax as that found in the previous section. For instance, to track the
number of users navigating to the outgoing link you would modify
that hyperlink like so:
<a href="
onClick="javascript:pageTracker._trackPageView('/outgoing/wjgilmore.com')"; />
Download at Boykma.Com
294 CHAPTER 13 • MONITOR TRAFFIC AND MANAGE ADS WITH GOOGLE
Be sure the Analytics tracking code is also present on this page so the _trackPageView method can
be called.
Step #2. Advertising with Google AdWords
The constant prodding of family members, friends and colleagues to let others know about your web-
site has been pretty effective, and using Google Analytics you're watching the trafc grow by the day.
However, given your boundless ambition, you won't be satised until your website ranks among the
most popular in the world. To obtain such lofty heights, you'll need to reach beyond your inner circle
and target a larger potential audience.
One of the most effective ways to do this is through online advertising, and there's no greater online
advertising solution than Google AdWords. Launched in 2000, Google AdWords has since become
the largest online advertising network in the world, and is responsible for the lion's share of Google's
revenue. Its success is due to the solution's tremendous power, exibility, and cost-effectiveness, of-
fering features such as:
• Powerful campaign management: Whether you're interested in using AdWords to advertise
a single product or service, or want to create a complex promotional campaign involving ban-
ner variations, keyword lters, and regional targeting, AdWords offers the tools required to
effectively create and manage a successful campaign.
• Cost controls: Newcomers to online advertising are often wary of advertising expenses,
wondering how much it costs to display an ad, and whether it costs more if the advertisement
is clicked. AdWords removes such concerns by allowing the advertiser to specify a maximum
desired cost-per-click, with willingness to pay a higher fee for the click playing a factor in the
ad's position. Advertisers can also set a maximum daily budget which when reached will halt
the campaign until the start of the next day.
• Advanced reporting solutions: Rather than login to the AdWords site and sift through the
lengthy benchmarking data, you can create reports highlighting the performance of cam-
paigns, keywords, search queries, and demographics. You can also arrange for these reports to
be e-mailed to one or several recipients attached as a CSV, HTML, TSV, or XML document.
• Multiple online advertising formats: AdWords supports a variety of advertising formats,
including the default text-, image- , and video-based ads.
• Localized Placement: If your goal is to drive individuals to a physical business location,
you can take advantage of AdWords' local business ad placement service. This feature places
your ad on Google Maps when appropriate, and will also display your ad when users perform
context- and location-specic searches, or when Google identies the user's originating IP
address as being closely situated to your business address.
• Regional and Language-specic Placement: While certain international organizations wish
to seek a worldwide following through online advertising, AdWords recognizes the desire
for many advertisers to limit advertising to select regions or languages. In addition to giving
advertisers the ability to limit their campaign to one or several of 40 supported languages, it's
Download at Boykma.Com
295CHAPTER 13 • MONITOR TRAFFIC AND MANAGE ADS WITH GOOGLE
also possible to constrain the display of advertisements to users hailing from certain conti-
nents, countries, states, cities, and even zip codes. It's even possible specify a certain radius
limitation surrounding a particular location.
• Multiple advertising venues: Although AdWords was originally created as an online
advertising-specic network, Google has since expanded the program to support radio and
television advertising. For instance, Google Audio Ads program makes it possible for you to
advertise on over 1,600 FM and AM radio stations around the country.
In this step I'll show you how to get started with Google AdWords, introducing you to the program's
key features and showing you how to tie AdWords into your Google Analytics account in order to bet-
ter gauge an ad's effectiveness.
Creating an AdWords Account
Creating an AdWords account is free; payment is only due after your advertising campaign has
launched, and visitors begin clicking on your advertisements. Before you can begin using the service
however, you'll need to create an account. Begin by heading over to
and clicking on the Start now button. Next you'll be prompted to choose from one of two AdWords
programs:
• Starter Edition: The Starter Edition is geared towards advertisers interested in promoting
a single item or service. Chances are you'll want to choose this edition, as it offers the easi-
est path for getting started. This version does however only offer text-based ads, whereas the
Standard Edition offers numerous advertising formats. You can always upgrade to the Stan-
dard Edition as your advertising requirements grow in size and complexity. The information
provided throughout the remainder of this step is based on the presumption you've chosen this
edition.
• Standard Edition: The Standard Edition is ideal for more experienced advertisers interested
in promoting multiple products or services and wishing to manage potentially multiple adver-
tising initiatives. Among other features not available through the Starter Edition, the Standard
Edition gives you the ability to identify specic websites for ad placement.
Once you've chosen a program, you'll next be optionally prompted to provide your country and phone
number. If your business is already listed in the Google business directory (
gle.
com/local/add), Google will use the information to cut down on the amount of information you'd
otherwise need to redundantly provide when completing the AdWords registration process.
In the next step you'll start creating the rst advertisement! You'll be asked to provide several key
pieces of information, such as the location of your customers, and the advertisement's language. This
information is important because it will help Google to determine who will see the advertisement. For
instance, if your organization sells athletics memorabilia for teams based in the state of Ohio, Google
will not show your advertisements to individuals residing in Europe, provided you identify your cus-
tomer base as residing in Ohio.
You'll also identify the URL your advertisement will link to, the advertisement's headline and corre-
sponding message, and the context keywords which will cause your advertisement to appear with the
Download at Boykma.Com
296 CHAPTER 13 • MONITOR TRAFFIC AND MANAGE ADS WITH GOOGLE
Google advertising network. The wizard will automatically render an example of what the text-based
advertisement will look like, as depicted in Figure 13-6.
Figure 13-6. Creating your advertisement text is easy using the wizard
To complete this step, you'll be prompted to identify the currency you'll use to pay for the advertising,
and your monthly advertising budget. You can set this to whatever monetary value monetary value
you'd like, and change the value later as your budget uctuates.
Finally you'll need to setup an account tied to this advertisement. You'll be prompted to either sign
into your existing Google account, or identify a new e-mail address and password for logging into
this account. For reasons of convenience I suggest using the same account you used for the Analytics
account.
Activating Your Account
Once you've created the account, Google will send a verication e-mail to the address you've pro-
vided. If you created a new account, you'll need to click on a URL provided in the e-mail to activate
the account. If the account already existed prior to registering for AdWords, you'll just need to login
by navigating to In either case, you'll be transported you back to
the Google AdWords website where you'll complete the registration process by providing your billing
information. In these nal steps you'll be prompted to determine whether you'd like to prepay or post-
pay for the advertising. I suggest the latter option, using a credit card or direct debit to be debited the
cost of your advertising on a 30-day billing cycle. Regardless of which payment option you choose,
Google will charge you a one-time $5 setup fee once the activation process is complete.
Next you'll be prompted to agree to Google's Advertising Program Terms. Take some time to read this
document, and if acceptable, click the appropriate radio button to signify your agreement and click
the
Continue button to continue.
Finally, you'll be prompted to provide your billing information. This information will vary slightly
based on the payment format, however presuming you chose a credit card you'll be prompted to
Download at Boykma.Com
297CHAPTER 13 • MONITOR TRAFFIC AND MANAGE ADS WITH GOOGLE
identify the credit card type, number, verication code, card holder's name, and expiration date. You'll
also need to provide the billing address, and answer a few optional questions regarding the purpose of
your advertising. Once completed, click the
Save and Activate button, at which point your adver-
tising campaign will immediately begin!
Managing Your Campaign
The Google AdWords campaign manager provides you with a powerful set of tools for monitoring the
campaign performance on a per-keyword basis, and tallying the total costs accrued during the current
billing period. The main interface for managing a campaign is shown in Figure 13-7. I've annotated
this screenshot with numbered callouts to key elements you'll want to understand. Following the
screenshot I've summarized these callouts.
Figure 13-7. Monitoring keyword efciency of a new campaign
There are six callouts to key features of this manager interface, each of which is explained here:
• Callout #1. The advertisement: This callout identies the advertisement exactly as it ap-
pears to users perusing the Google content network. Be sure to periodically review your ad
to ensure there are no spelling errors or other misstatements. To edit the advertisement's URL
destination, or edit the ad title or text, click the
Edit button located below the advertisement.
If you click on the
Create another ad link, you'll be prompted to do one of two things: cre-
ate a variation of the existing ad, which will run in accordance with the existing set of key-
words, or create an entirely new ad intended to promote another product. If you choose the
latter, you'll need to upgrade to Standard Edition, which is free to do but comes at the cost of
a slightly steeper learning curve.
• Callout #2. The toggle switch: You can pause and resume your campaign by clicking the
context-sensitive link located here. As you can see, this campaign is currently paused. To
resume it, just click the link, at which point Google AdWords will immediately begin serving
the ad anew.
Download at Boykma.Com
298 CHAPTER 13 • MONITOR TRAFFIC AND MANAGE ADS WITH GOOGLE
• Callout #3. Campaign settings: Although oddly placed next to the campaign budget speci-
cation, clicking the Edit settings link will actually take you to a page controlling not only
budgetary matters, but also the specied native language and location of the users who will
view the advertisement. I'll talk more about how to make the most of your budget later in this
section.
• Callout #4. The campaign keywords: The beauty of Google's AdWords program is that
advertisements are served in context-specic settings, not only in accordance with predened
language and location constraints, but also with the content being currently viewed by the
consumer. Logically, if the advertisements are somehow related to the material currently be-
ing viewed by the consumer, it's more likely the consumer will be interested and investigate
the advertisement. As an advertiser, you can use this interface to monitor and manage those
keywords which dene the context. From here you can add and delete keywords, learn more
about each keyword's efcacy by comparing the number of triggered impressions to the num-
ber of clicks, and monitor the total cost incurred due to using these keywords for the specied
period.
• Callout #5. The date range: You can change the range of dates used to summarize keyword
efcacy and cost by clicking on the
change link next to the date.
• Callout #6. The content network: By default your advertisement will not only appear as ap-
propriate within the ubiquitous vertical column located to the right of Google search results,
but also within relevant sites comprising Google's enormous content network, including AOL,
Ask.com, Netscape Netcenter, The Food Network, About.com, and thousands of other web-
sites run by users taking part in the Google AdSense program (discussed in Step #3). You can
force AdWords to exclusively show your advertisement within searches executed on Google.
com by turning the content network off here.
Tweaking the Budget
When using the Starter Edition, Google AdWords helps new users control costs by promising to never
exceed the budget you identied when setting up the AdWords account. You can change this maxi-
mum monthly expenditure by clicking on the
Edit settings link identied by callout #3 of Figure
13-7. Using a feature known as the Budget Optimizer, Google AdWords will autonomously manage
your cost-per-click in an attempt to achieve the maximum number of clicks possible within the con-
straints of your pre-dened monthly budget.
You can however play a more active role in your cost-per-click exposure by clicking on the
Edit
settings
link, disabling the Budget Optimizer, and setting a maximum cost-per-click value in its
place. You might want to do so in an attempt to ensure you have submitted the highest-possible bid
for a keyword, thereby solidifying your advertisement's position at the top of the ads competing for
space, and subsequently increasing the likelihood it will be clicked by an interested user. What's
particularly nice about this feature is that you will not always pay the maximum specied value with
each click. Instead, Google AdWords will determine the amount of the second highest bid, and adjust
your bid to just $0.01 above that bid! Regardless, before disabling the Budget Optimizer, I suggest
taking some time to learn more about the nuances of keyword advertising and the Google AdWords
network.
Download at Boykma.Com
299CHAPTER 13 • MONITOR TRAFFIC AND MANAGE ADS WITH GOOGLE
If you nd this idea of tweaking the cost-per-click intriguing, I suggest upgrading to the Standard
Edition as it offers far more powerful tools for managing per-click expenses than are available with
the Starter Edition. Among other things you can set per-click bids for each keyword, thereby wielding
total control over the conditions under which your advertisement will be served.
Tying Google AdWords to Your Google Analytics Account
The Google Analytics and Google AdWords services each offer tremendously powerful solutions
for analyzing website trafc and managing online advertising campaigns, respectively. However, the
Google team has taken great pains to ensure these services can be used together to produce a truly
compelling service which helps you to maximize all of your online efforts. By integrating AdWords
into your Analytics account, you'll be able to closely monitor the demographics and behavior of users
who visited your website by way of an ad campaign.
Conguration Prerequisites
In order to link your Google AdWords and Google Analytics accounts, you'll need to rst upgrade
your AdWords account to the standard edition if you haven't already done so. Doing so is easy; just
login to your AdWords account and click on the
Graduate to Standard Edition link located at the
bottom left-hand corner of the page. Doing so doesn't delete any of the advertisements or analytical
data collected thus far; migrating just grants you several additional capabilities, among them the abil-
ity to link AdWords data to the Analytics platform.
If you want to link your AdWords to an existing Analytics account, you'll also have either used the
same Google account for both services, or have added your AdWords account to the Analytics ac-
count as an administrator. I showed you how to add an administrator account in Step #1, in the section
"Granting Access to Your Colleagues".
Once you've upgraded to the Standard Edition, click on the
Analytics tab located at the top of the
page. From here you'll be able to create a new Google Analytics account if you don't already have
one, or specify you've already created the account and would like to link to it. Presuming the latter,
you'll next be prompted to identify the Analytics account you'd like to link to, and also optionally en-
able two options:
• Destination URL Auto-tagging: Enabling this feature (the default) will cause AdWords to
automatically append a unique ID to each advertisement's destination URL, helping you to
more effectively analyze the efcacy of the advertisement. Alternatively you can choose to
specify custom tracking parameters by disabling this feature and appending the necessary
data to the advertisement's destination URL. I suggest leaving this option enabled unless you
have specic needs regarding URL formatting.
• Apply Cost Data: Enabling this feature (the default) will also integrate your AdWords cost
data into Analytics, helping you to further understand the cost-efciency of each campaign. I
suggest leaving this option enabled.
Once enabled, you'll be able to begin tracking all sorts of useful information regarding your AdWords
campaigns, a process made even more streamlined because the Analytics interface is now integrated
Download at Boykma.Com
300 CHAPTER 13 • MONITOR TRAFFIC AND MANAGE ADS WITH GOOGLE
directly into your AdWords interface. Navigate to your website's AdWords analytical overview by
clicking on the Trafc Sources tab located on the left-hand menu, then on the AdWords submenu, as
shown in Figure 13-8.
Figure 13-8. You'll nd links to AdWords data under the Trafc Sources section
Clicking on the
AdWords Campaigns menu item, you'll be able to analyze trafc originating from
your advertisements just as you would any other page using Google Analytics. A sample page of such
analysis is shown in Figure 13-9.
Figure 13-9. Monitoring campaign effectiveness is easy using Analytics
Clicking on the
Keyword Positions menu item, you'll be able to keep tabs on the clickthrough ef-
ciency of keywords according to the advertisement's position within search results pages. Among
other things, this will help you to determine whether your maximum keyword bid should be adjusted
in order to achieve the maximum possible return on investment.
Download at Boykma.Com
301CHAPTER 13 • MONITOR TRAFFIC AND MANAGE ADS WITH GOOGLE
Step #3: Earning Money with Google AdSense
Although your website's popularity continues to soar, you've yet to make a dime from it. Something
seems wrong with this picture, doesn't it? The remainder of this book seeks to change that by devoting
the remainder of this chapter to showing you how to make money through advertising, and in the next
chapter by accepting payments for products using PayPal. Turning to the former effort, in this step I'll
show you how to integrate relevant, non-intrusive advertising into your website by taking advantage
of the world's most popular advertising network, namely Google AdSense.
I'd attribute Google AdSense's meteoric rise in popularity to two key characteristics. First, it serves
only context-specic advertisements on your website, meaning your visitors are more likely to pay
attention to them. For instance, on GameNomad.com you'll nd advertisements pertaining to top-
ics such as online gaming websites, gaming hardware and consoles, and science ction. Second, the
advertisements are non-intrusive. Annoying pop-ups and auto-expanding advertisements are not al-
lowed, and you can even control which types of advertisements are published on your site (choosing
from text-based, image, link units, video, and gadgets).
Publishers are most commonly paid on a per-click basis, meaning you'll be paid every time a visitor
clicks on an advertisement. The payment rate varies, determined by the rate bid by way by a competi-
tive bidding process. Payments are issued when the AdSense user's account accrues more than $100
in unpaid earnings.
Tip. If you're operating in a particularly competitive industry, you can even use the AdSense Com-
petitive Ad Filter to prevent your competition from displaying advertisements on your website!
Joining the AdSense Program
Joining Google AdSense is free, and only takes a few minutes to do. To register, navigate to
and click the Sign up now button to begin the registration pro-
cess. You'll be required to provide the domain which will serve the advertising, along with payment
information and various reassurances such as your promise to not serve advertisements on porno-
graphic websites, nor click on the advertisements in an effort to boost your revenue share.
Once submitted, Google will review your application and follow up via e-mail with instructions. Ac-
cording to the AdSense documentation, turnaround time is typically 2-3 days, although it could take
up to a week to respond. My experience has shown a faster turnaround time of less than 24 hours.
TIP. Google will not approve applications for websites they deem to still be under construction.
Therefore be sure to apply for your AdSense account only after launching a reasonably complete
version of your website.
Adding Advertisements to Your Website
Once approved, you'll be able to login to the AdSense control panel
(
to begin managing your advertisements. AdSense currently
offers six advertising products:
Download at Boykma.Com
302 CHAPTER 13 • MONITOR TRAFFIC AND MANAGE ADS WITH GOOGLE
• AdSense for Content: The most popular of all the products, AdSense for Content allows you
to publish advertisements matching the content of your website and general interests of your
audience.
• AdSense for Search: If your website includes a search feature, you can use this product to
present advertisements matching the context of the user's search keywords.
• AdSense for Feeds: If your website offers RSS content, you can use this product to integrate
text-based advertising into the feed. This is accomplished by passing along the feed's current
URL, which Google will then use to create an ad-infused version which you'll subsequently
point future users towards. If you're using the popular FeedBurner RSS service, Google also
offers an easy way to move those feeds to Google.
• AdSense for Domains: If you're currently doing nothing with that brilliant domain name you
purchased after a night out at the bar a few months back, you can use the AdSense for Do-
mains product to publish advertisements on the domain until you nd a better use for it.
• AdSense for Video: One of AdSense's newest offerings, AdSense for Video offers advertis-
ers a cutting-edge way to communicate with consumers by way of video content. If you think
your website audience may have an afnity for video-based material, this may be an interest-
ing way to capture new revenue.
• AdSense for Mobile Content: With the evolution of popular internet-enabled phones such as
the Apple iPhone, and Google G1, chances are you'll soon be considering building a mobile
version of your website, if you aren't already doing so. AdSense for Mobile Content gives you
the opportunity to host advertising on your mobile website, using a format conducive to the
smaller screen form factors and lower bandwidth requirements.
While I invite you to investigate the latter ve options, the remainder of this chapter focuses on what
is generally the most popular of the bunch: AdSense for Content. Click the AdSense for Content link
to begin the process of integrating ads into your website.
Google's AdSense for Content feature allows you to choose from one of two advertising units: Ads
or Links. Ad units (Figure 13-10) comprise the text- and image-based ads you've surely grown ac-
customed to seeing while navigating the Web, whereas Link units (Figure 13-11) are the less com-
monplace lists of relevant topics based on the page context (Figures 13-10 and 13-11 are sample ads
located at
Clicking on a
topic takes the user to a page of related advertising. Presuming you're interested in Ad units, select
the corresponding radio button and click the Continue button to proceed. You also have the option of
selecting the ad format, which defaults to text and image ads.
TIP. First introduced in Chapter 1, the Firefox Web Developer plugin (illa.
org/en-US/refox/addon/60) ranks among the most valuable utilities in any Web developer's
toolbox. Among many other features, you can use it to quickly gauge how much space is available
for publishing advertisements by clicking on the Miscellaneous option and selecting Display
Ruler. Your mouse pointer will turn into a cross-hair, which you can drag over a specic area to
determine the exact pixel space available for the advertisement.
Download at Boykma.Com
303CHAPTER 13 • MONITOR TRAFFIC AND MANAGE ADS WITH GOOGLE
Figure 13-10. Sample image-based 250x250 pixel Ad unit
Figure 13-11. Sample 160x90 pixel Link unit
After determining the space in which you'd like to place the ad, choose the most size-appropriate for-
mat by selecting it from the drop-down list, of which numerous sizes are available (see Figure 13-12).
If you'd like to customize the ad display to more closely correspond to your website's theme, use the
Colors section to modify the ad's border, title, background, text, and URL colors.
Figure 13-12. Choosing an ad format and adjusting the colors
Once you've created the desired ad format, you'll be provided with a text box containing the code
you'll need to integrate into your website. For example, here's sample code for a text-based 782x90
pixel (skyscraper) advertisement:
Download at Boykma.Com
304 CHAPTER 13 • MONITOR TRAFFIC AND MANAGE ADS WITH GOOGLE
<script type="text/javascript"><!
google_ad_client = "pub-1234567890123456";
/* 728x90, created 2/24/09 */
google_ad_slot = "6446198789";
google_ad_width = 728;
google_ad_height = 90;
// >
</script>
<script type="text/javascript"
src="
</script>
Just paste this into the desired location within your website source code, save the changes and post
the updated page to your server. You'll immediately begin serving ads with the next page reload!
Conclusion
In the end, you can write code all day, but if you're not also actively thinking about key business op-
erations such as trafc analysis, advertising, and revenue generation, chances are your project is going
to slowly die on the vine. Thankfully, the Google Analytics, AdWords, and AdSense triumvirate go a
long way towards remedying these needs with amazingly little overhead.
In the next and nal chapter, I'll introduce you to PayPal, another revenue-related solution which can
be integrated into your website in mere minutes. Using this fantastic service, you'll be able to accept
payments in return for products sold through your website!
Download at Boykma.Com
CHAPTER 14
Accepting Online Payments with PayPal
By now the project has evolved into a mature website offering with all of the bells and whistles the
typical user has come to expect. And thanks to some positive buzz generated by the media an increas-
ingly successful Google AdWords initiative, the trafc is really starting to roll in. With the website
doing so well, you've started considering expanding the growing empire into other areas, most nota-
bly e-commerce. Having long had an interest in history and writing, you've decided to publish a his-
torical guide to the battles fought throughout the video game, "Call of Duty: World at War" (http://
www.callofduty.com/). You've already written the book and printed an initial 100 copies using one
of the online self-publishing services. All that's left to do is gure out how to sell the book through
your website!
In this fourteenth chapter of the book, I'll show you how to accept payments using PayPal, an elec-
tronic payment processing service capable of managing the global transfer of funds originating from
credit cards and bank accounts. By acting as a middleman, PayPal both eliminates potential distrust
from new users that you might mishandle credit card information, while removing the need for you to
implement a full-blown e-commerce solution.
VIDEO. An Introduction to E-Commerce
Companies around the globe consider e-commerce to be the golden goose capable of ensuring per-
petual protability. But there are many moving parts which need to be assembled in order to launch
even a simple e-commerce website. This video introduces you to these parts, going into detail
regarding their respective costs, and offers insight into where to purchase for instance the cheapest
SSL certicates. We'll also review several of the most popular e-commerce solutions, discussing the
pros and cons of each. Watch the video at />Chapter Steps
The goals of this chapter are accomplished in two steps:
• Step #1. Integrating PayPal Website Payments Standard: If you're interested in selling
just one item, PayPal Checkout offers a particularly straightforward solution. In this rst step
I'll show you how to start selling in just minutes using this solution.
• Step #2. Exploring Third-Party E-Commerce Solutions: Should you desire to implement
a full-blown e-commerce solution including features such as electronic downloads, product
categories, wish lists, bundled and product offers, I recommend seeking out a full featured
third-party e-commerce solution rather than attempting to build your own. In this step we'll
survey some of the most popular solutions, namely Magento, Ubercart, and Shopify.
Step #1. Integrating PayPal Website Payments Standard
Mention the term "online store" to executives of organizations large and small, and chances are they'll
Download at Boykma.Com