Professional ASP.NET 3.5 in C# and Visual Basic Part 22 pps
Bạn đang xem bản rút gọn của tài liệu. Xem và tải ngay bản đầy đủ của tài liệu tại đây (250.38 KB, 10 trang )
Evjen c03.tex V2 - 01/28/2008 12:33pm Page 164
Chapter 3: ASP.NET Web Server Controls
C#
protected void HiddenField1_ValueChanged(object sender, EventArgs e)
{
// Handle event here
}
The
ValueChanged
event is triggered w hen the ASP.NET page is posted b ack to the server if the value
of the HiddenField server control has changed since the last time the page was drawn. If the value has
not changed, the method is never triggered. Therefore, the method is useful to act upon any changes to
the HiddenField control — such as recording a value to the database or changing a value in the user’s
profile.
FileUpload Server Control
In ASP.NET 1.0/1.1, you could upload files using the HTML FileUpload server control. This control put
an
<
input type="file"
> element on your Web page to enable the end user to upload files to the server.
To use the file, however, you had to make a couple of modifications to the page. For example, you were
required to add
enctype="multipart/form-data"
to the page’s <
form
> element.
ASP.NET 2.0 introduced a new FileUpload server control that makes the process of uploading files to
a server even simpler. When giving a page the capability to upload files, you simply include the new
<
asp:FileUpload
> control and ASP.NET takes care of the rest, including adding the
enctype
attribute
to the page’s
<
form
> element.
Uploading Files Using the FileUpload Control
After the file is uploaded to the server, you can also take hold of the uploaded file’s properties and either
display them to the end user or use these values yourself in your page’s code behind. Listing 3-34 shows
an example of using the new FileUpload control. The page contains a single FileUpload control, plus a
Button and a Label control.
Listing 3-34: Uploading files using the new FileUpload control
VB
<
%@ Page Language="VB"%
>
<
script runat="server"
>
Protected Sub Button1_Click(ByVal sender As Object, ByVal e As System.EventArgs)
If FileUpload1.HasFile Then
Try
FileUpload1.SaveAs("C:
\
Uploads
\
"&_
FileUpload1.FileName)
Label1.Text = "File name: " & _
FileUpload1.PostedFile.FileName & "
<
br
>
"&_
"File Size: " & _
FileUpload1.PostedFile.ContentLength & " kb
<
br
>
"&_
"Content type: " & _
FileUpload1.PostedFile.ContentType
164
Evjen c03.tex V2 - 01/28/2008 12:33pm Page 165
Chapter 3: ASP.NET Web Server Controls
Catch ex As Exception
Label1.Text = "ERROR: " & ex.Message.ToString()
End Try
Else
Label1.Text = "You have not specified a file."
End If
End Sub
<
/script
>
<
html xmlns=" />>
<
head runat="server"
>
<
title
>
FileUpload Server Control
<
/title
>
<
/head
>
<
body
>
<
form id="form1" runat="server"
>
<
asp:FileUpload ID="FileUpload1" runat="server" /
>
<
p
>
<
asp:Button ID="Button1" runat="server" Text="Upload"
OnClick="Button1_Click" /
><
/p
>
<
p
>
<
asp:Label ID="Label1" runat="server"
><
/asp:Label
><
/p
>
<
/form
>
<
/body
>
<
/html
>
C#
<
%@ Page Language="C#"%
>
<
script runat="server"
>
protected void Button1_Click(object sender, EventArgs e)
{
if (FileUpload1.HasFile)
try {
FileUpload1.SaveAs("C:
\\
Uploads
\\
" + FileUpload1.FileName);
Label1.Text = "File name: " +
FileUpload1.PostedFile.FileName + "
<
br
>
"+
FileUpload1.PostedFile.ContentLength + " kb
<
br
>
"+
"Content type: " +
FileUpload1.PostedFile.ContentType;
}
catch (Exception ex) {
Label1.Text = "ERROR: " + ex.Message.ToString();
}
else
{
Label1.Text = "You have not specified a file.";
}
}
<
/script
>
From this example, you can see that the entire process is rather simple. The single button on the page
initiates the upload process. The FileUpload control itself does not initiate the uploading process. You
must initiate it through another event such as
Button_Click
.
165
Evjen c03.tex V2 - 01/28/2008 12:33pm Page 166
Chapter 3: ASP.NET Web Server Controls
When compiling and running this page, you may notice a few things in the generated source code of the
page. An example of the generated source code is presented here:
<
html xmlns=" />>
<
head id="Head1"
><
title
>
FileUpload Server Control
<
/title
><
/head
>
<
body
>
<
form name="form1" method="post" action="FileUpload.aspx" id="form1"
enctype="multipart/form-data"
>
<
div
>
<
input type="hidden" name="__VIEWSTATE" id="__VIEWSTATE"
value="/wEPDwUKMTI3ODM5MzQ0Mg9kFgICAw8WAh4HZW5jdHlwZQUTbXVsdGlwYXJ0L2Zvcm
0tZGF0YWRkrSpgAFaEKed5+5/8+zKglFfVLCE=" /
>
<
/div
>
<
input type="file" name="FileUpload1" id="FileUpload1" /
>
<
p
>
<
input type="submit" name="Button1" value="Upload" id="Button1" /
><
/p
>
<
p
>
<
span id="Label1"
><
/span
><
/p
>
<
div
>
<
input type="hidden" name="__EVENTVALIDATION" id="__EVENTVALIDATION"
value="/wEWAgL1wLWICAKM54rGBqfR8MhZIDWVowox+TUvybG5Xj0y" /
>
<
/div
><
/form
>
<
/body
>
<
/html
>
The first thing to notice is that because the FileUpload control is on the page, ASP.NET 3.5 modified the
page’s
<
form
> element on your behalf by adding the appropriate
enctype
attribute. Also notice that the
FileUpload control was converted to an HTML
<
input type="file"
> element.
After the file is uploaded, the first check (done in the file’s
Button1_Click
event handler) examines
whether a file reference was actually placed within the
<
input type="file"
> element. If a file was
specified, an attempt is made to upload the referenced file to the server using the
SaveAs()
method of
the FileUpload control. That method takes a single
String
parameter, which should include the location
where you want to save the file. In the
String
parameter used in Listing 3-34, you can see that the file is
being saved to a folder called
Uploads
, which is located in the
C:
\ drive.
The
PostedFile.FileName
attribute is used to give the saved file the same name as the file it was copied
from. If you want to name the file something else, simply use the
SaveAs()
method in the following
manner:
FileUpload1.SaveAs("C:
\
Uploads
\
UploadedFile.txt")
You could also give the file a name that specifies the time it was uploaded:
FileUpload1.SaveAs("C:
\
Uploads
\
" & System.DateTime.Now.ToFileTimeUtc() & ".txt")
After the upload is successfully completed, the Label control on the page is populated with metadata of
the uploaded file. In the example, the file’s name, size, and content type are retrieved and displayed on
166
Evjen c03.tex V2 - 01/28/2008 12:33pm Page 167
Chapter 3: ASP.NET Web Server Controls
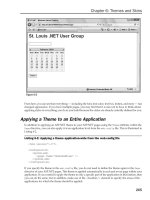
the page for the end user. When the file is uploaded to t he server, the page generated is similar to that
shown in Figure 3-37.
Figure 3-37
Uploading files to another server can be an error-prone affair. It is vital to upload files in your code using
proper exception handling. That is why the file in the example is uploaded using a
Try Catch
statement.
Giving ASP.NET Proper Permissions to Upload Files
You might receive errors when your end users upload files to your Web server through the FileUpload
control in your application. These might occur because the destination folder on the server is not writable
for the account used by ASP.NET. If ASP.NET is not enabled to write to the folder you want, you can
enable it using the folder’s properties.
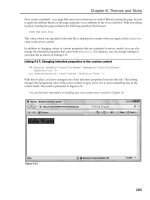
First, right-click on the folder where the ASP.NET files should be uploaded and select Properties from the
provided menu. The Properties dialog for the selected folder opens. Click the Security tab to make sure
the ASP.NET Machine Account is included in the list and has the proper permissions to write to disk. If
it is enabled, you see something similar to what is presented in Figure 3-38.
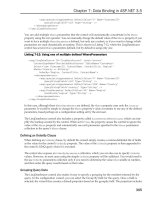
If you do not see the ASP.NET Machine Account in the list of users allowed to access the folder, add
ASP.NET by clicking the Add button and entering ASPNET (without the period) in the text area provided
(see Figure 3-39).
Click OK, and you can then click the appropriate check boxes to provide the permissions needed for your
application.
Understanding File Size Limitations
Your end users might never encounter an issue with the file upload process in your application, but you
should be aware that some limitations exist. When users work through the process of uploading files, a
size restriction is actually sent to the server for uploading. The default size limitation is 4 MB (4096 KB);
the transfer fails if a user tries to upload a file that is larger than 4096 KB.
167
Evjen c03.tex V2 - 01/28/2008 12:33pm Page 168
Chapter 3: ASP.NET Web Server Controls
Figure 3-38
Figure 3-39
A size restriction protects your application. You want to prevent malicious users from uploading numer-
ous large files to your Web server in an attempt to tie up all the available processes on the server. Such an
occurrence is called a denial of service attack. It ties up the Web server’s resources so that legitimate users
are denied responses from the server.
168
Evjen c03.tex V2 - 01/28/2008 12:33pm Page 169
Chapter 3: ASP.NET Web Server Controls
One of the great things about .NET, however, is that it usually provides a way around limitations. You
can usually change the default settings that are in place. To change the limit on the allowable upload
file size, you make some changes in either the root
web.config
file (found in the ASP.NET 2.0 config-
uration folder at
C:
\
WINDOWS
\
Microsoft.NET
\
Framework
\
v2.0.50727
\
CONFIG
) or in your application’s
web.config
file.
In the
web.config
file, you can create a node called <
httpRuntime
>. In this file, you apply the settings
so that the default allowable file size is dictated by the actual request size permitted to the Web server
(4096 KB). The
<
httpRuntime
> section of the
web.config.comments
file is shown in Listing 3-35.
Listing 3-35: Changing the file-size limitation setting in the web.config file
<
httpRuntime
executionTimeout="110"
maxRequestLength="4096"
requestLengthDiskThreshold="80"
useFullyQualifiedRedirectUrl="false"
minFreeThreads="8"
minLocalRequestFreeThreads="4"
appRequestQueueLimit="5000"
enableKernelOutputCache="true"
enableVersionHeader="true"
requireRootedSaveAsPath="true"
enable="true"
shutdownTimeout="90"
delayNotificationTimeout="5"
waitChangeNotification="0"
maxWaitChangeNotification="0"
enableHeaderChecking="true"
sendCacheControlHeader="true"
apartmentThreading="false" /
>
You can do a lot with the <
httpRuntime
> section of the
web.config
file, but two properties — the
maxRe-
questLength
and
executionTimeout
properties — are especially interesting.
The
maxRequestLength
property is the setting that dictates the size of the request made to the Web server.
When you upload files, the file is included in the request; you alter the size allowed to be uploaded by
changing the value of this property. The value presented is in kilobytes. To allow files larger than the
default of 4 MB, change the
maxRequestLength
property as follows:
maxRequestLength="11000"
This example changes the
maxRequestLength
property’s value to 11,000 KB (around 10 MB). With this set-
ting in place, your end users can upload 10 MB files to the server. When changing the
maxRequestLength
property, be aware of the setting provided for the
executionTimeout
property. This property sets the
time (in seconds) for a request to attempt to execute to the server before ASP.NET shuts down the
request (whether o r not it is finished). The default setting is
90
seconds. The end user receives a time-
out error notification in the browser if the time limit is exceeded. If you are going to permit larger
requests, remember that they take longer to execute than smaller ones. If you increase the size of the
maxRequestLength
property, you should examine whether to increase the
executionTimeout
property
as well.
169
Evjen c03.tex V2 - 01/28/2008 12:33pm Page 170
Chapter 3: ASP.NET Web Server Controls
If you are working with smaller files, it is advisable to reduce the size allotted for the request to the Web
server by decreasing the value of the
maxRequestLength
property. This helps safeguard your application
from a denial of service attack.
Making these changes in the
web.config
file applies this setting to all the applications that are on the
server. If you want to apply this only to the application you are working with, apply the
<
httpRuntime
>
node to the
web.config
file of your application, overriding any setting that is in the root
web.config
file.
Make sure this node resides between the
<
system.web
> nodes in the configuration file.
Uploading Multiple Files from the Same Page
So far, you have seen some good examples of how to upload a file to the server without much hassle.
Now, look at how to upload multiple files to the server from a single page.
No built-in capabilities in the Microsoft .NET Framework enable you to upload multiple files from a
single ASP.NET page. With a little work, however, you can easily accomplish this task just as you would
have in the p ast using .NET 1.x.
The trick is to import the
System.IO
class into your ASP.NET page and then to use the
HttpFileCollec-
tion
class to capture all the files that are sent in with the
Request
object. This approach enables you to
upload as many files as you want from a single page.
If you wanted to, you could simply handle each and every FileUpload control on the page individually,
as shown in Listing 3-36.
Listing 3-36: Handling each FileUpload control individually
VB
If FileUpload1.HasFile Then
’ Handle file
End If
If FileUpload2.HasFile Then
’ Handle file
End If
C#
if (FileUpload1.HasFile) {
// Handle file
}
if (FileUpload2.HasFile) {
// Handle file
}
If you are working with a limited number of file upload boxes, this approach works; but at the same
time you may, in certain cases, want to handle the files using the
HttpFileCollection
class. This is
especially true if you are working with a dynamically generated list of server controls on your ASP
.NET page.
170
Evjen c03.tex V2 - 01/28/2008 12:33pm Page 171
Chapter 3: ASP.NET Web Server Controls
For an example of this, you can build an ASP.NET page that has three FileUpload controls and one
Submit button ( using the Button control). After the user clicks the Submit button and the files are posted
to the server, the code behind takes the files and saves them to a specific location on the server. After the
files are saved, the file information that was posted is displayed in the ASP.NET page (see Listing 3-37).
Listing 3-37: Uploading multiple files to the server
VB
Protected Sub Button1_Click(ByVal sender As Object, _
ByVal e As System.EventArgs)
Dim filepath As String = "C:
\
Uploads"
Dim uploadedFiles As HttpFileCollection = Request.Files
Dim i As Integer = 0
Do Until i = uploadedFiles.Count
Dim userPostedFile As HttpPostedFile = uploadedFiles(i)
Try
If (userPostedFile.ContentLength
>
0) Then
Label1.Text += "
<
u
>
File #" & (i + 1) & "
<
/u
><
br
>
"
Label1.Text += "File Content Type: " & _
userPostedFile.ContentType & "
<
br
>
"
Label1.Text += "File Size: " & _
userPostedFile.ContentLength & "kb
<
br
>
"
Label1.Text += "File Name: " & _
userPostedFile.FileName & "
<
br
>
"
userPostedFile.SaveAs(filepath & "
\
"&_
System.IO.Path.GetFileName(userPostedFile.FileName))
Label1.Text += "Location where saved: " & _
filepath & "
\
"&_
System.IO.Path.GetFileName(userPostedFile.FileName) & _
"
<
p
>
"
End If
Catch ex As Exception
Label1.Text += "Error:
<
br
>
" & ex.Message
End Try
i+=1
Loop
End Sub
C#
protected void Button1_Click(object sender, EventArgs e)
{
string filepath = "C:
\\
Uploads";
HttpFileCollection uploadedFiles = Request.Files;
for (int i = 0; i
<
uploadedFiles.Count; i++)
Continued
171
Evjen c03.tex V2 - 01/28/2008 12:33pm Page 172
Chapter 3: ASP.NET Web Server Controls
{
HttpPostedFile userPostedFile = uploadedFiles[i];
try
{
if (userPostedFile.ContentLength
>
0)
{
Label1.Text += "
<
u
>
File #" + (i+1) +
"
<
/u
><
br
>
";
Label1.Text += "File Content Type: " +
userPostedFile.ContentType + "
<
br
>
";
Label1.Text += "File Size: " +
userPostedFile.ContentLength + "kb
<
br
>
";
Label1.Text += "File Name: " +
userPostedFile.FileName + "
<
br
>
";
userPostedFile.SaveAs(filepath + "
\\
"+
System.IO.Path.GetFileName(userPostedFile.FileName));
Label1.Text += "Location where saved: " +
filepath + "
\\
"+
System.IO.Path.GetFileName(userPostedFile.FileName) +
"
<
p
>
";
}
}
catch (Exception Ex)
{
Label1.Text += "Error:
<
br
>
" + Ex.Message;
}
}
}
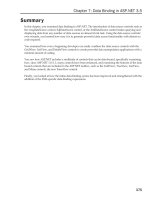
This ASP.NET page enables the end user to select up to three files and click the Upload Files button,
which initializes the
Button1_Click
event. Using the
HttpFileCollection
class with the
Request.Files
property lets you gain control over all the files that are uploaded from the page. When the files are in this
state, you can do whatever you want with them. In this case, the files’ properties are examined and
written to the screen. In the end, the files are saved to the Uploads folder in the root directory of the
server. The result of this action is illustrated in Figure 3-40.
Placing the Uploaded File into a Stream Object
One nice feature of the FileUpload control is that it not only gives you the capability to save the file
to disk, but it also lets you place the contents of the file into a
Stream
object. You do this by using the
FileContent
property, as demonstrated in Listing 3-38.
Listing 3-38: Uploading the file contents into a Stream object
VB
Dim myStream As System.IO.Stream
myStream = FileUpload1.FileContent
172
Evjen c03.tex V2 - 01/28/2008 12:33pm Page 173
Chapter 3: ASP.NET Web Server Controls
C#
System.IO.Stream myStream;
myStream = FileUpload1.FileContent;
Figure 3-40
In this short example, an instance of the
Stream
object is created. Then, using the FileUpload control’s
FileContent
property, the content of t he uploaded file is placed into the object. This is possible because
the
FileContent
property returns a
Stream
object.
Moving File Contents from a Stream Object to a Byte Array
Because you have the capability to move the file contents to a
Stream
object of some kind, it is also fairly
simple to move the contents of the file to a
Byte
array (useful for such operations as placing files in a
database of some kind). To do so, first move the file contents to a
MemoryStream
object and then convert
the object to the necessary
Byte
array object. Listing 3-39 shows the process.
173