Professional ASP.NET 3.5 in C# and Visual Basic Part 32 pps
Bạn đang xem bản rút gọn của tài liệu. Xem và tải ngay bản đầy đủ của tài liệu tại đây (368.3 KB, 10 trang )
Evjen c06.tex V2 - 01/28/2008 1:58pm Page 265
Chapter 6: Themes and Skins
Figure 6-2
From here, you can see that everything — including the font, font color, text box, button, and more — has
changed appearance. If you have multiple pages, you may find that it is nice not to have to think about
applying styles to everything you do a s you build because the styles are already centrally defined for you.
Applying a Theme to an Entire Application
In addition to applying an ASP.NET theme to your ASP.NET pages using the
Theme
attribute within the
Page
directive, you can also apply it at an application level from the
web.config
file. This is illustrated in
Listing 6-2.
Listing 6-2: Applying a theme application-wide from the web.config file
<?xml version="1.0"?>
<configuration>
<system.web>
<pages theme="SmokeAndGlass" />
</system.web>
</configuration>
If you specify the theme in the
web.config
file, you do not need to define the theme again in the
Page
directive of your ASP.NET pages. This theme is applied automatically to each and every page within your
application. If you wanted to apply the theme to only a specific part of the application in this fashion, then
you can do the same, but in addition, make use of the <location/> element to specify the areas of the
applications for which the theme should be applied.
265
Evjen c06.tex V2 - 01/28/2008 1:58pm Page 266
Chapter 6: Themes and Skins
Removing Themes from Server Controls
Whether themes are set at the application level or on a page, at times you want an alternative to the theme
that has been defined. For example, change the text box server control that you have been working with
(from Listing 6-1) by making its background black and using white text:
<asp:Textbox ID="TextBox1" runat="server"
BackColor="#000000" ForeColor="#ffffff" />
The black background color and the color of the text in the text box are specified directly in the control
itself with the use of the
BackColor
and
ForeColor
attributes. If you have applied a theme to the page
where this text box control is located, however, you will not see this black background or white text
because these changes are overridden by the theme itself.
To apply a theme to your ASP.NET page but not to this text box control, you simply use the
EnableThem-
ing
property of the text box server control:
<asp:Textbox ID="TextBox1" runat="server"
BackColor="#000000" ForeColor="#ffffff" EnableTheming="false" />
If you apply this property to the text box server control from Listing 6-1 while the
SmokeAndGlass
theme
is still applied to the entire page, the theme is applied to every control on the page except the text b ox.
This result is shown in Figure 6-3.
Figure 6-3
266
Evjen c06.tex V2 - 01/28/2008 1:58pm Page 267
Chapter 6: Themes and Skins
If you want to turn off theming for multiple controls within a page, consider using the Panel control
(or any container control) to encapsulate a collection of controls and then set the
EnableTheming
attribute
of the Panel control to
False
. This disables theming for each control contained within t he Panel
control.
Removing Themes from Web Pages
Now what if, when you set the theme for an entire application in the
web.config
file, you want to exclude
a single ASP.NET page? It is quite possible to remove a theme setting at the page level, just as it is at the
server control level.
The
Page
directive includes an
EnableTheming
attribute that can be used to remove theming from your
ASP.NET pages. To remove the theme that would be applied by the theme setting in the
web.config
,
you simply construct your
Page
directive in the following manner:
<%@ Page Language="VB" EnableTheming="False" %>
This construct sets the theme to nothing — thereby removing any settings that were specified in the
web.config
file. When this directive is set to
False
at the page or control level, the
Theme
directory is
not searched, and no
.skin
files are applied (
.skin
files are used to define styles for ASP.NET server
controls). When it is set to
True
at the page or control level, the
Theme
directory is searched and
.skin
files are applied.
If themes are disabled because the
EnableTheming
attribute is set to
False
at the page level, you can still
enable theming for specific controls on this page by setting the
EnableTheming
property for the control
to
True
and applying a specific theme at the same time, as illustrated here:
<asp:Textbox ID="TextBox1" runat="server"
BackColor="#000000" ForeColor="#ffffff" EnableTheming="true" SkinID="mySkin" />
Understanding Themes When Using Master Pages
When working with ASP.NET applications that make use of master pages, notice that both the
Page
and
Master
page directives include an
EnableTheming
attribute.
Master pages are covered in Chapter 5.
If both the
Page
and
Master
page directives include the
EnableTheming
attribute, what behavior results
if both are used? Suppose you have defined your theme in the
web.config
file of your ASP.NET appli-
cation and you specify in the master page that theming is disabled using the
EnableTheming
attribute as
shown here:
<%@ Master Language="VB" EnableTheming="false" %>
If this is the case, what is the behavior for any content pages using this master page? If the content
page that is using this master page does not make any specification on theming (it does not use the
EnableTheming
attribute), what is specified in the master page naturally takes precedence and no theme
is utilized as required by the
false
setting. Even if you have set the
EnableTheming
value in the content
page, any value that is specified in the master page takes precedence. This means that if theming is set
to
false
in the master page and set to
true
in the content page, the page is constructed with the value
267
Evjen c06.tex V2 - 01/28/2008 1:58pm Page 268
Chapter 6: Themes and Skins
provided from the master page — in this case,
false
. Even if the value is set to
false
in the master page,
however, you can override this setting at the control level rather than doing it in the
Page
directive of the
content page.
Understanding the StyleSheetTheme Attribute
The
Page
directive also includes the attribute
StyleSheetTheme
that you can use to apply themes to a
page. So, the big question is: If you have a
Theme
attribute and a
StyleSheetTheme
attribute for the
Page
directive, what is the difference between the two?
<%@ Page Language="VB" StyleSheetTheme="Summer" %>
The
StyleSheetTheme
attribute works the same as t he
Theme
attribute in that it can be used to apply a
theme to a page. The difference is that the when attributes are set locally on the page within a particular
control, the attributes are overridden by the theme if you use the
Theme
attribute. They are kept in place,
however, if you apply the page’s theme using the
StyleSheetTheme
attribute. Suppose you have a text
box control like the following:
<asp:Textbox ID="TextBox1" runat="server"
BackColor="#000000" ForeColor="#ffffff" />
In this example, the
BackColor
and
ForeColor
settings are overridden by the theme if you have applied it
using the
Theme
attribute in the
Page
directive. If, instead, you applied the theme using the
StyleSheet-
Theme
attribute in the
Page
directive, the
BackColor
and
ForeColor
settings remain in place, even if they
are explicitly defined in the theme.
Creating Your Own Themes
You will find that creating themes in ASP.NET is a rather simple process — although sometimes it
does require some artistic capabilities. The themes you create can be applied at the application, page,
or server control level. Themes are a great way to easily apply a consistent look-and-feel across your
entire application.
Creating the Proper Folder Structure
In order to create your own themes for an application, you first need to create the proper folder struc-
ture in your application. To do this, right-click your project and add a new folder. Name the folder
App_Themes
. You can also create this folder by right-clicking on your project in Visual Studio and select-
ing Add ASP.NET Folder ➪ Theme. Notice when you do this t hat the theme folder w ithin the
App_Themes
folder does not have the typical folder icon next to it, but instead has a folder icon that includes a paint-
brush. This is shown in Figure 6-4.
Within the
App_Themes
folder, you can create an additional theme folder for each and every theme that
you might use in your application. For instance, if you are going to have four themes — Summer, Fall,
Winter,andSpring — then you create four folders that are named appropriately.
You might use more t han one theme in your application for many reasons — season changes, day/night
changes, different business units, category of user, or even user preferences.
268
Evjen c06.tex V2 - 01/28/2008 1:58pm Page 269
Chapter 6: Themes and Skins
Figure 6-4
Each theme folder must contain the elements of the theme, which can include the following:
❑ A single skin file
❑ CSS files
❑ Images
Creating a Skin
A skin is a definition of styles applied to the server controls in your ASP.NET page. Skins can work in
conjunction with CSS files or images. To create a t heme to use in your ASP.NET applications, you use
just a single skin file in the theme folder. The skin file can have any name, but it must have a
.skin
file
extension.
Even though you have four theme folders in your application, concentrate on the creation of the Summer
theme for the purposes of this chapter. Right-click the
Summer
folder, select Add New Item, and select
Skin File from the listed options. Name the file Summer.skin. Then complete the skin file as shown in
Listing 6-3.
Listing 6-3: The Summer.skin file
<asp:Label runat="server" ForeColor="#004000" Font-Names="Verdana"
Font-Size="X-Small" />
<asp:Textbox runat="server" ForeColor="#004000" Font-Names="Verdana"
Font-Size="X-Small" BorderStyle="Solid" BorderWidth="1px"
BorderColor="#004000" Font-Bold="True" />
<asp:Button runat="server" ForeColor="#004000" Font-Names="Verdana"
Font-Size="X-Small" BorderStyle="Solid" BorderWidth="1px"
BorderColor="#004000" Font-Bold="True" BackColor="#FFE0C0" />
269
Evjen c06.tex V2 - 01/28/2008 1:58pm Page 270
Chapter 6: Themes and Skins
This is just a sampling of what the
Summer.skin
file should contain. To use it in a real application, you
should actually make a definition for each and every server control option. In this case, you have a
definition in place for three different types of server controls: Label, TextBox, a nd Button. After saving
the
Summer.skin
file in the
Summer
folder, your file structure should look like Figure 6-5 from the Solution
Explorer of Visual Studio 2008.
Figure 6-5
As with the regular server control definitions that you put on a typical
.aspx
page, these control defini-
tions must contain the
runat="server"
attribute. If you specify this attribute in the skinned version of
the control, you also include it in the server control you put on an
.aspx
page that uses this theme. Also
notice that no
ID
attribute is specified in the skinned version of the control. If you specify an
ID
attribute
here, you get an error when a page tries to use this theme.
As you can see, you can supply a lot of different visual definitions to these three controls, and this should
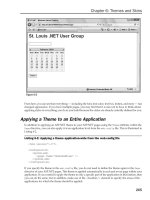
give the page a summery look and feel. An ASP.NET page in this project can then simply use this custom
theme as was shown earlier in this chapter (see Listing 6-4).
Listing 6-4: Using the Summer theme in an ASP.NET page
VB
<%@ Page Language="VB" Theme="Summer" %>
<script runat="server">
Protected Sub Button1_Click(ByVal sender As Object, ByVal e As System.EventArgs)
Label1.Text = "Hello " & TextBox1.Text
End Sub
</script>
270
Evjen c06.tex V2 - 01/28/2008 1:58pm Page 271
Chapter 6: Themes and Skins
<html xmlns=" /><head runat="server">
<title>St. Louis .NET User Group</title>
</head>
<body>
<form id="form1" runat="server">
<asp:Textbox ID="TextBox1" runat="server">
</asp:Textbox>
<br />
<br />
<asp:Button ID="Button1" runat="server" Text="Submit Your Name"
OnClick="Button1_Click" />
<br />
<br />
<asp:Label ID="Label1" runat="server" />
</form>
</body>
</html>
C#
<%@ Page Language="C#" Theme="Summer" %>
<script runat="server">
protected void Button1_Click(object sender, System.EventArgs e)
{
Label1.Text = "Hello " + TextBox1.Text.ToString();
}
</script>
Looking at the server controls on this
.aspx
page, you can see that no styles are associated with them.
These are just the default server controls that you drag and drop onto the design surface of Visual Studio
2008. There is, however, the style that you defined in the
Summer.skin
file, as shown in Figure 6-6.
Figure 6-6
271
Evjen c06.tex V2 - 01/28/2008 1:58pm Page 272
Chapter 6: Themes and Skins
Including CSS Files in Your Themes
In addition to the server control definitions that you create from within a
.skin
file, you can make further
definitions using Cascading Style Sheets (CSS). You might have noticed, when using a
.skin
file, that
you could define only the styles associated with server controls and nothing else. However, developers
usually use quite a bit more than server controls in their ASP.NET pages. For instance, ASP.NET pages
are routinely made up of HTML server controls, raw HTML, or even raw text. At present, the Summer
theme has only a
Summer.skin
file associated with it. Any other items have no style whatsoever applied
to them.
For a theme that goes beyond the server controls, you must further define the theme style so that HTML
server controls, HTML, and raw text are a ll changed according to the theme. You achieve this with a CSS
file within your theme folder.
It is rather easy to create CSS files for your themes when using Visual Studio 2008. Right-click the
Summer
theme folder and select Add New Item. In the list of options, select the option Style Sheet and name
it
Summer.css
.The
Summer.css
file should be sitting right next to your
Summer.skin
file. This creates
an empty
.css
file for your theme. I will not go into the details of how to make a CSS file using Visual
Studio 2008 and the CSS creation tool because this was covered earlier in Chapter 2 in this book. The
process is also the same as in previous versions of Visual Studio. Just remember that the dialog that
comes with Visual Studio 2008 enables you to completely define your CSS page with no need to actually
code anything. A sample dialog is shown in Figure 6-7.
To create a comprehensive theme with this dialog, you define each HTML element that might appear in
the ASP.NET page or your make use of class names or element IDs. This can be a lot of work, but it is
worth it in the end. For now, create a small CSS file that changes some of the non-server control items on
your ASP.NET page. This CSS file is shown in Listing 6-5.
Listing 6-5: A CSS file with some definitions
body
{
font-size: x-small;
font-family: Verdana;
color: #004000;
}
a:link {
color: Blue;
text-decoration: none;
}
a:visited
{
color: Blue;
text-decoration: none;
}
a:hover {
color: Red;
text-decoration: underline overline;
}
272
Evjen c06.tex V2 - 01/28/2008 1:58pm Page 273
Chapter 6: Themes and Skins
Figure 6-7
InthisCSSfile,fourthingsaredefined.First,youdefinetextthatisfoundwithinthe
<body>
tag of the
page (basically all the text). Generally, plenty of text can appear in a typical ASP.NET page that is not
placed inside an
<asp:Label>
or
<asp:Literal>
tag. Therefore, you can define how your text should
appear in the CSS file; otherwise, your Web page may appear quite odd at times. In this case, a definition
is in place for the size, the font family, and the color of the text. You make this definition the same as the
one for the
<asp:Label>
server control in the
Summer.skin
file.
The next three definitions in this CSS file revolve around the
<a>
element (for hyperlinks). One cool
feature that many Web pages use is responsive hyperlinks — or hyperlinks that change when you hover a
mouse over them. The
A:link
definition defines what a typical link looks like on the page. The
A:visited
definition defines the look of the link if the end user has clicked on the link previously (without this def-
inition, it is typically purple in IE). Then the
A:hover
definition defines the appearance of the hyperlink
when the end user hovers the mouse over the link. You can see that not only are these three definitions
changing the color of the hyperlink, but they are also changing how the underline is used. In fact, when
the end user hovers the mouse over a hyperlink on a page using this CSS file, an underline and an over-
line appear on the link itself.
In CSS files, the order in which the style definitions appear in the
.css
file is important. This is an
interpreted file — the first definition in the CSS file is applied first to the page, next the second definition
is applied, and so forth. Some styles might change previous styles, so make sure your style definitions
273
Evjen c06.tex V2 - 01/28/2008 1:58pm Page 274
Chapter 6: Themes and Skins
are in the proper order. For instance, if you put the
A:hover
style definition first, you would never see it.
The
A:link
and
A:visited
definitions would supersede it because they are defined after it. In addition
to order, other factors such as the target media type, importance (whether the declaration is specified as
important or normal), and the origin of the stylesheet also play a factor in interpreting declarations.
In working with your themes that include
.css
files, you must understand what they can and cannot do
for you. For instance, examine an
.aspx
file that contains two text boxes — one text box created using a
server control and another text box created using a typical
<input>
HTML element:
<asp:Textbox ID="TextBox1" runat="server" />
<input type="text" />
Suppose you have a definition for the TextBox server control in the
.skin
file:
<asp:Textbox runat="server" ForeColor="#004000" Font-Names="Verdana"
BackColor="#ffffff" Font-Size="X-Small" BorderStyle="Solid" BorderWidth="1px"
BorderColor="#004000" Font-Bold="True" />
However, what if you also have a definition in your
.css
file for each
<input>
element in the ASP.NET
page as shown here:
INPUT
{
background-color: black;
}
When you run the
.aspx
page with these kinds of style conflicts, the
.skin
file takes precedence over
styles applied to every HTML element that is created using ASP.NET server controls regardless of what
the
.css
file says. In fact, this sort of scenario gives you a page in which the
<input>
element that is
created from the server control is white, as defined in the
.skin
file, and the second text box is black, as
defined in the
.css
file(seeFigure6-8).
Figure 6-8
274