Professional ASP.NET 3.5 in C# and Visual Basic Part 47 pps
Bạn đang xem bản rút gọn của tài liệu. Xem và tải ngay bản đầy đủ của tài liệu tại đây (651.9 KB, 10 trang )
Evjen c08.tex V2 - 01/28/2008 2:05pm Page 416
Chapter 8: Data Management with ADO.NET
Listing 8-27: Building the EmptyItemTemplate
<
EmptyDataTemplate
>
<
table runat="server"
style="background-color: #FFFFFF;border-collapse: collapse;
border-color: #999999;border-style:none;border-width:1px;"
>
<
tr
>
<
td
>
No data was returned.
<
/td
>
<
/tr
>
<
/table
>
<
/EmptyDataTemplate
>
Creating the InsertItemTemplate
The last section looked at here is the
InsertItemTemplate
. This section allows you to define how a form
should be laid out for inserting data, similar to that used in the
ItemTemplate
, into the data store.
Listing 8-28 shows an example of the
InsertItemTemplate
.
Listing 8-28: Building the InsertItemTemplate
<
InsertItemTemplate
>
<
tr style=""
>
<
td
>
<
asp:Button ID="InsertButton" runat="server" CommandName="Insert"
Text="Insert" /
>
<
asp:Button ID="CancelButton" runat="server" CommandName="Cancel"
Text="Clear" /
>
<
/td
>
<
td
>
<
asp:TextBox ID="CustomerIDTextBox" runat="server"
Text=’
<
%# Bind("CustomerID") %
>
’/
>
<
/td
>
<
td
>
<
asp:TextBox ID="CompanyNameTextBox" runat="server"
Text=’
<
%# Bind("CompanyName") %
>
’/
>
<
/td
>
<
td
>
<
asp:TextBox ID="ContactNameTextBox" runat="server"
Text=’
<
%# Bind("ContactName") %
>
’/
>
<
/td
>
<
/tr
>
<
/InsertItemTemplate
>
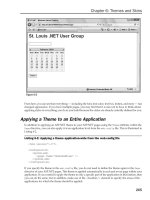
The Results
After you have created an additional AlternatingItemTemplate that is the same as the ItemTemplate (but
styled differently), you can then run the page. Then you will be presented with your own custom grid.
An example is presented in Figure 8-9.
416
Evjen c08.tex V2 - 01/28/2008 2:05pm Page 417
Chapter 8: Data Management with ADO.NET
Figure 8-9
Figure 8-10
417
Evjen c08.tex V2 - 01/28/2008 2:05pm Page 418
Chapter 8: Data Management with ADO.NET
From this figure, you can see that all your defined elements are in place. The header is defined through
the use of the LayoutTemplate. The items in the grid are defined through the use of the ItemTemplate.
The AlternatingItemTemplate, the insert form, is defined through the use of the InsertTemplate. The
page navigation is defined by the new DataPager server control. Again, the DataPager control is defined
within the LayoutTemplate itself.
Editing items in this template is as simple as clicking on the Edit button. This will change the view to the
EditTemplate for the selected item, as illustrated in Figure 8-10.
Once you enter the edit mode here, you can change any of the values within the text boxes and then
click the Update button to update the data to the new values. You can also cancel out of the operation by
clicking the Cancel b utton.
Inserting data is as simple as filling out the form and clicking on the Insert button, as illustrated in
Figure 8-11.
Figure 8-11
418
Evjen c08.tex V2 - 01/28/2008 2:05pm Page 419
Chapter 8: Data Management with ADO.NET
Although this example shows a grid as the output of the new ListView control, you can also structure it
so that your data items are presented in any fashion you want (such as bulleted lists).
Using Visual Studio for ADO.NET Tasks
Earlier, this chapter covered how to construct a D ataSet and how to fill it w ith data using the Data-
Adapter. Although you can always build this construction yourself, you also have the option of building
data access into your ASP.NET applications using some of the wizards available from Visual Studio 2008.
The following example, which is a little bit of a lengthy one, shows you how to build an ASP.NET page
that displays the results from a DataSet that gets its data from two separate tables. You will discover
several different wizards in Visual Studio that you can work with when using ADO.NET.
Creating a Connection to the Data Source
As in code, one of the first things you do when working with data is make a connection to the data source.
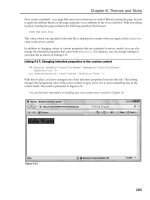
Visual Studio provides a visual way to make connections to your data stores. In this case, you will want
to make a connection to the Northwind database in SQL Server.
When you open the Server Explorer, you will notice a section for data connections (see Figure 8-12).
Figure 8-12
The steps to create a data connection to the Northwind database in SQL Server are straightforward.
Right-click on Data Connections and choose Add Connection. You are presented with the Data Link
Properties dialog box. This dialog box, by default, asks for a connection to SQL Server. If you are going
to connect to a different source, such as Microsoft Access, simply click on the Provider tab and change
the provider.
Figure 8-13 shows the Add Connection dialog box and the settings that you need in order to connect to
your local SQL Server Express Edition.
If you are connecting to a SQL Server that resides on your localhost, you want to put a period (.) in the
box that asks you to select or enter a server name. If you are working from a local SQL Server Express
Edition file in your project (such as what is shown here in Figure 8-13), then you are going to want to
useyourservernamewith
\
SQLEXPRESS
. Put in your login credentials for SQL Server and then select the
419
Evjen c08.tex V2 - 01/28/2008 2:05pm Page 420
Chapter 8: Data Management with ADO.NET
database that you wish to make the connection to by using the drop-down list. The other option, if you
are using a SQL Server Express Edition file, is to select the physical database file by using the Attach a
Database File option.
Figure 8-13
From this dialog box, you can also test the connection to ensure that everything works properly. If every-
thing is in place, you get a confirmation stating such. Clicking OK will then cause a connection to appear
in the Solution Explorer.
420
Evjen c08.tex V2 - 01/28/2008 2:05pm Page 421
Chapter 8: Data Management with ADO.NET
Expanding this connection, you find a way to access the data source just as you would by using the SQL
Server Enterprise Manager (see Figure 8-14).
Figure 8-14
From here, you can work with the database and view information about all the tables and fields that
are contained within the database. More specifically, you can view and work with Database Diagrams,
Tables, Views, Stored Procedures, and Functions.
421
Evjen c08.tex V2 - 01/28/2008 2:05pm Page 422
Chapter 8: Data Management with ADO.NET
After you have run through this wizard, you have a connection to the Northwind database that can be
used by any components that you place on any component designer that you might be working with in
your application.
Working with a Dataset Designer
The next step is to create a typed
DataSet
object in your project that pulls its data from the Northwind
database. First you need to make sure that your application has an
App_Code
folder within the solution.
Right-clicking on the folder will allow you to add a new item to the folder. From the provided dialog
box, add a DataSet called
CustomerOrders.xsd
. You will then be presented with the message shown in
Figure 8-15.
Figure 8-15
This page is referred to as t he Dataset Designer. This is the design surface for any non-visual components
that you incorporate within your
DataSet
object. Just as you can drag and drop controls onto a design
surface for any Windows Forms or Web Forms application, the Dataset Designer enables you to drag and
drop components onto this surface.
A component does not appear visually in your applications, but a visual representation of the component
sits on the design surface. Highlighting the component allows you to modify its settings and properties
in the Properties window.
422
Evjen c08.tex V2 - 01/28/2008 2:05pm Page 423
Chapter 8: Data Management with ADO.NET
What can you drag and drop onto this surface? In the following examples, you see how to work with
TableAdapter
and
DataTable
objects on this design surface. If you open up the Toolbox window, and
click the DataSet tab, you see some additional components that can be used on this design surface.
The goal of this example is to return a DataSet to the end user through an XML Web service. To accom-
plish this, you have to incorporate a
DataAdapter
to extract the data from the data source and to populate
the
DataSet
before passing it on.
This example uses the Northwind database and the first step you need to take is to drag and drop a
TableAdapter
onto the D ataset design surface. Dragging and dropping a
TableAdapter
onto your design
surface causes a wizard to appear, as shown in Figure 8-16.
Figure 8-16
Because you want this DataSet to contain two DataTables — one for the Customers table and another for
the Orders table — you have to go through this process twice.
It is important to note that the job of the
TableAdapter
object is to make the connection to the specified
table as well as to perform all the select, update, insert, and delete commands that are required. For this
423
Evjen c08.tex V2 - 01/28/2008 2:05pm Page 424
Chapter 8: Data Management with ADO.NET
example, you simply want the
TableAdapter
to make the select call and then later to update any changes
that are made back to the SQL Server.
As you work through the wizard, you come to a screen that asks how you want to query the database (see
Figure 8-17). You have three options: using SQL statements, using stored procedures that have already
been created, or building brand-new stored procedures directly from this wizard.
Figure 8-17
For this example, choose Use SQL statements. Selecting this option brings you to a text box where you
can write your own SQL statement if you wish.
The great thing about this process is that, after you create a SQL
select c
ommand, the TableAdapter
wizard also creates the associated
insert
,
update
,and
delete c
ommands for you. You also have the
option of building your queries using the Query Builder. This enables you to graphically design the
query yourself. If this option is selected, you can choose from a list of tables in the Northwind database.
For the first TableAdapter, choose Customers. For the second TableAdapter choose Orders. You make
your selection by clicking the Add button and then closing the dialog box (see Figure 8-18).
424
Evjen c08.tex V2 - 01/28/2008 2:05pm Page 425
Chapter 8: Data Management with ADO.NET
Figure 8-18
Figure 8-19
425