Professional ASP.NET 3.5 in C# and Visual Basic Part 88 pps
Bạn đang xem bản rút gọn của tài liệu. Xem và tải ngay bản đầy đủ của tài liệu tại đây (544.51 KB, 10 trang )
Evjen c17.tex V2 - 01/28/2008 2:58pm Page 827
Chapter 17: Portal Frameworks and Web Parts
drop-down list that you created earlier, you have already provided the end user with this capability. He
simply enters the Design mode, and this allows for this type of movement.
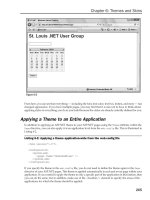
Figure 17-9
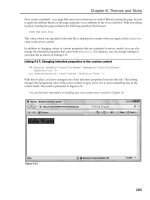
The Design option in the drop-down list changes the page so that the user can see the zones defined on
the page, as illustrated in Figure 17-10.
From this figure, you can see the three zones (
WebPartZone1
,
WebPartZone2
,and
WebPartZone3
).
At this point, the end user can select one of the Web Parts contained in one of these zones and either
change its order in the zone or move it to an entirely different zone on the page. To grab one of the Web
Parts, the user simply clicks and holds the left mouse button on the title of the Web Part. When done
correctly, the crosshair, which appears when the end user hovers over the Web Part’s title, turns into an
arrow. This means that the user has grabbed hold of the Web Part and can drag it to another part of the
page. While the user drags the Web Part around the page, a visual representation of the item appears
(see Figure 17-11). In this state, the Web Part is a bit transparent and its location in the state of the page
is defined with a blue line (the darker line shown at the top of
WebPartZone3
). Releasing the left mouse
button drops the Web Part at the blue line’s location.
827
Evjen c17.tex V2 - 01/28/2008 2:58pm Page 828
Chapter 17: Portal Frameworks and Web Parts
Figure 17-10
After the end user places all the items where he wants them, the locations of the items on the page are
saved for later use.
When he reopens the browser, everything is then drawn in the last state in which he left the page. This
is done on a per-user basis, so any other users browsing to the same page see either their own modified
results or the default view if it is a first visit to the page.
The user can then leave the Design view by opening the list of options from the drop-down list of modes
and selecting Browse.
Another way to move Web Parts is to enter the Catalog mode of the page (which is now one of the options
in the drop-down list due to the addition of the Catalog Zone section). The Catalog mode enables you to
add deleted items to the page, but it also allows you to modify the location of the items on the page by
providing the same drag-and-drop capability as the Design mode.
Modifying the Web Part S ettings
Another option in the list of modes that can be added to the drop-down list is to allow your end users to
edit the actual Web Parts themselves to a degree. This is done through the available Edit mode, and this
828
Evjen c17.tex V2 - 01/28/2008 2:58pm Page 829
Chapter 17: Portal Frameworks and Web Parts
Figure 17-11
enables the end user to modify settings determining appearance, behavior, and layout for a particular
Web Part on the page.
To make this functionality work, you must add an Editor Zone to the page just as you add the Catalog
Zone. This is illustrated in Listing 17-5. You place this bit of new code within the same table directly
below the Catalog Zone declaration.
Listing 17-5: Adding an Editor Zone to the page
<
td
>
<
asp:CatalogZone ID="Catalogzone1" runat="server"
>
<
ZoneTemplate
>
<
asp:PageCatalogPart ID="Pagecatalogpart1" runat="server"/
>
<
/ZoneTemplate
>
<
/asp:CatalogZone
>
<
asp:EditorZone ID="Editorzone1" runat="server"
>
<
ZoneTemplate
>
<
asp:AppearanceEditorPart ID="Appearanceeditorpart1" runat="server" /
>
<
asp:BehaviorEditorPart ID="Behavioreditorpart1" runat="server" /
>
<
asp:LayoutEditorPart ID="Layouteditorpart1" runat="server" /
>
Continued
829
Evjen c17.tex V2 - 01/28/2008 2:58pm Page 830
Chapter 17: Portal Frameworks and Web Parts
<
asp:PropertyGridEditorPart ID="PropertyGridEditorPart1" runat="server" /
>
<
/ZoneTemplate
>
<
/asp:EditorZone
>
<
/td
>
Just like the <
asp:CatalogZone
>,the<
asp:EditorZone
> control is a templated control that requires a
<
ZoneTemplate
> section. Within this section, you can place controls that allow for the modification of the
appearance, behavior, and layout of the selected Web Part. These controls include
<
asp:AppearanceEditorPart
>, <
asp:BehaviorEditorPart
>, <
asp:LayoutEditorPart
>,and
<
asp:PropertyGridEditorPart
>.
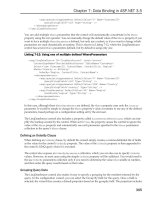
When you run this new section of code and select Edit from the drop-down list of modes, the arrow that
is next to the Web Part title from each of the Web Parts on the page will show an Edit option, as illustrated
in Figure 17-12.
Figure 17-12
830
Evjen c17.tex V2 - 01/28/2008 2:58pm Page 831
Chapter 17: Portal Frameworks and Web Parts
After you select the Edit option from this list of three options, the right column of the table shows the
various editing sections for this particular Web Part.
The Appearance section enables the end user to change the Web Part’s details, including the title, how the
title appears, and other appearance-related items such as the item’s height and width. The Appearance
section is shown in Figure 17-13.
Figure 17-13
The Behavior section (shown in Figure 17-14) enables the end user to select whether the Web Part can be
closed, minimized, or exported. This section allows you to change behavior items for either yourself only
(a single user) or for everyone in the system (a shared view of the Web Part). Using the shared view, the
Behavior section is generally used to allow site editors (or admins) to change the dynamics of how end
users can modify Web Parts. General viewers of the page most likely will not see this section.
To get the Behavior section to appear, you first need to make the changes to the
Web.config
files pre-
sented in Listing 17-6.
Listing 17-6: Getting the Behavior section to appear through settings in the
Web.config
<
configuration
>
<
system.web
>
<
webParts
>
<
personalization
>
<
authorization
>
<
allow users="*" verbs="enterSharedScope" /
>
<
/authorization
>
<
/personalization
>
<
/webParts
>
<
/system.web
>
<
/configuration
>
831
Evjen c17.tex V2 - 01/28/2008 2:58pm Page 832
Chapter 17: Portal Frameworks and Web Parts
Figure 17-14
After the
Web.config
file is in place, the next step is to add a bit of code to your
Page_Load
event, as
shown in Listing 17-7.
Listing 17-7: Adding some code to allow the Behavior section to appear
VB
If Webpartmanager1.Personalization.Scope = PersonalizationScope.User _
AndAlso Webpartmanager1.Personalization.CanEnterSharedScope Then
Webpartmanager1.Personalization.ToggleScope()
End If
C#
if (Webpartmanager1.Personalization.Scope == PersonalizationScope.User
&& Webpartmanager1.Personalization.CanEnterSharedScope)
{
Webpartmanager1.Personalization.ToggleScope();
}
832
Evjen c17.tex V2 - 01/28/2008 2:58pm Page 833
Chapter 17: Portal Frameworks and Web Parts
The Layout section (shown in Figure 17-15) enables the end user to change the order in which Web Parts
appear in a zone or move Web Parts from one zone to another. This is quite similar to the drag-and-drop
capabilities illustrated previously, but this section allows for the same capabilities through the manipu-
lation of simple form elements.
Figure 17-15
The PropertyGridEditorPart, although not demonstrated yet, allows end users to modify properties that
are defined in your own custom server controls. At the end of this chapter, we will look at building a
custom Web Part and using the PropertyGridEditorPart to allow end users to modify one of the publicly
exposed properties contained in the control.
After you are satisfied with the appearance and layout of the Web Parts and have made the necessary
changes to the control’s properties in one of the editor parts, simply click OK or Apply.
Connecting Web Parts
One option you do have is to make a connection between two Web Parts using the <
asp:ConnectionsZone
>
control. This control enables you to make property connections between two Web Parts on the same page.
For example, within the Weather Web Part built into one of ASP.NET’s pre-built applications, you can
have a separate Web Part that is simply a text box and a button that allows the end user to input a zip
code. This, in turn, modifies the contents in the original Weather Web Part.
Modifying Zones
One aspect of the Portal Framework that merits special attention is the capability to modify zones on the
page. These zones allow for a high degree of modification — not only in the look-and-feel of the items
placed in the zone, but also in terms of the behaviors of zones and the items contained in the zones as
well. Following are some examples of what you can do to modify zones.
Turning Off the Capability for Modifications in a Zone
As you have seen, giving end users the capability to move Web Parts around the page is quite easy,
whether within a zone or among entirely different zones. When working with the Portal Framework and
multiple zones on a page, you do not always want to allow the end user to freely change the items that
appear in every zone. You want the items placed in some zones to be left alone. Listing 17-8 shows an
example of this.
833
Evjen c17.tex V2 - 01/28/2008 2:58pm Page 834
Chapter 17: Portal Frameworks and Web Parts
Listing 17-8: Turning off the zone modification capability
<
asp:WebPartZone ID="WebPartZone1" runat="server"
LayoutOrientation="Horizontal" AllowLayoutChange="false"
>
<
ZoneTemplate
>
<
asp:Label ID="Label1" runat="server" Text="Label"
Title="Welcome to my web page!"
>
Welcome to the page!
<
/asp:Label
>
<
/ZoneTemplate
>
<
/asp:WebPartZone
>
In this example, the first Web Part Zone,
WebPartZone1
,usesthe
AllowLayoutChange
attribute with a
value of
False
, which turns off the end user’s capability to modify this particular Web Part Zone. When
you run this page and go to the design mode, notice that you cannot drag and drop any of the Web Parts
from the other zones into
WebPartZone1
. Neither can you grab hold of the Label Web Part contained in
WebPartZone1
. No capability exists to minimize and close the Web Parts contained in this zone. It allows
absolutely no modifications to the zone’s layout.
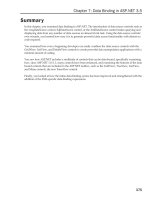
You may notice another interesting change when you are working in the page catalog mode with the
AllowLayoutChange
attribute set to
False
. After you select items to add to the page through the page
catalog,
WebPartZone1
does not appear in the drop-down list of places where you can publish the Web
Parts (see Figure 17-16). From this figure, you can see that only
WebPartZone2
and
WebPartZone3
appear
and allow modifications.
Adding Controls through Other Means
Earlier in this chapter, you examined how to use the <
asp:PageCatalogPart
> control to restore controls
to a page after they had been deleted. Although the
<
asp:PageCatalogPart
> is ideal for this, you might
also want to allow the end user to add Web Parts that are not on the page by default. You may want to
enable the end user to add more than one of any particular Web Part to a page. For these situations, you
work with the
<
asp:DeclarativeCatalogPart
> control.
Listing 17-9 shows an example of using this type of catalog system in place of the
<
asp:Page-
CatalogPart
> control.
Listing 17-9: Using the DeclarativeCatalogPart control
<
asp:CatalogZone ID="Catalogzone1" Runat="server"
>
<
ZoneTemplate
>
<
asp:DeclarativeCatalogPart ID="Declarativecatalogpart1" Runat="server"
>
<
WebPartsTemplate
>
<
uc1:CompanyContactInfo ID="CompanyContact" Runat="Server"
Title="Company Contact Info" /
>
<
uc1:PhotoAlbum ID="PhotoAlbum" Runat="Server" Title="Photo Album" /
>
<
uc1:Customers ID="Customers" Runat="Server" Title="Customers" /
>
<
uc1:Locations ID="Locations" Runat="Server" Title="Locations" /
>
<
/WebPartsTemplate
>
<
/asp:DeclarativeCatalogPart
>
<
/ZoneTemplate
>
<
/asp:CatalogZone
>
834
Evjen c17.tex V2 - 01/28/2008 2:58pm Page 835
Chapter 17: Portal Frameworks and Web Parts
Figure 17-16
Instead of using the
<
asp:PageCatalogPart
> control, this catalog uses the <
asp:Declarative-
CatalogPart
> control. This templated control needs a <
WebPartsTemplate
> section where you can
place all the controls you want available as options for the end user. The controls appear in the check
box list in the same order in which you declare them in the
<
WebPartsTemplate
> section. Figure 17-17
shows how the catalog looks in the Design view in Visual Studio 2008.
Figure 17-17
835
Evjen c17.tex V2 - 01/28/2008 2:58pm Page 836
Chapter 17: Portal Frameworks and Web Parts
This catalog lets you select items from the list of Web Parts and assign the location of the zone in which
they will be placed. After they are placed, notice that the option to add these Web Parts has not disap-
peared as it did with the earlier PageCatalogPart control. In fact, you can add as many of these items to
the page as you deem necessary — even if it is to the same zone within the Portal Framework.
Using the DeclarativeCatalogPart control is not always a completely ideal solution. When the end user
closes one of the Web Parts that initially appears on the page, he may not see that control listed in the
DeclarativeCatalogPart control’s list of elements. You must explicitly specify it should appear when you
write the code for the DeclarativeCatalogPart control. In fact, the end user cannot re-add these deleted
items. Using both the PageCatalogPart control and the DeclarativeCatalogPart control simultaneously
is sometimes the best solution. The great thing about this framework is that it allows you to do that.
The Portal Framework melds both controls into a cohesive control that not only enables you to add
controls that are not on the page by default, but it also lets you add previously deleted default controls.
Listing 17-10 shows an example of this.
Listing 17-10: Combining both catalog types
<
asp:CatalogZone ID="Catalogzone1" Runat="server"
>
<
ZoneTemplate
>
<
asp:PageCatalogPart ID="Pagecatalogpart1" Runat="server" /
>
<
asp:DeclarativeCatalogPart ID="Declarativecatalogpart1" Runat="server"
>
<
WebPartsTemplate
>
<
uc1:CompanyContactInfo ID="CompanyContact" Runat="Server"
Title="Company Contact Info" /
>
<
uc1:PhotoAlbum ID="PhotoAlbum" Runat="Server" Title="Photo Album" /
>
<
uc1:Customers ID="Customers" Runat="Server" Title="Customers" /
>
<
uc1:Locations ID="Locations" Runat="Server" Title="Locations" /
>
<
/WebPartsTemplate
>
<
/asp:DeclarativeCatalogPart
>
<
/ZoneTemplate
>
<
/asp:CatalogZone
>
In this example, both the PageCatalogPart control and the DeclarativeCatalogPart control are contained
within the
<
ZoneTemplate
> section. When this page is run, you see the results shown in Figure 17-18.
You can see that each catalog is defined within the Catalog Zone. Figure 17-18 shows the PageCatalog-
Part control’s collection of Web Parts (defined as Page Catalog). Also, note that a link to the Declarative
Catalog is provided for that particular list of items. Note that the order in which the catalogs appear in
the
<
ZoneTemplate
> section is the order in which the links appear in the Catalog Zone.
Web Part Verbs
Web Part verbs declare the actions of the items (such as Minimize and Close) that appear in the title.
These verbs are basically links that initiate an action for a particular Web Part. The available list of Web
Part verbs includes the following:
❑
<
CloseVerb
>
❑ <
ConnectVerb
>>
❑ <
DeleteVerb
>
❑ <
EditVerb
>
836