Microsoft ADO .NET 4 Step by Step - p 6 docx
Bạn đang xem bản rút gọn của tài liệu. Xem và tải ngay bản đầy đủ của tài liệu tại đây (585.82 KB, 10 trang )
26 Microsoft ADO.NET 4 Step by Step
3. Open the source code view for the TableDetails form. Locate the TableDetails_Load rou-
tine. Just below the comment, “Add the columns to the display list,” add the following
statements to access individual columns of the DataTable:
foreach (DataColumn oneColumn in ActiveTable.Columns)
this.AllColumns.Items.Add(oneColumn);
if (this.AllColumns.Items.Count == 0)
this.AllColumns.Items.Add("No columns available");
4. Locate the AllColumns_DrawItem event handler. Just below the comment, “Extract the
column details,” add the following statements to access members of the DataColumn:
columnName = itemDetail.ColumnName;
dataTypeName = itemDetail.DataType.ToString();
isPrimaryKey = ((ActiveTable.PrimaryKey != null) &&
(ActiveTable.PrimaryKey.Contains(itemDetail) == true));
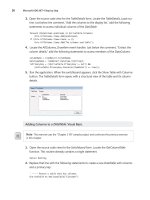
5. Run the application. When the switchboard appears, click the Show Table with Columns
button. The TableDetails form opens with a structural view of the table and its column
details.
Adding Columns to a
DataTable
: Visual Basic
Note This exercise uses the “Chapter 2 VB” sample project and continues the previous exercise
in this chapter.
1. Open the source code view for the Switchboard form. Locate the GetColumnTable
function. This routine already contains a single statement.
Return Nothing
2. Replace that line with the following statements to create a new DataTable with columns
and a primary key:
' Return a table that has columns.
Dim theTable As New DataTable("Customer")
Chapter 2 Building Tables of Data 27
' Add some basic columns.
theTable.Columns.Add("ID", GetType(Long))
theTable.Columns.Add("FullName", GetType(String))
theTable.Columns.Add("LastOrderDate", GetType(Date))
' Create a primary key for the table.
theTable.PrimaryKey = {theTable.Columns("ID")}
' Finished.
Return theTable
3. Open the source code view for the TableDetails form. Locate the TableDetails_Load
routine. Just below the comment that says “Add the columns to the display list,” add the
following statements to access individual columns of the DataTable:
For Each oneColumn In ActiveTable.Columns
AllColumns.Items.Add(oneColumn)
Next oneColumn
If (AllColumns.Items.Count = 0) Then _
AllColumns.Items.Add("No columns available")
4. Locate the AllColumns_DrawItem event handler. Just below the comment that says
“Extract the column details,” add the following statements to access members of the
DataColumn:
columnName = itemDetail.ColumnName
dataTypeName = itemDetail.DataType.ToString()
isPrimaryKey = ((ActiveTable.PrimaryKey IsNot Nothing) AndAlso
(ActiveTable.PrimaryKey.Contains(itemDetail) = True))
5. Run the application. When the switchboard appears, click the Show Table with Columns
button. The TableDetails form opens with a structural view of the table and its column
details.
Dataset Designer
Visual Studio includes the Dataset Designer, a drag-and-drop tool through which you can
design your own ADO.NET data sets, including multiple data tables within the set. As with
the data sets created using the Data Source Connection Wizard (refer to the “Connecting to
External Data” section, on page 8 in Chapter 1), the Dataset Designer creates ADO.NET ob-
jects that reside within your Visual Basic or C# project.
28 Microsoft ADO.NET 4 Step by Step
You can use DataTable objects created with the Dataset Designer in your code just like the
DataTable objects you built using code earlier in this chapter. However, rather than being
built with C# or Visual Basic source code, you create the tables with your mouse. These tables
are stored as XML, in a file with an .xsd extension. (Visual Studio will also add a few other files
that it requires to support the Dataset Designer environment. Visual Studio generates these
files automatically, and you shouldn’t change them manually.)
Using the Dataset Designer is straightforward. You add a DataSet item to your project, which
induces Visual Studio to display the designer. Using designer-specific toolbox items, you cre-
ate your data tables and the relationships between them. You can also drag existing database
tables from the Solution Explorer onto the design surface and customize them to meet your
application’s needs. The following two examples take you through the process of building a
DataTable using the Dataset Designer.
Creating a Custom Table in the Dataset Designer
1. Start a new Visual Basic or C# project. A Windows Forms application might be the most
convenient for this demonstration, but most other project types will work as well. (The
images shown in this example use a C# project, but the process is identical for Visual
Basic.)
2. Add a new DataSet item to your project. Select Project | Add New Item from the Visual
Studio menu. When the Add New Item dialog box appears, select the Data item from
the Installed Templates panel and then select DataSet from the main list of items.
Provide a file name with an .xsd extension in the Name field and then click the Add
button. Visual Studio creates the necessary files and opens the designer.
Chapter 2 Building Tables of Data 29
3. The designer displays a blank surface on which you will craft your table.
The Toolbox (accessible through the View | Toolbox menu or possibly already visible
within the development environment), which is commonly used in Windows Forms
projects and other projects with a visual focus, now displays items specific to the de-
signer: Da taTable, Query, Relation, and TableAdapter.
For this example, you will focus on the DataTable element. Add a DataTable to the de-
signer by double-clicking the DataTable tool or by dragging the DataTable tool to the
designer surface. A new table named DataTable1 appears on the surface.
4. Modify the name of the table either by clicking the name in the table’s image or
through the Name entry in the Properties panel. Changes to the table name are reflected
in the TableName property of the resulting Da taTable object. Rename the sample table
to Customer.
30 Microsoft ADO.NET 4 Step by Step
5. Add columns to the table (and in turn, to the underlying DataTable object’s Columns
collection) by right-clicking the title bar of the table image and selecting
Add | Column from the shortcut menu that appears. When the table is selected, you
can also use the keyboard shortcut Ctrl+L to add new columns.
Add three columns to the Customer table. Name them ID, FullName, and LastOrderDate.
6. Adding a primary key is just as easy. The same Add menu used to create a new column
includes a Key menu command. After you have added one or more columns to the
table’s definition, selecting the Add | Key shortcut menu displays the Unique Constraint
dialog box. This dialog box serves two purposes: to indicate which columns should have
their Unique properties enabled and to establish the primary key for the table.
Bring up the Unique Constraint dialog box for the Customer table. To create a primary key
using the ID column, select the ID check box in the Columns list and then select the Primary
Key check box underneath the Columns list. Click OK to add the key constraint to the table.
Chapter 2 Building Tables of Data 31
7. To set the properties of each column, select the column name in the designer’s view of
the table and then use the development environment’s Properties panel to modify the
relevant settings. If you click the ID column in the Customer table, you will see that the
designer already set this column’s AllowDBNull property to False and its Unique prop-
erty to True, two requirements for any primary key column.
Select the ID column from the table’s image and change its Da taType property to
System.Int64. Alter the Last OrderDate column in the same way, so that its DataType
property is set to System.DateTime.
32 Microsoft ADO.NET 4 Step by Step
8. The designer includes features for establishing relationships between tables and for
building custom data queries. These ADO.NET features will be discussed in later chap-
ters. For now, save the changes you made in the designer by choosing File | Save in the
Visual Studio menu.
Adding an existing database table to the designer surface is as simple as creating a new
table. The main difference is that instead of obtaining new designer items from the Toolbox,
you get them from the Server Explorer, another toolbox-like panel in Visual Studio.
Adding a Database Table to the Dataset Designer
1. In a C# or Visual Basic project, open the Dataset Designer by adding a DataSet item to
the project, as detailed in the previous exercise.
Note
If the Server Explorer is not already visible in the development environment, access it by
choosing View | Server Explorer. If you completed the exercise in Chapter 1 that added a connec-
tion to the StepSample example database, that connection will appear in the Server Explorer. (If
not, you can add a connection to the database by right-clicking Data Connections in the Server
Explorer and following the prompts, as discussed in the Chapter 1 example.)
Some editions of Visual Studio include a Database Explorer instead of a Server Explorer. Although
this example uses the Server Explorer, completing the steps using the Database Explorer is a
nearly identical process. Access the Database Explorer by choosing View | Database Explorer.
2. Expand the Data Connections item in the Server Explorer. Then expand the StepSample
database entry and the Tables item within it.
Chapter 2 Building Tables of Data 33
3. To add one of the tables to the designer, drag it from the Server Explorer to the design
surface. For example, dragging the Customer table places a representation of that
table’s structure on the design surface. The designer also sets all the correct properties
for the table and its columns in the Properties panel.
After you have added a complete .xsd file to a project through the Dataset Designer, its
member tables are immediately available to the project’s source code. In this exercise, you
will complete the sample project started earlier in this chapter.
Using Dataset Designer Tables in Code
Note If you have not yet done so, follow the coding steps for the “Chapter 2 VB” or “Chapter 2
CSharp” project documented previously.
1. Using the steps in the prior example, add the Customer table to a new Dataset
Designer file named ExternalTable.xsd.
34 Microsoft ADO.NET 4 Step by Step
2. Open the source code for the Switchboard form. Locate the GetDesignerTable function.
The code currently includes a single source code line that returns null (in C#) or Nothing
(in Visual Basic). Replace this line with the following source code:
C#
return new ExternalTable.CustomerDataTable();
Visual Basic
Return New ExternalTable.CustomerDataTable
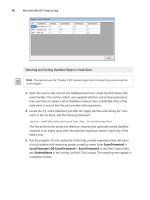
3. Run the application. When the switchboard appears, click the Show Designer Table but-
ton. The TableDetails form opens with a structural view of the Customer table from the
StepSample database.
Summary
This chapter introduced the DataTable class, the focus of data activity in ADO.NET. To be use-
ful, the DataTable class requires support from additional objects, especially the DataColumn
class that defines the columns for a table. There are many ways to create data tables in .NET
applications. Direct coding of the relevant table objects in Visual Basic or C# source code is
quite common, but you can also build new tables visually by using the Visual Studio Dataset
Designer. Adding existing table designs from external databases is also an option.
After the table structures exist in code, they can be processed and analyzed just like any
other set of objects. In the example in the preceding section, you added DataColumn objects
from a data table as items in a ListBox control, and the control displayed various properties
from each column in its list of items.
Chapter 2 Building Tables of Data 35
Chapter 2 Quick Reference
To Do This
Design a DataTable in code Create a System.Data.DataTable object.
Create one or more objects and add them to the table’s
Columns collection.
Add a primary key in code Assign to the D ataTable object’s PrimaryKey property an
array of items from the table’s Columns collection.
Build a new table visually Create or open a project.
Select Project | Add New Item.
Add a DataSet item to your project.
Drag DataTable items from the Toolbox to the Dataset
Designer design surface.
Use Ctrl+L to add new columns quickly.
Add an external database table visually Create or open a project.
Select Project | Add New Item.
Add a DataSet item to your project.
Drag the table from the Server Explorer (or Database
Explorer) to the Dataset Designer design surface.