Học php, mysql và javascript - p 5 potx
Bạn đang xem bản rút gọn của tài liệu. Xem và tải ngay bản đầy đủ của tài liệu tại đây (2.04 MB, 10 trang )
You are now ready to run the MAMP for the first time. Double-click the MAMP
program
and
you’ll
see the main control window appear, along with the welcome page, which
will display in your default web browser.
The Apache and MySQL servers should start automatically and display their status in
the control window. If they don’t, you can click on the Start Servers button to get them
going. Then you’ll see the welcome page in your browser (see Figure 2-10).
Now that you have your MAMP fully installed and running, it’s time to test it with a
quick HTML file. So, using an editor such as TextEdit, create a file called index.html
as follows and save it in the htdocs folder of your MAMP installation (you may need to
ensure that you have your TextEdit preferences set to “ignore rich text commands in
HTML files” in order to use it as an HTML editor):
<html><head><title>A quick test</title></head>
<body>A quick test</body></html>
And now you can test your setup by entering the following into your browser’s address
bar:
http://localhost:8888
Figure 2-9. The MAMP application in your Applications folder and after copying to your desktop
Installing a MAMP on Mac OS X | 21
This tells your browser to serve up the default page stored locally in the MAMP
htdocs folder, which,
in this case, is your index.html file. All being well, you will see the
simple test page displayed (see the browser window in the upper-left corner of Fig-
ure 2-11).
To get back to the main welcome page at any time, you can click on the “Open start
page” button in the control window. Click it now and then click on the “phpinfo”
button near the top of the web page, just to the right of the Start button.
If everything is working correctly, you will now be presented with a very long page of
information all about your installation of PHP (see Figure 2-12). You should also ensure
that MySQL is correctly installed: click on the “phpMyAdmin” button and you’ll be
presented with a control page.
At this point, there’s no need to explain what this new page does. As long as you see
similar screens to those in the figures, you can be confident that you now have a fully
working MAMP installation.
Figure 2-10. The MAMP—up and running and displaying a page
22 | Chapter 2: Setting Up a Development Server
Figure 2-11. The MAMP—working and displaying the test page
Figure 2-12. PHP, properly installed and running
Installing a MAMP on Mac OS X | 23
Some Final Tweaking
When you visit
a site such as google.com, you are really visiting port 80 of the server
hosting the website. Likewise, port 3306 is the one most commonly used for MySQL.
But by default, MAMP uses ports 8888 and 8889 for Apache and MySQL, respectively.
This means that you will need to append the port number whenever you request a web
page from your development server or access MySQL.
As you’ll recall, instead of typing the URL localhost into your web browser, you had to
type localhost:8888, which is rather annoying. So the last thing you need to do to set
up your MAMP is click the Preferences button in the MAMP control window and then
click Ports. Now click “Set to default Apache and MySQL ports,” then click OK (see
Figure 2-13).
You can now call up your test HTML page with either of the following shorter URLs
(the latter being the IP address that all computers use for referring to themselves):
http://localhost
http://127.0.0.1
Figure 2-13. MAMP is easier to use with regular port settings
24 | Chapter 2: Setting Up a Development Server
Other Alternatives
You may already be familiar with the XAMPP system, which you can download from
If you have at least OS X 10.4, feel free to use
it if you prefer, but make sure to carefully follow the instructions supplied with the
package. You may also be interested in the new Zend Server CE (Community Edition)
available at This is another free
W/M/LAMP and, as I write, it’s available as a release candidate—but the final release
should be ready by the time you read this.
If you are a beginner to PHP and MySQL web development, I wouldn’t recommend
that you try to set up Apache and MySQL on their own without following the MAMP
route, as configuration can be tricky.
Users of versions of OS X prior to 10.3 (pre-2003) cannot use either of the current
versions of MAMP described here (or the current releases of XAMPP or Zend Server
CE). So I recommend that you upgrade your operating system, if you can, in order to
make use of the simple installation processes available.
Installing a LAMP on Linux
If you know much about Linux, you may have already set up and installed PHP and
MySQL. If not, your best bet is probably to look at XAMPP for Linux, which is available
at />The process is relatively simple. After downloading, go to a Linux shell and log in as
the system administrator (root) by typing:
su
Enter your system administration password. Many desktop Linux systems allow you
to use your personal account’s password for the administration password. Some sys-
tems, including the popular Ubuntu, encourage you not to use su to log in as root, but
to precede each system administration command with sudo instead. You’ll know what
to do if you’ve performed any administrative tasks on your system. Now extract the
downloaded archive file to /opt with the following command (inserting the appropriate
filename if the version you downloaded is a later version):
tar xvfz xampp-linux-1.6.8a.tar.gz -C /opt
Any XAMPP version that was already installed will be overwritten by this command.
Once the command finishes, XAMPP will be installed below the /opt/lampp directory.
To start it, enter the following:
/opt/lampp/lampp start
You should now see something like this on your screen:
Starting XAMPP 1.6.8a
LAMPP: Starting Apache
Installing a LAMP on Linux | 25
LAMPP: Starting MySQL
LAMPP started.
Ready. Apache and MySQL are running.
Now
you are
ready to test the setup. Type the following URL into your web browser’s
address bar:
http://localhost
You should now see the start page of XAMPP, containing some links to check the status
of the installed software and some small programming examples (see Figure 2-14).
Figure 2-14. XAMPP for Linux, installed and running
Working Remotely
If you have
access to a web server already configured with PHP and MySQL, you can
always use that for your web development. But unless you have a high-speed connec-
tion, it is not always your best option. Developing locally allows you to test modifica-
tions with little or no upload delay.
26 | Chapter 2: Setting Up a Development Server
Accessing MySQL remotely may not be easy either. You may have to Telnet or SSH
into your server to manually create databases and set permissions from the command
line. Your web hosting company will advise you on how best to do this and provide
you with any password they have set for your MySQL access (as well as, of course, for
getting into the server in the first place).
Logging In
I recommend that, at minimum, Windows users should install a program such as
PuTTY, available at , for Telnet and SSH access (remember that SSH is
much more secure than Telnet).
On a Mac, you already have SSH available. Just select the Applications folder, followed
by Utilities, and then launch Terminal. In the terminal window, log in to a server using
SSH as follows:
ssh mylogin @ server.com
where server.com is the name of the server you wish to log in to and mylogin is the
username you will log in under. You will then be prompted for the correct password
for that username and, if you enter it correctly, you will be logged in.
Using FTP
To transfer files to and from your web server, you will need an FTP program. If you go
searching the Web for a good one, you’ll find so many that it could take you quite a
while to come across one with all the right features for you.
Nowadays I always recommend FireFTP, because of these advantages:
• It is an add-on for the Firefox 3 web browser, and will therefore work on any
platform on which Firefox 3 runs.
• Calling it up can be as simple as selecting a bookmark.
• It is one of the fastest and easiest to use FTP programs that I have encountered.
You may say “But I use only Microsoft Internet Explorer and FireFTP
is not available
for it,” but I would counter that if you are going to de-
velop web pages, you need a copy of each of the main browsers installed
on your PC anyway, as suggested at the start of this chapter.
To install FireFTP, visit using Firefox and click on the Down-
load FireFTP link. It’s about half a megabyte in size and installs very quickly. Once it’s
installed, restart Firefox; you can then access FireFTP from the Tools menu (see Fig-
ure 2-15).
Working Remotely | 27
Unfortunately, at the time of writing, Firefox 3 would not run on any versions of OS X
prior to 10.4.
If that is the case for you, I recommend that you install the excellent
Classic FTP program available at Unlike most other FTP
programs for the Mac, it’s free and it runs on OS X 10.2 and later (see Figure 2-16).
If you have an OS earlier than 10.2, you may wish to try a shareware program such as
Hefty, available at You can try it 50 times be-
fore having to register it for $20.
Another excellent FTP program is the open source FileZilla, available from http://file
zilla-project.org, for Windows, Linux and Mac OS X 10.5 or newer.
Of course, if you already have an FTP program, all the better—stick with what you
know.
Using a Program Editor
Although a plain-text editor works for editing HTML, PHP, and JavaScript, there have
been some tremendous improvements in dedicated program editors, which now
Figure 2-15. FireFTP offers full FTP access from within Firefox 3
28 | Chapter 2: Setting Up a Development Server
incorporate very handy
features such as colored syntax highlighting. Today’s program
editors are smart and can show you where you have syntax errors before you even run
a program. Once you’ve used a modern editor, you’ll wonder how you ever managed
without one.
There are a number of good programs available, but I have settled on Editra, because
it’s free and available through a simple installer for both the Mac and the PC, and in
source code form for Linux/Unix. You can download a copy by visiting http://editra
.org and selecting the Download link toward the top left of the page, where you can
also find the documentation for it.
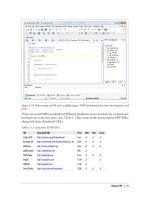
As you can see from Figure 2-17, Editra understands HTML and highlights the syntax
appropriately. It also notices when it encounters PHP code and correctly highlights
that, too, using colors different from the HTML color tones to help clarify what’s going
on.
What’s more, you can place the cursor next to brackets or braces and Editra will high-
light the matching pair so that you can check whether you have too many or too few.
In fact, Editra does a lot more in addition, which you will discover and enjoy as you
use it.
Figure 2-16. Classic FTP for the Mac, which runs on OS X 10.2 and is free
Using a Program Editor | 29
Again, if you have a different preferred program editor, use that—it’s always a good
idea to use programs you’re already familiar with.
Using an IDE
As good as
dedicated program editors can be for your programming productivity, their
utility pales into insignificance when compared to Integrated Development Environ-
ments (IDEs), which offer many additional features such as in-editor debugging and
program testing, as well as function descriptions and much more.
Figure 2-18 shows the popular phpDesigner IDE with a PHP program loaded into the
main frame, and the righthand Code Explorer listing the various classes, functions, and
variables that it uses.
When developing with an IDE, you can set breakpoints and then run all (or portions)
of your code, which will then stop at the breakpoints and provide you with information
about the program’s current state.
As an aid to learning programming, the examples in this book can be entered into an
IDE and run there and then, without the need to call up your web browser.
Figure 2-17. Program editors are superior to plain-text editors
30 | Chapter 2: Setting Up a Development Server

