Học php, mysql và javascript - p 26 pdf
Bạn đang xem bản rút gọn của tài liệu. Xem và tải ngay bản đầy đủ của tài liệu tại đây (1.69 MB, 10 trang )
Fetching a row
It was important to show how you can fetch a single cell of data from MySQL, but now
let’s look at a much more efficient method. So, replace the for loop of query.php (in
Example 10-5) with the new loop in Example 10-6, and you will find that you get exactly
the same result that was displayed in Figure 10-1.
Example 10-6. Replacement for loop for fetching results one row at a time
<?php
for ($j = 0 ; $j < $rows ; ++$j)
{
$row = mysql_fetch_row($result);
echo 'Author: ' . $row[0] . '<br />';
echo 'Title: ' . $row[1] . '<br />';
echo 'Category: ' . $row[2] . '<br />';
echo 'Year: ' . $row[3] . '<br />';
echo 'ISBN: ' . $row[4] . '<br /><br />';
}
?>
In this modified code, only one-fifth of the calls are made to a MySQL-calling function
(a full 80 percent less), because each row is fetched in its entirety using the
mysql_fetch_row function. This returns a single row of data in an array, which is then
assigned to the variable $row.
All that’s necessary then is to reference each element of the array $row in turn (starting
at an offset of zero). Therefore $row[0] contains the Author data, $row[1] the Title, and
so on, because each column is placed in the array in the order in which it appears in
the MySQL table. Also, by using mysql_fetch_row instead of mysql_result, you use
substantially less PHP code and achieve much faster execution time, due to simply
referencing each item of data by offset rather than by name.
Closing a connection
When you have finished using a database, you should close the connection. This is
done by issuing the command in Example 10-7.
Example 10-7. Closing a MySQL database connection
<?php
mysql_close($db_server);
?>
We have to pass the identifier returned by mysql_connect back in Example 10-2, which
we stored in the variable $db_server.
Querying a MySQL Database with PHP | 231
All database connections are automatically closed when PHP exits, so
it doesn’t matter that the connection wasn’t closed in Example 10-5.
But in longer programs, where you may continually open and close da-
tabase connections, you are strongly advised to close each one as soon
as accessing it is complete.
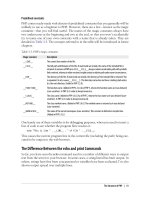
A Practical Example
It’s time to write our first example of inserting data in and deleting it from a MySQL
table using PHP. I recommend that you type in Example 10-8 and save it to your web
development directory using the filename sqltest.php. You can see an example of the
program’s output in Figure 10-2.
Figure 10-2. The output from Example 10-8, sqltest.php
Example 10-8 creates a
standard HTML form. The following chapter
explains forms in detail, but in this chapter I take form handling for
granted and just deal with database interaction.
232 | Chapter 10: Accessing MySQL Using PHP
Example 10-8. Inserting and deleting using sqltest.php
<?php // sqltest.php
require_once 'login.php';
$db_server = mysql_connect($db_hostname, $db_username, $db_password);
if (!$db_server) die("Unable to connect to MySQL: " . mysql_error());
mysql_select_db($db_database, $db_server)
or die("Unable to select database: " . mysql_error());
if (isset($_POST['author']) &&
isset($_POST['title']) &&
isset($_POST['category']) &&
isset($_POST['year']) &&
isset($_POST['isbn']))
{
$author = get_post('author');
$title = get_post('title');
$category = get_post('category');
$year = get_post('year');
$isbn = get_post('isbn');
if (isset($_POST['delete']) && $isbn != "")
{
$query = "DELETE FROM classics WHERE isbn='$isbn'";
if (!mysql_query($query, $db_server))
echo "DELETE failed: $query<br />" .
mysql_error() . "<br /><br />";
}
else
{
$query = "INSERT INTO classics VALUES" .
"('$author', '$title', '$category', '$year', '$isbn')";
if (!mysql_query($query, $db_server))
echo "INSERT failed: $query<br />" .
mysql_error() . "<br /><br />";
}
}
echo <<<_END
<form action="sqltest.php" method="post"><pre>
Author <input type="text" name="author" />
Title <input type="text" name="title" />
Category <input type="text" name="category" />
Year <input type="text" name="year" />
ISBN <input type="text" name="isbn" />
<input type="submit" value="ADD RECORD" />
</pre></form>
_END;
$query = "SELECT * FROM classics";
$result = mysql_query($query);
A Practical Example | 233
if (!$result) die ("Database access failed: " . mysql_error());
$rows = mysql_num_rows($result);
for ($j = 0 ; $j < $rows ; ++$j)
{
$row = mysql_fetch_row($result);
echo <<<_END
<pre>
Author $row[0]
Title $row[1]
Category $row[2]
Year $row[3]
ISBN $row[4]
</pre>
<form action="sqltest.php" method="post">
<input type="hidden" name="delete" value="yes" />
<input type="hidden" name="isbn" value="$row[4]" />
<input type="submit" value="DELETE RECORD" /></form>
_END;
}
mysql_close($db_server);
function get_post($var)
{
return mysql_real_escape_string($_POST[$var]);
}
?>
At
over 80
lines of code, this program may appear daunting, but don’t worry—you’ve
already covered many of them in Example 10-5, and what the code does is actually
quite simple.
It first checks for any inputs that may have been made and then either inserts new data
into the classics table of the publications database or deletes a row from it, according
to the input supplied. Regardless of whether there was input, the program then outputs
all rows in the table to the browser. So let’s see how it works.
The first section of new code starts by using the isset function to check whether values
for all the fields have been posted to the program. Upon such confirmation, each of the
first six lines within the if statement call the function get_post, which appears at the
end of the program. This function has one small but critical job: fetching the input from
the browser.
The $_POST Array
I mentioned in an earlier chapter that a browser sends user input through either a GET
request or a POST request. The POST request is usually preferred, and we use it here. The
web server bundles up all the user input (even if the form was filled out with a hundred
fields) and puts it into an array named $_POST.
234 | Chapter 10: Accessing MySQL Using PHP
$_POST is an associative array, which you encountered in Chapter 6. Depending on
whether a form has been set to use the POST or the GET method, either the $_POST or the
$_GET associative array will be populated with the form data. They can both be read in
exactly the same way.
Each field has an element in the array named after that field. So if a form contained a
field named isbn, the $_POST array contains an element keyed by the word isbn. The
PHP program can read that field by referring to either $_POST['isbn'] or
$_POST["isbn"] (single and double quotes have the same effect in this case).
If the $_POST syntax still seems complex to you, rest assured that you can just use the
convention I’ve shown in Example 10-8, copy the user’s input to other variables, and
forget about $_POST after that. This is normal in PHP programs: they retrieve all the
fields from $_POST at the beginning of the program and then ignore it.
There is no reason to write to an element in the $_POST array. Its only
purpose is to communicate information from the browser to the pro-
gram, and you’re better off copying data to your own variables before
altering it.
So, back to the get_post function, which passes each item it retrieves through the
mysql_real_escape_string function to strip out any characters that a hacker may have
inserted in order to break into or alter your database.
Deleting a Record
Having loaded up the various possible variables that could have been posted with
any values that were passed, the program then checks whether the variable
$_POST['delete'] has a value. If so, the user has clicked on a DELETE RECORD button
to erase a record. In this case, the value of $isbn will also have been posted.
As you’ll recall, the ISBN uniquely identifies each record. The HTML form appends
the ISBN to the DELETE FROM query string created in the variable $query, which is then
passed to the mysql_query function to issue it to MySQL. mysql_query returns either
TRUE or FALSE, and FALSE causes an error message to be displayed explaining what went
wrong.
If $delete didn’t contain the word “yes,” then the following else statement is executed.
$query is set to an INSERT INTO command, followed by the five values to be inserted.
The variable is then passed to mysql_query, which upon completion returns either
TRUE or FALSE. If FALSE is returned, an error message is displayed.
A Practical Example | 235
Displaying the Form
Next we get to the part of code that displays the little form at the top of Figure 10-2.
You should recall the echo <<<_END structure from previous chapters, which outputs
everything between the _END tags.
Instead of the echo command, the program could also drop out of PHP
using ?>, issue the HTML, and then reenter PHP processing with
<?php. Whichever style used is a matter of programmer preference, but
I always recommend staying within PHP code for these reasons:
• It makes it very clear when debugging (and also for other users)
that everything within a .php file is PHP code. Therefore, there is
no need to go hunting for dropouts to HTML.
• When you wish to include a PHP variable directly within HTML,
you can just type it in. If you had dropped back to HTML, you
would have had to temporarily reenter PHP processing, output the
variable, and then drop back out again.
The HTML form section simply sets the form’s action to sqltest.php. This means that
when the form is submitted, the contents of the form fields will be sent to the file
sqltest.php, which is the program itself. The form is also set up to send the fields as a
POST rather than a GET request. This is because GET requests are appended to the URL
being submitted and can look messy in your browser. They also allow users to easily
modify submissions and try to hack your server. Therefore, whenever possible, you
should use POST submissions, which also have the benefit of hiding the posted data from
view.
Having output the form fields, the HTML displays a Submit button with the name ADD
RECORD and closes the form. Note the use of the <pre> and </pre> tags here, which
have been used to force a monospaced font and allow all the inputs to line up neatly.
The carriage returns at the end of each line are also output when inside <pre> tags.
Querying the Database
Next, the code returns to the familiar territory of Example 10-5 where, in the following
four lines of code, a query is sent to MySQL asking to see all the records in the clas-
sics table. After that, $rows is set to a value representing the number of rows in the table
and a for loop is entered to display the contents of each row.
I have altered the next bit of code to simplify things. Instead of using the <br /> tags
for line feeds in Example 10-5, I have chosen to use a <pre> tag to line up the display
of each record in a pleasing manner.
After the display of each record there is a second form that also posts to sqltest.php (the
program itself) but this time contains two hidden fields: delete and isbn. The delete field
236 | Chapter 10: Accessing MySQL Using PHP
is set to “yes” and isbn to the value held in $row[4], which contains the ISBN for the
record. Then a Submit button with the name DELETE RECORD is displayed and the
form is closed. A curly brace then completes the for loop, which will continue until all
records have been displayed.
Finally, you see the definition for the function get_post, which we’ve already looked
at. And that’s it—our first PHP program to manipulate a MySQL database. So, let’s
check out what it can do.
Once you have typed the program in (and corrected any typing errors), try entering the
following data into the various input fields to add a new record for the book Moby
Dick to the database:
Herman Melville
Moby Dick
Fiction
1851
9780199535729
Running the Program
When you have submitted this data using the ADD RECORD button, scroll down to
the bottom of the web page to see the new addition. It should look like Figure 10-3.
Figure 10-3. The result of adding Moby Dick to the database
A Practical Example | 237
Now let’s look at how deleting a record works by creating a dummy record. So try
entering just the number 1 in each of the five fields and click on the ADD RECORD
button. If you now scroll down, you’ll see a new record consisting just of 1s. Obviously
this record isn’t useful in this table, so now click on the DELETE RECORD button and
scroll down again to confirm that the record has been deleted.
Assuming that everything worked, you are now able to add and delete
records at will. Try doing this a few times, but leave the main records
in place (including the new one for Moby Dick), as we’ll be using them
later. You could also try adding the record with all 1s again a couple of
times and note the error message that you receive the second time, in-
dicating that there is already an ISBN with the number 1.
Practical MySQL
You are now ready to look at some practical techniques that you can use in PHP to
access the MySQL database, including tasks such as creating and dropping tables, in-
serting, updating, and deleting data, and protecting your database and website from
malicious users. Note that the following examples assume that you’ve created the
login.php program discussed earlier in this chapter.
Creating a Table
Let’s assume that you are working for a wildlife park and need to create a database to
hold details about all the types of cats it houses. You are told that there are nine
families of cats: Lion, Tiger, Jaguar, Leopard, Cougar, Cheetah, Lynx, Caracal, and
Domestic, so you’ll need a column for that. Then each cat has been given a name, so
that’s another column, and you also want to keep track of their ages, which is another.
Of course, you will probably need more columns later, perhaps to hold dietary re-
quirements, inoculations, and other details, but for now that’s enough to get going. A
unique identifier is also needed for each animal, so you also decide to create a column
for that called id.
Example 10-9 shows the code you might use to create a MySQL table to hold this data,
with the main query assignment in bold text.
Example 10-9. Creating a table called cats
<?php
require_once 'login.php';
$db_server = mysql_connect($db_hostname, $db_username, $db_password);
if (!$db_server) die("Unable to connect to MySQL: " . mysql_error());
mysql_select_db($db_database)
or die("Unable to select database: " . mysql_error());
$query = "CREATE TABLE cats (
id SMALLINT NOT NULL AUTO_INCREMENT,
238 | Chapter 10: Accessing MySQL Using PHP
family VARCHAR(32) NOT NULL,
name VARCHAR(32) NOT NULL,
age TINYINT NOT NULL,
PRIMARY KEY (id)
)";
$result = mysql_query($query);
if (!$result) die ("Database access failed: " . mysql_error());
?>
As
you can
see, the MySQL query looks pretty similar to how you would type it in
directly to the command line, except that there is no trailing semicolon, as none is
needed when accessing MySQL from PHP.
Describing a Table
When you aren’t logged into the MySQL command line, here’s a handy piece of code
that you can use to verify that a table has been correctly created from inside a browser.
It simply issues the query DESCRIBE cats and then outputs an HTML table with four
headings: Column, Type, Null, and Key, underneath which all columns within the table
are shown. To use it with other tables, simply replace the name “cats” in the query with
that of the new table (see Example 10-10).
Example 10-10. Describing the cats table
<?php
require_once 'login.php';
$db_server = mysql_connect($db_hostname, $db_username, $db_password);
if (!$db_server) die("Unable to connect to MySQL: " . mysql_error());
mysql_select_db($db_database)
or die("Unable to select database: " . mysql_error());
$query = "DESCRIBE cats";
$result = mysql_query($query);
if (!$result) die ("Database access failed: " . mysql_error());
$rows = mysql_num_rows($result);
echo "<table><tr> <th>Column</th> <th>Type</th>
<th>Null</th> <th>Key</th> </tr>";
for ($j = 0 ; $j < $rows ; ++$j)
{
$row = mysql_fetch_row($result);
echo "<tr>";
for ($k = 0 ; $k < 4 ; ++$k) echo "<td>$row[$k]</td>";
echo "</tr>";
}
echo "</table>";
?>
Practical MySQL | 239
The output from the program should look like this:
Column Type Null Key
id smallint(6) NO PRI
family varchar(32) NO
name varchar(32) NO
age tinyint(4) NO
Dropping a Table
Dropping
a table is very easy to do and is therefore very dangerous, so be careful.
Example 10-11 shows the code that you need. However, I don’t recommend that you
try it until you have been through the other examples, as it will drop the table cats and
you’ll have to recreate it using Example 10-9.
Example 10-11. Dropping the table cats
<?php
require_once 'login.php';
$db_server = mysql_connect($db_hostname, $db_username, $db_password);
if (!$db_server) die("Unable to connect to MySQL: " . mysql_error());
mysql_select_db($db_database)
or die("Unable to select database: " . mysql_error());
$query = "DROP TABLE cats";
$result = mysql_query($query);
if (!$result) die ("Database access failed: " . mysql_error());
?>
Adding Data
Let’s add some data to the table using the code in Example 10-12.
Example 10-12. Adding data to table cats
<?php
require_once 'login.php';
$db_server = mysql_connect($db_hostname, $db_username, $db_password);
if (!$db_server) die("Unable to connect to MySQL: " . mysql_error());
mysql_select_db($db_database)
or die("Unable to select database: " . mysql_error());
$query = "INSERT INTO cats VALUES(NULL, 'Lion', 'Leo', 4)";
$result = mysql_query($query);
if (!$result) die ("Database access failed: " . mysql_error());
?>
You may wish to add a couple more items of data by modifying $query as follows and
calling the program up in your browser again:
240 | Chapter 10: Accessing MySQL Using PHP