Học php, mysql và javascript - p 32 potx
Bạn đang xem bản rút gọn của tài liệu. Xem và tải ngay bản đầy đủ của tài liệu tại đây (1.43 MB, 10 trang )
Example 13-6. Retrieving session variables
<?php // continue.php
session_start();
if (isset($_SESSION['username']))
{
$username = $_SESSION['username'];
$password = $_SESSION['password'];
$forename = $_SESSION['forename'];
$surname = $_SESSION['surname'];
echo "Welcome back $forename.<br />
Your full name is $forename $surname.<br />
Your username is '$username'
and your password is '$password'.";
}
else echo "Please <a href=authenticate2.php>click here</a> to log in.";
?>
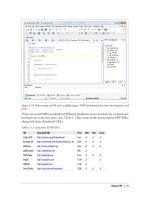
Now
you are ready to call up authenticate2.php into your browser, enter a username of
“bsmith” and password of “mysecret”, (or “pjones” and “acrobat”) when prompted,
and click on the link to load in continue.php. When your browser calls it up, the result
should be something like Figure 13-5.
Figure 13-5. Maintaining user data with sessions
Sessions neatly confine
to a single program the extensive code required to authenticate
and log in a user. Once a user has been authenticated, and you have created a session,
your program code becomes very simple indeed. You need only to call up
session_start and look up any variables to which you need access from $_SESSION.
In Example 13-6, a quick test of whether $_SESSION['username'] has a value is enough
to let you know that the current user is authenticated, because session variables are
stored on the server (unlike cookies, which are stored on the web browser) and can
therefore be trusted.
If $_SESSION['username'] has not been assigned a value, no session is active, so the last
line of code in Example 13-6 directs users to the login page at authenticate2.php.
Using Sessions | 291
The continue.php program prints back the value of the user’s password
to show you how session variables work. In practice, you already know
that the user is logged in, so it should not be necessary to keep track of
(or display) any passwords, and doing so would be a security risk.
Ending a Session
When the time comes to end a session, usually when a user requests to log out from
your site, you can use the session_destroy function in association with the unset func-
tion, as in Example 13-7. That example provides a useful function for totally destroying
a session, logging a user out, and unsetting all session variables.
Example 13-7. A handy function to destroy a session and its data
<?php
function destroy_session_and_data()
{
session_start();
$_SESSION = array();
if (session_id() != "" || isset($_COOKIE[session_name()]))
setcookie(session_name(), '', time() - 2592000, '/');
session_destroy();
}
?>
To see this in action, you could modify continue.php as in Example 13-8.
Example 13-8. Retrieving session variables, then destroying the session
<?php
session_start();
if (isset($_SESSION['username']))
{
$username = $_SESSION['username'];
$password = $_SESSION['password'];
$forename = $_SESSION['forename'];
$surname = $_SESSION['surname'];
echo "Welcome back $forename.<br />
Your full name is $forename $surname.<br />
Your username is '$username'
and your password is '$password'.";
destroy_session_and_data();
}
else echo "Please <a href=authenticate2.php>click here</a> to log in.";
function destroy_session_and_data()
{
$_SESSION = array();
if (session_id() != "" || isset($_COOKIE[session_name()]))
setcookie(session_name(), '', time() - 2592000, '/');
292 | Chapter 13: Cookies, Sessions, and Authentication
session_destroy();
}
?>
The first time
you surf from authenticate2.php to continue.php, it will display all the
session variables. But, because of the call to destroy_session_and_data, if you then click
on your browser’s Reload button, the session will have been destroyed and you’ll be
prompted to return to the login page.
Setting a timeout
There are other times when you might wish to close a user’s session yourself, such as
when the user has forgotten or neglected to log out, and you wish the program to do
it for them for their own security. The way to do this is to set the timeout, after which
a logout will automatically occur if there has been no activity.
To do this, use the ini_set function as follows. This example sets the timeout to exactly
one day:
ini_set('session.gc_maxlifetime', 60 * 60 * 24);
If you wish to know what the current timeout period is, you can display it using the
following:
echo ini_get('session.gc_maxlifetime');
Session Security
Although I mentioned that once you had authenticated a user and set up a session you
could safely assume that the session variables were trustworthy, this isn’t exactly the
case. The reason is that it’s possible to use packet sniffing (sampling of data) to discover
session IDs passing across a network. Additionally, if the session ID is passed in the
GET part of a URL, it might appear in external site server logs. The only truly secure way
of preventing these from being discovered is to implement a Secure Socket Layer (SSL)
and run HTTPS instead of HTTP web pages. That’s beyond the scope of this book,
although you may like to take a look at for details on setting
up a secure web server.
Preventing session hijacking
When SSL is not a possibility, you can further authenticate users by storing their IP
address along with their other details by adding a line such as the following when you
store their session:
$_SESSION['ip'] = $_SERVER['REMOTE_ADDR'];
Then, as an extra check, whenever any page loads and a session is available, perform
the following check. It calls the function different_user if the stored IP address doesn’t
match the current one:
Using Sessions | 293
if ($_SESSION['ip'] != $_SERVER['REMOTE_ADDR']) different_user();
What code you place in your different_user function is up to you. I recommend that
you simply delete
the current session and ask the user to log in again due to a technical
error. Don’t say any more than that or you’re giving away potentially useful
information.
Of course, you need to be aware that users on the same proxy server, or sharing the
same IP address on a home or business network, will have the same IP address. Again,
if this is a problem for you, use SSL. You can also store a copy of the browser user agent
string (a string that developers put in their browsers to identify them by type and ver-
sion), which might also distinguish users due to the wide variety of browser types,
versions, and computer platforms. Use the following to store the user agent:
$_SESSION['ua'] = $_SERVER['HTTP_USER_AGENT'];
And use this to compare the current agent string with the saved one:
if ($_SESSION['ua'] != $_SERVER['HTTP_USER_AGENT']) different_user();
Or, better still, combine the two checks like this and save the combination as an md5
hexadecimal string:
$_SESSION['check'] = md5($_SERVER['REMOTE_ADDR'] .
$_SERVER['HTTP_USER_AGENT']);
And this to compare the current and stored strings:
if ($_SESSION['check'] != md5($_SERVER['REMOTE_ADDR'] .
$_SERVER['HTTP_USER_AGENT'])) different_user();
Preventing session fixation
Session fixation happens when a malicious user tries to present a session ID to the server
rather than letting the server create one. It can happen when a user takes advantage of
the ability to pass a session ID in the GET part of a URL, like this:
/>In this example, the made-up session ID of 123456789 is being passed to the server.
Now, consider Example 13-9, which is susceptible to session fixation. To see how, type
it in and save it as sessiontest.php.
Example 13-9. A session susceptible to session fixation
<?php // sessiontest.php
session_start();
if (!isset($_SESSION['count'])) $_SESSION['count'] = 0;
else ++$_SESSION['count'];
echo $_SESSION['count'];
?>
294 | Chapter 13: Cookies, Sessions, and Authentication
Once saved, call it up in your browser using the following URL (prefacing it with the
correct pathname, such as http://localhost/web/):
sessiontest.php?PHPSESSID=1234
Press Reload a few times and you’ll see the counter increase. Now try browsing to:
sessiontest.php?PHPSESSID=5678
Press Reload a few times here and you should see it count up again from zero. Leave
the counter on a different number than the first URL and then go back to the first URL
and see how the number changes back. You have created two different sessions of your
own choosing here, and you could easily create as many as you needed.
The reason this approach is so dangerous is that a malicious attacker could try to dis-
tribute these types of URLs to unsuspecting users, and if any of them followed these
links, the attacker would be able to come back and take over any sessions that had not
been deleted or expired!
To prevent this, add a simple additional check to change the session ID using
session_regenerate_id. This function keeps all current session variable values, but re-
places the session ID with a new one that an attacker cannot know. To do this, you can
check for a special session variable’s existence. If it doesn’t exist, you know that this is
a new session, so you simply change the session ID and set the special session variable
to note the change.
Example 13-10 shows what the code might look like using the session variable
initiated.
Example 13-10. Session regeneration
<?php
session_start();
if (!isset($_SESSION['initiated']))
{
session_regenerate_id();
$_SESSION['initiated'] = 1;
}
if (!isset($_SESSION['count'])) $_SESSION['count'] = 0;
else ++$_SESSION['count'];
echo $_SESSION['count'];
?>
This way, an attacker can come back to your site using any of the session IDs that he
generated, but none of them will call up another user’s session, as they will all have
been replaced with regenerated IDs. If you want to be ultra-paranoid, you can even
regenerate the session ID on each request.
Using Sessions | 295
Forcing cookie-only sessions
If you are prepared to require your users to enable cookies on your website, you can
use the ini_set function like this:
ini_set('session.use_only_cookies', 1);
With that setting, the ?PHPSESSID= trick will be completely ignored. If you use this
security measure, I also recommend you inform your users that your site requires
cookies, so they know what’s wrong if they don’t get the results they want.
Using a shared server
On a server shared with other accounts, you will not want to have all your session data
saved into the same directory as theirs. Instead, you should choose a directory to which
only your account has access (and that is not web-visible) to store your sessions, by
placing an ini_set call near the start of a program, like this:
ini_set('session.save_path', '/home/user/myaccount/sessions');
The configuration option will keep this new value only during the program’s execution,
and the original configuration will be restored at the program’s ending.
This sessions folder can fill up quickly; you may wish to periodically clear out older
sessions according to how busy your server gets. The more it’s used, the less time you
will want to keep a session stored.
Remember that your websites can and will be subject to hacking at-
tempts. There are
automated bots running riot around the Internet try-
ing to find sites vulnerable to exploits. So whatever you do, whenever
you are handling data that is not 100 percent generated within your own
program, you should always treat it with the utmost caution.
At this point, you should now have a very good grasp of both PHP and MySQL, so in
the next chapter it’s time to introduce the third major technology covered by this book,
JavaScript.
Test Your Knowledge: Questions
Question 13-1
Why must a cookie be transferred at the start of a program?
Question 13-2
Which PHP function stores a cookie on a web browser?
Question 13-3
How can you destroy a cookie?
296 | Chapter 13: Cookies, Sessions, and Authentication
Question 13-4
Where are the username and password stored in a PHP program when using HTTP
authentication?
Question 13-5
Why is the md5 function a powerful security measure?
Question 13-6
What is meant by “salting” a string?
Question 13-7
What is a PHP session?
Question 13-8
How do you initiate a PHP session?
Question 13-9
What is session hijacking?
Question 13-10
What is session fixation?
See the section “Chapter 13 Answers” on page 445 in Appendix A for the answers to
these questions.
Test Your Knowledge: Questions | 297
CHAPTER 14
Exploring JavaScript
JavaScript brings a dynamic functionality to your websites. Every time you see some-
thing pop up
when you mouse over an item in the browser, or see new text, colors, or
images appear on the page in front of your eyes, or grab an object on the page and drag
it to a new location—all those things are done through JavaScript. It offers effects that
are not otherwise possible, because it runs inside the browser and has direct access to
all the elements in a web document.
JavaScript first appeared in the Netscape Navigator browser in 1995, coinciding with
the addition of support for Java technology in the browser. Because of the initial in-
correct impression that JavaScript was a spin-off of Java, there has been some long-
term confusion over their relationship. However, the naming was just a marketing ploy
to help the new scripting language benefit from the popularity of the Java programming
language.
JavaScript gained new power when the HTML elements of the web page got a more
formal, structured definition in what is called the Document Object Model or DOM.
DOM makes it relatively easy to add a new paragraph or focus on a piece of text and
change it.
Because both JavaScript and PHP support much of the structured programming syntax
used by the C programming language, they look very similar to each other. They are
both fairly high-level languages, too; for instance, they are weakly typed, so it’s easy to
change a variable to a new type just by using it in a new context.
Now that you have learned PHP, you should find JavaScript even easier. And you’ll be
glad you did, because it’s at the heart of the Web 2.0 Ajax technology that provides the
fluid web front-ends that savvy Web users expect these days.
JavaScript and HTML Text
JavaScript is a client-side scripting language that runs entirely inside the web browser.
To call it up, you place it between opening <script> and closing </script> HTML tags.
299
A typical HTML 4.01 “Hello World” document using JavaScript might look like Ex-
ample 14-1.
Example 14-1. “Hello World” displayed using JavaScript
<html>
<head><title>Hello World</title></head>
<body>
<script type="text/javascript">
document.write("Hello World")
</script>
<noscript>
Your browser doesn't support or has disabled JavaScript
</noscript>
</body>
</html>
You may have seen web pages that use the HTML tag
<script language="javascript">, but that
usage has now been depre-
cated. This example uses the more recent and preferred
<script type="text/javascript">.
Within the script tags is a single line of JavaScript code that uses its equivalent of the
PHP echo or print commands, document.write. As you’d expect, it simply outputs the
supplied string to the current document, where it is displayed.
You may also have noticed that, unlike PHP, there is no trailing semicolon (;). This is
because a new line acts the same way as a semicolon in JavaScript. However, if you
wish to have more than one statement on a single line, you do need to place a semicolon
after each command except the last one. Of course, if you wish, you can add a semicolon
to the end of every statement and your JavaScript will work fine.
The other thing to note in this example is the <noscript> and </noscript> pair of tags.
These are used when you wish to offer alternative HTML to users whose browser does
not support JavaScript or who have it disabled. The use of these tags is up to you, as
they are not required, but you really ought to use them, because it’s usually not that
difficult to provide static HTML alternatives to the operations you provide using Java-
Script. However the remaining examples in this book will omit <noscript> tags, because
we’re focusing on what you can do with JavaScript, not what you can do without it.
When Example 14-1 is loaded, a web browser with JavaScript enabled will output the
following (see Figure 14-1):
Hello World
One with JavaScript disabled will display this (see Figure 14-2):
Your browser doesn't support or has disabled JavaScript
300 | Chapter 14: Exploring JavaScript