Quản lý cấu hình web - part 8 potx
Bạn đang xem bản rút gọn của tài liệu. Xem và tải ngay bản đầy đủ của tài liệu tại đây (6.05 MB, 10 trang )
Installation and Conguration
[ 52 ]
Installing the Alfresco WAR on any platform
Use the Web Archive (WAR) le to install Alfresco on any platform. A WAR le
is a JAR le used to distribute a collection of les (JavaServer Pages, servlets, Java
classes, XML les, tag libraries, and static web pages) that together constitute a
web application.
Use this method of installing Alfresco if you already have installed a JDK, a
supported database, an application server, and the additional Alfresco components.
The WAR zip includes the binaries for ImageMagick and pdf2swf. To download and
install the Alfresco WAR le you need to carry out the following:
1. Browse to the Alfresco Community Edition download area.
2. Select and download one of the following les:
alfresco-community-war-3.2.zip
alfresco-community-war-3.2.tar.gz
3. Specify a location for the download.
4. Extract the downloaded le.
5. Copy the
alfresco.war le and share.war le to the appropriate location
for your application server, for example: <TOMCAT_HOME>/webapps.
If you deployed previous versions of Alfresco, you must remove any temporary les
created by your application server.
Modifying the directory paths for Tomcat 6.x
If you install Tomcat 6.x separately, some of the directories that were present in
Tomcat 5.x will not be present in the former. For example, Tomcat 6.x does not contain
the shared/classes and shared/lib directories. Alfresco uses these directories to
locate some of the conguration override les. This section describes how to congure
Tomcat 6.x to use the correct directory structure and les for Alfresco:
1. Locate
<TOMCAT_HOME>.
2. Create the
shared/classes directory.
3. Open the
<TOMCAT-HOME>/conf/catalina.properties le.
4. Change the value
shared.loader= to the following:
shared.loader=${catalina.base}/shared/classes,${catalina.base}/
shared/lib/*.jar
5. Copy the JDBC drivers for the database you are using to lib/.
Download from Wow! eBook <www.wowebook.com>
Chapter 2
[ 53 ]
6. Ensure that a copy of the commons-el.jar le is in the lib directory.
7. If you are using Java SE 6, copy any
.jar les that needed to go into the
Tomcat common/endorsed directory into the following directory:
jdk6/jre/lib/endorsed.
Downloading the extension samples
Each Alfresco distribution includes a download containing sample extension les,
such as the Spring conguration. You can use these sample extensions for advanced
Alfresco customizations by downloading and installing the les mentioned below,
as follows:
1. Browse to the Alfresco Community Edition downloads area.
2. Select and download one of the following les:
alfresco-community-sample-extensions-3.2.zip
alfresco-community-sample-extensions-3.2.tar.gz
3. Specify a location for the download. The extension samples are available for
you to congure. Once you have downloaded the sample les, copy them
into <classPathRoot>.
Deploying Share into a separate Tomcat
instance
This task provides information for running Share in a separate Tomcat instance.
These instructions are for Windows deployments, but Linux-based deployments can
use the same methods:
1. Install a new Tomcat instance.
2. Modify the
/conf/server.xml le for the new Tomcat instance as follows:
a. Change the port number in the line (for example, to 8006):
<Server port="8005" shutdown="SHUTDOWN">
b. Change the port number in the section (for example, to 8180):
<! Define a non-SSL HTTP/1.1 Connector on port 8080 >
<Connector port="8080"
3. Move the share.war le from the original Tomcat /webapps directory to the
new Tomcat /webapps directory.
Download from Wow! eBook <www.wowebook.com>
Installation and Conguration
[ 54 ]
4. (Optional) Congure the original Alfresco Tomcat deployment.
5. Start the original Tomcat. You can use Alfresco-supplied batch les.
6. Ensure that a copy of the
commons-el.jar le is in the Share Tomcat
lib directory.
7. If you are running the Share Tomcat on a separate machine, you must modify
the override le in the Share Tomcat
web-extension directory, as follows:
1. Open the
webscript-framework-config-custom.xml le.
2. Change any instance of the server and port to the correct name or IP
address of the Alfresco server:
http://<server-name>:8080.
3. Start the new Share Tomcat. You can use copies of the Alfresco-supplied
batch les, or your own.
Installing Alfresco components
This section describes how to install components that integrate with Alfresco. These
can be installed any time before or after installing Alfresco. This section will take you
through the installation of these components:
• Alfresco WCM
• WCM standalone deployment receiver
• OpenOfce
• ImageMagick
• Microsoft Ofce Add-ins
• Flash Player
• SWFTools
• TinyMCE language packs
• Alfresco Module Package
• Microsoft Ofce SharePoint Protocol Support
Installing Alfresco WCM
This section describes how to set up Alfresco Web Content Management (WCM) to
an existing instance of Alfresco:
1. Browse to the Alfresco Community Edition download area.
Download from Wow! eBook <www.wowebook.com>
Chapter 2
[ 55 ]
2. Select one of the following les:
° Windows:
alfresco-community-wcm-3.2.zip
° Linux: alfresco-community-wcm-3.2.tar.gz
3. Download the le into the Alfresco home directory. For example:
° Windows:
C:\Alfresco
° Linux: /opt/alfresco
4. Browse to the Alfresco home directory and unzip the downloaded le.
5. If your unzip program asks about existing directories, allow this because no
existing les will be overwritten.
6. In the root of the Alfresco home directory, copy the
wcm-bootstrap-
context.xml
le to the <extension> directory.
7. Restart the Alfresco server.
This ensures that the Alfresco server starts to use the installed WCM components. To
restart the Alfresco server, see the Starting the Alfresco server section further on in this
chapter. WCM is installed and congured.
Verifying the WCM installation
Verify the WCM installation after you have installed, congured, and started the
Alfresco server:
1. In the Alfresco home directory, open
alfresco.log.
2. In
alfresco.log, search for the following text: The Web Forms folder
was successfully created:
and The Web Projects folder was
successfully created:
3. Check that the following additional spaces are in your Alfresco repository:
° Web Projects in Company Home
° Web Forms in Data Dictionary
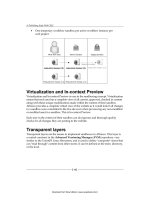
WCM has been installed, congured, started, and veried. To use the Website
Preview feature, start the Alfresco virtualization server (see the Starting the Alfresco
virtualization server section later in this chapter).
Download from Wow! eBook <www.wowebook.com>
Installation and Conguration
[ 56 ]
Installing the WCM standalone deployment receiver
The standalone deployment receiver allows a web project from WCM to be deployed
to a remote le server, typically a web or application server. The published les are
then typically published by a web server such as Apache for static content, or an
application server such as Tomcat or JBoss for dynamic content. To carry out the
installation follow the steps mentioned below:
1. Browse to the Alfresco Community Edition download area.
2. Download one of the following les:
° Windows:
Alfresco-DeploymentCommunity-3.2-Setup.exe
° Linux: Alfresco-DeploymentCommunity-3.2-Linux-x86-Install
3. At the Language selection prompt, click on OK.
4. At the Install Alfresco Standalone Deployment Receiver prompt,
click on Yes.
5. In the Welcome to the Alfresco Standalone Deployment Receiver window,
click on Next.
6. In the Choose Destination Location window, click on Next to accept
the default location for Alfresco or choose another location. For example,
C:\alfresco\deployment on Windows or /opt/alfresco/deployment
on Linux.
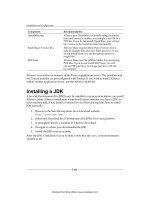
7. In the Deployment Settings window, enter the following settings:
Deployment setting Description
Temporary Data
The directory in which to store temporary data les
Log Location
The directory in which to store log data
Metadata Location
The directory in which to store metadata
Target Location
The directory in which to store deployment les
Name of default lesystem target
The default name of the lesystem target is default
8. For Windows directory locations, the backslashes need to be changed. For
example, use C:\\directory1\\directory2. Alternatively, you can use the
slash character as a separator, for example, C:/directory1/directory2.
9. Click on Next.
10. Enter a username and password for the user account that will administer the
deployment receiver.
Download from Wow! eBook <www.wowebook.com>
Chapter 2
[ 57 ]
11. If you are using RMI as your transport protocol, enter the port numbers
for the following:
Deployment setting Description
RMI Registry Port Number
The port number for the RMI registry. Choose the default of
44101 to avoid conict with the other services.
RMI Service Port Number
The port number to use for the RMI service. Choose this so
that there are no conicts with other services.
12. In the Start Copying Files window, click on Next.
13. In the InstallJammer Wizard Complete window, click on Finish.
The deployment receiver, out of the box, is congured with a single lesystem
deployment target.
Compiling and deploying the customizations on top
of the WCM core
We already talked about the build process for the code deployment in the previous
sections. So we have the build le ready and now we will see how we can deploy
the code or customizations we have done for Alfresco WCM. There are two main
approaches for this.
Integrating the code in the existing Alfresco WAR le
In this approach, we will integrate the les directly in the alfresco.war le. For
this you need to run the integrate-extension target. This target has some dependent
targets, which will compile the Java source les. Make the JAR le and then package
everything in one ZIP le and then integrate it with the alfresco.war le.
Deploying the code as an AMP
AMP stands for Alfresco Module Package. Using this approach, you can install
the code as a module. If you are installing using AMP, you should follow the
folder-specic folder structure for that, which has already been described earlier
in the Source code tree section. Apart from the folder structure, there are two other
les that need to be created:
•
module.properties: This will specify the metadata of the module with the
ID and version number.
Download from Wow! eBook <www.wowebook.com>
Installation and Conguration
[ 58 ]
The sample module.properties le that we have used here will look like:
# Cignex module
module.id=Cignex
module.title=Cignex Website
module.description=Cignex Website module
module.version=1.0
• file-mapping.xml: This le will be used if you want to customize the way
in which your AMP le is mapped into the WAR. If it is not provided, then
the default mapping information will be used.
Here we have customized this for the
WEB-INF folder, which generally
contains the faces-config-custom.xml or any faces-related
conguration les.
The content for
file-mapping.xml le is:
# Custom AMP to WAR location mappings
/web/WEB-INF=/WEB-INF
For deploying the code as an AMP, you need to run the update-war target. This
target has some dependent targets, which will compile the Java source les. Make
the JAR le and then create an AMP package with all of the customized les and
nally install this AMP to the Alfresco WAR le and update the WAR le.
Installing OpenOfce
Within Alfresco, you can transform a document from one format to another, for
example, a text le to a PDF le. To have access to these transformation facilities in
Alfresco, you must install OpenOfce. This is optional and can be done any time
after Alfresco is installed. If you installed Alfresco using an installation wizard,
OpenOfce may already be installed.
Download from Wow! eBook <www.wowebook.com>
Chapter 2
[ 59 ]
1. Browse to the OpenOfce.org download site: http://download.
openoffice.org
.
2. Download the latest (stable) version of OpenOfce for your platform.
3. When prompted, specify a download destination.
4. Browse to the location of your downloaded le and install the application.
5. A wizard guides you through the installation.
6. Accept the license agreement and click on Next.
7. Enter customer information and click on Next.
8. Select the Setup Type as Custom and click on Next.
Download from Wow! eBook <www.wowebook.com>
Installation and Conguration
[ 60 ]
9. Change the installation directory to:
° Windows:
c:\Alfresco\OpenOffice
° Linux: /opt/alfresco/OpenOffice
10. Optionally, select the les for which you want OpenOfce to be the default
application and click on Next.
11. Start one of the OpenOfce programs for the initial registration and then
close the program.
12. If the Alfresco server is running, stop and restart the server.
13. Modify the
ooo.exe= property in the <classPathRoot>\alfresco-
global.properties
le to point to the OpenOfce binary office.exe.
Installing ImageMagick
To enable image manipulation in Alfresco, you must install and congure
ImageMagick. Alfresco uses ImageMagick to manipulate images for previewing. If
you installed Alfresco using one of the installation wizards, ImageMagick has already
been installed. If however, ImageMagick has not been installed, you can choose to do
so by downloading it and installing it to work with your Alfresco instance.
Download from Wow! eBook <www.wowebook.com>
Chapter 2
[ 61 ]
1. Verify if ImageMagick is already installed in your system. You can run the
convert command, which is part of ImageMagick and is usually located in
/usr/bin.
2. If ImageMagick is not in your system, browse to the ImageMagick download
site and install the appropriate package for your platform.
3. Modify the
img.root= and img.exe= properties in the <classPathRoot>/
alfrescoglobal.properties
le to point to the ImageMagick root directory.
For example, in Windows:
° Set the
img.root= property to img.root=C:/Alfresco/ImageMagick.
° Set the
img.exe= property to img.exe=C:/Alfresco/ImageMagick/
bin/convert.exe.
And for Linux:
° Set the
img.root= property to img.root=/ImageMagick.
° Set the
img.exe= property to img.exe=/ImageMagick/bin/
convert.exe
.
° Ensure that you do not include a slash (
/) at the end of the path. For
example, /ImageMagick/.
Installing Microsoft Ofce add-ins
This task describes how to install Alfresco Add-ins for Microsoft® Ofce
applications, such as Word, Excel, and PowerPoint. The Alfresco add-ins have been
designed with Microsoft Ofce 2003 in mind. However, they are also compatible
with Microsoft Ofce 2007. Before you start, make sure that:
• The .NET Programmability Support option is installed for each of the Ofce
applications that you are installing the add-ins in (such as Word, Excel,
and PowerPoint). To nd these options, run the Ofce Setup program and
expand the list of available options for each application. You may require
your original Ofce 2003 install media to add these required components.
• The installing user has Windows administrator privileges.
• Any Microsoft Ofce applications on your system are NOT running,
including Outlook if you use Word as an e-mail editor. If you are running
Ofce 2007 on Windows Vista, note that Microsoft has rewritten the
WebDAV parts of Vista, which means you will experience READ-ONLY
access to the Alfresco repository over WebDAV. This is a known problem
with Vista and affects many applications, including Microsoft's own
SharePoint Server. There is no known workaround at the time of writing.
CIFS access is unaffected and works as it does with Windows XP. Therefore,
use CIFS to obtain read/write access to Alfresco using Windows Vista.
Download from Wow! eBook <www.wowebook.com>