Quản lý cấu hình web - part 10 potx
Bạn đang xem bản rút gọn của tài liệu. Xem và tải ngay bản đầy đủ của tài liệu tại đây (5.78 MB, 10 trang )
Installation and Conguration
[ 72 ]
• Virtualization server
• Standalone deployment receiver
Before running Alfresco, you may need to modify the
conguration settings. If you have installed Alfresco using one
of the installation wizards, the conguration is set for you.
Starting the Alfresco server
Once you have installed Alfresco, you can test the installation by starting the server.
For Windows:
1. Browse to
C:\alfresco and double-click on alf_start.bat.
2. Or if you installed Alfresco using the installer, from the Start menu, select
All Programs | Alfresco Community Edition | Start Alfresco Server.
A command prompt opens with a message indicating the server has started.
INFO: Server startup in nnnn ms
For Linux:
1. Browse to
/opt/alfresco/ and run alfresco.sh start.
2. The default shell is
sh. You can edit the alfresco.sh le to change to your
preferred shell.
Starting Alfresco Share
Once you have installed Alfresco, you can start Alfresco Share using a browser.
1. Browse to the location of your Alfresco installation. If you installed Alfresco on
your local machine, browse to
http://localhost:8080/share. In Windows,
alternatively, you can click on the Start menu and select All Programs |
Alfresco Community Edition | Alfresco Share. Alfresco Share opens.
2. Log in using admin as the default username and password.
Download from Wow! eBook <www.wowebook.com>
Chapter 2
[ 73 ]
Starting Alfresco Explorer
Once you have installed Alfresco, you can start Alfresco Explorer using a browser.
1. Browse to the location of your Alfresco installation. If you installed Alfresco
on your local machine, browse to
http://localhost:8080/alfresco.
In Windows, alternatively, you can click on the Start menu, and select All
Programs | Alfresco Community Edition | Alfresco Explorer. Alfresco
Explorer opens.
2. Log in using admin as the default username and password.
Stopping the Alfresco server
For Windows:
1. Browse to
C:\alfresco and double-click on alf.stop.bat.
2. Or click on the Start menu and select All Programs | Alfresco Community
Edition | Stop Alfresco Server.
The command prompt that opened during startup closes. Alfresco has now stopped.
For Linux:
1. Browse to /opt/alfresco/ and run alfresco.sh stop.
Starting the Alfresco virtualization server
If you have installed Alfresco WCM, you can use the Preview Website feature by
starting the Alfresco virtualization server.
For Windows:
1. Browse to
C:\alfresco and double-click on virtual.start.bat.
2. Or click on the Start menu and select All Programs | Alfresco Community
Edition | Start Virtual Server.
For Linux:
1. Browse to
/opt/alfresco/ and run virtual.alf_sh start.
Download from Wow! eBook <www.wowebook.com>
Installation and Conguration
[ 74 ]
Stopping the Alfresco virtualization server
For Windows:
1. Browse to
C:\alfresco and double-click on virtual.stop.bat.
2. Or you can also click on the Start menu and select Programs | Alfresco
Community Edition | Stop Virtual Server.
For Linux:
1. Browse to
/opt/alfresco/ and run sh virtual_alf.sh stop.
Starting the deployment engine
The standalone deployment engine is implemented as a set of Java libraries and is
multi-platform. Bourne shell scripts are provided for Unix, and Windows batch les
are provided for Windows.
For Windows, to start the standalone deployment engine:
1. Open a command prompt and run the
deploy_start script, or select Start
Menu | All Programs | Alfresco Standalone Deployment Receiver | Start
Alfresco Standalone Deployment Receiver.
2. The Start Menu action is available if you have used the deployment
installer to install the Standalone Deployment Engine. This action is calling
the
deploy_start.bat script. It is also possible to install the standalone
deployment engine as a Windows service, which can automatically start
when Windows starts.
For Linux, to start the standalone deployment engine, open a command prompt and
run the
deploy_start.sh script.
1. When deploying to a deployment engine running on a multi-NIC system,
it may be necessary to bind the RMI registry to a particular IP address. To
do this, add the following to the Java command in
deploy_start.sh or
deploy_start.bat:
-Djava.rmi.server.hostname=x.x.x.x
Here x.x.x.x is the IP address assigned to the NIC to which you want
to bind.
Download from Wow! eBook <www.wowebook.com>
Chapter 2
[ 75 ]
Stopping the deployment engine
The standalone deployment engine is implemented as a set of Java libraries and is
multi-platform. Bourne shell scripts are provided for Unix, and Windows batch les
are provided for Windows.
For Windows, to stop the standalone deployment engine:
1. Open a command prompt and run
deploy_stop.bat, or select Start Menu |
All Programs | Alfresco Standalone Deployment Receiver | Stop Alfresco
Standalone Deployment Receiver.
For Linux, to stop the standalone deployment engine open a command prompt and
run the
deploy_stop.sh script.
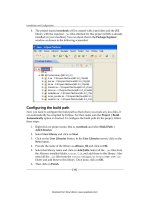
Starting and stopping Alfresco as a console
application
The options for starting and stopping Alfresco as a console application can be
viewed by clicking on Start | All Programs | Alfresco Enterprise as shown in the
following screenshot:
The options there are discussed next:
1. Stop Alfresco Server: This option is used to stop the Alfresco server. It stops
the MySQL server and the Tomcat application server.
2. Start Alfresco Server: Use this option to start the Alfresco server as a console
application. This will start the MySQL server and the Tomcat server.
3. Stop Virtual Server: This option is used to stop the Alfresco Virtual server. It
stops the Virtual Tomcat application server.
Download from Wow! eBook <www.wowebook.com>
Installation and Conguration
[ 76 ]
4. Start Virtual Server: Use this option to start the Alfresco Virtual server,
mainly used for Alfresco WCM. This will start the Virtual Tomcat Server.
5. Alfresco Explorer: This option is used to open Alfresco Web Client in
the browser.
6. Alfresco Share: This option is used to open Alfresco Share in the web browser.
7. Alfresco Website: This option is used to open Alfresco's website in the
web browser.
Alternatively, you can always start, stop, and restart the Tomcat application server
and the MySQL database server manually by going to their respective directories.
It gives more control to the user. However, the console option gives batch les to
perform the start/stop procedures in a consolidated way, relieving the user of any
unwanted errors.
Installation folder structure
Let's take a peek into the installation directory <alfresco_installation_folder>
to look at the folders:
•
alfresco: All of the shortcuts to installing, uninstalling, starting, and
stopping Alfresco as a Windows service, and restarting, stopping, and
starting of Alfresco as a normal console application from the Start menu of
Windows points to this folder.
•
alf_data: All of the Alfresco content and Lucene indexes are stored in this
directory.
•
amps: All of the AMP extensions les are required to be put here, and then
use the apply_amps script to perform the update.
•
bin: This directory contains the sub-installations of Alfresco. The main
installation scripts in the alfresco directory calls the sub-scripts in this
folder to start the sub-Alfresco Tomcat component of the installation, creating
and setting up the permissions for the Alfresco MySQL database. This folder
is very useful for people going for the manual installation rather than using
an installer.
•
extras: Contains additional les such as space template for records
management le plan, which can be imported into the Alfresco repository.
•
java: As is evident by the name, it contains the Java Development Kit.
All of the Alfresco development is done using Java as the core
programming language.
•
licenses: This directory contains the licenses for Alfresco, MySQL, Apache,
and licenses for the other third-party applications used inside Alfresco.
Download from Wow! eBook <www.wowebook.com>
Chapter 2
[ 77 ]
• tomcat: Again, as evident from the name, this directory holds the Tomcat
installation where the Alfresco application is deployed as a WAR le. You
can see the alfresco.war and share.war les in the webapps sub-folder of
this directory.
•
openoffice: This directory contains the entire portable Ofce suite
installation that is used for word processing, spread sheet processing,
and so on.
•
virtual-tomcat: This folder contains the customized Tomcat, which is used
for previewing the les in the WCM.
• The
README le gives information about using CIFS and some
troubleshooting tips.
You can uninstall the program by clicking on the
uninstall.exe application.
Conguring Alfresco as a Windows service
You can also congure Alfresco as a Windows service in a standard Alfresco/Tomcat
Installation. With the default installation, Alfresco is bundled as a web application
that launches within Tomcat. To congure Alfresco to run as a Windows service, you
need to set up Tomcat to run as a Windows service.
To congure Alfresco as a Windows service:
1. Open a command prompt.
2. Go to the
<alfresco_installation_folder>/tomcat/bin directory.
3. Use the following commands:
service.bat install alfresco
tomcat5.exe //US//alfresco DisplayName "Alfresco Server"
tomcat5.exe //US//alfresco JvmMs=256 JvmMx=512 JvmSs=64
tomcat5.exe //US//alfresco JavaHome=<alfresco_installation_
folder>/java
tomcat5.exe //US//alfresco Environment ALF_HOME=<alfresco_
installation_folder>/
tomcat5.exe //US//alfresco Environment PATH=<alfresco_
installation_folder>/bin;%PATH%
tomcat5.exe //US//alfresco StartPath <alfresco_installation_
folder> Startup auto
4. To uninstall the service, go to the <alfresco_installation_folder>/
tomcat/bin
and enter the following command:
service.bat uninstall alfresco
Download from Wow! eBook <www.wowebook.com>
Installation and Conguration
[ 78 ]
5. To edit your service settings, navigate to <alfresco_installation_
folder>/tomcat/bin
and enter the following command:
tomcat5w.exe //ES//alfresco
6. To start the service, locate the service named Alfresco Server in your
Windows Service control panel and start Alfresco from this control panel.
Summary
In this chapter we learned:
• Alfresco can be installed using a number of different methods as per
your preference.
• You can install Alfresco as a standard Web Archive (WAR) le to deploy on
your existing application server, or as a bundle that includes a precongured
Tomcat server, the Alfresco WAR (
alfresco.war), batch les, database setup
scripts, and a sample extensions folder.
• The various avors of installations mentioned in this chapter are aimed
to help you select what is best suited for your purpose and optimize your
development experience with Alfresco WCM.
The next chapter will take you through creating web forms and web projects and the
various aspects. You shall also learn about creating, editing, and updating content
and the Advanced Versioning Manager.
Download from Wow! eBook <www.wowebook.com>
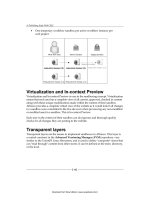
Getting Started with Alfresco
WCM
This chapter introduces the basic concepts of Alfresco Web Content Management from
a user's perspective. It demonstrates how to set up and congure the Alfresco Explorer
for managing a web project and showcases a sample web publishing scenario.
At the end of this module, you will be able to:
• Create a web project in Alfresco
• Bulk load an existing website content into a web project
• Congure the Virtualization Server to enable the previewing of content
• Publish the content from User Sandbox to Staging Sandbox after an
approval process
Understanding the basics of WCM
We assume you are familiar with Alfresco Explorer, which is a web-based user
interface to the Alfresco WCM. Before beginning the tutorial, you must ensure that:
1. The Alfresco ECM and WCM applications are installed.
2. The Alfresco Web Server is running.
3. The Alfresco Virtualization Server is running.
Download from Wow! eBook <www.wowebook.com>
Getting Started with Alfresco WCM
[ 80 ]
Log in to Alfresco WCM web interface
Using any web browser, you can connect to the Alfresco Explorer application. You
will be able to manage users, security, content, business rules, and everything related
to the enterprise content stored in Alfresco through the web client.
1. Access Alfresco web interface using the URL
http://localhost:8080/
alfresco
. Or use the URL as per your installation.
2. Log in as Administrator using the default credentials:
° Username: admin
° Password: admin
3. Click on Login.
Once you log in, you will notice My Alfresco Dashboard as the home page.
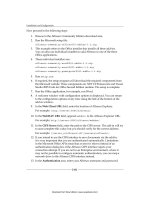
My Alfresco Dashboard
The My Alfresco Dashboard is a congurable area where you can select from a list
of precongured dashlets and components to construct your own page.
To start conguring your dashboard, click on the Congure icon given in My Alfresco
Dashboard as shown in the following screenshot. The Congure Dashboard Wizard
will open up allowing you to select the dashboard layout and dashlets:
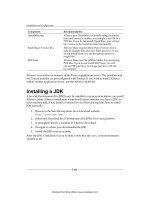
When conguring the dashboard, each component you select is displayed as a pane
on the dashboard. The available components are as follows:
Component Description
Getting Started
This displays helpful information for getting started, including links
to an Alfresco demonstration, a feature tour, and the Alfresco online
help system. Descriptions of some common tasks you may want to
perform in Alfresco are also included.
My Tasks To Do
Here all incomplete tasks assigned to you are listed. In this pane, you
can manage and reassign your tasks.
Download from Wow! eBook <www.wowebook.com>
Chapter 3
[ 81 ]
Component Description
All Active Tasks
The All Active Tasks component displays all active tasks—those
assigned to us and those assigned to other users. In this pane you
manage and reassign tasks.
My Pooled Tasks
All pooled tasks relevant to us are displayed here. These will be
pooled tasks assigned directly to us or tasks assigned to a group that
you belong to. In this pane you can manage and reassign your tasks.
My Completed
Tasks
The My Completed Tasks pane displays all tasks that you have
completed. In this pane you can view and cancel workows related to
a completed task.
OpenSearch
This component displays the OpenSearch pane on your dashboard,
which provides the ability to search across multiple repositories. This
is the same search pane that is displayed in the sidebar.
My Document
List
The My Document List component displays the documents within
your home space. In this pane you can view the document details,
preview the document, and perform various actions on the content
item without leaving the dashboard, including Check Out, Check In,
Update, Delete, Edit Details, and Download. Use the document type
lter in this pane to specify the information to display: All Items,
Word Documents, HTML Documents, PDF Documents, or Recently
Modied.
My Spaces List
This displays the current repository. In this pane you can navigate
the repository from the dashboard and perform various actions,
including creating spaces, uploading content, and viewing content
items. Use the lter in this pane to specify the type of information
to display: All Items, Spaces, Documents, My Items, or Recently
Modied.
My Tasks
Displays all incomplete tasks assigned to you. In this pane you can
lter the tasks by due date (Due Today, Next 7 days, No due date,
Overdue) and manage the tasks. This component is similar to the My
Tasks To Do component but with a different user interface.
My Web Forms
This displays the web projects you have been invited to and the web
forms associated with each project. The My Web Forms pane enables
you to preview a web project, create web content from a web form,
and display the Sandbox view for a project—all from the dashboard.
My Web Files
All the web projects you have been invited to and the Modied Items
list from your sandbox for each project are listed here. This pane
enables us to edit and preview individual content items, preview a
web project, and display the Sandbox view for a project—all from
the dashboard.
Web projects are created in the Company Home | Web Projects space. This space is
automatically created if either WCM was included with the base install of Alfresco or
if WCM is installed separately.
Download from Wow! eBook <www.wowebook.com>