Quản lý cấu hình web - part 11 ppt
Bạn đang xem bản rút gọn của tài liệu. Xem và tải ngay bản đầy đủ của tài liệu tại đây (5.97 MB, 10 trang )
Getting Started with Alfresco WCM
[ 82 ]
Web project Sandboxes
Before you delve into the details of web projects, it is worthwhile to understand the
concept of sandboxes.
• Each user in a web project is provided their own sandbox.
• Each web project has a Staging Sandbox. All user changes, such as uploading
a le in the system, are stored in their sandbox until they are submitted to the
Staging Sandbox.
• The User Sandbox also maps all les in the Staging Sandbox, which have not
been modied by the current user, providing a complete view of the web
project for that specic user with their current changes.
• The Staging Sandbox has all les submitted by each user, where the current
view is the most recently submitted version of a specic le.
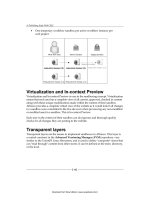
The following diagram illustrates what user Mark sees with no modied le in his
sandbox. Note how he sees the Staging Sandbox's version of
Index.html:
Mark creates or uploads a new products page. He will see the new Products.html
le and the staging's version of the Index.html le.
Download from Wow! eBook <www.wowebook.com>
Chapter 3
[ 83 ]
Now Mark modies the Index.html le to link to the Products.html le. This
creates a new version of the Index.html le in his sandbox. He no longer sees the
current Staging Sandbox's version of the le as illustrated in the following diagram:
Mark is satised with his changes and submits them through workow and the two
les are promoted to staging. His versions of the Index.html and Products.html
les become the Staging Sandbox's current versions as shown in the next diagram:
Download from Wow! eBook <www.wowebook.com>
Getting Started with Alfresco WCM
[ 84 ]
User Sandbox interface
The following screenshot shows the WCM interface for the user's sandbox at the
bottom and the Staging Sandbox at the top:
Using this interface users can:
• Browse their sandbox and the Staging Sandbox web project hierarchy using
the appropriate Browse Website action.
• Preview the website based on the state of their sandbox or the Staging
Sandbox using the appropriate Preview Website action.
• Submit all modied les from their sandbox to a workow using the Submit
All action.
• Roll back all modied les in their sandbox using the Undo All action.
• Refresh their sandbox or the Staging Sandbox using the appropriate Refresh
action. This is useful to view a new le submitted in another fashion (CIFS)
in the user's sandbox, or new submission in the Staging Sandbox from
other users.
Download from Wow! eBook <www.wowebook.com>
Chapter 3
[ 85 ]
Advanced Versioning Manager (AVM)
Sandboxes are backed by the Advanced Versioning Manager (AVM). The AVM
is an advanced repository implementation designed to support the version
control requirements of large websites and web applications. It is a completely
different implementation from the stores used by Alfresco Document and Records
Management. Think of the AVM as a virtual time machine. For example, if you want
to look at how a particular le appeared one month ago, you will be able to see it
against the backdrop of how everything else looked one month ago. The state of
the entire repository will be recorded in an efcient manner at each moment in its
transaction history. The AVM provides the following features, including some found
in other software tools like Subversion and TeamSite:
• Directories, renames, and le metadata will be versioned
• Every moment in transaction history is available immediately as a
read-only lesystem
• All directories are rst-class versioned objects
• Branching will be a constant-time operation
• Choice of database backends (for example, MySQL, Oracle, PostgreSQL)
• Access through CIFS
Alfresco AVM is an advanced store implementation designed to support the version
control requirements of managing large websites and web applications. The AVM
consists of a forest of content stores that can be used to manage the development
and staging of web content and associated source code. Each AVM store is loosely
modeled on Subversion, providing source code control for websites. Each AVM store
supports an extended versioning model, including:
• File-level version control
• File-level branching
• Directory-level version control
• Directory-level branching
• Store-level version control (snapshots)
• Store-level branching
Download from Wow! eBook <www.wowebook.com>
Getting Started with Alfresco WCM
[ 86 ]
In addition to these extended versioning operations, the AVM also supports the
following capabilities:
File version comparison
• Between two le versions on the same branch within a single store
• Between two le versions on different branches within the same store
• Between two le versions between any two stores
Directory version comparison
• Between two directory versions on the same branch within a single store
• Between two directory versions on different branches within the same store
• Between two directory versions between any two stores
Store version comparison
• Between two versions of any single store
• Between any two stores
AVM's support for le, directory, and store comparison provides the basis for
synchronization operations, for example, to synchronize any two branched versions
of a source tree within an AVM store or maintained in separate AVM stores.
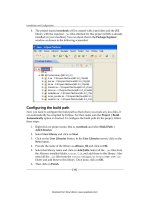
The web project
A web project contains all of the content and assets (les and images) required for the
website(s). All actions for managing a specic website, creating content, uploading
assets, reviewing and previewing content, workows, managing web forms,
managing rendering templates, and publishing are associated to a web project.
Create the web project
To create a new web project, go to the Company Home | Web Projects space, select
the Create drop-down menu and click on the Create Web Project link as shown in
the following screenshot:
Download from Wow! eBook <www.wowebook.com>
Chapter 3
[ 87 ]
You will see the Create Web Project Wizard, which includes seven steps in creating
a web project as follows:
1. Specify the basic web project details.
2. Indicate if you are creating a new project or using the structure of an
existing project.
3. Congure deployment servers.
4. Select and congure web forms for generating site content.
5. Select and congure workow for content added that is not generated by a
web form.
6. Add users and assign user roles to them.
7. E-mail a notication to the selected users.
The Create Web Project Wizard is shown in the following screenshot for
your reference:
Download from Wow! eBook <www.wowebook.com>
Getting Started with Alfresco WCM
[ 88 ]
Step one: Web Project Details
Use some sample web project information to complete the step.
Name
Unique name of your web project. This is used as unique ID for your
web project.
DNS name
DNS name for deployment. Usually it is your website DNS entry
such as Cignex.com.
Default Webapp
Your web project can have a web application folder name. By default
it is called as ROOT in WCM. You can have more than one web
application in your web project. The details of creating more web
applications are given in Chapter 8, Managing Multiple Websites
Using WCM.
Title
Title of your web project.
Description
Brief description of the web project.
Use as a template?
This web project can also be used as a template project to create many
such web projects with the click of a button.
Preview Provider
By default Alfresco provides Virtualization Server Preview. You can
customize it to have your own preview server.
Step two: Create From Existing Web Project
Select the Create a new empty Web Project option and click on the Next button.
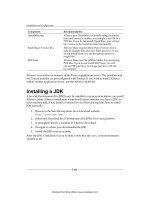
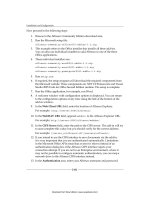
Step three: Congure Deployment Receivers
Click on Add Deployment Receiver to display the conguration details. Use the
following information to complete the page. More information about the deployment
receiver and the deployment process is explained in Chapter 7, Content Delivery
and Deployment.
Type
Live Server
Host
localhost
Port
44100
Username
admin
Password
admin
Step four: Congure Web Forms
Web form is a very important functionality of WCM. We are going to skip this step
as web forms are covered in detail in Chapter 4, Web Content Production with Web
Forms. Click on the Next button to skip this step.
Download from Wow! eBook <www.wowebook.com>
Chapter 3
[ 89 ]
Step ve: Congure Workow
This step helps you to add and congure a new workow for the web project. The
workow can also be associated with a web form (from the previous step).
Workows are covered very extensively in this book in Chapters 5 and 6. Refer these
chapters for understanding more about adding and conguring workows. For this
web project, do not select any workow. Click on the Next button to skip this step.
Step six: Add Users
This step allows you to select the content managers for this web project from the list
of available users.
Using the search feature provided, locate and select the user. Select Content
Manager as the role for this user and click on Add to List. You can add as many
users as you want to a specic web project:
Download from Wow! eBook <www.wowebook.com>
Getting Started with Alfresco WCM
[ 90 ]
Step seven: Email Users
Accept the default option No so that a notication e-mail is not sent.
Summary
Review the summary screen and click on the Finish button once you are ne with
the information provided in the summary.
You can always add or modify the web project details at any given point of time.
The new web project appears in the Web Projects space. Completing the wizard
automatically creates a source repository called a Staging Sandbox, and a set of
development repositories called User Sandboxes. There is one User Sandbox for
each user invited to work on the project, as well as an administrator sandbox.
Creating a site easily with web project
In this section we shall see how we can easily create a website with a web project. For
this we will use an existing ROOT folder, and import it into the web projects folder.
The details of creating a website from scratch are given in the subsequent chapters of
the book.
1. Create a new web project CIGNEX Technologies:
Download from Wow! eBook <www.wowebook.com>
Chapter 3
[ 91 ]
2. Import the .zip le of the existing ROOT folder into the newly created
web project:
3. Click on the created website, CIGNEX Technologies.
Download from Wow! eBook <www.wowebook.com>