Quản lý cấu hình web - part 16 ppt
Bạn đang xem bản rút gọn của tài liệu. Xem và tải ngay bản đầy đủ của tài liệu tại đây (6.2 MB, 10 trang )
Web Content Production with Web Forms
[ 132 ]
Let's develop a FreeMarker template for rendition:
1. Navigate to the
<installed-alfresco>/extras/wcm/forms folder.
2. Create a le named
news.ftl in the above-specied path and populate it
with the downloaded code from Packt's website.
3. Create a le named
blogs.ftl in the above-specied path and populate it
with the downloaded code from Packt's website.
For your reference, a complete guide to FreeMarker directives is
available at:
Download the complete code samples from the Packt website.
Extensible Stylesheet Language
The Extensible Stylesheet Language is divided into two sub-languages: Extensible
Stylesheet Language Transformations (XSLT) and Extensible Stylesheet
Language-Formatting Objects (XSL-FO).
Using XSLT for renditions
XSLT is a stylesheet language for XML documents. It is designed to transform
XML documents into other formats such as XHTML (Extensible HTML). With
XSLT you can add/remove elements and attributes to or from the output le. You
can also rearrange and sort elements, perform tests, and make decisions about
which elements to hide and display. XSLT uses XPath to nd information in an
XML document. XPath is used to navigate through elements and attributes in
XML documents. XSLT uses XPath to dene parts of the source document that
should match one or more predened templates. When a match is found, XSLT will
transform the matching part of the source document into the result document. XSLT
is written in stylesheet language and will have .xsl extension.
Download from Wow! eBook <www.wowebook.com>
Chapter 4
[ 133 ]
Some of the fundamentals used for XSLT are:
Declare namespaces
<?xml version="1.0" encoding="UTF-8"?>
<xsl:stylesheet version="1.0"
xmlns:xhtml=" />xmlns:xsl=" />xmlns:newsevents=" />xmlns:fn=" />exclude-result-prefixes="xhtml">
Dene output
format
<xsl:output method="html" encoding="UTF-8"
indent="yes"
doctype-public="-//W3C//DTD XHTML 1.0
Transitional//EN"
doctype -system="
xhtml1-transitional.dtd"
media-type="text/html"/>
Dene Template
<xsl:template match="/">
Iterate from a set of
repeating elements
<xsl:for-each select="/newsevents:news_events">(
newsevents is prefix and news_events is complex
element defined)
Select the values
of single occurring
element
<xsl:value-of select="newsevents:title"/>
Provide conditions
<xsl:if test="/newsevents:news_events/
newsevents:training-date">
<xsl:value-of select=" newsevents:news_events/
newsevents:training-date"/>
</xsl:if>
Let's develop an XSL template for rendition:
1. Navigate to the
<installed-alfresco>/extras/wcm/forms folder.
2. Create a le named
training.xsl in the above-specied path and populate
it with the downloaded code from the Packt website.
Download the complete code samples from Packt Publishing's
website. For your reference, a complete guide to XSL template is
available at: />Download from Wow! eBook <www.wowebook.com>
Web Content Production with Web Forms
[ 134 ]
Using XSL-FO for renditions
It is designed to provide a mechanism for formatting XML data for print, screen, and
other output media. Transforming XML for print is accomplished by transforming an
XML document to a Formatting Objects (FO) document, which itself is XML based,
via XSLT. The Formatting Objects processor is able to read the FO document and
transform it for different types of print output. The most common and best-supported
print output is currently Adobe PDF. XSL-FO has the advantage of being able to
produce PDFs.
The template les are now ready to use. The next task is to associate rendition
templates with the web forms created earlier, for this web form should be created in
Alfresco. In our case, we have already created a web form in the earlier section.
Associating rendition templates to web forms in
Alfresco
Templates cannot be associated through the web project after the web form is
created. Since the web form is already created, the association of template must
be done through Company Home | Data Dictionary | Web Forms | <web-form
space name>. We will congure our template to the blog's web form. The process is
as follows:
1. Ensure that the Alfresco Server is up and running.
2. Go to Company Home | Data Dictionary | Web Forms | <web-form space
name> | Blog:
Download from Wow! eBook <www.wowebook.com>
Chapter 4
[ 135 ]
3. Clicking on Edit Web Form action image under the web form space name
(as shown in the previous screenshot) opens the Edit Web Form Wizard
window. You may notice that the Edit Web Form Wizard window has four
steps, as shown in the following screenshot. The rst step is to delete the
previously uploaded XSD (if you want to upload another XSD) le and
then upload the XSD, the second step is to congure templates for rendition
output, the third step is to dene the workow for form data, and the fourth
step is to conrm the web form.
4. In the Step One window, you will notice the information provided about the
web project if this corresponding web form is associated. You will also see
that the rest of the values are prepopulated on the basis of the attached web
form. You are given the facility to upload or delete the existing XSD le, if
required. You can also change the Output path pattern. For now we will not
make any change, so click on Next.
Download from Wow! eBook <www.wowebook.com>
Web Content Production with Web Forms
[ 136 ]
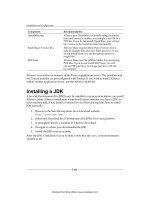
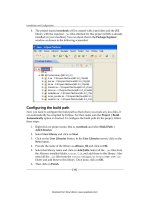
5. In the Step Two window, the Congure Templates page is shown. This step
allows you to upload a template le in order to generate forms in various
outputs. Click on Browse to locate and upload the blog.ftl le created in
the <installed-alfresco>/extras/wcm/forms folder. After uploading,
it will automatically ll up values, such as Rendering Engine, Name, Title,
Rendition mimetype, and Output path pattern. By default, the Rendition
mimetype will be selected as HTML. You can change the output path pattern
and also the extension. This means the le will be created with the specied
extension in the specied path. Take a look at the following screenshot and
change the output path as specied. We have also changed the extension in
order to generate the JSP le. By default, an HTML le will be generated.
Click on the Add to List button to add the uploaded templates. You can click
on the Add to List button as many times as you want to upload templates. A
list of associated templates will be visible at the bottom. The Remove icon is
also provided to delete the template in case it's not required. Click on Next:
Download from Wow! eBook <www.wowebook.com>
Chapter 4
[ 137 ]
6. In the Step Three window, the Congure Workow page is shown.
Select the No not now option (this step allows the creation of default
workows for form data; you will learn more about this in the next
chapter WCM Workow).
7. Clicking on the Next button will take you to the Step Four window, which
displays a summary of the web form. Clicking on the Finish button will
create the template. You will notice blog.ftl inside the blog space:
Download from Wow! eBook <www.wowebook.com>
Web Content Production with Web Forms
[ 138 ]
8. Continue the previous steps to upload the news.ftl and training.xsl le.
Provide the Output path pattern, as shown in the following screenshot, for
creating the news template when the Congure Templates pane is open.
9. Provide the Output path pattern as shown in the following screenshot for
creating the training template when the Congure Templates pane is open.
Download from Wow! eBook <www.wowebook.com>
Chapter 4
[ 139 ]
Do not proceed to the subsequent sections without rst conguring the
templates. The remaining sample solution is based on these web forms
and templates. Remember to specify the output path pattern as shown in
the previous screenshots for news and blogs. The Alfresco Wiki website
(
contains information about forms and widgets.
Associating web forms and renditions for
specic/multiple project(s)
Now we have created templates for our web forms. We have also associated our
template with the web forms and we are ready to use these forms to create and
publish content. We will subscribe to both (news and blog) web forms in this web
project and congure each for our web project website's unique content generation.
Once congured for a given web project, a Content Contributor can create new web
content using web forms via the Create Content wizard.
Follow these steps to congure web forms and templates to the web project:
1. Go to Company Home | Web Projects | Cignex.
2. Select Edit Web Project Settings from the action menu.
3. Click on Next.
4. On the next screen, again click on Next.
Download from Wow! eBook <www.wowebook.com>
Web Content Production with Web Forms
[ 140 ]
5. In the Step Three window, you will notice that the Select Web Forms
drop down will display all the available forms in Company Home | Data
Dictionary | Web Forms. If you want to select from the drop down, then
you have to click on the Add to List button.
6. If you want to create a new web form, you can select the Create Web Form
button, which will open the Create Web Form wizard. Once the web form
is created you can click on the Add to List button to add the newly-created
web form. You can see the added web forms in the panel as shown in the
following screenshot. You will also see the space of the newly created web
form inside Company Home | Data Dictionary | Web Forms.
7. You can also set up the templates if more than one template is associated
with each web form selected. You can also select the web form details to
change the Output path pattern, Title, Description, and also congure
workow. You will learn in detail about conguring workows in the next
chapter WCM Workow:
8. Click on Next and then click on Finish.
Download from Wow! eBook <www.wowebook.com>
Chapter 4
[ 141 ]
A few points to be considered are as follows:
• As we have learned, we can create a web form using two ways.
• Once a web form is created, association of the rendering template is available
only with the rst option (Create Web Form).
• Output paths for web forms and templates can be different for each web
project for the same web form. Using the rst option (Create Web Form), you
can create a generic output path and then this can be customized for various
projects using the second option (Edit Web Project setting).
Creating dynamic content
To support creation and editing of web content, Alfresco provides support for a
sandbox development model as you have read in Chapter 3, Getting Started with
Alfresco WCM.
There are multiple methods of adding and creating content for a web project. In
addition to creating web content within a project, you can also upload individual
les from your computer and perform a bulk import. For more details refer to
Chapter 3, Getting Started with Alfresco WCM. Let's assume that we have all the folders
in place inside the Cignex web project. We just want to create content for the news
and Blog web forms. The link for the news, blog, and training web form is specied
inside
index.jsp, which is placed under the root folder of the project. Follow these
steps:
1. Go to
Company Home | Web Projects | Cignex.
2. Expand the web form panel in the user sandbox. You will see a list of web
forms, which are congured for the web project. Select Create Content next
to the web form:
Download from Wow! eBook <www.wowebook.com>