JavaScript Bible, Gold Edition part 7 potx
Bạn đang xem bản rút gọn của tài liệu. Xem và tải ngay bản đầy đủ của tài liệu tại đây (375.04 KB, 10 trang )
24
Part I ✦ Getting Started with JavaScript
Below the rule, the script displays plain body text that combines static text with
information about the browser you use to load the document. The script writes a
stream of HTML information to the browser, including a tag to render a portion of
the information in boldface. Even though two lines of code are writing information
to the page, the result is rendered as one line — just as it is when all the text is
hard-coded in HTML.
Entering Your First Script
It’s time to start creating your first JavaScript script. Launch your text editor and
browser. If your browser offers to dial your Internet service provider (ISP) or begins
dialing automatically, cancel or quit the dialing operation. If the browser’s Stop
button is active, click it to halt any network searching it may try to do. You may
receive a dialog box message indicating that the URL for your browser’s home page
(usually the home page of the browser’s publisher — unless you’ve changed the set-
tings) is unavailable. That’s fine. You want the browser open, but you shouldn’t be
connected to your ISP. If you’re automatically connected via a local area network in
your office or school, that’s also fine. However, you don’t need the network connec-
tion for now. Next, follow these steps to enter and preview your first JavaScript
script:
1. Activate your text editor and create a new, blank document.
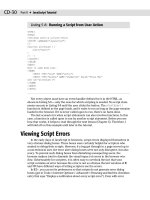
2. Type the script into the window exactly as shown in Listing 3-1.
Listing 3-1: Source Code for script1.htm
<HTML>
<HEAD>
<TITLE>My First Script</TITLE>
</HEAD>
<BODY>
<H1>Let’s Script </H1>
<HR>
<SCRIPT LANGUAGE=”JavaScript”>
<! hide from old browsers
document.write(“This browser is version “ + navigator.appVersion)
document.write(“ of <B>” + navigator.appName + “</B>.”)
// end script hiding >
</SCRIPT>
</BODY>
</HTML>
3. Save the document with the name script1.htm. (This is the lowest common
denominator filenaming convention for Windows 3.1 — feel free to use an
.html extension if your operating system allows it.)
4. Switch to your browser.
25
Chapter 3 ✦ Your First JavaScript Script
5. Choose Open (or Open File on some browsers) from the File menu and select
script1.htm. (On some browsers, you have to click a Browse button to reach
the File dialog box.)
If you typed all lines as directed, the document in the browser window should
look like the one in Figure 3-3 (with minor differences for your computer’s operating
system and browser version). If the browser indicates that a mistake exists some-
where as the document loads, don’t do anything about it for now. (Click the OK but-
ton if you see a script error dialog box.) Let’s first examine the details of the entire
document so you understand some of the finer points of what the script is doing.
Examining the Script
You do not need to memorize any of the commands or syntax discussed in this
section. Instead, relax and watch how the lines of the script become what you see
in the browser. In Listing 3-1, all of the lines up to the
<SCRIPT> tag are very stan-
dard HTML. Your JavaScript-enhanced HTML documents should contain the same
style of opening tags you normally use.
The <SCRIPT> tag
Any time you include JavaScript verbiage in an HTML document, you must
enclose those lines inside a
<SCRIPT> </SCRIPT> tag pair. These tags alert the
browser program to begin interpreting all the text between these tags as a script.
Because other scripting languages (such as Microsoft’s VBScript) can take advan-
tage of these script tags, you must specify the precise name of the language in
which the enclosed code is written. Therefore, when the browser receives this sig-
nal that your script uses the JavaScript language, it employs its built-in JavaScript
interpreter to handle the code. You can find parallels to this setup in real life: If you
have a French interpreter at your side, you need to know that the person with
whom you’re conversing also knows French. If you encounter someone from Russia,
the French interpreter can’t help you. Similarly, if your browser has only a
JavaScript interpreter inside, it can’t understand code written in VBScript.
Now is a good time to instill an aspect of JavaScript that will be important to you
throughout all your scripting ventures: JavaScript is case-sensitive. Therefore, you
must enter any item in your script that uses a JavaScript word with the correct
uppercase and lowercase letters. Your HTML tags (including the
<SCRIPT> tag) can
be in the case of your choice, but everything in JavaScript is case-sensitive. When a
line of JavaScript doesn’t work, look for the wrong case first. Always compare your
typed code against the listings printed in this book and against the various vocabu-
lary entries discussed throughout it.
A script for all browsers
The next line after the <SCRIPT> tag in Listing 3-1 appears to be the beginning of
an HTML comment tag. It is, but the JavaScript interpreter treats comment tags in a
special way. Although JavaScript dutifully ignores a line that begins with an HTML
comment start tag, it treats the next line as a full-fledged script line. In other words,
the browser begins interpreting the next line after a comment start tag. If you want
to put a comment inside JavaScript code, the comment must start with a double
slash (
//). Such a comment may go near the end of a line (such as after a JavaScript
26
Part I ✦ Getting Started with JavaScript
statement that is to be interpreted by the browser) or on its own line. In fact, the
latter case appears near the end of the script. The comment line starts with two
slashes.
Step back for a moment and notice that the entire script (including comments) is
contained inside a standard HTML comment tag (
<! comment >). The value of
this containment is not clear until you see what happens to your scripted HTML
document in a non-JavaScript-compatible browser. Such a browser blows past the
<SCRIPT> tag as being an advanced tag it doesn’t understand. But it treats a line of
script as regular text to be displayed in the page. If you enclose script lines between
HTML comment tags, most older browsers don’t display the script lines. Still, some
old browsers can get tripped up and present some ugliness because they interpret
any
> symbol (not the whole > symbol) as an end-of-comment character. Figure
3-4 shows the results of your first script when viewed in a now obsolete version of
the America Online Web browser (version 2.5 for Windows).
Figure 3-4: If you enclose script lines between HTML comments,
the entire script is ignored by most, but not all, non-JavaScript
browsers. Here, an old America Online browser shows part of the
script anyway.
Remember, too, that some users don’t have access to modern browsers or
graphical browsers. (They use the Lynx text-oriented UNIX Web reader software or
Lynx-like browsers in handheld computers.) By embracing your script lines within
these comments, your Web pages don’t look completely broken in relatively mod-
ern, non-JavaScript browsers.
Notice that the comment lines that shield older browsers from your scripts go
inside the <SCRIPT> </SCRIPT> tags. Do not put these comment lines above
the <SCRIPT> tag or below the </SCRIPT> tag and expect them to work.
One more issue about the script-hiding comment lines in this book. To save
space on the page, most examples do not have comment lines inserted in them. But
as you can see in the full-fledged application examples from Chapters 49 through
57, the comment lines are where they should be. For any pages you produce for
public consumption, always encase your script lines inside these comments.
Note
27
Chapter 3 ✦ Your First JavaScript Script
Displaying some text
Both script lines in Listing 3-1 use one of the possible actions a script can ask a
document to perform (
document.write(), meaning display text in the current doc-
ument). You learn more about the
document object in Chapter 18.
Whenever you ask an object (a document in this case) to perform a task for you,
the name of the task is always followed by a set of parentheses. In some cases —
the
write() task, for example — JavaScript needs to know what information it
should act on. That information (called a parameter) goes inside parentheses after
the name of the task. Thus, if you want to write the name of the first U.S. president
to a document, the command to do so is
document.write(“George Washington”)
The line of text that the script writes starts with some static text (“This
browser is version”
) and adds some evaluated text (the version of the browser)
to it. The writing continues with more static text that includes an HTML tag (
“of
<B>”
), more evaluated text (the name of the browser application), and an HTML
closing tag and the sentence’s period (
“</B>.”). JavaScript uses the plus symbol
(
+) to join (concatenate) text components into a larger, single string of text charac-
ters to be written by the document. Neither JavaScript nor the
+ symbol knows any-
thing about words and spaces, so the script is responsible for making sure that the
proper spaces are passed along as part of the parameters. Notice, therefore, that an
extra space exists after the word “version” in the first
document.write() parame-
ter, and extra spaces exist on both sides of “of” in the second
document.write()
parameter.
To fetch the information about the browser version and name for your parame-
ters, you call upon JavaScript to extract the corresponding properties from the
navigator object. You extract a property by appending the property name to the
object name (
navigator in this case) and separating the two names with a period.
If you’re searching for some English to mentally assign to this scheme as you read
it, start from the right side and call the right item a property “of” the left side: the
appVersion property of the navigator object. This dot syntax looks a great deal
like the
document.write() task, but a property name does not have parentheses
after it. In any case, the reference to the property in the script tells JavaScript to
insert the value of that property in the spot where the call is made. For your first
attempt at the script, JavaScript substitutes the internal information about the
browser as part of the text string that gets written to the document.
Have Some Fun
If you encounter an error in your first attempt at loading this document into your
browser, go back to the text editor and check the lines of the script section against
Listing 3-1, looking carefully at each line in light of the explanations. There may be a
single character out of place, a lowercase letter where an uppercase one belongs,
or a quote or parenthesis missing. Make necessary repairs, switch to your browser,
and click Reload.
28
Part I ✦ Getting Started with JavaScript
To see how dynamic the script in script1.htm is, go back into the text editor
and replace the word “browser” with “client software.” Save, switch, and reload
to see how the script changes the text in the document. Feel free to substitute
other text for the quoted text in the
document.write() statement. Or, add
more text with additional
document.write() statements. The parameters to
document.write() are HTML text, so you can even write “<BR>” to make a line
break. Always be sure to save, switch, and reload to see the results of your
handiwork.
✦✦✦
JavaScript
Tutorial—
Summary
T
he JavaScript tutorial is intended for the newcomer who
has little or no programming experience. But even expe-
rienced programmers who have not worked in an object-
based environment will find many of the tutorial chapters
helpful in grasping basic concepts about the ways scripts
interact with HTML elements on a page. In fact, an experi-
enced programmer may have to “unlearn” some concepts
while making the transition to a looser, interpreted environ-
ment in contrast to the rigorous discipline required in other
environments.
That’s not to say that JavaScript is anything less than “real”
programming. As several chapters in this tutorial prove, the
JavaScript language provides the same fundamental program-
ming facilities that exist in most heavy-duty languages. At the
same time, however, the language is simplified and forgiving in
an attempt to attract a wider audience than may gravitate to
languages such as C, C++, or Java.
A significant challenge in molding a tutorial about client-
side JavaScript is accommodating the wide range of document
object models that are spread among numerous browser
brands, operating systems, and versions. Despite the large
number of object model permutations implemented in the
browsers that visit a public Web site, the earliest object
model, as implemented in the first scriptable browsers, serves
as a convenient and easily digestible common denominator
for learning the basics. Therefore, the tutorial focuses most of
its energy on the first-generation object model. Everything
you learn from the tutorial is immediately applicable to the
latest browsers. This knowledge also serves as an excellent
foundation for understanding newer object model concepts,
whether your development target is just one browser type for
a corporate intranet or any browser “out there” surfing the
Web. After you have been through the tutorial, Chapter 14’s
overview of the branches of the object model evolutionary
tree becomes crystal clear.
✦✦✦✦
In This Part
Nine Tutorial
Chapters
What Scripts Do in
Documents
Programming
Fundamentals
Introduction to
Document Objects
✦✦✦✦
PART
II
II
30
Part II ✦ JavaScript Tutorial — Summary
The following sections provide brief summaries of the topics covered in the tuto-
rial chapters found on the CD-ROM in Acrobat format. Each of the chapters ends
with exercises, whose answers are also on the CD-ROM in Appendix C.
Chapter 4. Browser and Document Objects
One of the best ways to understand why JavaScript is so valuable on the client
computer is to see how scripts add life to otherwise flat HTML documents. Popular
categories of scripting implementations include interactive user interfaces, instan-
taneous form validation, small data collection lookups (the data is embedded in the
document for JavaScript to search through), multiple frame management, and, in
more recent browsers, dynamic designs that allow dragging elements around the
page. At the same time, it is important to recognize when JavaScript is not the pre-
ferred technology.
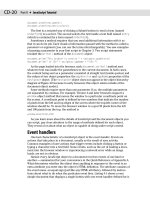
This chapter introduces the concept of a document object model (DOM). You can
visualize the object model as a kind of road map to the page elements that become
objects in the browser’s memory as the page loads into the browser. Figure II-1 is
a roadmap for a hypothetical Web page that contains one of each kind of element
recognized as an object in the lowest common denominator model. The containment
notion conveyed by the grey boxes reinforces the way script statements reference
objects, starting with the
window object at the top of the hierarchy. For example,
to address a text box, you assemble a reference like this:
window.document.
formName.textBoxName
.
Figure II-1: Map of the lowest common denominator document object model
window
frame self top parent
history document location
link anchorform
text
textarea
password
radio
checkbox
button
reset
submit
select
option
On the
CD-ROM
31
Part II ✦ JavaScript Tutorial — Summary
After a discussion of how “dot syntax” works, the chapter ends with an introduc-
tion to the way objects distinguish themselves from each other by way of their
properties, methods, and event handlers. An object’s properties are like adjectives
that describe various characteristics of the object. Methods are like an object’s
verbs, which provide scripts with ways to ask objects to do something. Event han-
dlers denote the kinds of user and system actions (such as clicking on a button)
that trigger script statements to run. Once you know an object’s properties, meth-
ods, and event handlers, you know everything your scripts can do to make it
“dance.”
Chapter 5. Scripts and HTML Documents
This chapter helps you begin to see the physical relationships between blocks of
scripts and the rest of the tags in an HTML document. By and large, scripts go
inside a set of
<SCRIPT> tags. These tags tell the HTML rendering engines of script-
able browsers to ignore the content between the start and end tags. Such script
blocks can occur inside the HEAD or BODY elements, or both, depending on what
your scripts have to do in the page. But non-scriptable browsers do not recognize
the
<SCRIPT> tag and try to render the scripts. To avoid this possibility, surround
the content of
<SCRIPT> tags with HTML comment symbols. Scriptable browsers
can still run the scripts, but most non-scriptable browsers skip over the com-
mented material.
Script statements — each line of script code is a statement — run either immedi-
ately or in deferred mode. An immediate script statement is one that runs while the
page loads into the browser. Such a statement might use scripting to generate part
of the page’s content dynamically (as the script in Chapter 3 does). Most scripts,
however, load into the browser’s memory and sit quietly until some user or system
action triggers those statements.
While you develop scripts — and especially while you learn JavaScript — script
errors are bound to occur. It is important to view the messages associated with an
error. In this chapter you learn the ways various browsers and browser generations
let you view error messages.
Chapter 6. Programming Fundamentals, Part I
For the next two chapters, you momentarily leave the browser world, and dive
into vital concepts that the JavaScript language shares with just about every pro-
gramming language. The terminology may be foreign at first (if you are a non-pro-
grammer), but you will use this knowledge virtually every day that you apply
JavaScript to your pages.
First is the simple idea that any piece of information — a string of text charac-
ters, a number, a special indicator of “true” or “false”—is a value. To simplify a
script statement’s interaction with values, you typically assign each value to a vari-
able. In the JavaScript world, a variable is simply a name (identifier) that makes it
easy to preserve a value in memory while other statements run.
One of the most important concepts to master is that a script statement usually
consists of one or more expressions — either a value or combination of values, such
32
Part II ✦ JavaScript Tutorial — Summary
as 3 + 4. Each expression is said to evaluate to some value. The expression 3+4
evaluates to 7; if the value 3 is assigned to a variable named a, and 4 is assigned to
a variable named
b, then the expression a+b also evaluates to 7.
To help you experiment with values, expressions, and expression evaluation,
Chapter 6 introduces you to a tool called Evaluator Jr., a simplified version of a
more powerful authoring and learning tool found in Chapter 13. You can type an
expression into one field on Evaluator Jr.’s page, and immediately see the value to
which it evaluates.
Every value is of some type, such as a number or string of text characters. While
so-called data typing is not as rigid in JavaScript as it is in other languages, it is
sometimes necessary to convert a value of one type to another. Thus, the chapter
demonstrates simple conversions between number and string values. You then
meet basic operators for simple arithmetic and comparisons.
Chapter 7. Programming Fundamentals,
Part II
The tour of programming fundamentals continues with ways to influence the
sequence that the browser follows to execute statements in a script. A few
approaches to these control structures allow a script to follow different paths based
on decisions (using the comparison operators shown in Chapter 6) or on criteria
for repetition (such as inspecting each character of a text string). You learn about
if constructions and simple repeat loops.
Next you learn how to gather a related sequence of script statements into a
group called a function. A function contains the statements of a deferred script.
Functions are most commonly invoked by user actions (from object model event
handlers), but they are also invoked by statements in other functions. You can also
hand off values from one function to another in the form of parameters to a function.
To round out the fundamentals discussion, this chapter introduces the very
important concept of arrays. An array is an organized list of values (visualize a one-
column spreadsheet). You can use arrays to keep a set of related values together,
very commonly as a way to facilitate looking for a value within a collection (with the
help of the repeat loops you learned earlier). Arrays also play a role in related
groups of objects in the document object model, as you learn in subsequent chapters.
Chapter 8. Window and Document Objects
Starting with Chapter 8, you come back to the browser objects, and begin to
apply your working knowledge of the core JavaScript language to understanding the
way scripts work with objects in a document. This chapter focuses on object high
up the hierarchy shown earlier in Figure II-1.
At the top of the hierarchy is the
window object, which represents the window
created by the browser program. You can also use scripts to create subwindows.
For the tutorial, you learn about setting text in the window’s status bar, three types
of dialog boxes, and how to trigger scripts when a pages finishes loading all of its
content into the window.
33
Part II ✦ JavaScript Tutorial — Summary
The location and history objects are not quite as concrete as the window
object. The
location object is the more important of the two, because it contains
information about the URL (and various pieces of the URL) of the page currently in
the window. For privacy and security reasons, scripts have very little access to the
browser’s history, but the
history object provides limited script access to actions
that simulate the Back and Forward navigation buttons.
A pivotal object is the
document. It is the master container of all content that
arrives with the page. Scripts reference elements on the page by way of the
document
object, such that the term, document, becomes part of the reference to an element.
You can use one of the
document object’s methods to generate content on the page
as it loads (as demonstrated in Chapter 3).
Chapter 9. Forms and Form Elements
Most interactive Web pages contain forms, which provide text boxes to fill in,
lists to choose from, and buttons to click. The form, itself, is an object. Many of its
properties reflect the attributes you typically assign to a form, such as
METHOD,
ACTION, and TARGET. Thus, scripts can change the values of those attributes based
on other user settings in the form.
A form object is also a container. Nested inside are the form controls with which
users interact. In this chapter you meet the most common properties and event
handlers of text fields, buttons, radio buttons, checkboxes, and SELECT elements.
Because form control interaction so often triggers script execution, you learn how to
pass information from the form to a function invoked by a control’s event handler.
While you’re on the subject of forms, you see the basics of client-side validation
of data to assure that form settings or text in a desired format get submitted to the
server. Client-side validation is much faster and more user-friendly than having the
server return the form for the user to complete.
Chapter 10. Strings, Math, and Dates
In Chapter 10, you come back momentarily to the core JavaScript language to
learn about a few objects that many of your document object scripts use to manipu-
late form or other kinds of values. You see more and more how the core JavaScript
language and document object models work together to produce your applications.
A string object represents a sequence of text characters. Script statements often
need to assemble longer strings out of smaller components. Operators (introduced
back in Chapter 6) play a role. But a string object also has several methods avail-
able to simplify the copying of sections of a string or finding out if a longer string
contains a shorter one (for example, whether a text box for an e-mail address con-
tains an
@ character).
The JavaScript
Math object is a resource that is always available to any script
statement. Use the object’s properties to get copies of constant values, such as pi;
use its methods for operations such as getting the absolute value of a number or
raising a number to a power.
Calculations involving dates and times take advantage of a huge assortment of
methods associated with the
Date object. With the help of this object, your scripts