OCA /OCP Oracle Database 11g A ll-in-One Exam Guide- P70 pot
Bạn đang xem bản rút gọn của tài liệu. Xem và tải ngay bản đầy đủ của tài liệu tại đây (274.72 KB, 10 trang )
OCA/OCP Oracle Database 11g All-in-One Exam Guide
646
4. If you wish the new user to have privileges on databases already registered,
issue this command:
grant catalog for database dbname to vpcowner;
where dbname is the name of an already registered database that you wish
vpcowner to manage.
5. As vpcowner, connect to the catalog with RMAN, and issue the command
create virtual catalog;
6. Using RMAN, connect to the catalog as vpcowner and to the target as SYS, register
the target (if was not previously registered), and then carry out backup and
restore operations as normal.
The owner of a virtual private catalog will have no access to backups relating to
databases not registered in their domain, and need have no object or tablespace privileges
in the catalog database, nor any system privileges beyond those granted in Step 2.
TIP A GRANT REGISTER DATABASE will insert a row in VPC_USERS, a
table in the catalog owner’s schema. A GRANT CATALOG FOR DATABASE
will insert a row in the VPC_DATABASES table. The virtual catalog owner has
synonyms that allow these tables, which are used to filter access to be seen.
Protecting and Rebuilding the Catalog
If the recovery catalog is not available, RMAN can still function—but it will be crippled.
Because the RMAN repository is always stored in the target databases’ controlfiles, loss
(temporary or permanent) of the catalog is not disastrous. But the controlfile-based
repository will only hold a relatively small amount of information—all data older than
the CONTROLFILE_RECORD_KEEP_TIME parameter will be overwritten. So while
backups can still be performed, any restore and recover operations will be much harder.
Backup sets and image copies going back weeks may be available, but RMAN will not be
able to find them. Furthermore, any stored scripts will also be unavailable. It is therefore
necessary to protect the catalog database. And worst of all, if all copies of the controlfile
itself are lost, then RMAN will be useless—unless the controlfile autobackup facility has
been enabled (which it should always be).
There is a recursive problem with backing up the catalog database. If you back it up
with RMAN, then if it needs to be restored, RMAN will not be able to do the job. So,
unless you have a second catalog database and use this to register the first, you will have
to use a user-managed backup technique. These are fully described in Chapter 18.
The catalog schema is not very big, nor very busy. Even if the catalog is supporting
hundreds of databases, it will usually be only a few gigabytes. It may therefore be feasible
to make full whole offline backups regularly: simply shut it down, and copy it. This,
together with the archive logs (as with any production database, the catalog database
should be run in ARCHIVELOG mode), will be an adequate backup—if you can stand
the downtime. Alternatively, it may be possible to make a logical backup, using the
export/import utilities or the newer Data Pump facility (described in Chapter 23).
Chapter 17: Advanced RMAN Facilities
647
PART III
If backups are made without connecting to the catalog for any reason (such as the
catalog being unavailable—perhaps because it was down for a cold backup), then
the catalog repository must be resynchronized with the controlfile repository. This
will happen automatically the next time RMAN connects to both the target and the
catalog. The resync operation transfers all information from the controlfile repository
into the catalog, thus bringing it up to date. Data about backups will therefore only be
lost if the period without a resync exceeds the CONTROLFILE_RECORD_KEEP_TIME.
TIP All backup events that occur while not connected to the catalog, as well
as information regarding archive log generation and physical changes such as
datafile creation, are transferred into the catalog by an automatic resync at the
next connection. You can also force a resync from the RMAN prompt with
the RESYNC CATALOG command.
But what if the controlfile and perhaps other parts of the target database are
lost, and the catalog is lost too? The backups (backup sets and image copies) may
be perfect, but RMAN will not be able to find them. Of course, it should be possible
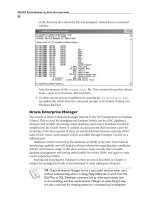
to restore the catalog—but assume that it is not. The first step is to connect to the
target with the RMAN executable, and start it in NOMOUNT mode. Even if there is
no parameter file, this will succeed because RMAN will start the instance with a
dummy parameter file; Figure 17-2 shows this procedure. Of course, the startup
will stop in NOMOUNT mode: there will be no controlfile to mount.
Once the instance is started, if you know where the backups of the controlfile and
spfile are located, instruct RMAN to restore them from this location; or if autobackup
had been enabled, use the technique described in Chapter 16. Then restart the instance
with the restored spfile, and mount the database with the restored controlfile. Then, if
Figure 17-2 Starting a Windows instance, with RMAN and no parameter file
OCA/OCP Oracle Database 11g All-in-One Exam Guide
648
you know where the other backup sets are stored, register them in the controlfile-based
repository with the CATALOG command. For example,
catalog datafilecopy '/u02/dfcopies/example01/dbf';
catalog backuppiece '/u02/backupsets/TAG20081028T174426_4JGMW1R9_.BKP';
catalog start with '/u01/app/oracle/flash_recovery_area';
The first of these commands registers an image copy of a datafile, which could
have been made either by RMAN or by a user-managed backup. Similar syntax can
register copies of the controlfile and of archive log files. The second command registers
a backup set piece. Note that in neither case is it necessary to tell RMAN what the copy
or backup set contains: RMAN can work this out by inspecting the file contents. The
third command is the most powerful: it instructs RMAN to go to a directory (in the
example, the root of the flash recovery area) and navigate down all subdirectories
cataloging every copy and backup set piece that it finds. By giving a tape device as the
path, RMAN can rebuild an entire repository. Follow up the catalog commands by
connecting to each target database. The automatic RESYNC operation will populate
the catalog with any information from the repositories in each controlfile that has not
already been inserted.
While it is possible to create a new, empty, RMAN catalog and then populate it
(always assuming that you know where the backups are) with the CATALOG and
RESYNC CATALOG commands, it is far more preferable to back up your catalog so
that if it is damaged, you can restore it.
By all means back up your catalog database with RMAN. Connect to it as a target,
and back it up as you would any other target. Be sure to enable the autobackup facility.
But do not back up your recovery catalog database only with RMAN! If it is damaged,
there could be a recursive problem with any attempt to restore: if either the controlfile
or the tablespace containing the catalog were damaged, any attempt to open the
database and then connect to it as a catalog must fail. The autobackup will help you
to survive this situation, but it will be necessary to protect the catalog database by
other means—perhaps user-managed backups (detailed in Chapter 18), or using
operating system– and hardware-based techniques, or using the Data Pump facility
(described in Chapter 23) to make a logical backup.
Exercise 17-1: Create a Recovery Catalog In this exercise, you will create a
recovery catalog. Use any database you have available, even the one you intend to use
as a target—though this would not be acceptable for a production environment. The
examples assume that the catalog database is reachable through the TNS connect string
CATDB, and that the target is a local database to be connected to with operating
system authentication.
1. Connect to the catalog database using SQL*Plus as user system:
sqlplus system/oracle@rman
2. Create a tablespace in the catalog database, with a command such as
create tablespace rman datafile '/u01/oradata/orcl/rman01.dbf' size 50m;
Chapter 17: Advanced RMAN Facilities
649
PART III
3. Create a schema to hold the catalog, using the new tablespace as the default
tablespace:
create user rman identified by rman default tablespace rman;
4. Grant privileges to the new schema:
grant recovery_catalog_owner to rman;
alter user rman quota unlimited on rman;
5. From an operating system prompt, launch the RMAN executable and connect
to the catalog database as the new user:
rman catalog rman/rman@catdb
6. Create the catalog:
create catalog;
7. Exit from RMAN, and from an operating system prompt connect concurrently
to both the catalog and the target:
rman catalog rman/rman@catdb target /
8. Register the target and see if any RMAN backups have been made:
register database;
list backup of database;
If no backups are listed, perform a full backup (as detailed in Chapter 15).
9. Exit from RMAN, and use SQL*Plus to query some views that will confirm
that the target has been registered and that backups have been made:
sqlplus rman/rman@catdb
SQL> select dbid,name from rc_database;
SQL> select db_id,bs_key,backup_type from rc_backup_set;
Stored Scripts
RMAN scripts can be stored as operating system files, and invoked from the command line.
For example, if these two commands are saved into a file named rman_script.rmn,
run {backup database plus archivelog delete all input;
delete obsolete;}
then the script can be invoked from an operating system prompt as follows:
rman target / catalog rman/rman@catdb @rman_script.rmn
However, if you have a catalog, you can use it to store scripts. There are six script-
related commands:
create [ global ] script
replace [ global ] script
print [ global ] script
list [ global ] script names
execute [ global ] script
delete [ global ] script
OCA/OCP Oracle Database 11g All-in-One Exam Guide
650
TIP There is no command to edit a script. However, you can query the views
RC_STORED_SCRIPT and RC_STORED_SCRIPT_LINE to view scripts, and
edit them by using DML against these views. Of course, you bypass all the
syntax checking if you do this. The views will not show global scripts.
The commands are all self-explanatory. By default, scripts are database-specific. If
you want to run the same script against many targets, you must connect to each target
and create it many times. But if the GLOBAL keyword is used, then the script will be
visible to all targets. While global scripts are very useful, care must be taken to ensure
that they will run against any target you wish. For example, if a script includes a FORMAT
clause to name the backup pieces, the path element of the piece name would have to be
different for Unix targets and Windows targets because of the different form of the
directory delimiter on these operating systems. Extensive use of the CONFIGURE
command will allow more use of global scripts, because the scripts behavior will
then be modified transparently by each target.
TIP You can convert RMAN scripts stored as operating system files to scripts
stored within the catalog with this command:
create script script_name from file 'file_name';
Figure 17-3 demonstrates the creation and running of a stored script. Note the
automatic resync of the recovery catalog: this will update the catalog with any changes
Figure 17-3 Creating and executing an RMAN stored script
Chapter 17: Advanced RMAN Facilities
651
PART III
that have occurred since the last resync, such as datafile adjustments and archivelog
generation, so that the catalog will be aware of the current state of the database.
Using RMAN to Create Databases
To clarify some naming conventions, the target database is the existing database you
want to copy. The auxiliary database is the new database created from the target. The
target and the auxiliary may be on the same server or on different machines. The
examples that follow assume that you are duplicating a database and instance named
orcl to a database and instance named newdb.
Here are the general steps to follow to create a duplicate database:
1. Install the Oracle Home on the node that will host the auxiliary database.
2. Create a password file for the auxiliary instance.
3. Ensure network connectivity to the auxiliary instance.
4. Create an initialization parameter file for the auxiliary instance.
5. Start the auxiliary instance as NOMOUNT.
6. Start the target database in MOUNT or OPEN mode.
7. Create backups or copy existing backups and archived redo log files to a
location accessible to the auxiliary instance, unless you are using active
database duplication.
8. Allocate auxiliary channels if necessary.
9. Run the RMAN DUPLICATE command.
10. Open the auxiliary instance.
You must create a password file in the Oracle home for the auxiliary database. For
example,
orapwd file=$ORACLE_HOME/dbs/oranewdb password=oracle1 entries=3
Note that the location for all database password files is $ORACLE_HOME/dbs on
Unix, or %ORACLE_HOME%\database on Windows. The file itself must be named
ora<SID> on Unix, and PWD<SID>.ora on Windows, where <SID> is the new
instance name.
You must ensure network connectivity to the auxiliary. This will entail launching
a listener process if the auxiliary is on a different server, and in any case configuring a
tnsnames.ora file entry that will connect to the new instance.
The next step is to create an initialization parameter file for the auxiliary instance,
in the same location as the password file. Only DB_NAME must be specified; all other
parameters are optional, depending on whether you use Oracle Managed Files or you
want to specify an alternative location for one or more file destinations. Table 17-1
lists the parameters you can specify in the auxiliary initialization file along with their
descriptions and under what circumstances they are required.
OCA/OCP Oracle Database 11g All-in-One Exam Guide
652
Note that the DB_FILE_NAME_CONVERT parameter can be specified when
you run the DUPLICATE command. Here is an initialization parameter file for an
auxiliary instance, using the CONVERT parameters to map the names of the target
files to those to be used in the auxiliary:
DB_NAME=NEWDB
DB_BLOCK_SIZE=8192
CONTROL_FILES=('/u01/app/oracle/oradata/newdb/control01.ctl',
'/u01/app/oracle/oradata/newdb/control02.ctl',
'/u01/app/oracle/oradata/newdb/control03.ctl')
DB_FILE_NAME_CONVERT=('/u01/app/oracle/oradata/orcl/',
'/u01/app/oracle/oradata/newdb/')
LOG_FILE_NAME_CONVERT=('/u01/app/oracle/oradata/orcl/',
'/u01/app/oracle/oradata/newdb/',
'/u06/app/oracle/oradata/orcl/',
'/u06/app/oracle/oradata/newdb/')
Using the initialization parameter file you just created, start the instance in
NOMOUNT mode. Set your ORACLE_SID environment variable to the name of the
new instance, and start it in NOMOUNT mode using the new parameter file. On Unix:
export ORACLE_SID=newdb
Initialization Parameter Value(s) Required?
DB_NAME
The name you specify
in the DUPLICATE
command, which must
be unique among
databases in the
destination ORACLE_
HOME.
Ye s
CONTROL_FILES
All controlfile locations. Yes, unless you use Oracle-
Managed Files (OMF)
DB_BLOCK_SIZE
The block size for the
duplicate database. This
size must match the
source database.
Yes, if not using the
default (which is 2KB)
DB_FILE_NAME_CONVERT
Pairs of strings for
converting datafile and
tempfile names.
No
LOG_FILE_NAME_CONVERT
Pairs of strings to
rename online redo
log files.
No
DB_CREATE_FILE_DEST
Location for OMF
datafiles.
No, unless using OMF
DB_CREATE_ONLINE_LOG_DEST_n
Location for OMF
online redo log files.
No, unless using OMF
DB_RECOVERY_FILE_DEST
Location of the flash
recovery area.
No
Table 17-1 Auxiliary Instance Initialization Parameters
Chapter 17: Advanced RMAN Facilities
653
PART III
Or on Windows,
set ORACLE_SID=newdb
and then treat the Windows service:
oradim –new –sid newdb
and then,
sqlplus / as sysdba
startup nomount
If the target database is not already open, start it in MOUNT or OPEN mode.
All datafile backups of the target, including incremental backups and archived
redo log files, must be available on a file system accessible by the auxiliary instance.
Alternatively, you can perform an active database duplication, in which case you do
not have to create or copy backups for the operation in advance. Either way, the
directories in which the auxiliary database files will be created must exist.
Now use RMAN to connect concurrently to both the target database and to the
newly started auxiliary instance. Allocate channels (possibly several, which may
reduce the time needed) against both, and execute the DUPLICATE command. This
must be done within a run block:
rman target sys/oracle@orcl auxiliary sys/oracle@newdb
run { allocate auxiliary channel a1 device type disk;
allocate auxiliary channel a2 device type disk;
allocate channel t1 type disk;
allocate channel t2 type disk;
duplicate target database to newdb;}
This example will create the new database from existing backups. Alternative
syntax to use the live database as the source rather than a backup is
duplicate target database to newdb from active database;
In summary, here is what the DUPLICATE command does:
• Creates a controlfile for the duplicate database.
• Restores the target datafiles to the duplicate database or copies directly from
the running database.
• Performs incomplete recovery up to the last archived redo log file.
• Shuts down and restarts the auxiliary instance.
• Opens the auxiliary database with the RESETLOGS option to create the online
redo log files.
• Generates a new DBID for the auxiliary database.
OCA/OCP Oracle Database 11g All-in-One Exam Guide
654
The generation of a new DBID is critical: RMAN distinguishes databases by their
DBID, not by their DB_NAME, and if a new DBID were not generated, RMAN would
not be able to tell the two databases apart.
A duplicate database can be used for many things, including the following:
• Test backup and recovery procedures without disrupting the production
database.
• Create development and UAT systems.
• Generate reports that would otherwise have a detrimental effect on the
response time for an online transaction processing (OLTP) production system.
• Export a table from the duplicate database that was inadvertently dropped
from the production database, and then import it back into the production
database.
Tablespace Point-in-Time Recovery (TSPITR)
Tablespace point-in-time recovery, or TSPITR, is a technique for performing incomplete
recovery on just a part of the database. Incomplete recovery must, as a general rule,
be applied to the whole database: as described in Chapter 16, all the datafiles must be
restored, and rolled forward together. The TSPITR technique creates an auxiliary
database from a subset of the tablespaces of the target database, performs an incomplete
recovery on just this subset, and then replaces the tablespaces in the target database
with those from the auxiliary. The end result appears as though just the subset has
been restored and recovered, leaving the remainder of the target database up-to-date.
Doing this manually would be a nontrivial task.
The TSPITR Methodology
RMAN facilitates automatic TSPITR, making it easy to restore the contents of one or
more tablespaces to a previous point in time without affecting other tablespaces
or other objects in the database. TSPITR is a useful recovery tool for these scenarios:
• Corruption or deletion of rows in key tables that occur in a logically isolated
tablespace; in other words, no indexes or parent/child relationships from
objects in other tablespaces
• Incorrect Data Definition Language (DDL) changes the structure of one or
more tables in a tablespace, such that Flashback Table is not available to
recover these tables
• A table dropped with the PURGE option
TSPITR is not a cure-all for all tablespace disasters. For example, you cannot use
it to recover a dropped tablespace. You also cannot recover a renamed tablespace to
a point in time before it was renamed.
Chapter 17: Advanced RMAN Facilities
655
PART III
First, some terminology:
• Target time The point in time or SCN to which the tablespace(s) will be
recovered
• Recovery set The group of datafiles containing the tablespace(s) to be
recovered
• Auxiliary set Other datafiles required to recover the tablespace(s), such as
the datafiles for the SYSTEM, UNDO, and TEMP tablespaces
• Auxiliary destination A temporary location to store the auxiliary set of files,
including online and archived redo log files, and a copy of the controlfile
created during the recovery process
The key to TSPITR is an auxiliary instance to facilitate the recovery process, as covered
earlier in this chapter. The auxiliary instance does the work of restoring a backup
controlfile from before the desired point in time, restores the recovery set and the
auxiliary set from the target database, and finally recovers the database for the
auxiliary instance to the desired point in time. Here is a complete list of steps that
RMAN performs during TSPITR:
1. Starts an auxiliary instance with a randomly generated name.
2. Restores a controlfile to the auxiliary instance, and mounts the auxiliary
database.
3. Restores the datafiles for the recovery set to the auxiliary database.
4. Restores the datafiles for the auxiliary set to the auxiliary database.
5. Recovers the auxiliary database to the desired point in time.
6. Exports the dictionary metadata for the recovered tablespace from the
auxiliary database.
7. Imports the dictionary metadata for the recovered tablespace into the target
database.
8. Deletes all auxiliary files.
Steps 6 and 7 are critical. The export process writes out the definitions of all objects
in the auxiliary tablespace set as they are at the point in time to which the recovery
was made; the import process then reads this information into the target database,
replacing all current definitions. This completes the process of taking the affected
tablespace(s) back to a previous point in time, while leaving the remainder of the
target database current. There is one final step that must be performed manually:
bringing the recovered tablespace online.
Perform Automated TSPITR
Performing a TSPITR with RMAN is simple—but there are a few steps to be done
before and after to ensure a successful operation.