Học Actionscript 3.0 - p 8 pps
Bạn đang xem bản rút gọn của tài liệu. Xem và tải ngay bản đầy đủ của tài liệu tại đây (4.95 MB, 10 trang )
49
IN THIS PART
Chapter 3
Properties, Methods,
and Events
Chapter 4
The Display List
Chapter 5
Timeline Control
Chapter 6
OOP
Chapter 7
Motion
Chapter 8
Drawing with Vectors
Chapter 9
Drawing with Pixels
GraphicS and
interaction
PART
II
Part II represents the largest section of the book, spanning Chapter 3 through
Chapter 9. This part covers many significant features that distinguish
ActionScript 3.0 from prior versions. It focuses on graphics and interactions
and includes the new event model and display list.
Chapter 3 is a discussion of properties, events, and methods—the items
responsible for manipulating just about anything in Flash. Chapter 4 goes on
to explain the display list, a great new way to display visual assets in Flash.
Chapter 5 discusses timeline control, including various navigation techniques.
Chapter 6 marks an important transition in the book. Chapter 6 discusses
object-oriented programming and, while still introducing syntax in the
timeline, the remaining chapters in the book will focus increasingly on OOP.
Chapter 7 takes a look at various ways to animate graphics with ActionScript.
Chapters 8 and 9 round out the presentation of graphics and interactivity
with tutorials covering drawing with vectors and pixels. Included are demon-
strations for creating vectors with ActionScript and manipulating a variety of
bitmap properties in your projects.
Download from Wow! eBook <www.wowebook.com>
Download from Wow! eBook <www.wowebook.com>
51
IN THIS CHAPTER
Jump Right In
Properties
Events
Methods
Event Propagation
Frame and Timer Events
Removing Event Listeners
What’s Next?
In addition to the core language fundamentals reviewed in the previous chap-
ter, you will find that the majority of your scripts are written using properties,
methods, and events. These are the basic building blocks of most scripted
tasks and allow you to get and set characteristics of, issue instructions to, and
react to input from, many assets.
This is what we’ll be covering in this chapter:
• Jump Right In. Get your feet wet right away by starting the chapter with
a simple practical example. Adapt the Hello World! example by conveying
your greeting one character at a time.
• Properties. Properties are somewhat akin to adjectives, in that they
describe the object being modified or queried. For example, you can
check or set the width of a button. Most properties are read-write, in that
you can both get and set their values. Some properties, however, are read-
only, which means you can ask for, but not change, their values.
• Events. Events are the catalysts that trigger the actions you write, set-
ting properties and calling methods. For instance, a user might click the
mouse button, which would then result in a mouse event. If you write
code to react when that event is detected, the event can then cause a func-
tion to execute performing the desired actions.
• Methods. Methods are a bit like verbs. They tell objects to do something,
such as play and stop. In some cases, methods can be used to simplify
the setting of properties. You might use a method called
setSize(), for
example, to simultaneously set the width and height of something. Other
methods are more unique, such as
navigateToURL(), which instructs a
browser to display a web page.
In this chapter, you will build a utility that will demonstrate each of these
ActionScript structures. Using mouse and keyboard events, you will manipu-
late several properties, as well as execute a few methods. The majority of
ActionScript objects—from visual assets like movie clips to code-only objects
like timers—have properties, methods, and events.
ProPertIes, methods,
and events
CHAPTER
3
Download from Wow! eBook <www.wowebook.com>
Part II: Graphics and Interaction
52
Jump Right In
For simplicity, we’ll focus primarily on the movie clip. Using the movie clip to
centralize our discussion will make it easier for you to expand your examples
on your own, as you look for other attributes to manipulate. Once you are
comfortable with how properties, methods, and events work, it will be rela-
tively easy to learn about other objects.
Jump Right In
This chapter’s first script again builds on the Hello World! theme, this time
concentrating on properties, methods, and events. In this example, we’ll
display our salutation one character at a time. As with prior chapters, we’ll
explain this code briefly, and elaborate as the chapter continues. This script
is found in the hello_world_prop_event.fla source file.
1 var txtFld:TextField = new TextField();
2 addChild(txtFld);
3
4 txtFld.textColor = 0xFF0000;
5
6 var str:String = "Hello World!";
7 var len:int = str.length;
8 var i:int = 0;
9
10 this.addEventListener(Event.ENTER_FRAME, onEnter, false, 0, true);
11 function onEnter(evt:Event):void {
12 txtFld.appendText(str.charAt(i));
13 i++;
14 if (i > len) {
15 removeEventListener(Event.ENTER_FRAME, onEnter);
16 }
17 }
Lines 1 and 2 again create a text field and add it to the display list so the user
can see it. Line 4 sets
textColor, a basic property of the text field, coloring
the text red. This approach to text coloring is a quick solution, but it colors
all text in the field. In Chapter 10, you’ll learn how to exercise more precise
control over text, allowing you to color individual segments of text.
Lines 6 through 8 create and populate variables including a string, the num-
ber of characters in that string, and a counter’s initial value. The remainder of
the script is an enter frame event listener to add the string text to the end of
the field, character by character. Each time the event is received, line 12 uses
the string method
charAt() to determine the character at position i in the
string, and the
appendText() method to add that character to the field. The
i counter is then incremented and, if it exceeds the number of characters in
the field, the listener is removed, halting the process. The result is that “Hello
World!” is added to the field, one character at a time.
N O T E
ActionScript 3.0 uses hexadecimal nota-
tion to express colors as numbers. The
format of a simple color is 0xRRGGBB.
0x tells the compiler the number is a
hexadecimal value and replaces the #
symbol used to express the same value
as a string, as in HTML. The next three
character pairs represent red, green, and
blue and must represent values from 0
to 255. To do this, hexadecimal num-
bers use base16 (instead of base10 like
a decimal number) and each character
uses not only 0–9 but also A–F. 00 is
no color and FF is all color, for each
pair. 0x000000 is black (no colors),
and 0xFFFFFF is white (all colors). The
color used in this script is all red, no
green, and no blue.
Download from Wow! eBook <www.wowebook.com>
Properties
Chapter 3: Properties, Methods, and Events
53
Properties
If you think of properties as ways of describing an object, they become sec-
ond nature. Asking where a movie clip is, for example, or setting its width, are
both descriptive steps that use properties.
In Chapter 2, we briefly discussed the object model and dot syntax that
bring order and structure to ActionScript as well as many other scripting and
programming languages. The first step in using a property is to determine
which object you want to manipulate. For example, you might want to affect
a movie clip on the stage with an instance name of box. The instance name is
important because there may be multiple movie clips on stage, but you may
want to alter only one. So you need to be able to differentiate which clip to
change.
It’s easy to give a movie clip on the stage an instance name. Select it and
type the name in the upper portion of Flash Professional’s Properties panel,
as seen in Figure 3-1. (You’ve also learned how to create objects, such as text
fields, entirely from code, and you’ll be doing that more and more as the book
progresses.)
Figure 3-1. Giving a movie clip an instance name in Flash Professional CS5’s Properties
panel
The syntax for manipulating a property with ActionScript requires that you
follow the instance name with a dot (period) and the property name. To get
you started, we’ll show you the syntax for making several changes to movie
clip properties in the following table. Then, when we demonstrate how to
handle events in the next section, we’ll change these properties interactively.
The following examples assume that a movie clip with an instance name of
box is on the stage, and Figure 3-2 demonstrates the visual change made by
each property. The light-colored square is the original state before the movie
clip is affected. (The
alpha property shows only the final state, and the dashed
stroke for the visible property is only to show that the box is not visible.)
Table 3-1 shows nine movie clip properties with sample syntax and notes on
each property’s unit of measure and possible sample range of values.
box.x += 10;
box.y += 10;
box.scaleX = 0.5;
box.scaleY = 0.5;
box.rotation = 20;
box.alpha = 0.5;
box.visible = false;
Figure 3-2. Changes to movie clip
properties
Download from Wow! eBook <www.wowebook.com>
Part II: Graphics and Interaction
54
Events
Table 3-1. Movie clip properties
Description Property Syntax for Setting Value Units and/or Range
Location
x, y box.x = 100;
box.y = 100;
Pixels
Scale
scaleX, scaleY box.scaleX = 0.5;
box.scaleY = 0.5;
Percent / 0–1
Dimensions
width, height box.width = 72;
box.height = 72;
Pixels
Rotation
rotation box.rotation = 45;
Degrees / 0–360
Transparency
alpha box.alpha = 0.5;
Percent / 0–1
Visibility
visible box.visible = false;
Boolean
If you have experience with prior versions of ActionScript, you may notice a
few changes in the property syntax. First, the properties do not begin with an
underscore. This is a beneficial consistency introduced with ActionScript 3.0.
Rather than varying property syntax, some with and some without leading
underscores, in 3.0 no properties begin with the underscore character.
Second, some value ranges that used to be 0–100 are now 0–1. Examples
include
scaleX, scaleY, and alpha. Instead of using 50 to set a 50% value,
specify 0.5.
Finally, the first scaling method uses properties
scaleX and scaleY, rather
than
_xscale and _yscale, which are their ActionScript 1.0 and 2.0 equiva-
lents. Typically, ActionScript 3.0 properties will cite the x and y version of a
property as a suffix to make referencing the property easier.
Table 3-1 shows syntax only for setting properties for the box movie clip.
Getting the value of a property is just as easy. For example, if you wanted
to trace the movie clip’s
alpha value, or store it in a variable, you could write
either of the following, respectively:
trace(box.alpha);
var bAlpha:Number = box.alpha;
Events
Events make the Flash world go ’round. They are responsible for setting your
scripts in motion, causing them to execute. A button can be triggered by a
mouse event, text fields can react to keyboard events—even calling your own
custom functions is a means of issuing a custom event.
Events come in many varieties. In addition to the obvious events like mouse
and keyboard input, most ActionScript classes have their own events. For
example, events are fired when watching a video, working with text, and resiz-
ing the stage. To take advantage of these events to drive your application, you
need to be able to detect them.
N O T E
In Chapter 2, you learned that ++ adds
1 and
subtracts 1 from a variable.
You can also use these operators with
properties.
The following code uses
+= to change
the rotation of the box movie clip.
Rather than adding just 1 to the left side
of the equation,
+= will add whatever
value is on the right side of the equa-
tion. The operators
-=, *=, and /= func-
tion similarly—subtracting, multiplying,
or dividing the left side of an equation
by the value on the right of the operator.
These are called compound assignment
operators because they simultaneously
alter and assign values.
This code will add 20 degrees to the
movie clip’s rotation:
box.rotation += 20;
This is equivalent to, but shorter than:
box.rotation = box.rotation + 20;
Download from Wow! eBook <www.wowebook.com>
Events
Chapter 3: Properties, Methods, and Events
55
In previous versions of ActionScript, there were a variety of ways to react to
events. You could apply a script directly to a button, for example, and use
the
on(Release) approach. As the language matured, you could create event
handlers and apply them remotely using instance names—for example, using
myButton.onRelease. Finally, you could use event listeners, structures that listen
for the occurrence of an event and execute a function, primarily with compo-
nents or custom objects.
In the latest version of ActionScript, reacting to events is simplified by relying on
one approach for all event handling. The ActionScript 3.0 event model uses event
listeners regardless of the type of event or how it is used.
Using Event Listeners
The concept of event listeners is pretty simple. Essentially, you tell an object
to listen for an event and react if that event occurs. Imagine that you’re sitting
in a busy airport. Lots of things are going on around you, all of which can be
thought of as events. If you had no particular reason to be at the airport, you
might ignore all of these events. They would still occur, but you would not listen
for them.
However, if you’re scheduled to depart on an upcoming flight, you might establish
a few listeners. For example, you might listen for a loudspeaker announcement
about your flight number but ignore everything else. Or, you might also listen for
a loudspeaker announcement about your destination city. You might even plan to
listen for a third event: the inclusion of your airline in an announcement.
In all cases, the reaction to these events would be to pay attention to the
announcement hoping to learn more about your flight. Other events might still
occur in the airport, including other announcements, but without listening for
those events, they would wash over you without reaction.
ActionScript 3.0 event listeners work much the same way. Creating an event
listener, in its most basic form, is fairly straightforward. The first item needed
is the object that will listen for the event. A button is a good example to start
with. The
addEventListener() method is then used to assign a listener to that
object. This method requires two arguments. The first argument is an event to
listen for—one that is appropriate for your goal. For example, it makes sense for
a button to listen for a mouse event, but less so to listen for the end of a video
or a resizing of the stage. The second argument is a function to execute when
the event is heard.
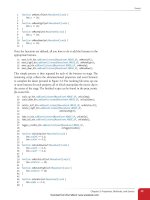
Here’s an example of code that uses a button with the instance name rotate_
right_btn and a function called
onRotateRight(). This can be found in the
simple_event_listener.fla source file.
1 rotate_right_btn.addEventListener(MouseEvent.MOUSE_UP, onRotateRight);
2 function onRotateRight(evt:MouseEvent):void {
3 box.rotation += 20;
4 }
Download from Wow! eBook <www.wowebook.com>
Part II: Graphics and Interaction
56
Events
The event this code is listening for is a mouse up event—that is, when the
mouse button is released while over the button. In ActionScript 3.0 syntax,
events are typically grouped together in classes, and the event itself is usually
defined as a constant—a variable that cannot be changed after it’s defined.
Using constants, when you know a value will never change, reduces errors
because the compiler will warn you if you try to change them. Constants
are usually typed in all uppercase letters, with multiple words separated by
underscores.
The
MouseEvent class contains constants that refer to mouse events like
MOUSE_UP and MOUSE_DOWN. Other examples of events are ENTER_FRAME, found
in the
Event class and used to react to playhead updates, and KEY_UP, found
in the
KeyboardEvent class, for reacting to user keyboard input. We’ll look at
both of these events later on in this chapter.
The second argument in the
addEventListener() method, the function that is
called when the event is received, is listed by name only, without the trailing
parentheses. This is because you are referring to the function, not actually
calling it. The listener will do that for you when the event is received. In this
example,
onRotateRight refers to the onRotateRight() function, defined in
lines 2 through 4.
You will probably be familiar with the structure of this function from the
discussion about functions in Chapter 2. To review the syntax, the braces
define the function’s contents. In this case, line 3 adds 20 degrees to the cur-
rent rotation value of the movie clip box. Also explained in Chapter 2, the
void that follows the function name and parentheses indicates that no value
is returned by the function.
However, new to our discussion of functions (see Chapter 2 if needed)
is the fact that when functions are used in event listeners, the function
requires a single parameter. This parameter receives information not from
any ActionScript you write, but rather from the event. In this case, we arbi-
trarily named the parameter
evt. (You may also see e or event used in other
resources, but any valid parameter name will work.)
Without a parameter in place to receive that incoming data, you will get an
error that says something like, “Argument count mismatch. Expected 0, got
1.” It will also tell you which function has the problem to make it easier to
find. The error means that the function expected no arguments coming in,
because no parameters were defined. Instead, one argument was received,
resulting in a mismatch.
You’ll get used to this quickly, and reap the benefits. The data received usually
contains useful information about the event and element that triggered the
event. You can parse this information for use in the function. In keeping with
good error reporting, the parameter should have a data type that matches the
type of data being sent into the function. In this case, the event that triggered
the listener was of type
MouseEvent. Using this as the parameter data type will
N O T E
Separating mouse events into discrete
up and down events allows you to react
independently to each event. That is,
you can assign one listener to the down
event and another to the up event. This
can be useful when creating draggable
objects. You can start dragging on mouse
down, and then stop dragging on mouse
up, as you’ll see later in this chapter.
You can also use a simpler mouse event
called
CLICK, which requires both the
down and up stages of the user’s click
process to trigger a listener.
Download from Wow! eBook <www.wowebook.com>
Events
Chapter 3: Properties, Methods, and Events
57
make sure that the listener receives only a MouseEvent, or the compiler will
warn you to the contrary.
To illustrate the use of this argument data, let’s look at another mouse event
example, found in the start_stop_drag.fla source file. This time, however, we’ll
use two events, and use the incoming information to identify the
target
of the event—speaking generically, the object at which the event occurred.
Specific to this case, the target is the object that was clicked.
1 myMovieClip.addEventListener(MouseEvent.MOUSE_DOWN, onStartDrag);
2 myMovieClip.addEventListener(MouseEvent.MOUSE_UP, onStopDrag);
3 function onStartDrag(evt:MouseEvent):void {
4 evt.target.startDrag();
5 }
6 function onStopDrag(evt:MouseEvent):void {
7 stopDrag();
8 }
In this example, two event listeners are assigned to a movie clip in lines 1
and 2. One listens for a mouse down event, another listens for a mouse up
event. They each invoke different functions. In the first function, the
target
property of the event, which is parsed from the function argument, is used
to identify which object received the mouse event. This allows the
onStart-
Drag()
function in lines 3 through 5 to start dragging the movie clip that
was clicked. The
onStopDrag() function in lines 6 through 8 then stops all
dragging when the movie clip receives a mouse up event.
The best thing about this example is that the
target property identifies the
movie clip without an instance name. This generic approach is very useful
because it makes the function much more flexible. The function can act
upon any appropriate object that is clicked and passed into its parameter.
In other words, the same function could start and stop dragging any movie
clip to which the same listener was added. The following additional lines,
adding the same functionality to a second movie clip called myMovieClip2,
demonstrate this:
9 myMovieClip2.addEventListener(MouseEvent.MOUSE_DOWN, onStartDrag);
10 myMovieClip2.addEventListener(MouseEvent.MOUSE_UP, onStopDrag);
Finally, this example’s last modification demonstrates that more than one
object can also call the same listener function. It is possible, while dragging
an object, to move your mouse so quickly that the mouse up event occurs
outside the bounds of the object you’re dragging. If that occurs, the object
would not receive the mouse up event, and the drag would not be stopped.
One way to get around this is to attach another listener to the stage, and set
that listener to also call the
onStopDrag() function. This way, whether your
mouse up occurs over the movie clip or over the stage, the dragging will cease.
11 stage.addEventListener(MouseEvent.MOUSE_UP, onStopDrag);
N O T E
It is also possible to type an event lis-
tener parameter with the more generic
Event class, from which other built-
in ActionScript 3.0 event classes are
extended. This will allow more than one
type of event to call the same function.
N O T E
A similar event property is current-
Target
, which references the object to
which the event listener is attached.
When a listener is attached to a single
movie clip (as in the cited example),
target and currentTarget are the
same because you click on the object
with the listener. However, you’ll learn
in the next chapter that events can
pass from a parent clip down to any
child clips within. When the listener is
attached to the parent and you click
on the child, target will still refer to
the child, because that’s what you
clicked. The
currentTarget prop-
erty, however, will refer to the parent
movie clip because that’s the object to
which the listener is attached. For more
information, see “The Event Object,”
an event-related post at http://www.
LearningActionScript3.com.
Download from Wow! eBook <www.wowebook.com>
Part II: Graphics and Interaction
58
Events
Using Mouse Events to Control Properties
Now we can combine the syntax we’ve covered in the “Properties” and “Events”
sections to set up interactive control over properties. In the chapter03 direc-
tory of the accompanying source code for this book, you’ll find a file called
props_events_methods_ui.fla. It contains nothing more than the example
movie clip box and two buttons in the library that will be used repeatedly to
change the five properties discussed earlier. The movie clip contains numbers
to show which of its frames is visible, and the instance name of each copy
of the button on the stage reflects its purpose. Included are move_up_btn,
scale_down_btn, rotate_right_btn, fade_in_btn, and toggle_visibile_btn, among
others. Figure 3-3 shows the layout of the file.
Figure 3-3. Layout of the props_events_ui.fla file
Starting with movement, we need to define one or more functions to update
the location of the movie clip. There are two common approaches to this
task. The first is to create one function in the keyframe in frame 1 for all
movement that uses a conditional to decide how to react to each event. We’ll
demonstrate that when we discuss keyboard events. For now, we’ll use the
simpler direct approach of defining a separate basic function for each type of
movement, as shown in the following script:
Download from Wow! eBook <www.wowebook.com>