Học Actionscript 3.0 - p 12 docx
Bạn đang xem bản rút gọn của tài liệu. Xem và tải ngay bản đầy đủ của tài liệu tại đây (5.06 MB, 10 trang )
Managing Object Names, Positions, and Data Types
Chapter 4: The Display List
89
However, the ActionScript compiler doesn’t know if gotoAndStop() is a legal
method of mc’s parent because it doesn’t know the parent’s data type. For
example, the parent might be a sprite and a sprite doesn’t have a timeline. As
such, you can’t very well go to frame 20 of a sprite. If the data type of the par-
ent is unknown to the ActionScript compiler, you will get an error similar to:
Call to a possibly undefined method gotoAndStop through a reference with
static type flash.display:DisplayObjectContainer.
You can avoid this error by casting the object. Previously discussed in
Chapter 2, casting is particularly important when manipulating the display
list and warrants another mention. Casting means you are explicitly tell-
ing the ActionScript compiler the data type of the object—changing the
compiler’s understanding of the data from one type to another. Casting
does not actually change data. In our example, to make sure the compiler
doesn’t object to the
gotoAndStop() method, you must cast the parent from
DisplayObjectContainer to MovieClip. You can do this by surrounding the
object of unknown type with the desired class name. The following syntax
tells the compiler that mc’s parent is of data type
MovieClip:
MovieClip(mc.parent).gotoAndStop(20);
N OT E
Another way to cast an object is by using the as operator. Continuing the example on
this page, this syntax will also cast mc’s parent as a movie clip:
var mc2:MovieClip = mc.parent as MovieClip;
mc2.gotoAndStop(20);
Although this is more verbose, it has advantages. For example, the <ClassName>()
syntax may be confusing because it looks like you are calling a function or instan-
tiating a class. Also, some conversion or creation functions takes precedence over
casting and prevents casting from working. For example,
Array() will not cast to
an array because that syntax is equivalent to
new Array(), which creates an array.
This means it’s possible to cast an object to Array only using the
as operator.
One reason we like to use the <ClassName>() syntax is that the compiler will dis-
play an error if the casting is incorrect. The
as operator will return null in this case,
but not issue an error.
If you need to tell the compiler that a display object is of another type, the
syntax is consistent. The following syntax examples tell the compiler that a
variable named obj is a text field, and that an item retrieved from the display
list is a sprite, respectively:
TextField(obj);
Sprite(getChildAt(0));
N OT E
It’s possible to change the data type of
an object implicitly, or even inadver-
tently. This is called coercion. You will
sometimes see this in error messages
similar to “Type Coercion failed,” or
“Implicit coercion of type X to type Y.”
When you see this, you should look in
your code for possible data type errors
or incompatible operations performed
on a specific data type.
Download from Wow! eBook <www.wowebook.com>
Part II: Graphics and Interaction
90
Changing the Display List Hierarchy
Changing the Display List Hierarchy
In addition to improving consistency over previous versions of ActionScript,
the display list also makes managing assets much easier. Particularly simpli-
fied are: changing the visual stacking order (depth management) and dynam-
ically changing the familial relationship between visual assets (reparenting, or
moving a display object from one parent to another).
Depth Management
Adding items to the display list does not require that you specify which level
the new child should occupy, because all of that is handled for you automati-
cally. This also makes managing the depths of display objects much easier
than ever before.
To begin with, you can simply use the
addChild() or addChildAt() methods
to alter the order of display list items. As we discussed, adding a child to a
display list position below other elements using the
addChildAt() method
will automatically push the other elements up in the list. But you can also
use the
addChild() method on an object that already exists in the display list.
This step will remove the object from its original position and move it to the
top of stack, pushing the other elements down.
For example, consider the following simple code, found in the source file
add_child_trace.fla. Lines 1 through 6 use the standard approach of creating
and adding movie clips to the display list, with the added step of giving each
clip an instance name. Lines 7 and 8 display the results at this point and, as
expected, the traces (indicated by comments here) show
mc1, or “clip1,” at
position 0, and
mc2, or “clip2,” at position 1.
1 var mc1:MovieClip = new MovieClip();
2 mc1.name = "clip1";
3 addChild(mc1);
4 var mc2:MovieClip = new MovieClip();
5 mc2.name = "clip2";
6 addChild(mc2);
7 trace(getChildAt(0).name); //clip1
8 trace(getChildAt(1).name); //clip2
However, if you add mc1 to the display list again, it is moved from position 0
to the end of the list, and
mc2 gets pushed to position 0. Adding the following
lines to the script will demonstrate this process.
9 addChild(mc1);
10 trace(getChildAt(0).name); //clip2
11 trace(getChildAt(1).name); //clip1
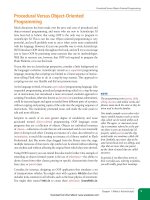
This is demonstrated further in the following script, found in the bring_to_
top.fla source file (Figure 4-7). This example takes advantage of the event
propagation discussed in Chapter 3 to automatically bring any display object
that is rolled over with the mouse to the top of the visual stacking order:
Figure 4-7. In bring_to_top.fla, rolled-over
items pop to the top
Download from Wow! eBook <www.wowebook.com>
Changing the Display List Hierarchy
Chapter 4: The Display List
91
1 addEventListener(MouseEvent.MOUSE_OVER, onBringToTop,
2 false, 0, true);
3
4 function onBringToTop(evt:MouseEvent):void {
5 addChild(MovieClip(evt.target));
6 }
If adding or moving an item to the top of all others is not specific enough for
your needs, there are also direct methods for swapping the depths of objects
that are already in the display list. The
swapChildren() method will swap the
depths of two display objects regardless of where they are in the display list.
For example, the following code, found in the swap_children.fla source file,
will swap positions between the movie clip at the top of the display list—no
matter how many display objects exist—and the movie clip that is clicked—
no matter where in the display list that clip may be:
1 var gs:MovieClip = new GreenSquare();
2 gs.x = gs.y = 0;
3 addChild(gs);
4 var rs:MovieClip = new RedSquare();
5 rs.x = rs.y = 25;
6 addChild(rs);
7 var bs:MovieClip = new BlueSquare();
8 bs.x = bs.y = 50;
9 addChild(bs);
10
11 addEventListener(MouseEvent.CLICK, onClick, false, 0, true);
12 function onClick(evt:MouseEvent):void {
13 var clickedChild:MovieClip = MovieClip(evt.target);
14 var topChild:MovieClip = MovieClip(getChildAt(numChildren-1));
15 swapChildren(clickedChild, topChild);
16 }
Lines 1 through 9 repeat the same process three times. First, new instances of
library symbols, using the
GreenSquare, RedSquare, and BlueSquare linkage
classes, respectively, are created. (See the “Adding Custom Symbol Instances
to the Display List” section in this chapter for more information.) Next, the
x and y coordinates of each instance are set 25 pixels apart. Finally, each
instance is added to the display list.
Line 11 creates an event listener that is attached to the main timeline and
listens for a mouse click. Any time an object in the main timeline is clicked,
the
onClick() function is called. Line 13 casts whatever is clicked as a movie
clip, line 14 does the same with the last object in the display list, and line 15
swaps those display objects.
ActionScript identifies the bottom item in the display list using 0. Therefore,
Line 14 can’t use the
numChildren property by itself to identify the last item in
the display list. For example, if you have three items in the display list,
num-
Children
returns 3, but the indices (positions) of those items are 0, 1, and 2.
So, to retrieve the last item in the list, you must use
numChildren - 1, which
correctly identifies the last item in the list.
N OT E
This script is written in the main time-
line, so that is the script’s scope. By
using methods like
addChild() and
addEventListener() without attach-
ing them to a specific object, the scope
of the script is the implied object. Using
the
this keyword to refer to the cur-
rent scope is another way to make this
clear. Considering line 3 as an example,
the syntax is
this.addChild(gs). See
Chapter 2 for more information.
Download from Wow! eBook <www.wowebook.com>
Part II: Graphics and Interaction
92
Changing the Display List Hierarchy
You can also swap the contents of any two depths, no matter what’s in them,
using the
swapChildrenAt() method. This example snippet will swap which-
ever display objects are in display list positions 0 and 10:
swapChildrenAt(0, 10);
Finally, you can move a child to a specific depth using the setChildIndex()
method. It requires two arguments: the child you want to move, and its
intended depth. The following code adjustment to the swap children exam-
ple, found in the set_child_index.fla source file, changes line 15 to set the
index of the clicked child to 0.
12 function onClick(evt:MouseEvent):void {
13 var clickedChild:MovieClip = MovieClip(evt.target);
14 var topChild:MovieClip = MovieClip(getChildAt(numChildren-1));
15 setChildIndex(clickedChild, 0);
16 }
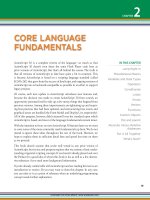
Reparenting Children
Another task made easy by the display list is moving a child from one parent
to another. In the reparenting.fla source file, a moon can be moved to either
of two night skies, just by clicking that sky (Figure 4-8). Both skies are also
draggable, demonstrating that the moon will automatically move with each
sky because it is a child object inside the parent.
Figure 4-8. In reparenting.fla, the moon becomes a child of the clicked sky
This exercise again demonstrates the bubbling of events by attaching both
listeners to a parent container once, instead of to each sky. (See Chapter 3 for
more information.) However, a side effect of this efficiency is that the moon,
as a child of that parent container, will also react to the events. So, it’s possible
to add the moon to itself, resulting in an error. To prevent this from happen-
ing, line 1 disables mouse interaction with the moon.
Download from Wow! eBook <www.wowebook.com>
A Dynamic Navigation Bar
Chapter 4: The Display List
93
In the default layout of the file, the three siblings (moon and two skies) are
all on the stage. The first reparenting process is demonstrated in line 2 by
adding the moon to the first sky (on the left) as its starting position. Lines 4
and 5 then add two event listeners to the main timeline. Note that the listen-
ers are not attached to a specific object in lines 4 and 5. The
this object is
the implied responsible party, indicating the current scope, or main timeline.
As a result, any child display object that receives a
mouse down event will call
onDrag() and a child mouse up event will call onDrop().
1 moon.mouseEnabled = false;
2 sky0.addChild(moon);
3
4 addEventListener(MouseEvent.MOUSE_DOWN, onDrag, false, 0, true);
5 addEventListener(MouseEvent.MOUSE_UP, onDrop, false, 0, true);
6
7 function onDrag(evt:MouseEvent):void {
8 evt.target.addChild(moon);
9 evt.target.startDrag();
10 }
Line 8 then adds the moon to the sky that was clicked. This process removes
the moon from its previous parent and adds it to the clicked item, reparenting
the moon. The last line of the function then enables dragging of the clicked
item.
Finally, when the
mouse up event is received, the onDrop() function disables
dragging.
11 function onDrop(evt:MouseEvent):void {
12 stopDrag();
13 }
As you can see, by using the addChild() method, you can move a display
object from one parent container to another. As a result, the child will inherit
basic display attributes from its parent. For example, in addition to the x and
y coordinates demonstrated in this file, the child will also be affected by any
changes to rotation, scale, or alpha values of the parent.
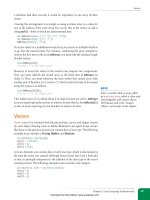
A Dynamic Navigation Bar
Now it’s time to tie much of this together and create a dynamic navigation
bar. This project will create a five-button navigation bar that will be centered
on the stage as shown in Figure 4-9. To simulate functionality, each button
will trace its name to the Output panel when clicked. Later in the book, you’ll
combine additional skills to create a similar navigation bar that will use XML
and load external assets.
Figure 4-9. A dynamically generated navigation bar
Download from Wow! eBook <www.wowebook.com>
Part II: Graphics and Interaction
94
A Dynamic Navigation Bar
This script can be found in the dyn_nav_bar.fla source file. Lines 1 and 2
initialize the number of buttons used and the space between each button (in
pixels). Line 4 creates a container that will hold not only the buttons, but also
background art. The container doesn’t need a timeline, so for efficiency (and
practice), a sprite is used rather than a movie clip. Next, line 5 adds the sprite
to the display list.
1 var btnNum:int = 5;
2 var spacing:Number = 10;
3
4 var navBar:Sprite = new Sprite();
5 addChild(navBar);
Lines 6 through 15 create the buttons. Line 6 types a variable as SimpleButton,
which allows you to use (or create) button symbol instances, rather than rely-
ing solely on movie clips. The loop defined in line 7 creates five buttons,
based on the value of
btnNum assigned in line 1.
6 var btn:SimpleButton;
7 for (var i:int = 0; i < btnNum; i++) {
8 btn = new Btn();
9 btn.name = "button" + i;
10 btn.x = spacing + i * (btn.width + spacing);
11 btn.y = spacing / 2;
12 btn.addEventListener(MouseEvent.CLICK, onTraceName,
13 false, 0, true);
14 navBar.addChild(btn);
15 }
Each time through the loop, a new button is created from a button symbol in
the library with the linkage class, Btn (line 8). The button is given a name by
combining the string “button” and the loop counter value (line 9). The first
button is called button0, the second is called button1, and so on.
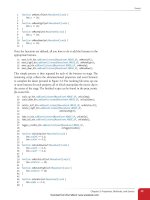
Each button is positioned horizontally (line 10) using the spacing gap set
in line 2, plus the width of the button (in this case, 65 pixels) and another
spacing gap. Figure 4-10 shows the measurements in use. The first button is
positioned only 10 pixels to the right of the container’s edge, while the second
button is positioned 85 pixels to the right of the container’s edge. In both
cases, the spacing is 10, and the button width (65) plus spacing is 75. So, the
first result is 10 plus 0 * (65 + 10), or 10 + 0, or 10. The second result is 10 plus
1 * (65 + 10), or 10 + 75, or 85. This process continues for each button. The
vertical position is also set for each button, moving the button down 10 / 2,
or 5 pixels.
10
10
65 10 65 10 65 10 65 10 1065
75
150
225
Figure 4-10. Object positioning in the dynamic navigation bar
N OT E
The SimpleButton class, used to create
custom buttons, is so named because a
Button class already existed. The latter
is used to create instances of the
Button
component.
Download from Wow! eBook <www.wowebook.com>
What’s Next?
Chapter 4: The Display List
95
The last lines in the loop add a mouse click event listener to the button (line
12) that will call the
onTraceName() function when the event is received, and
add the button to the
navBar parent container (line 14).
16 var bg:MovieClip = new NavBarBack();
17 bg.width = spacing + btnNum * (btn.width + spacing);
18 bg.height = btn.height + spacing;
19 navBar.addChildAt(bg, 0);
Starting with line 15, a background is added to the navBar. Similar to the
calculation used to position each button, its width is set to an initial spacing
gap plus the total number of buttons times the sum of the button width and
spacing (line 16). It’s height is set to the button height plus spacing (line 17).
The background is then added to the
navBar at position 0, ensuring that it’s
placed behind all the buttons (line 18). The result is, no matter how many
buttons you need, or what the button size is, the buttons will be spaced uni-
formly within the background, both horizontally and vertically.
Finally, the last script block positions the finished
navBar and creates the lis-
tener function. The bar is centered horizontally by subtracting its width from
the stage width, and dividing that value by two for a left and right margin
(line 19). It is also positioned vertically at a y coordinate of 20 pixels (line 20).
The
onTraceName() function (lines 22 through 24) traces the name of each
button when the user clicks on it.
20 navBar.x = (stage.stageWidth - navBar.width) / 2;
21 navBar.y = 20;
22
23 function onTraceName(evt:MouseEvent):void {
24 trace(evt.target.name);
25 }
This exercise demonstrates how to create a simulated navigation bar using
the display list, when no assets previously existed on the stage. Later in the
book, you’ll also learn how to create the buttons and draw the background
shape entirely with ActionScript, removing the need to precreate these assets
as library symbols. You’ll also learn how to create a class-based version of this
system to control the playhead of a movie clip (Chapter 6), and load images
or SWFs (Chapter 13).
What’s Next?
The display list is among the most important new introductions to
ActionScript 3.0. It is worth the effort to explore the properties, methods,
and events of the various display list classes—starting with the contents of
this chapter, and then delving into the Flash help system, and additional
resources, as you gain experience. Experimenting with the display list will
show you that it is easy to use and, if you have experience with prior versions
of ActionScript, you will soon find that it’s much simpler and more consistent
than equivalent methods in ActionScript 1.0 or ActionScript 2.0.
N OT E
Push Yourself: A bonus file in this chap-
ter’s source archive expands on this
example. It’s called dyn_nav_bar_urls.
fla and shows how to load web pages
based on this dynamic navigation bar
example. It uses information explained
in Chapter 13, but if you want to learn
more at the same time you put this
chapter into practice, give the file a look!
Download from Wow! eBook <www.wowebook.com>
Part II: Graphics and Interaction
96
What’s Next?
Next, we’ll discuss timeline control. Regardless of whether you are creat-
ing lengthy linear animations or single-frame applications, you are likely
to require some degree of control over the main timeline or movie clips.
ActionScript 3.0 offers a few new features for you to try out.
In the next chapter, we’ll discuss:
• Controlling playback of your animations and applications by moving the
playhead with ActionScript
• Parsing frame label names from timelines and scenes
• Changing the frame rate of movie playback for the first time
Download from Wow! eBook <www.wowebook.com>
97
IN THIS CHAPTER
Jump Right In
Playhead Movement
Frame Labels
Frame Rate
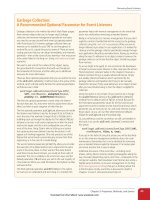
A Simple Site
or Application Structure
What’s Next?
In this chapter, you’ll learn some basic approaches to controlling timelines—
both that of the main Flash movie and the movie clips it contains. We’ll
divide our focus into three main areas:
• Jump Right In. Change the frame rate of your SWF at runtime.
• Playhead Movement. This includes stopping and playing the file, and
going to a specific frame.
• Frame Labels. Including improved playhead movement techniques with-
out relying on frame numbers.
• Frame Rates. Changing the movie’s frame rate to increase or decrease
animation speed during playback.
• A Simple Site or Application Structure. We’ll wrap up the chapter by
building a project that combines timeline animation with ActionScript
navigation. The project can be used as an example template for a multi-
state application or Flash-based website.
We’ll also take a look at an undocumented feature that allows you to add
frame scripts to movie clips at runtime and show you a demo of how to create
a flexible structure for a Flash website or application.
Jump Right In
We’ll start off with one of the most-desired features in the evolution of
ActionScript: the ability to adjust the frame rate of a file with code. Consider
a simple example that switches a SWF’s frame rate between 1 and 24 frames
per second, with every click of the mouse. This script can be found in the
frame_rate_trace.fla source file.
1 stage.frameRate = 24;
2
3 this.addEventListener(Event.ENTER_FRAME, onEnter, false, 0, true);
4 function onEnter(evt:Event):void {
5 trace(stage.frameRate);
6 }
7
tImeLIne ControL
CHAPTER
5
Download from Wow! eBook <www.wowebook.com>
Part II: Graphics and Interaction
98
Playhead Movement
8 stage.addEventListener(MouseEvent.CLICK, onClick, false, 0, true);
9 function onClick(evt:MouseEvent):void {
10 if (stage.frameRate == 24) {
11 stage.frameRate = 1;
12 } else {
13 stage.frameRate = 24;
14 }
15 }
Line 1 shows a new stage property called frameRate, which is assigned to
24 frames per second. Lines 3 through 6 contain an enter frame listener
that traces the current frame rate. Lines 8 through 15 contain a mouse click
listener that will toggle the frame rate between 1 and 24 frames per second.
Once you get this example working, experiment by adding visual assets, as in
frame_rate_timeline_tween.fla, and watch your animations change. A similar
example later in the chapter will show the speed of an animation change in
response to buttons that increase or decrease the frame rate.
Playhead Movement
One of the most basic ActionScript skills you need to embrace is the ability
to navigate within your Flash movies. You will often use these skills to control
the playback of movie clips nested within your main movies.
The code in this chapter is straightforward enough that you can create your
own examples to test the functionality discussed, if you want to use your own
assets. We’ll cover the structural necessities for each example to make it easier
for you to follow along using your own assets. In each section, we’ll also cite
the sample file we’re using so you can consult that file if preferred.
Let’s start by covering the basic concept of stopping and starting playback
of the main timeline or movie clip, and then add an initial jump to another
frame. If you’re creating your own file, be sure it has a linear animation in
one layer of the main timeline, and four buttons in one or more other layers
that span the length of the animation. In other words, your buttons must be
visible throughout the animation. Alternatively, you can open the sample file
navigation_01.fla.
Figure 5-1 shows navigation_01.fla, which contains four timeline tweens of
black circles. For added visual impact, the circles use the Invert blend mode
(seen in the Display section of the Properties panel) to create an interesting
optical illusion of rotating cylinders. We’ll be starting and stopping playback
at any point, as well as jumping to a specific frame to start and stop playback
(frame 1, in this example). Initially, we’ll rely on frame numbers to specify
where to start and stop.
N OT E
Real-world frame rates vary based on
many factors including the processing
power of your computer, how hard it’s
working at any given moment, and what
your SWF is trying to do. Depending
on these circumstances, among others,
you’re likely to achieve a maximum
frame rate between 60 and 120 frames
per second.
Although you’re unlikely to see this
performance anytime soon, it’s theoreti-
cally possible to assign a frame rate up
to 1000 fps. Any assignment above that
number will fall back to 1000.
N OT E
To review the basics of movie clips, con-
sult Chapters 3 and 4.
Download from Wow! eBook <www.wowebook.com>