Học Actionscript 3.0 - p 21 doc
Bạn đang xem bản rút gọn của tài liệu. Xem và tải ngay bản đầy đủ của tài liệu tại đây (5.16 MB, 10 trang )
Geometry and Trigonometry
Chapter 7: Motion
179
storing the current angle in a variable (line 12) and incrementing the angle
to the next button position (line 13). The value of the angle is converted
from degrees to radians using
deg2rad(), the utility function we’ve discussed
before, at the end of the script.
The button is then created using the library symbol with the
SatelliteButton
linkage class, centered, and positioned on the circle defined by the mainButton
center point and radius. The same technique to move an object along a circu-
lar path is used here. The cosine of the current angle times the radius of the
circle determines the x coordinate, and the sine of the angle multiplied by the
circle’s radius calculates the y coordinate (lines 16 and 17).
Each button is then given a name in line 18, consisting of an uppercase “B,”
and the number of the button, taken from the loop counter. The first button,
for example, will be B0, the second B1, and so on. the last line of this code
block adds a mouse click listener to each button that calls the
onClick()
function found in lines 36 through 38. In this simple example, this function
just traces the button name. However, as discussed in Chapter 6, you can
change this instruction to update the playhead in a movie clip, and we’ll teach
you how to load external assets in Chapter 13.
Because the buttons in this example have text labels, Line 21 is very impor-
tant. Setting the
mouseChildren property of an object to false prevents the
content of that object from receiving mouse events. By default, the mouse
will automatically interact with the text fields in this example that display
the labels inside the buttons. This interaction includes text selection, cursor
feedback, and more. With
mouseChildren set to false for each button, the text
field child of the button won’t react to mouse events.
Line 22 is also important to this example because the navigation widget is
draggable. By adding each button as a child of mainButton, rather than the
main timeline, dragging the center button will also drag all its satellite but-
ton children.
The remainder of the function is consistent with our prior basic uses of text
fields in the Hello World! applications presented in earlier chapters. Line 24
creates the text field, line 25 sets the field’s width to the width of the button,
and lines 26 and 27 center the button horizontally and vertically, respectively.
Line 28 automatically scales the text field down to fit its text and is also a
simple way to center the text prior to learning more advanced formatting
options in Chapter 10. Line 29 is another formatting shortcut, making all text
in the field white. Finally, the button name is added to the text field in line 30
and the field is added as a child of the button to serve as its label.
10 function positionButtons() {
11 for (var i:int = 0; i < numButtons; i++) {
12 var radian:Number = deg2rad(angle);
13 angle += angleChange;
14
15 var btn:SatelliteButton = new SatelliteButton();
16 btn.x = Math.cos(radian) * radius;
N O T E
Although not strictly necessary in this
example, it’s good practice to convert the
int data type of the loop counter to a
String data type before adding it to the
button name.
Download from Wow! eBook <www.wowebook.com>
Part II: Graphics and Interaction
180
Geometry and Trigonometry
17 btn.y = Math.sin(radian) * radius;
18 btn.name = "B" + String(i);
19 btn.addEventListener(MouseEvent.CLICK, onClick,
20 false, 0, true);
21 btn.mouseChildren = false;
22 mainButton.addChild(btn);
23
24 var tf:TextField = new TextField();
25 tf.width = btn.width;
26 tf.x = -btn.width / 2;
27 tf.y = -btn.height / 4;
28 tf.autoSize = TextFieldAutoSize.CENTER;
29 tf.textColor = 0xFFFFFF;
30 tf.text = btn.name;
31 btn.addChild(tf);
32 }
33 }
34 positionButtons();
35
36 function onClick(evt:MouseEvent) {
37 trace(evt.target.name);
38 }
Lines 39 through 51 are responsible for creating the drag behavior of main -
Button. Lines 39 and 40 create a mouse down listener that triggers
onStart-
Drag()
, and lines 41 through 44 assign mouse up listeners to both mainButton
and the stage. The latter is important because it’s possible while dragging for
a mouse up event to not register on the button. Without allowing the stage to
catch that event, the draggable object would be stuck to your mouse.
The
onStartDrag() function (lines 46 through 48) is a great example of how
using
currentTarget in an event listener function can be very helpful. As dis-
cussed in Chapter 3, the
target property will tell you which button received
the mouse down event, but it will also make that single button draggable.
The
currentTarget property, on the other hand, refers to the object to which
the listener is attached. That means that no matter which button you mouse
down upon, mainButton will move, dragging all its child buttons along.
Finally, the
onStopDrag() function (lines 49 through 51) stops all dragging.
39 mainButton.addEventListener(MouseEvent.MOUSE_DOWN, onStartDrag,
40 false, 0, true);
41 mainButton.addEventListener(MouseEvent.MOUSE_UP, onStopDrag,
42 false, 0, true);
43 stage.addEventListener(MouseEvent.MOUSE_UP, onStopDrag,
44 false, 0, true);
45
46 function onStartDrag(evt:MouseEvent):void {
47 evt.currentTarget.startDrag();
48 }
49 function onStopDrag(evt:MouseEvent):void {
50 stopDrag();
51 }
52
53 function deg2rad(degree):void {
54 return degree * (Math.PI / 180);
55 }
Download from Wow! eBook <www.wowebook.com>
Geometry and Trigonometry
Chapter 7: Motion
181
This example shows how a little math can spice up even a simple naviga-
tion system, but without being too difficult to master. Best of all, this script
automatically positions your satellite buttons for you, even if the number of
buttons changes. If you’d rather have nine buttons instead of six, so be it! Just
change the value in line 1 and the script will evenly space the buttons around
the circumference of the circle.
Rotation Toward an Object
Determining points on a circle when you start with an angle requires sine
and cosine, as seen in the previous example. However, the opposite of that
task requires a different trigonometric method. Determining an angle when
starting with point data requires
atan2(). The atan2() method is a varia-
tion on the arctangent method and is especially useful when you want to
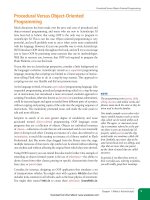
use rotation to point something at another location. For instance, the next
code example uses a frame event to continuously point a movie clip at the
mouse location, no matter where the mouse is on the stage, as simulated in
Figure 7-17.
The formula used to calculate the angle for the rotating object is:
Math.atan2(y2 - y1, x2 - x1)
There are two important issues to be aware of when using atan2(). As you
can see, the method always takes
y point data as its first parameter (instead of
x, which is more commonly placed in the first position). Second, the method
returns its angle in radians, not degrees.
With that in mind, let’s take a look at the following script, found in the
point_at_mouse.fla source file. It begins by creating a new instance of the
Hand
linkage class from the library, placing the hand and forearm shown in Figure
7-17 in the center of the stage, and adding it to the display list. The listener
that follows in lines 6 through 11 calculates the angle of rotation in radians,
and then converts it to degrees, the unit required by the movie clip’s
rotation
property. The conversion takes place in the utility function
rad2deg() at the
end of the script.
The
atan2() method in line 8 subtracts the mouse location from the hand
location (in y and x components) to get the angle the hand must use to point
at the mouse. Think of the location at which you want to point as the origin
of the system. In other words, point back to home base. That will help you
remember that the rotating object is point 2, and the mouse (in this case) is
point 1.
1 var hand:MovieClip = new Hand();
2 hand.x = stage.stageWidth / 2;
3 hand.y = stage.stageHeight / 2;
4 addChild(hand);
5
Figure 7-17. Using atan2(), you can
continuously point a movie clip at the
mouse no matter where it’s on the stage
Download from Wow! eBook <www.wowebook.com>
Part II: Graphics and Interaction
182
Geometry and Trigonometry
6 addEventListener(Event.ENTER_FRAME, onLoop, false, 0, true);
7 function onLoop(evt:Event):void {
8 var rotationRadians:Number = Math.atan2(hand.y - mouseY,
9 hand.x - mouseX);
10 hand.rotation = rad2deg(rotationRadians);
11 }
12
13 function rad2deg(rad:Number):Number {
14 return rad / (Math.PI / 180);
15 }
This example points one movie clip at the mouse, but the effect can be
adapted in many ways. One obvious variant is to point a movie clip at
another movie clip. Another visually interesting adjustment is to point many
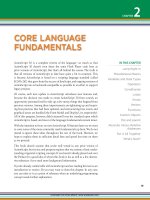
instances of a movie clip at the same object. A grid of such pointers, for
example, looks interesting because each pointer rotates independently based
on its location. This can be seen in Figure 7-18, and will be demonstrated in
the next script. Finally, the ultimate effect need not be visual. You can use
this technique simply to track things, such as planning the trajectory of a
projectile toward a target.
Creating a grid using modulus
The following script, found in the grid_point_mouse.fla source file, points
several independent objects at the mouse, but it also lays out the objects in a
grid. Using
atan2() to point at the mouse has already been discussed in the
prior example, so let’s focus on how to create the grid.
Line 1 stores the y position of the first row in the grid, and the variable in line
2 will hold instances of the FLA library linkage class,
Arrow. Line 3 starts a
loop that increments 70 times to build a grid with as many arrows. Each arrow
is created in line 4 and added to the display list in line 10. But the grid layout
occurs in lines 5 through 9 through the magic of the modulo operator (
%).
The modulo operator, often refer to as “mod,” returns the remainder of a divi-
sion—any partial value left over when a number can’t be divided into equal
parts. For example, 4 divided by 2 is 2, with no remainder. However, 5 divided
by 2 leaves a remainder of 1. Modulo can be used to test when a specific num-
ber of iterations has occurred, without the need for another variable.
It’s tidy to arrange 70 items in a grid that contains 10 columns and 7 rows. To
do this, we can loop over a process 70 times, but we need to know when the
end of a row is reached if we are to advance down to the next row. We can’t
rely solely on the loop counter because it increments from 0 to 70. However,
dividing the loop counter by 10, there will be no remainder at counter values
0, 10, 20, and so on. Therefore, using the modulo operator, we can tell when
the remainder is 0 and when we’ve reached the end of a row. The header of
Table 7-3 shows the remainders of all numbers 0 through 69. For example,
the numbers in the first column all have a remainder of 0, the numbers in the
second column all have a remainder of 1, and so on.
Figure 7-18. Detail of grid_point_mouse.
fla. Using
atan2(), you can continuously
point a movie clip at the mouse no matter
where it is on the stage
Download from Wow! eBook <www.wowebook.com>
Programmatic Tweening
Chapter 7: Motion
183
Table 7-3. 70 values (i) listed by their remainder when dividing by 10 (i % 10)
0 1 2 3 4 5 6 7 8 9
0 1 2 3 4 5 6 7 8 9
10 11 12 13 14 15 16 17 18 19
20 21 22 23 24 25 26 27 28 29
30 31 32 33 34 35 36 37 38 39
40 41 42 43 44 45 46 47 48 49
50 51 52 53 54 55 56 57 58 59
60 61 62 63 64 65 66 67 68 69
Line 6 sets the x coordinate of the arrow based on the grid column number,
derived using modulo (i % 10). All columns start with an initial offset of 50,
and an additional offset of 50 pixels per column is added. The first arrow will
be positioned at 50 (based on 50 + (0 * 50)), the second will be positioned
at 100 (based on 50 + (1 * 50)), and so on. If i % 10 is 0 (line 6) a new row is
required and 50 is added to
rowY.
1 var rowY:Number = 0;
2 var myArrow:Arrow;
3 for (var i:int = 0; i < 70; i++) {
4 myArrow = new Arrow();
5 myArrow.x = 50 + ((i % 10) * 50);
6 if (i % 10 == 0) {
7 rowY += 50;
8 }
9 myArrow.y = rowY;
10 addChild(myArrow);
11 myArrow.addEventListener(Event.ENTER_FRAME, onLoop,
12 false, 0, true);
13 }
14
15 function onLoop(evt:Event):void {
16 var thisArrow:Arrow = Arrow(evt.target);
17 var rotationRadians:Number = Math.atan2(thisArrow.y - mouseY,
18 thisArrow.x - mouseX);
19 thisArrow.rotation = rad2deg(rotationRadians);
20 }
21
22 function rad2deg(rad:Number):Number {
23 return rad / (Math.PI / 180)
24 }
Programmatic Tweening
Scripting your own animations from scratch gives you a lot of control and
freedom, but it can be time-consuming, too. You may also discover that you’re
frequently rewriting similar equations in project after project. If you find
yourself spending too much time in this manner, you may want to look into
ActionScript tweening classes. A tween is an animation sequence in which the
Download from Wow! eBook <www.wowebook.com>
Part II: Graphics and Interaction
184
Programmatic Tweening
computer interpolates all relevant settings between starting and ending prop-
erty values. For example, just like you would create a motion tween in Flash
Professional’s timeline, you might write a programmatic tween that moves a
movie clip from an x position of 100 to an x position of 400.
Adobe’s Tween Class
Until you are comfortable using third-party ActionScript packages, you may
want to get up to speed with tweening using Adobe’s
Tween class. Built into
the ActionScript language, the
Tween class is fairly limited but also easy to
understand. Here is a look at the class’s signature, and the seven parameters
into which you send data when instantiating a tween object:
Tween(obj:Object, prop:String, func:Function, begin:Number,
finish:Number, duration:Number, useSeconds:Boolean):Tween
The class takes the following arguments (in this order):
•
obj: The object to animate
•
prop: A relevant property to manipulate
•
func: A preexisting easing function to add expressiveness to the ani-
mation
•
begin: The beginning value of the property
•
finish: The finishing value of the property
•
duration: The duration of the tween
•
useSeconds: Whether to use seconds or frames as the desired time unit
It also returns a
Tween object, so you can store a reference to the tween for
additional manipulation. For example, you can stop or start the tween at a
later point.
The following script, found in the tween_class.fla source file, provides a
simple example of how to use the
Tween class. It moves a movie clip from
one side of the stage to the other, bouncing the clip into its final destination.
Lines 1 through 4 tell the compiler where to find the required classes. Lines
6 through 8 create a movie clip from the FLA library using the
Ball linkage
class, place it at point (100, 100), and then add it to the display list.
1 import fl.transitions.Tween;
2 import fl.transitions.easing.Bounce;
3 import fl.transitions.easing.None;
4 import fl.transitions.TweenEvent;
5
6 var ball:MovieClip = new Ball();
7 ball.x = ball.y = 100;
8 addChild(ball);
9
10 var ballXTween:Tween = new Tween(ball, "x", Bounce.easeOut,
11 100, 400, 3, true);
12
N O T E
As discussed in Chapters 1 and 6, even
though this code is a simple timeline
script, it still needs import statements
because the required classes are not part
of the
flash package. Only classes from
this package are automatically imported
behind the scenes in Flash Professional
timeline scripts.
Download from Wow! eBook <www.wowebook.com>
Programmatic Tweening
Chapter 7: Motion
185
13 ballXTween.addEventListener(TweenEvent.MOTION_FINISH,
14 onMotionFinish);
15 function onMotionFinish(evt:TweenEvent):void {
16 var ballAlphaTween:Tween = new Tween(ball, "alpha",
17 None.easeOut,
18 1, 0.3, 1, true);
19 }
Lines 10 and 11 create a Tween instance to animate ball’s x property. Pay par-
ticular attention to the fact that the property is specified in string format.
That can take a little getting used to.
The tween will use the
Bounce easing function to add expressiveness to the
animation while moving the movie clip horizontally from 100 to 400 pixels.
As a result, the ball will appear to bounce against its final position. Finally,
the tween will conclude in 3 seconds—indicated by the time unit 3, and the
true value of the last parameter, useSeconds, ensuring the tween is timed with
seconds, not frames.
Lines 13 and 14 add an event listener to the
ballXTween object, to trigger
the listener function when the animation is finished and the
TweenEvent.
MOTION_FINISH
event is fired. At that point, a new tween is created, to fade the
alpha property of the same object from 1 to 0.3. The second tween will take 1
second, and uses no easing to complete the task.
Only the last parameter of the
Tween class is optional. (When omitted,
useSeconds will be false and will use frames to time the tween, rather than
seconds.) Therefore, if you don’t want to use easing, you must specify the
None
easing class, and either the
easeIn or easeOut property. Which you choose
will not matter, as no easing will be applied. The names and descriptions
of other available easing classes can be found in Table 7-4. All easing classes
allow easing in, easing out, and easing both in and out of the tween.
Table 7-4. Easing types found in the fl.transitions.easing package
Easing Class Description
Back
Easing in begins by backing up and then moving toward the tar-
get. Easing out overshoots the target and backtracks to approach it.
Bounce
Bounces in with increasing speed, or out with decreasing speed.
Elastic
Undulates in an exponentially decaying sine wave, accelerating in
and decelerating out.
None
Linear motion without easing.
Regular
Normal easing, like that found in the timeline’s simple easing fea-
ture, accelerating in and decelerating out.
Strong
Emphasized easing, stronger than that found in the timeline’s
simple easing feature, but without additional effects. Accelerates in
and decelerates out.
Download from Wow! eBook <www.wowebook.com>
Part II: Graphics and Interaction
186
Programmatic Tweening
GreenSock’s TweenLite
After gaining a little experience with third-party packages, you’ll very likely
want to stop using the built-in
Tween class and find a tweening package that
you like. Invariably, these heavily optimized products are smaller, faster, and
more robust, offering quite a bit that is worthy of your experimentation.
Our favorite is the Tweening Platform by GreenSock. The platform contains
several great products, but the one we want to focus on is TweenLite. The
tweening library comes in two variations: TweenLite, which is the smallest
possible size and is optimized by making a wide array of features optional,
and TweenMax, which is basically TweenLite with all of its features pre-
enabled, as well as a handful of additional advanced features.
We’ll introduce TweenLite by recreating the tween example from the “Adobe’s
Tween Class” section for comparison, and then building an example ban-
ner as an additional project. The main tools of TweenLite are a pair of nice,
simple methods:
to() and from(). As their names imply, they allow you to
tween an object’s properties from their current values to final values, or from
initial values to their current values, respectively.
Our first TweenLite example will demonstrate the
to() method, which has
the following signature:
to(target:Object, duration:Number, vars:Object):TweenLite
It begins with the object to tween, then includes the duration of the tween,
and finishes up with an object that contains all other variables you may want
to use to manipulate your tween. We’ll show you a few options for the vari-
ables object in a moment, but a relevant example is the
useFrames property.
The duration of the tween is measured in seconds by default, but you can set
useFrames to true if you prefer, and the tween duration will be based on the
file’s frame rate. The method also returns a
TweenLite instance if you want to
store a reference to the tween for later use.
All TweenLite examples are found in the tweenLite directory in the source
archive, and the following script is in the tweenLite.fla source file, The first
six lines are very similar to the
Tween class example from the prior section—
importing required classes and creating a movie clip to manipulate. Because
this is an external library, you must have the Greensock Tweening Platform
package in a known class path for the imports to work. For this example, you
can place the package’s com folder in the same directory as your FLA file.
1 import com.greensock.TweenLite;
2 import com.greensock.easing.Bounce;
3
4 var ball:MovieClip = new Ball();
5 ball.x = ball.y = 100;
6 addChild(ball);
7
8 TweenLite.to(ball, 3, {x:400, ease:Bounce.easeOut,
9 onComplete:fadeBall});
N O T E
With the developer’s kind permission,
we’ve included the Tweening Platform
with the sample source code from the
companion website. As with any software
product, however, you would be wise to
check periodically with the Greensock
website ()
to see if any changes to the packages
have been made, and update your files
accordingly.
Download from Wow! eBook <www.wowebook.com>
Programmatic Tweening
Chapter 7: Motion
187
10 function fadeBall():void {
11 TweenLite.to(ball, 1, {alpha:0.3});
12 }
In lines 8 and 9, TweenLite to() method is used to tween ball for 3 seconds,
from whatever the current location is (100, as set in line 5) to 400. It uses the
Bounce easing class and calls the fadeBall() function when the animation is
complete.
The way TweenLite handles methods is quite different from the
Tween class.
Instead of having to create all your own listeners, TweenLite uses callbacks.
An ActionScript callback is similar to the everyday use of the term. It’s a
mechanism where you can essentially leave a message for an object and ask
it to call you back at the function specified when an event occurs. In this
case, you’re asking TweenLite to call the
fadeBall() function when the tween
is complete. When the function is called, another tween is created, this time
fading the ball movie clip to 30 percent.
TweenLite also makes it very easy to build a sequence of tweens by using
the
delay property. In the prior example, the first tween spanned 3 seconds
and, upon finishing, called another tween. Rather than relying on events, you
can simply create both tweens but delay the second one to occur when the
first finishes. This will produce the same effect as the previous example, but
illustrates the ability to start your tweens whenever it suits you. To see this
in action, simply use the following code to replace lines 8 through 12 of the
prior example. This modification can be found in the tweenLite_to_delay.fla
source file.
8 TweenLite.to(ball, 3, {x:400, ease:Bounce.easeOut});
9 TweenLite.to(ball, 1, {alpha:0.3, delay:3, overwrite:false});
Note that when taking this approach, you’re essentially asking the tween to
reassign itself. Just like for a variable, you may want a new behavior, or you
may not. If you don’t want a tween to cancel out a prior tween referencing
the same object, you must use a property called
overwrite to control how the
tweens interrelate. Setting the property to false will treat the tweens indepen-
dently. The result is a sequence of tweens but without relying on events. The
next example uses this technique.
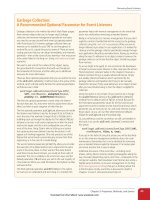
Creating a simple banner using TweenLite
With a little experience under your belt, let’s make a banner. We’ll explore two
key TweenLite concepts in this exercise: the
from() method, and the ability to
add advanced features through a plug-in mechanism.
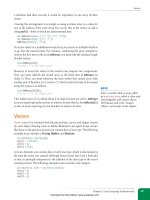
The nice thing about using the
from() method is that you can precreate a
layout and TweenLite will automatically build it up using your specified
from settings. For example, Figure 7-19 shows what the FLA file looks like
when you write your script. This is actually the final state of the banner, so
you can adjust your layout until you’re satisfied. Once you’re happy with the
N O T E
The object syntax for the third param-
eter of TweenLite’s
to() method makes
it very easy to tween many properties
at once. For example, you could write a
tween like this:
TweenLite.to(ball, 3, {x:10,
y:10, alpha:1, rotation:90,
ease:Bounce.easeOut});
This tween would alter the x, y, alpha,
and
rotation properties all in a single
structure, making it much easier to use
than Adobe’s
Tween class. You can kill
all properties, or even select properties,
any time so you can change the behav-
ior of the tween after creating it.
Download from Wow! eBook <www.wowebook.com>
Part II: Graphics and Interaction
188
Programmatic Tweening
banner, it’s time to itemize the properties you want to work with and their
initial values. The following script is found in the tweenLite_from_banner.fla
source file.
The first property we’ll use is called
tint, and it’s not part of the TweenLite
default configuration. It is part of TweenLite’s bigger brother package,
TweenMax, but TweenLite is optimized to be as small as possible and doesn’t
include any non-essential features. However, you don’t need to move up to
TweenMax if you only want to use a few features and keep everything really
small. TweenLite has a plug-in system that allows you to activate specific
plug-ins on an as-needed basis. You have to do this only once and the plug-in
features will be available to the rest of your file thereafter.
Lines 1 through 4 import the needed classes, including the
TweenPlugin class
that manages plug-ins, and the specific plug-in we need,
TintPlugin. Line 6
activates the
TintPlugin. It will then be available throughout the life of the
project. Lines 9 through 17 are the
from() tweens, each of which lasts for 1
second.
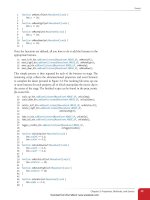
Line 8 fades the background up from black. Lines 9 through 16 scale up the
four balls from 0 to final size. They use an
Elastic ease so the tweens spring
forward and back a few times around their final scale values. However, each
tween is delayed a bit to build a sequence. The first ball starts a half-second
after the tint fade begins, the second tween starts one and one-half seconds
later, and so on. The last ball springs into place three seconds after the process
begins. This timing is amassed from a two-second delay and a one-second
duration. At the same time, the word “AS3” finishes sliding in from the left.
1 import com.greensock.TweenLite;
2 import com.greensock.plugins.TweenPlugin;
3 import com.greensock.plugins.TintPlugin;
4 import com.greensock.easing.Bounce;
5
6 TweenPlugin.activate([TintPlugin]);
7
8 TweenLite.from(bg, 1, {tint:0x000000});
9 TweenLite.from(ball0, 1, {scaleX:0, scaleY:0,
10 ease:Elastic.easeOut, delay:0.5});
11 TweenLite.from(ball1, 1, {scaleX:0, scaleY:0,
12 ease:Elastic.easeOut, delay:1.5});
13 TweenLite.from(ball2, 1, {scaleX:0, scaleY:0,
14 ease:Elastic.easeOut, delay:1.75});
15 TweenLite.from(ball3, 1, {scaleX:0, scaleY:0,
16 ease:Elastic.easeOut, delay:2});
17 TweenLite.from(as3, 1, {x:-100, ease:Elastic.easeOut, delay:2});
Figure 7-19. A mock banner
advertisement animated with TweenLite
Download from Wow! eBook <www.wowebook.com>