Học Actionscript 3.0 - p 35 potx
Bạn đang xem bản rút gọn của tài liệu. Xem và tải ngay bản đầy đủ của tài liệu tại đây (5.06 MB, 10 trang )
Visualizing Sound Data
Chapter 11: Sound
319
The Waveform class
The first dozen or so lines of the Waveform class will be familiar to you if
you’ve been reading this book linearly. Line 1 declares the class’s package
path as this class is part of the learningactionscript3 code library developed
throughout this book. Lines 3 through 7 import all the other classes required
by this class. Line 9 declares the class and extends
Sprite so it can inherit
all accessible properties, methods, and events from the
Sprite class. As dis-
cussed extensively in Chapter 6, this is important for things like being able to
access properties like
graphics, use event listeners, and add instances of this
class to the display list.
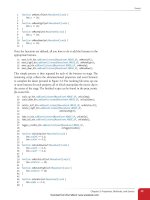
1 package com.learningactionscript3.sound {
2
3 import flash.display.Graphics;
4 import flash.display.Sprite;
5 import flash.events.Event;
6 import flash.media.SoundMixer;
7 import flash.utils.ByteArray;
8
9 public class Waveform extends Sprite {
10
11 private var _bytes:ByteArray = new ByteArray();
12 private var _fft:Boolean;
13 private var _g:Graphics;
14
15 public function Waveform(fft:Boolean=false) {
16 _fft = fft;
17 _g = this.graphics;
18
19 this.addEventListener(Event.ENTER_FRAME, onVisualize,
20 false, 0, true);
21 }
22
23 private function onVisualize(evt:Event):void {
24 SoundMixer.computeSpectrum(_bytes, _fft);
25 _g.clear();
26 plotWaveform(0x009900, 50);
27 plotWaveform(0xFF0000, 100);
28 }
29
30 private function plotWaveform(col:uint,
31 chanBaseline:Number):void {
32 _g.lineStyle(1, col);
33 _g.beginFill(col, 0.5);
34 _g.moveTo(0, chanBaseline);
35 for (var i:Number = 0; i < 256; i++) {
36 _g.lineTo(i, (chanBaseline -
37 _bytes.readFloat() * 50));
38 }
39 _g.lineTo(i, chanBaseline);
40 _g.endFill();
41 }
42 }
43 }
Download from Wow! eBook <www.wowebook.com>
Part IV: Sound and Video
320
Visualizing Sound Data
Lines 11 through 13 create three class properties. The _bytes property stores
an instance of the
ByteArray class to hold the sound data. The Boolean _fft
determines whether the class draws a waveform or frequency peaks. Finally,
_g stores a reference to the graphics property, as described in Chapter 8, so
we can draw the waveform with vectors.
The class constructor in lines 15 through 21 does only three simple things. Line
16 sets the Boolean class property
_fft to the value passed into the FFTMode
parameter during instantiation. Note that the parameter has a default value
of false. Therefore, if true is passed into the parameter,
computeSpectrum()
will use its FFT mode, and only positive values will be calculated. If nothing
is passed into the parameter,
computeSpectrum() will return values between
–1 and 1, drawing a waveform.
Line 17 stores a reference to the
graphics property of the class so we can
draw the sound’s waveform at runtime. Remember that this class extends
Sprite, so it already has its own graphics property. Furthermore, because
you’ll be adding an instance of this
Waveform class to the display list anyway,
there’s no benefit to creating another sprite within that instance just to serve
as a canvas for your drawing.
Finally, lines 19 and 20 add an event listener to the class that calls the
onVisualize() method every time it hears an enter frame event. This meth-
od draws one waveform for each stereo channel.
The first task of the
onVisualize() method is to extract the waveform data
from the sound using the
computeSpectrum() method (line 24). The data is
stored in the
_bytes property and _fft determines if wave or frequency spec-
trum data is returned. Line 25 then clears all prior drawing to the graphics
property to show only the current waveform and prevent an ongoing layering
of vectors. Finally, lines 26 and 27 call the
plotWaveform() method to draw a
waveform for the left and right stereo channels, respectively. These calls pass
the color and y coordinate of the baseline of each waveform to the method.
The first two lines of the method create a hairline stroke (line 32) and
50-percent transparent fill (line 33) of the requested color. Line 34 moves the
virtual drawing pen to an x coordinate of 0, and a y coordinate that matches
the requested baseline. The loop that follows in lines 35 through 41 will draw
the waveform from this point.
Earlier we mentioned that the
ByteArray is populated with 512 data values
each time the
computeSpectrum() method is called. Note, however, that the
for loop starting in line 35 iterates only 256 times. This is because the class is
designed to draw the waveform for the left and right stereo channels consecu-
tively. That is, the method call in line 26 draws a waveform using the first 256
values, which correspond to the left channel. Line 27 calls the method to draw
a waveform using the next 256 values, representing the right channel. Therefore,
each time
onVisualize() is executed all 512 values are retrieved. Because the
ByteArray instance automatically increments itself when a value is retrieved, it
returns to its first position ready for the next request of 256 values.
N OT E
Using two loops of 256 values, rather
than 1 loop of 512 values, makes it easier
for us to draw the left and right chan-
nels separately. For example, because the
loop counter (
i) ranges from 0 to 255, we
can use it as an x coordinate for each
point of our waves. If we used a single
loop from 0 to 511, the x coordinate of
the right channel waveform would begin
at 256, after the left channel waveform
ended, and the two waveforms would
appear next to each other, rather than
stacked vertically.
Download from Wow! eBook <www.wowebook.com>
Visualizing Sound Data
Chapter 11: Sound
321
Lines 36 and 37 call the lineTo() method of the Graphics class. The
repeated call of the method by the loop draws a line that connects all 256
samples of each waveform. The x coordinates increment from 0 to 255, and
the y coordinates are based on the values stored in the byte array. Each float,
or decimal value, returned from the byte array is multiplied by the maximum
waveform height of 40 pixels Therefore, at full amplitude (1 or –1), the wave-
form height at that point is 40 or –40, at minimum amplitude (0), the height
of the waveform is 0, and with an interim amplitude the waveform height will
fall somewhere in between.
The resulting waveform height is then subtracted from the desired baseline.
A positive sample amplitude is subtracted from the baseline position, causing
a peak to rise above the baseline. Negative sample amplitudes are effectively
added to the baseline position (subtracting a negative value is equivalent to
adding that value) causing a peak to appear below the baseline. (Increasing
y values in the Flash Coordinate system move down the y axis.) Figure 11-9
shows a few sample values and their resulting position in the waveform.
Finally, lines 39 and 40 return the drawing point of the waveform to its base-
line, and then close the fill, respectively.
The best part of this visualization is that it operates independently of any
sound playback code. As we discussed previously, the
SoundMixer class is
equivalent to the main channel on a recording studio mixing desk. As such,
our
Waveform class will automatically visualize any sound running through
that master mixer—in other words, any sound in any
SoundChannel instance.
We’ll show this in action by demonstrating how easy it is to add the visualiza-
tion to a project that already plays sound.
Adding the Waveform Visualization to Our
Sound Player
The following code completes our ongoing sound player project, and appears
in the
player_complete.fla source file. Because the visualizer plots waveforms
for all sounds, and because the player is already capable of playing sound,
all we need to do is add an instance of
Waveform to the player’s display list.
Line 146 imports the class we just created, line 148 creates the instance we
need, lines 149 and 150 position the visualization sprite, and line 151 adds it
to the display list. For cosmetic purposes, line 152 doubles the scale of the
visualization so it spans 512 pixels to fill the stage, rather than its default
256-pixel width.
145 //waveform visualization
146 import com.learningactionscript3.sound.Waveform;
147
148 var vis:Waveform = new Waveform();
149 vis.x = 20;
150 vis.y = 100;
151 vis.scaleX = vis.scaleY = 2;
152 addChild(vis);
100 - (-1.0 * 100) = 200
100 - (-0.5 * 100) = 150
100 - (0.75 * 100) = 25
y: 100
y: 200
y: 0
Figure 11-9. A few sample amplitude
calculations, and where they appear in an
example waveform
Download from Wow! eBook <www.wowebook.com>
Part IV: Sound and Video
322
Visualizing Microphone Input
This is just one example visualization, with a simple display. The kind of art
you can create is limited only by what you can manipulate with numbers in
real time and, of course, your imagination.
Visualizing Microphone Input
Prior to Flash Player 10, accessing input from the microphone was very limited.
Only an overall activity level, somewhat akin to the amplitude of the input,
was available. As of Flash Player 10, extensive manipulation of mic input is now
possible. You can draw a waveform of the input, capture the input, alter it, and
even save it to a WAV file with the help of additional classes.
For maximum compatibility, we’ll start our discussion about microphone
input by visualizing the mic’s
activityLevel property. This is compatible
all the way back to the introduction of ActionScript 3 (which also means ver-
sions CS3 through CS5 of Flash Professional support this technique). We’ll
then follow with additional features that require Flash Player 10.
Activity Level
The following code is found in the microphone_activity_level.fla source file.
After granting Flash Player permission to use the microphone, this file will
continually react to microphone input, drawing a line across the screen that
corresponds to microphone activity level. The relationship between activity
and time makes the file look a bit like an EKG read out. The line perpetually
draws to the right and the line draws up and down with mic activity.
Figure 11-10 shows a sample of the file output. The first segment of the plot
was created with staccato whistling. The sharp rise and fall of activity is char-
acteristic of this type of sound. The second segment was created by a human
voice steadily increasing the amplitude of a single tone to crescendo and then
diminishing again to silence. The fact that the rise and fall of the tone are not
represented by straight lines is attributed to the natural wavering of the aver-
age human voice when attempting this exercise.
The first six lines of this script are important as they initialize the micro-
phone for use. Line 1 stores a reference to the current microphone using the
static method,
getMicrophone() of the Microphone class. This will activate
the microphone, but it won’t yet provide any data to ActionScript. In order
to work with the microphone input, you’ll need to feed that data back to
ActionScript, as seen in line 2.
When doing so, it’s best to use echo suppression, shown in line 3, to mini-
mize feedback from your speakers during recording. As an added measure
against feedback, we’ll set the volume of the microphone to 0 later on, as
we don’t need to hear the input in this example. Line 4 sets the
gain of the
microphone—the amount by which the microphone data is multiplied
before transmitting. It’s a little like the volume of the microphone’s throughput.
Figure 11-10. A visualization of a
microphone’s activity level
Download from Wow! eBook <www.wowebook.com>
Visualizing Microphone Input
Chapter 11: Sound
323
0 transmits nothing, 50 is the default value, and 100 amplifies the input to its
maximum degree.
Line 5 sets the
sample rate of the microphone—the number of samples taken
from the source audio during the encoding process. The higher the sample
rate, more samples are taken, and the better the sound quality is. Possible
values include 5, 8, 11, 22, and 44, which correspond to 5.512 and 8.000 kHz,
(both poor quality), 11.025 kHz (good for basic voice input), 22.050 kHz (mid
quality), and 44.100 kHz (maximum quality, and the rates at which audio
CDs are sampled).
Line 6 sets the silence level—a kind of activity threshold. In order for the
microphone to sense any activity, a noise level above the first value (5 in this
case) must be sustained for a specified number of milliseconds (1,000, or
1 second, in this case). This helps reduce the amount of background noise
captured by the microphone.
1 var mic:Microphone = Microphone.getMicrophone();
2 mic.setLoopBack(true);
3 mic.setUseEchoSuppression(true);
4 mic.gain = 80;
5 mic.rate = 11;
6 mic.setSilenceLevel(5, 1000);
Despite echo suppression, if your microphone is close to your speakers (par-
ticularly when using a laptop with a built-in microphone), feedback can still
occur. Therefore, if you don’t need to hear the input, you may wish to set the
volume of the mic throughput to zero, as seen in lines 8 through 10. This is
not the same as muting, or deactivating, the microphone; it merely sets the
volume of the data recorded to an inaudible level.
7 //transformation
8 var trans:SoundTransform = mic.soundTransform;
9 trans.volume = 0;
10 mic.soundTransform = trans;
The next two dozen lines are optional and provide feedback about the mic to
the Output panel. If you’re not getting any results from your code, it’s helpful
to know what your microphone settings are. You may find that the mic is
muted, or has a 0 gain, or a high silence threshold.
You may also be able to check on the microphone’s responsiveness by check-
ing its
silenceTimeout property. This is the number of milliseconds between
the time the microphone stops sensing input, and the time an inactivity event
is sent. (The event
ActivityEvent.ACTIVITY is dispatched both when the
microphone starts and stops sensing activity.)
The listener created in lines 12 through 20 responds to the event,
StatusEvent.
STATUS, which is triggered by any microphone status updates, such as when
the mic is muted or unmuted. Each time the listener function is triggered,
it checks to see whether the user has granted access to the mic, which
would be reflected by a
Microphone.Unmuted status code (line 15). If so,
Download from Wow! eBook <www.wowebook.com>
Part IV: Sound and Video
324
Visualizing Microphone Input
the showMicInfo() function is called. If the received code is Microphone.
Muted (line 17), a trace says that access was denied.
11 //mic status
12 mic.addEventListener(StatusEvent.STATUS, onMicStatus
13 false, 0, true);
14 function onMicStatus(evt:StatusEvent):void {
15 if (evt.code == "Microphone.Unmuted") {
16 showMicInfo();
17 } else if (evt.code == "Microphone.Muted") {
18 trace("Microphone access denied.");
19 }
20 }
21
22 function showMicInfo():void {
23 var sndInputs:Array = Microphone.names;
24 trace("Available sound input devices:");
25 for (var i:int = 0; i < sndInputs.length; i++) {
26 trace(" ", sndInputs[i]);
27 }
28 trace("Selected sound input device name:", mic.name);
29
30 trace("Muted:", mic.muted);
31 trace("Echo suppression:", mic.useEchoSuppression);
32 trace("Gain:", mic.gain);
33 trace("Rate:", mic.rate, "kHz");
34 trace("Silence level:", mic.silenceLevel);
35 trace("Silence timeout:", mic.silenceTimeout);
36 }
Another reason that you may not get the results you expect from microphone
input is if the wrong input has been selected, when multiple inputs are avail-
able. Lines 23 through 28 of the
showMicInfo() function retrieve an array of
all available microphones, loop through the list and trace them, and finish
with the name of the currently selected microphone. This allows you to verify
that the desired mic is active.
Next, we begin to get into the visualization section of the file. This example
will plot a graph of microphone activity levels over time. To do this, we need
to use the
Graphics class and draw lines from point to point, as discussed
earlier when covering the
Waveform class. Lines 38 through 46 create a sprite
into which we can draw, clear the canvas, set a line style, and move the virtual
drawing pen to the far left of the stage at the y coordinate 300.
Notice that lines 43 through 45, the methods responsible for initializing the
canvas, are placed into a function and then called right away in line 47. This
may seem like an unnecessary step but the
initCanvas() function will be
called again and again to reinitialize the canvas.
37 //creating a canvas to draw into
38 var canvas:Sprite = new Sprite();
39 var g:Graphics = canvas.graphics;
40 addChild(canvas);
41
42 function initCanvas():void {
43 g.clear();
Download from Wow! eBook <www.wowebook.com>
Visualizing Microphone Input
Chapter 11: Sound
325
44 g.lineStyle(0, 0x6600CC);
45 g.moveTo(0, 300);
46 }
47 initCanvas();
As our last task, we draw the graph. We want this exercise to plot continually,
even if there is no activity, much like an EKG will run until it is stopped. So,
we’ll use a Timer event firing every 50 milliseconds to visualize the mic activ-
ity (lines 49 through 52). Line 54 initializes a variable that will be used for the
x coordinate of each point in the line.
The graph is drawn from point to point in line 56, using the same technique
discussed in the
Waveform class. The x coordinate is advanced across the
screen, and the y coordinate is determined by subtracting the mic activity
level from a baseline. A maximum line height is not required here, however,
because the values output from the
activityLevel property are between 0
and 100.
Finally, a conditional in lines 57 through 62 determines the x coordinate of
each point to which a line is drawn in the graph. Line 57 checks to see if the
x coordinate has exceeded the right side of the stage. If so, the
xPos property
is reset to 0, the graph is cleared, and the graphing process begins anew from
the left side of the stage. If not, the graph continues to advance across the
stage 2 pixels at a time.
48 //drawing the activity graph
49 var myTimer:Timer = new Timer(50);
50 myTimer.addEventListener(TimerEvent.TIMER, onTimer,
51 false, 0, true);
52 myTimer.start();
53
54 var xPos:int = 0;
55 function onTimer(ev:TimerEvent):void {
56 g.lineTo(xPos, 300 - mic.activityLevel);
57 if (xPos > stage.stageRight) {
58 xPos = 0;
59 initCanvas();
60 } else {
61 xPos += 2;
62 }
63 }
SampleDataEvent
Flash Player 10 significantly improves ActionScript’s sound processing capa-
bilities through the use of the
SampleDataEvent.SAMPLE_DATA event. This
event is dispatched in two ways. The first is when a sound object requests
sound data. We’ll look at this circumstance at the end of the chapter when
we play back recorded input.
The second way this event is used is when the microphone receives input.
Every time audio samples become available to the microphone, the event is
dispatched and you can process the incoming data. The following example,
N OT E
See the “Timer Events” section of
Chapter 3 for more information.
Download from Wow! eBook <www.wowebook.com>
Part IV: Sound and Video
326
Visualizing Microphone Input
found in the microphone_sample_data_event.fla source file, visualizes micro-
phone input by drawing a waveform at runtime.
Lines 1 through 5 create a sprite canvas into which we’ll draw our visualiza-
tion. Line 3 positions it horizontally, 20 pixels from the left of the stage, and
line 4 centers the visualization vertically. Line 5 scales the canvas to 25 per-
cent of its original size. We’ll tell you why in a moment when we discuss the
size of the waveform we’re drawing.
Line 8 creates an instance of the microphone, and line 9 sets its sample
rate to 44.100 kHz. Lines 10 and 11 create a microphone event listener that
responds to the
SAMPLE_DATA event. Each time sample data is received by the
microphone, the
onMicData() function (lines 13 through 22) is called. This
function uses the same techniques described when visualizing spectrum
data and microphone activity level, with a few notable exceptions that we’ll
explain after the code.
1 var canvas:Sprite = new Sprite();
2 var g:Graphics = canvas.graphics;
3 canvas.x = 20;
4 canvas.y = stage.stageHeight / 2;
5 canvas.scaleX = canvas.scaleY = 0.25;
6 addChild(canvas);
7
8 var mic:Microphone = Microphone.getMicrophone();
9 mic.rate = 44;
10 mic.addEventListener(SampleDataEvent.SAMPLE_DATA, onMicData,
11 false, 0, true);
12
13 function onMicData(evt:SampleDataEvent):void {
14 var xPos:Number = 0;
15 g.clear();
16 g.lineStyle(1, 0x0000FF);
17
18 while(evt.data.bytesAvailable) {
19 g.lineTo(xPos, evt.data.readFloat() * 200);
20 xPos++;
21 }
22 }
First, we’re not calculating sound bytes using the computeSpectrum() meth-
od. Instead, bytes are being provided by the event, and we’re referencing the
byte array in which they’re stored through the event’s
data property.
Second, we’ve simplified access to the byte array by looping through all avail-
able bytes. This is possible because the byte array
readFloat() method auto-
matically increments through the data, as discussed in the “Sound Spectrum
Data” section of this chapter. So, as long as the event has bytes that have not
yet been read, the loop will continue. When all bytes have been checked, the
loop concludes and the next event is processed.
Finally, although the actual drawing of the waveform (line 19) is consistent
with prior examples, it does influence the scale setting we used in line 5.
There’s nothing different about the use of the
lineTo() method in this
example. We’re still incrementing the x coordinate of each point every time
Download from Wow! eBook <www.wowebook.com>
Recording, Playing, and Saving Microphone Input
Chapter 11: Sound
327
through a loop, and we’re still determining the y coordinate of each point by
multiplying an amplitude float from the byte array by a maximum possible
wave height.
However, the number of samples used by the microphone dictates how many
points are drawn. When recording or generating audio, you can typically
work with between 2048 and 8192 samples (bytes) per
SAMPLE_DATA event.
The higher the number of samples, the better your sound. The number of
samples used is determined by the
rate property of the microphone. Table
11-3 shows the correlation between the digital sample rate and the number
of samples used.
We set the mic
rate property to 44 in line 9, which means 8192 samples are
used every time
onMicData() is called. Because we need floats, not bytes, the
readFloat() method advances through the available bytes four at a time.
This means that we end up with 2048 points each time the waveform is plot-
ted. So, to fit the waveform within the default stage width of 550 pixels, we
scale the canvas sprite down to 25 percent.
When testing your file, after you grant access to the microphone, the SWF
will draw a single waveform in the center of the screen when microphone
input is received, as shown in Figure 11-11.
Figure 11-11. A microphone input waveform, using SampleDataEvent
Recording, Playing, and Saving
Microphone Input
The following exercise covers new features introduced with Flash Players 10
and 10.1 and requires Flash Player 10.1 or later to function. In this example,
you’ll capture mic input and play it back without a sound file to work from.
You’ll also use the ByteArray to save the data as a WAV file.
The source code consists of two classes:
RecordMicrophone, which is
part of the learningactionscript3 package (in the
sound directory), and
RecordMicrophone_Example, which is a document class that accompanies
the
RecordMicrophone_Example.fla. The document class simply sets up a user
interface with five buttons that are used to control the
RecordMicrophone
class. The
RecordMicrophone class contains the core functionality of the
exercise and is where we’ll start.
N OT E
When recording microphone input, you
can actually work with 1024 samples
per
SAMPLE_DATA event, by using a
microphone
rate of 8 or 5. However,
we recommend against it. We suggest
using a
rate of 44, resulting in 8192
samples per event, but a
rate of 11, for
2048 samples per event, should be a
minimum.
Notably, the fewer samples you use,
the higher the likelihood of introducing
audio artifacts like clicks and pops into
your sound. In fact, when generating
sounds from code, you can’t even use
fewer than 2048 samples.
Table 11-3. Microphone sample rates
and the number of samples recorded
per
SAMPLE_DATA event
Mic rate Sample Rate
Samples
Used
44 44.100 kHz 8192
22 22.050 kHz 4096
11 11.025 kHz 2048
8 8.000 kHz 1024
5 5.512 kHz 1024
N OT E
See “Storing and retrieving sound spec-
trum data” earlier in the chapter for
more information about the
ByteArray
class and
readFloat() method.
P
u
s
h
Y
o
u
r
s
e
l
f
!
Download from Wow! eBook <www.wowebook.com>
Part IV: Sound and Video
328
Recording, Playing, and Saving Microphone Input
Flash Professional users can try the exercise by testing the FLA, but you’ll
need version CS5 to compile. If you’re using another ActionScript editor,
we’ve written the
RecordMicrophone_Example class to extend MovieClip so
it can easily be used as an application class.
RecordMicrophone Class
Relying heavily on event-driven sample processing, RecordMicrophone is a
utility class that provides the minimum required to effectively record, play,
and save microphone input. During recording, it adds an event listener to the
microphone to listen for the
SAMPLE_DATA event, and will capture any input
that is fed to the mic.
During playback, it again creates an event listener to listen for the
SAMPLE_
DATA event but, this time, the listener is added to the Sound object. In this
case, the listener plays any sample data that is sent to the sound object, gen-
erating the sound dynamically at runtime.
Because both processes are event-driven, adding and removing these listeners
essentially switches on and off the two functions. Stopping recording or play-
back, for example, removes the corresponding listener, and listeners are recre-
ated each time the record or play button is used. Now let’s look at the code.
Lines 1 through 10 establish the package path of the class, and import all
required additional classes. Note that we’re using another class from Adobe’s
as3corelib package, and the
FileReference class, discussed in the “Image
Encoding and Saving” section of Chapter 9. The
WAVWriter class encodes
bytes of sound data as a WAV file and, as of Flash Player 10 and later, the
FileReference class saves a file to your hard drive.
Lines 12 through 17 declare the class and class properties. The
_mic property
holds an instance of the microphone. The
_sndBytes property contains a byte
array of all microphone input,
_snd is a Sound instance that we can use to
play back what we record, and
_channel references the sound channel into
which the
Sound object is played.
Lines 19 through 28 include the class constructor and
setupMicrophone()
method. The latter is a basic microphone initialization method that creates
an instance of the microphone and sets three simple mic properties discussed
previously in the chapter.
1 package com.learningactionscript3.sound {
2
3 import flash.events.Event;
4 import flash.events.SampleDataEvent;
5 import flash.media.Microphone;
6 import flash.media.Sound;
7 import flash.media.SoundChannel;
8 import flash.net.FileReference;
9 import flash.utils.ByteArray;
10 import com.adobe.audio.format.WAVWriter;
11
N OT E
As you look over the
RecordMicrophone class in the com-
ing pages, note which methods are pub-
lic and which are private. Their designa-
tion will affect which methods we can
call from our second class, which builds
the example interface.
N OT E
The RecordMicrophone class doesn’t
extend anything because no inheri-
tance is required. We don’t need to add
instances of this class to the display list,
for example, or inherit the accessible
properties, methods or events of a par-
ent class.
Download from Wow! eBook <www.wowebook.com>