PHP and MySQL Web Development - P68 ppt
Bạn đang xem bản rút gọn của tài liệu. Xem và tải ngay bản đầy đủ của tài liệu tại đây (140.67 KB, 5 trang )
307
Using Basic Authentication with Apache’s .htaccess Files
The line
require valid-user
specifies that any valid user is to be allowed access.
Listing 14.8 .htpass—The Password File Stores Usernames and Each User’s Encrypted
Password
user1:0nRp9M80GS7zM
user2:nC13sOTOhp.ow
user3:yjQMCPWjXFTzU
user4:LOmlMEi/hAme2
Each line in the .htpass file contains a username, a colon, and that user’s encrypted
password.
The exact contents of your .htpass file will vary.To create it, you use a small pro-
gram called htpasswd that comes in the Apache distribution.
The htpasswd program is used in one of the following ways:
htpasswd [-cmdps] passwordfile username
or
htpasswd -b[cmdps] passwordfile username password
The only switch that you need to use is -c. Using -c tells htpasswd to create the file.
You must use this for the first user you add. Be careful not to use it for other users
because if the file exists, htpasswd will delete it and create a new one.
The optional m, d, p, or s switches can be used if you want to specify which encryp-
tion algorithm (including no encryption) you would like to use.
The b switch tells the program to expect the password as a parameter, rather than
prompting for it.This is useful if you want to call htpasswd noninteractively as part of a
batch process, but should not be used if you are calling htpasswd from the command
line.
The following commands created the file shown in Listing 14.8:
htpasswd -bc /home/book/.htpass user1 pass1
htpasswd -b /home/book/.htpass user2 pass2
htpasswd -b /home/book/.htpass user4 pass3
htpasswd -b /home/book/.htpass user4 pass4
This sort of authentication is easy to set up, but there are a few problems with using a
.htaccess file this way.
Users and passwords are stored in a text file. Each time a browser requests a file that is
protected by the .htaccess file, the server must parse the .htaccess file, and then parse
the password file, attempting to match the username and password. Rather than using an
.htaccess file, we could specify the same things in our httpd.conf file—the main con-
figuration file for the Web server.An .htaccess file is parsed every time a file is
18 525x ch14 1/24/03 3:36 PM Page 307
308
Chapter 14 Implementing Authentication with PHP and MySQL
requested.The httpd.conf file is only parsed when the server is initially started.This
will be faster, but means that if we want to make changes, we need to stop and restart
the server.
Regardless of where we store the server directives, the password file still needs to be
searched for every request.This means that, like other techniques we have looked at that
use a flat file, this would not be appropriate for hundreds or thousands of users.
Using Basic Authentication with IIS
Like Apache, IIS supports HTTP authentication. Apache uses the UNIX approach and is
controlled by editing text files, and as you might expect, selecting options in dialog boxes
controls the IIS setup.
Using Windows 2000, you change the configuration of Internet Information Server 5
(IIS5) using the Internet Services Manager.You can find this utility by choosing
Administrative Tools in the Control Panel.
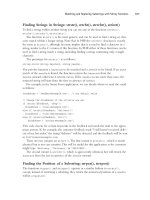
The Internet Services Manager will look something like the picture shown in
Figure 14.5.The tree control on the left side shows that on the machine named
windows-server, we are running a number of services.The one we are interested in is
the default Web site.Within this Web site, we have a directory called protected. Inside
this directory is a file called content.html.
Figure 14.5 The Microsoft Management Console allows
us to configure Internet Information Server 5.
To add basic authentication to the protected directory, right-click on it and select
Properties from the context menu.
The Properties dialog allows us to change many settings for this directory.The two
tabs that we are interested in are Directory Security and Custom Errors. One of the
options on the Directory Security tab is Anonymous Access and Authentication Control.
Pressing this Edit button will bring up the dialog box shown in Figure 14.6.
18 525x ch14 1/24/03 3:36 PM Page 308
309
Using Basic Authentication with IIS
Figure 14.6 IIS5 allows anonymous access by default,
but allows us to turn on authentication.
Within this dialog, we can disable anonymous access and turn on basic authentication.
With the settings shown in Figure 14.6, only people who provide an appropriate name
and password can view files in this directory.
In order to duplicate the behavior of the previous examples, we will also provide a
page to tell users that their authentication details were not correct. Closing the
Authentication methods dialog box will allow us to choose the Custom Errors tab.
The Custom Errors tab, shown in Figure 14.7, associates errors with error messages.
Here, we have stored the same rejection file we used earlier, rejection.html, shown in
Listing 14.6. IIS gives us the ability to provide a more specific error message than
Apache does, providing the HTTP error code that occurred and a reason why it
occurred. For the error 401, which represents failed authentication, IIS provides five dif-
ferent reasons.We could provide different messages for each, but have chosen to only
replace the two that are going to occur in this example with our rejection page.
That is all we need to do to require authentication for this directory using IIS5. Like
a lot of Windows software, it is easier to set up than similar UNIX software, but harder
to copy from machine to machine or directory to directory. It is also easy to accidentally
set it up in a way that makes your machine insecure.
The major flaw with IIS’s approach is that it authenticates Web users by comparing
their login details to accounts on the machine. If we want to allow a user "john" to log
in with the password "password",we need to create a user account on the machine, or
on a domain, with this name and password.You need to be very careful when you are
creating accounts for Web authentication so that the users only have the account rights
they need to view Web pages and do not have other rights such as telnet access.
18 525x ch14 1/24/03 3:37 PM Page 309
310
Chapter 14 Implementing Authentication with PHP and MySQL
Figure 14.7 The Custom Errors tab lets us associate
custom error pages with error events.
Using mod_auth_mysql Authentication
As already mentioned, using mod_auth with Apache is easy to set up and is effective.
Because it stores users in a text file, it is not really practical for busy sites with large
numbers of users.
Fortunately, you can have most of the ease of mod_auth, and the speed of a database
using mod_auth_mysql.This module works in much the same way as mod_auth,but
because it uses a MySQL database instead of a text file, it can search large user lists
quickly.
In order to use it, you will need to compile and install the module on your system or
ask your system administrator to install it.
Installing mod_auth_mysql
In order to use mod_auth_mysql,you will need to set up Apache and MySQL according
to the instruction in Appendix A,“Installing PHP and MySQL,” but add a few extra
steps.There are quite good instructions in the files README and USAGE that are in the dis-
tribution, but here is a summary.
1. Obtain the distribution archive for the module. It is on the CD-ROM that came
with this book, but you can always get the latest version from
/>or alternatively
/>18 525x ch14 1/24/03 3:37 PM Page 310
311
Using mod_auth_mysql Authentication
2. Unzip and untar the source code.
3. Change to the mod_auth_mysql directory and run configure.You need to tell it
where to find your MySQL installation and your Apache source code.To suit the
directory structure on my machine, I typed
./configure with-mysql=/var/mysql with-apache= /src/apache_1.x.xx
but your locations might be different.
4. Run make, and then make install.You will need to add
activate-module=src/modules/auth_mysql/libauth_mysql.a
to the parameters you give to configure when you configure Apache.
For the setup on my system, I used
./configure enable-module=ssl \
activate-module=src/modules/php4/libphp4.a \
enable-module=php4 prefix=/usr/local/apache enable-shared=ssl \
activate-module=src/modules/auth_mysql/libauth_mysql.a
5. After following the other steps in Appendix A, you will need to create a database
and table in MySQL to contain authentication information.This does not need to
be a separate database or table; you can use an existing table such as the auth data-
base from the example earlier in this chapter.
6. Add a line to your
httpd.conf file to give mod_auth_mysql the parameters it
needs to connect to MySQL.The directive will look like
Auth_MySQL_Info hostname user password
Did It Work?
The easiest way to check whether your compilation worked is to see whether Apache
will start.To start Apache, if you have SSL support type
/usr/local/apache/bin/apachectl startssl
If you don’t have SSL support you can type
/usr/local/apache/bin/apachectl start
If it starts with the Auth_MySQL_Info directive in the httpd.conf file, mod_auth_mysql
was successfully added.
Using mod_auth_mysql
After you have successfully installed the module, using it is no harder than using
mod_auth. Listing 14.9 shows a sample .htaccess file that will authenticate users with
encrypted passwords stored in the database created earlier in this chapter.
18 525x ch14 1/24/03 3:37 PM Page 311