Professional Information Technology-Programming Book part 11 docx
Bạn đang xem bản rút gọn của tài liệu. Xem và tải ngay bản đầy đủ của tài liệu tại đây (23.27 KB, 5 trang )
3.5. Add Metadata for the Record
By now, you already have some idea of how useful metadata can be. It records the
settings used by your camera to take the picture, so by looking at the image in the
Browser and clicking the Metadata tab and scrolling down to Camera Data, you
can see the f-stop and shutter speed, ISO setting, focal length of the lens at the time
the photo was shot, the maximum aperture of that lens, the name of the
photographer, the date it was shot, date downloaded, flash used, metering mode,
orientation, camera make, and camera model. Imagine how useful all that
informationwhich you didn't even have to input yourselfis going to be in three
years when you own several camera and lens combinations and you have no idea
how you captured that award-winning photo.
NOTE
To make the type larger in the Metadata panel, choose Increase Font Size from its
menu. It would be nice if you could do this for the Keywords panel, too, but nah!
But really, the usefulness of metadata starts with what the camera records. Camera
Raw and Photoshop go on to record most everything they do, too. In fact, the
image adjustments you make in Camera Raw only exist as metadata. The image
processing program then takes the adjustment information in the metadata file and
makes the adjustments to the thumbnails and to the image that opens in Photoshop
according to those settings in the metadata.
As we'll discover in the next section, when it comes time to rank and label your
images, Bridge records your ranking metadata as you enter it. However, when you
want to record your emotions, purpose, or the character of the image, you have to
make the effort to enter that data yourself. You can even enter information
regarding the client for the image.
3.5.1. Adding Copyright Info
Adobe Bridge allows you to automatically add your personal metadata to any or all
of the files that are currently open in a given folder in Bridge. Early on, while
you're thinking about it, you should add your personal and copyright information to
every photograph you've taken up until this moment. That information is needed
for every image you shoot and can be made to "travel" with your image files. You
then have at least some assurance that you will be able to prove ownership of that
image should someone later publish it without permission.
Adding personal metadata to your images is quite easy:
1. Open Adobe Bridge. There's no need to open Photoshop at the same time, so
more computing power will be available to Bridge.
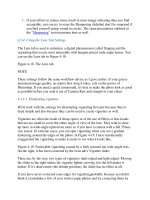
2. Create a new folder called Metadata Templates. Then open that folder. In
Photoshop CS2, choose New. The New dialog opens (see Figure 3-17).
Since this file's sole purpose is to hold text data, there is no point in
reserving space for a large image. So use a low-resolution setting and very
small pixel dimensions. The exact figures really don't matter.
Figure 3-17. The New (file) dialog.
3. Save the file as Yourname Copyright.psd in a new folder you've created in
your Photos folder called Metadata.
4. Open the file you just created in Bridge. Choose View Metadata. Scroll
down to the IPTC Core heading. Enter the data for the following fields, but
don't enter data for any other fields. You want to be sure you don't
unintentionally overwrite any data later in this process. Here are the fields
you should enter: Creator, Creator Job Title, Creator Address, Creator City,
Creator State/Province, Creator Postal Code, Creator Country, Creator
Phone(s), Creator Email(s), Creator Website(s), Copyright Notice, and
Rights Usage Terms.
5. Save the file. A dialog will ask if you want to apply the metadata to the file.
Click the Apply button.
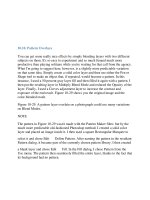
6. Open the File Info dialog (see Figure 3-18) using Photoshop CS2. At the
upper right, you will see the circled arrowhead that indicates a dialog menu.
Click to drop down the menu, and choose Save Metadata Template. Name
the template the same as the file, but there's no need for a file extension.
Click Save.
Figure 3-18. The File Info dialog box.
7. Use the Bridge Folders tab to navigate to the folder where you just
downloaded your files. Click the folder to open it. You will see the file
thumbnails in the thumbnails window. Click in the Thumbnails window so
that it's targeted and press Cmd/Ctrl-A to Select All.
8. Choose Tools Append Metadata from the Bridge menu. A menu will fly
out and you can choose the name of the file to which you saved the
metadata. Next, a dialog will pop up asking if you want to append metadata
to all the files. Click Yes.
9. Repeat these steps for every one of your pre-existing photo file folders. It's
also a very good idea at this point to copy all your archived files to a hard
drive and use this same procedure to add your author and copyright info to
all your files. The longer you put it off, the greater the risk that your files
will get lost or stolen, since someone may want to buy or license them and
won't know who to contact. I think you'll agree that it's not worth putting this
off any longer.
So far, you have only entered your personal information and your copyright
information. You will be doing a very similar process later to add information
that's pertinent to the shoot. When the time comes, I suggest you do this by adding
the data to your camera and copyright data. So be sure to keep the file handy that
you used to enter this data in the first place. You'll want to rename copies of that
file to the metadata for each subject or assignment category that you're likely to
encounter.
3.5.2. Setting Metadata Preferences
The title of this section makes setting metadata preferences sound like a big deal,
but it is one of the simplest operations in Bridge. Actually, you could get away
with not even bothering. Still, the program will usually run faster and better if you
do the following:
1. Choose Bridge Edit Preferences Metadata or from the Metadata
tab, click the Metadata menu (small arrow in upper-right corner), and choose
Preferences.
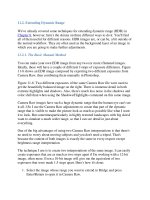
2. The Preferences dialog will appear (see Figure 3-19) set to Metadata. Scroll
down to Camera Data and uncheck the following: Software, Date Time,
Image Description, and File Source.
Figure 3-19. Metadata Preferences.
3. Click OK.
3.5.3. Adding IPTC Core Metadata
You can manually add or change the metadata in an image at any time, so long as
the metadata is assigned to the International Press Telecommunications Council
(IPTC) Core. The IPTC Core is the portion of the prescribed keywords used in
Photoshop XML; many other image management and digital darkroom programs
have adopted these keywords.
To see or change the metadata, click the Metadata tab and scroll down to IPTC
Core (see Figure 3-20). Click on any of the category titles that show a pencil icon
on the right and a field will open where you can enter the data by hand. Again, be
sure to collect a list for what could go into these fields so you don't enter similar
keywords for the same thing.
Figure 3-20. The categories for the IPTC core. You can enter these by hand if you
like or you can apply them to numerous files automatically through a template.
NOTE
It's a good idea to enter a title for any image you plan to use in a portfolio or web
gallery. A good many programs that make web galleries, including Photoshop, can
automatically label the image with its title.
3.5.4. Creating a Metadata Template
Metadata is added to whole groups of files in the same way personal and copyright
metadata is added. The only difference is that you want to make a different
template for each shoot. However, you'll probably never use exactly the same set
of metadata again and you don't really want to have hundreds or thousands of
templates. So after you've done a shoot that is typical of one of your categories,
duplicate it using your computer's operating system (Finder or Explorer) and give
the duplicate a generic name. Next time you do a similar shoot you can use the
generic template that suits that type of shoot. Now all you have to do is enter the
data that's changed in this particular shoot, such as keywords.
Here's the step-by-step procedure for adding metadata to files after the copyright
and personal metadata has been added:
1. Open Photoshop and one of the images to which you applied the template
for adding copyright metadata. As soon as the file is open, choose File
File Info. From the File Info dialog's menu, choose Save Metadata Template
(see Figure 3-21). This time, save the template to a different filename that
specifies the category of shoot that the new metadata will be added to. Make
sure it's named after one of the major categories in your list for ranking
images.
Figure 3-21. The Save Metadata Template and the dialog for naming the
saved metadata. Use a different set of metadata for each shooting category
so you can use the set of templates over and over.
2. Add the metadata you feel is important to add to this category of images. Do
not add any metadata that is peculiar to only a single imageit should pertain
to the entire category. The idea is to enter as much data at one time as
possible for as large a category of images as possible. You will want to add
the following information for each of the primary categories in your list:
Description
Document title: The complete, unabbreviated title under the image when it
appears in a slide show or in print. It is likely that several slight variations of
the same image will have the same title.
Author: The name of the person who wrote the title.
Author title: Probably you, but could be an assistant, editor, etc.
Description: This should be just enough for an explanatory caption.
Description writer: The name of the person who wrote the description above.
Keywords: Terms from your category list that pertain to this image. You can
add new words, but if you do that you should also add them to your list.
Then you will be able to reuse the same word for similar types of objects.
Copyright status (menu): Choose from Unknown, Copyrighted, or Public
Domain.
Copyright notice: Type the copyright symbol and year (e.g., © 2005) into
Word, copy that to the clipboard and paste it into the proper field. This is a
workaround since you cannot type a symbol in Photoshop.
Copyright info URL: The URL for the author's web site, e.g.,