Professional Information Technology-Programming Book part 21 pdf
Bạn đang xem bản rút gọn của tài liệu. Xem và tải ngay bản đầy đủ của tài liệu tại đây (15.82 KB, 5 trang )
5.1. A System of Layers for Nondestructive Editing
Table 5-1 lists the layer type for a given image's workflow if you applied
everything that Photoshop can do. Of course (and thank Heavens), very few
individual images will include each of these layer categories and even fewer could
use all the processes that occur within them.
Don't use any of these layers unnecessarilydoing so will give you no advantage and
will cause a little more destruction and use a little more disk space. The table is to
be used as a guide to let you know where the layers belong in your workflow.
Table 5-1. Recommended layer structure for nondestructive editing
Layer name Purpose Advice
Background
This is either the JPEG or
TIFF image as originally
shot or the Camera Raw
image as you've adjusted it.
It could also be the result of
merging several images, as
done for HDR or panoramic
composition.
Make sure you start with the
best background image possible.
Read the first four chapters of
this book carefully and do all
that it takes to get you here.
Never make any changes
directly to this layer; instead,
make them on a duplicate layer.
Spot retouching
Quick retouching sufficient
for client approval. Usually
done before the rest of this
process is completed.
Use only Healing Tools that
have the Sample All Layers
Option. Always keep (or move)
this layer to a position
immediately above the
Background (main image) layer.
Burn and dodge
Modifiable layer. Can be
enhanced after approval.
Never use actual Burn and
Dodge tools for this layer. If
needed, use them on an Effects
layer.
Levels Adjustment layer.
Use this layer to set black and
white point and overall dynamic
range.
Curves Adjustment layer.
Use this layer to adjust the
contrast of specific areas of
brightness.
Targeted curves Masked Adjustment layer.
Use this layer to adjust
brightness and contrast for a
specific portion of the image,
such as a face.
Color balance Adjustment layer. Adjust overall color balance.
Regional color
balance
Masked Adjustment layer.
Use this layer to color balance
for a specific portion of the
image.
Advanced
retouching
Copy of flattened version of
file as adjusted up to this
point.
You can always return to this
layer if you want to do even
more.
Transformation
Copy of flattened version of
file as adjusted up to this
point.
The Lens Correction filter can
perform several manipulations at
once.
Compositing
Copy of flattened version of
file as adjusted up to this
point, as well as imported
layers. Use Clipped
Adjustment Layer(s) if
needed.
Group all layers for composite
so they can be turned off/on.
Effects
Highly destructive. Many
effects are filters that work
only in 8-bit mode.
Additional layer for each
effect.
Blending modes and Opacity is
very important for mixing
layers. One common effect is
converting the image to
monochrome or duotone.
Destructive
editing
New, flattened layer for
each destructive editing
command. These include
Auto Levels, Contrast and
Color, Match Color, Replace
Color, Exposure, and
Equalize.
Effects
Sharpening[click
here]
Copy of flattened version of
file as adjusted up to this
point. Probably masked.
Could be several different
masked portions of layers.
[]
[]
Final sharpening must be done on a flattened duplicate of the image, preferably
saved as compressed LZW. You should then add the color profile for the
destination printer (see Chapter 12).
5.2. Layer Abbreviations in Filenames
Keep track of which layer you stopped on by adding an abbreviation to the
filename. Table 5-2
shows the abbreviations I give to the filename to show how far
along the layer workflow an image has processed. You could save a version of the
image with each of these filenames, but that's overkill in my opinion. The idea here
is that when you have to stop working to do something else, you know where you
left off when you come back to the file.
Table 5-2. Suggested abbreviations for layer names
Layer Add to filename
Background bkg
Spot Retouching spot
Burn and Dodge BrnDj
Levels lvl
Curves crv
Targeted Curves tgt crv
Color Balance clr bal
Regional Color Balance tgt clr bal
Advanced Retouching adv ret
Transformation xfrm
Compositing comp
Effects fx
Destructive editing destr ed
Effects Sharpening fx shrpn
You can perform different tasks within each of these layer categories. However,
doing so doesn't often create as many layers as you might thinkyou won't do
everything possible in Photoshop to every image you process.
5.3. What the Layers Palette Looks Like for All Stages
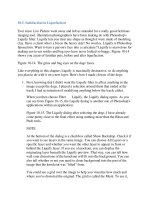
I thought you might find it helpful to see how a fairly typical landscape image's
Layers palette might look after a complete run at the nondestructive editing
workflow, which, in the end, is what this book is all about. You can also download
a lower-resolution, copyrighted version of this image that is still in Photoshop
format so you can experiment with turning the layers on and off, restacking them,
and so forth. In Figure 5-1, the untouched image is on the left. The a finished
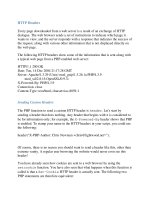
version of the image is on the right. In Figure 5-2, you see the Layers palette as it
was when the finished image was complete.
Figure 5-1. Left: the image just as it came from Camera Raw; right: the finished
image.
Figure 5-2. The Layers palette after processing the image in Figure 5-1 in
Photoshop CS2.