Lập trình .net 4.0 và visual studio 2010 part 21 pdf
Bạn đang xem bản rút gọn của tài liệu. Xem và tải ngay bản đầy đủ của tài liệu tại đây (216.94 KB, 8 trang )
CHAPTER 6 WINDOWS WORKFLOW FOUNDATION 4
142
4. Open Program.cs and add the following using statement:
using System.Collections.Generic;
5. Modify the Main() method to the following to create and pass in a dictionary of our initial
variables:
static void Main(string[] args)
{
Dictionary<string, object> Arguments = new Dictionary<string, object>();
Arguments.Add("FilmName", "Terminator");
Arguments.Add("ShowingDate", System.DateTime.Now.ToString());
Arguments.Add("NumberOfTickets", 4);
WorkflowInvoker.Invoke(new Workflow1(), Arguments);
Console.ReadLine();
}
6. That’s it; you have just created your first workflow. Now press F5 to run it.
7. Try changing the NumberOfTickets to five. Do you get a different result?
Wow, we covered a lot in that short example. You discovered the new workflow designer, how to use
arguments and variables, and some of the new activities in WF4.
Creating Your Own Activities
Microsoft supplies many activities out of the box, but you will want to and should create your own
activities. Activities can be created in three main ways:
• As a composition of other existing activities
• In code
• Pure XAML
Creating an Activity Composed of Other Activities
Let’s create a simple activity to simulate writing a customer’s ticket booking to a database.
1. Right-click on the project and add a new activity (from the Workflow section) called
SaveBooking.xaml.
2. Open SaveBooking.xaml in the design view.
3. Create an argument for the SaveBooking activity (String, In) called BookingReference.
4. Drag a Sequence activity onto the design surface.
5. Drag a WriteLine activity onto this activity and change its display name to “Simulate booking
storage.”
CHAPTER 6 WINDOWS WORKFLOW FOUNDATION 4
143
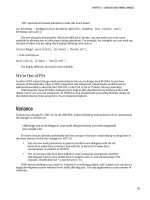
6. We are not going to go to the bother of actually writing data access code, so change the Value
property of the WriteLine activity to "Save booking " + BookingReference + “in database.” Your
workflow should look like Figure 6-12 (note the quotes).
7. Click Save.
Figure 6-12. Save booking activity
Before this activity can be used, the project needs to be compiled.
1. Compile the project
2. Open Workflow1.xaml and in the Toolbox (Project section) you will now find the new
SaveBooking activity should now be available. Drag it onto the Sequence activity just beneath
the "Check availability" activity.
3. On the properties of the "Save Booking" activity, set the BookingReference argument to use the
BookingReference variable defined in the main workflow.
4. Run your workflow. You should now see the output “Save booking” and whatever you have set
the booking reference variable to.
Creating Activities Purely in Code
Anything that can be done in the WF designer can also be done programmatically. Let’s say our client is
running a new promotion that every theater booking has a 1 in 100 chance of being free. We will create a
new code activity to simulate this.
1. Add a new Code activity to the project called FreeBookingPromotion.cs.
2. Ammend the code in FreeBookingPromotion.cs to the following:
public class FreeBookingPromotion : CodeActivity
{
public InArgument<string> BookingReference { get; set; }
public OutArgument<bool> FreeBooking { get; set; }
CHAPTER 6 WINDOWS WORKFLOW FOUNDATION 4
144
protected override void Execute(CodeActivityContext context)
{
System.Random Random = new Random();
if (Random.Next(1, 100) == 100)
{
//Customer has won free booking
FreeBooking.Set(context, true);
}
else
{
FreeBooking.Set(context, false);
}
}
}
3. Save and build the project.
4. Open Workflow1 and drag the FreeBookingPromotion activity from the Toolbox just before the
“Display output” activity.
5. Create a new variable at Workflow1.xaml level called FreeBooking of type Boolean.
6. Drag a new If activity before the “Display output" activity and change the display name to
“Check if booking free.”
7. Modify the activity's FreeBooking argument to use the main workflow's FreeBooking variable.
8. Double-click on the If activity.
9. In the condition enter: freebooking=true.
10. In the Then block, drag a WriteLine activity and change the text to “Congratulations you have
won a free booking.”
11. In the Else block, drag a WriteLine activity and change the text to “Sorry try again next time.”
12. Run your workflow.
Pure XAML Workflows
Activities can also be created purely in XAML, which is great news for third-party vendors and code
generation. You could even hold your activities' XAML definition in a database and load them at run
time. Let’s take a look at the XAML of our SaveBooking activity.
1. In Solution Explorer, right-click SaveBooking.xaml and select Open with.
2. Select XML Editor and you can then see the XAML that makes up this activity:
<Activity mc:Ignorable="sap" x:Class="Chapter6.HelloWF.SaveBooking"
xmlns="
xmlns:mc=" xmlns:mv="clr-
namespace:Microsoft.VisualBasic;assembly=System" xmlns:mva="clr-
namespace:Microsoft.VisualBasic.Activities;assembly=System.Activities" xmlns:s="clr-
namespace:System;assembly=mscorlib, Version=4.0.0.0, Culture=neutral,
CHAPTER 6 WINDOWS WORKFLOW FOUNDATION 4
145
PublicKeyToken=b77a5c561934e089" xmlns:s1="clr-namespace:System;assembly=mscorlib"
xmlns:s2="clr-namespace:System;assembly=System" xmlns:s3="clr-
namespace:System;assembly=System.Xml" xmlns:s4="clr-
namespace:System;assembly=System.Core"
xmlns:sa="clr-namespace:System.Activities;assembly=System.Activities, Version=4.0.0.0,
Culture=neutral, PublicKeyToken=31bf3856ad364e35" xmlns:sad="clr-
namespace:System.Activities.Debugger;assembly=System.Activities"
xmlns:sap="
xmlns:scg="clr-namespace:System.Collections.Generic;assembly=System" xmlns:scg1="clr-
namespace:System.Collections.Generic;assembly=System.ServiceModel" xmlns:scg2="clr-
namespace:System.Collections.Generic;assembly=System.Core" xmlns:scg3="clr-
namespace:System.Collections.Generic;assembly=mscorlib" xmlns:sd="clr-
namespace:System.Data;assembly=System.Data" xmlns:sd1="clr-
namespace:System.Data;assembly=System.Data.DataSetExtensions" xmlns:sl="clr-
namespace:System.Linq;assembly=System.Core" xmlns:st="clr-
namespace:System.Text;assembly=mscorlib"
xmlns:x="
<x:Members>
<x:Property Name="BookingReference" Type="InArgument(x:String)" />
</x:Members>
<mva:VisualBasic.Settings>Assembly references and imported namespaces serialized as
XML
namespaces</mva:VisualBasic.Settings>
<Sequence sad:XamlDebuggerXmlReader.
FileName="D:\wwwroot\book\Chapter6_WF\Chapter6.HelloWF\Chapter6.
HelloWF\SaveBooking.xaml" sap:VirtualizedContainerService.HintSize="233,200">
<sap:WorkflowViewStateService.ViewState>
<scg3:Dictionary x:TypeArguments="x:String, x:Object">
<x:Boolean x:Key="IsExpanded">True</x:Boolean>
</scg3:Dictionary>
</sap:WorkflowViewStateService.ViewState>
<WriteLine DisplayName="Simulate booking storage"
sap:VirtualizedContainerService.HintSize="211,62" Text="["Store booking " +
BookingReference + "in database"]" />
</Sequence>
</Activity>
Yikes, probably not the sort of thing you want to be typing yourself.
Invoking Workflows
WF4 offers the ability to invoke individual activities without using the workflow run time. This could be
used for scenarios such as unit testing. However, as many workflows will run for a long time, this won’t
be useful in all instances.
CHAPTER 6 WINDOWS WORKFLOW FOUNDATION 4
146
We will now invoke the workflow we created previously and check that requesting 10 tickets returns
the variable BookingSuccessful set to false. Note in reality you would write this as a unit test but we are
just covering the principles.
1. Add a new C# Console project to the solution called Chapter6.HelloWF.Tests.
2. Add a reference to System.Activities and Chapter6.HelloWF.
3. Enter the following using statements in Program.cs:
using System.Activities;
using System.Diagnostics;
4. Enter the following code in Program.cs:
static void Main(string[] args)
{
Dictionary<string, object> Arguments = new Dictionary<string, object>();
Arguments.Add("FilmName", "Terminator");
Arguments.Add("ShowingDate", System.DateTime.Now.ToString());
Arguments.Add("NumberOfTickets", 10);
IDictionary<string, object> Output = new Dictionary<string, object>();
Output = WorkflowInvoker.Invoke(new Chapter6.HelloWF.Workflow1(), Arguments);
Debug.Assert((bool)Output["BookingSuccessful"] == false);
}
NOTE
When using the Invoke() method, the activity is guaranteed to be performed on the invoking thread and
will time out after 60 seconds (unless you change this default — an overload in the Invoke() method).
Flowchart
Flowchart is a new type of workflow that makes it easier to model certain types of problems, particularly
those that return back to previous activities. Prior to WF4 this could be achieved by using a while loop
but flowchart workflows offer a more intuitive approach. We will create a flowchart workflow to simulate
a customer’s age being checked.
1. Open Visual Studio and create a new Workflow Console application called Chapter6.Flowchart.
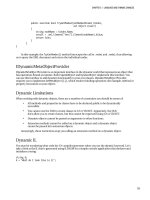
2. Drag a Flowchart activity from the Flowchart group onto the designer surface. You should see
something similar to Figure 6-13.
CHAPTER 6 WINDOWS WORKFLOW FOUNDATION 4
147
Figure 6-13. New flowchart workflow
3. The design view for flowcharts looks slightly different than sequential workflows. The green
circle indicates where the workflow starts. We need to create a new activity to read input from
the user. Create a new class called ReadInput.
4. Enter the following using statement:
using System.Activities;
5. Now enter the following code:
public class ReadInput : CodeActivity<Int32>
{
protected override Int32 Execute(CodeActivityContext context)
{
return Convert.ToInt32(Console.ReadLine());
}
}
6. Save the class and compile the application.
7. Open Workflow1.xaml.
8. Drag a WriteLine activity beneath the green circle and change the Display Name to “What is
your age?” and set the Text to “What is your age?”
CHAPTER 6 WINDOWS WORKFLOW FOUNDATION 4
148
9. Drag the new ReadInput activity beneath the “What is your age?” activity and change the
display name to “Read input.”
10. Create a new variable called age of type Int32.
11. On the ReadInput activity, set the Result property to age.
The next thing to do is determine if the customer is old enough to see the film (which in this case
will always have an 18 rating). Flow chart workflows have a new type of activity not found in sequential
workflows, called FlowDecision.
1. Drag a FlowDecision activity beneath the read input block and change the condition to Age >=
18. There are obviously two possibilities to this expression:
• Customer is old enough so they can see the film (FlowDecision condition = true).
• Customer is too young, so shouldn’t be seeing any movies (FlowDecision
condition = false).
2. To simulate the customer failing age verification, drag a WriteLine activity to the right of the
flow decision and change the display name and text to “Sorry not old enough.”
3. Drag another WriteLine activity beneath the flow decision and change the display name and
text to “Age validation successful.”
4. We now need to link up the activities we have just created. Move the mouse over the green
circle that indicates the start of the flow chart workflow, and three grey dots will appear around
it. Click the one on the bottom of the circle and then drag the mouse down to the ReadInput
activity.
5. When you near the WriteLine activity, three grey dots will appear around it. Drag the line to one
of these dots and then release the mouse button to link up the start of the workflow with our
read line activity.
6. Link up the “What is your age?” and ReadInput activities.
7. We need to join the FlowDecision up to the workflow. FlowDecision activities have two nodes,
true or false, that surprisingly indicate the path to take when the condition specified is true or
false. Drag the false node to the “Sorry not old enough” WriteLine activity and then drag
another line from “Sorry not old enough” back round to the ReadInput activity.
8. Drag the true node on the FlowDecision activity to the “Age validation successful” activity.
9. Finally drag a line between the “What is your age?” and ReadInput activity. Your final work flow
should look like Figure 6-14.
10. Open Program.cs and add a Console.ReadKey(); beneath the invoke command so the
application doesn’t close immediately.
11. That’s it; your workflow is ready to run. Press F5 to run it.
12. Try entering different ages and note that unless you enter at least 18 the workflow will write
“Sorry not old enough.”
CHAPTER 6 WINDOWS WORKFLOW FOUNDATION 4
149
Figure 6-14. Final age validation work flow
WCF/Messaging Improvements
A number of enhancements have been introduced in WF4 to improve integration with WCF and to ease
messaging scenarios.
Correlation
Correlation functionality first appeared in WF3.5 and allows you to route incoming messages to specific
workflow instances based on their content or protocol used. For example if you have a very long running
workflow where replies take weeks or months to return it is important that when a reply is received it is
sent to the correct individual workflow.
ReceiveAndSendReply and SendAndReceiveReply are the new activities discussed in the following
sections that provide a correlated send and receive activities with a number of new methods of
correlation such as xpath and correlation scope.
WCF Workflow Service Applications
WCF Workflow Service applications are a new type of project in VS2010 that make it very easy to create
workflows for sending and receiving data. They essentially provide a declarative WCF service defined