Manning Windows Forms Programming (phần 4) pptx
Bạn đang xem bản rút gọn của tài liệu. Xem và tải ngay bản đầy đủ của tài liệu tại đây (551.33 KB, 50 trang )
116 CHAPTER 4 STATUS BARS
4.3.2 ASSIGNING PANEL TEXT
With our panels defined, we simply set the Text property value for each panel to
have the text displayed by the application. This only works for panels with their
Style property set to Text, of course. We will look at our owner-drawn panel in
section 4.4. Since our panels only have meaning after an image is loaded, we assign
their values as part of the
Click event handler for the Load button, as indicated by
the following steps.
.NET Table 4.3 StatusBarPanel class
The StatusBarPanel class is a component that appears as a panel within a StatusBar con-
trol. This class is part of the
System.Windows.Forms namespace, and inherits from the Sys-
tem.ComponentModel.Component class. A panel must be associated with a StatusBar
instance with its
ShowPanels property set to true in order to appear on a form.
Public Properties
Alignment
Gets or sets the
HorizontalAlignment for the
panel’s text.
AutoSize Gets or sets how the panel is sized within the
status bar.
BorderStyle Gets or sets the type of border to display for the
panel, if any.
MinWidth Gets or sets the minimum width for the panel.
Parent Gets the
StatusBar object that contains this
panel.
Style Gets or sets the style used to draw the panel.
Text Gets or sets the text for the panel.
ToolTipText Gets or sets the tool tip for the panel.
Width Gets the current width or sets the default width
for the panel.
Public Methods
BeginInit
Begins initialization of the panel when used
within a form or other component.
EndInit Ends initialization of the panel when used within
a form or other component.
SET THE TEXT TO APPEAR IN THE PANELS
Action Result
1 In the
menuLoad_Click
method, set the
ShowPanels
property to
false while the
image is loading.
private void menuLoad_Click
(object sender, System.EventArgs e)
{
. . .
try
{
statusBar1.ShowPanels = false;
STATUS BAR PANELS 117
Look again at the new
try block.
try
{
statusBar1.ShowPanels = false;
statusBar1.Text = "Loading " + dlg.FileName;
pbxPhoto.Image = new Bitmap(dlg.OpenFile());
statusBar1.Text = "Loaded " + dlg.FileName;
this.sbpnlFileName.Text = dlg.FileName;
this.sbpnlImageSize.Text
= String.Format("{0:#} x {1:#}",
pbxPhoto.Image.Width, pbxPhoto.Image.Height);
statusBar1.ShowPanels = true;
}
Two items are worth noting in this code:
b
The ShowPanels property is set to false while an image is loading so that the Sta-
tusBar.Text
property setting will appear, and set to true after the image is loaded
and the panels are set.
c
The Format method used here is a static method provided by the String class for
constructing a string. We could spend a chapter covering this and other features avail-
able in C# strings generally and the .NET
System.String class specifically, but
instead will assume you can look this one up in the documentation. In the code shown
here, the
"{0:#} x {1:#}" string indicates that two parameters are required, both
of them integers.
Build and run the application to see these panels in action. Resize the window to see
how the panels react. You will notice that the first panel resizes automatically along
with the window, while the second two panels maintain their initial size. This is con-
sistent with the
AutoSize settings we used for these objects.
2 Initialize the sbpnlFileName
and
sbpnlImageSize panels
after the image is success-
fully loaded.
statusBar1.Text = "Loading " + dlg.FileName;
pbxPhoto.Image = new Bitmap(dlg.OpenFile());
statusBar1.Text = "Loaded " + dlg.FileName;
this.sbpnlFileName.Text = dlg.FileName;
this.sbpnlImageSize.Text
= String.Format("{0:#} x {1:#}",
pbxPhoto.Image.Width,
pbxPhoto.Image.Height);
3 Set the ShowPanels property
to
true so the panel text will
appear.
statusBar1.ShowPanels = true;
}
. . .
}
SET THE TEXT TO APPEAR IN THE PANELS (continued)
Action Result
b
Disable the
panels
c
Create image
size string
118 CHAPTER 4 STATUS BARS
4.4 OWNER-DRAWN PANELS
So what about this owner-drawn panel? Text panels do not need to worry about
drawing their text onto the panel, as the .NET Framework handles this internally.
There are some cases where text just will not do, and these situations requiring man-
ual drawing of the panel.
Drawing of panels and other objects in .NET are handled through use of the
Sys-
tem.Drawing
namespace, sometimes referred to as GDI+ since it is based on an
update to the graphical drawing interface provided by Microsoft. Components such as
menus, status bars, and tabs that contain drawable components support a
DrawItem
event that occurs when an item in the component should be drawn. Controls derived
from the
Control class provide a Paint event for this purpose. Both types of drawing
make use of the
Graphics class discussed in this section in order to draw the item.
This section will examine how owner-drawn status bar panels are supported, and
draw the
sbpnlImagePercent panel for our application. A similar discussion would
apply to owner-drawn menu items or other objects supporting the
DrawItem event.
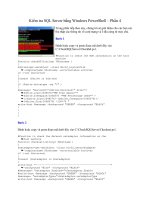
The result of our changes is shown in figure 4.5.
As you can see in the figure, when the image is displayed in Actual Size mode, the
third panel will show a numeric and visual representation of how much of the image
is displayed. Before we draw this panel, let’s take a closer look at the
DrawItem event.
4.4.1 T
HE DRAWITEM EVENT
The DrawItem event is used by a number of classes to draw an item contained
within some sort of larger collection. For instance, the
MenuItem, ListBox, and
ComboBox classes all include a DrawItem event for custom drawing of their con-
tents. These classes use the
DrawItemEventArgs class to provide the data associ-
ated with the event. The
StatusBar class uses a derived version of this class, but the
bulk of the drawing information is in the base class. An overview of this base class is
provided in .NET Table 4.4.
Figure 4.5
The third status bar panel here indicates that 30
percent of the image is visible in the window.
OWNER-DRAWN PANELS 119
For the
StatusBar class, the StatusBarDrawItemEventArgs class derives from
the
DrawItemEventArgs class and is received by StatusBar.DrawItem event
handlers. The
Panel property provided by this class is useful both for identifying the
panel and when the text assigned to the panel is needed.
When a
DrawItem event handler is invoked, the default property values are what
you might expect. The
Bounds property is set to the display rectangle of the panel to
draw. This rectangle is with respect to the rectangle for the containing status bar, so
the upper left corner of a panel’s bounds is not (0,0). The
Font and ForeColor prop-
erties are set to the font information for the
StatusBar object; the Graphics prop-
erty to an appropriate drawing object, the
Index to the zero-based index number of
the panel, and
State is typically set to DrawItemState.None. The DrawItem
event is called once for each panel drawn.
.NET Table 4.4 DrawItemEventArgs class
The DrawItemEventArgs class is an event object used when handling DrawItem events in a
number of classes. This class is part of the
System.Windows.Forms namespace, and inher-
its from the
System.EventArgs class. Practically, this class is used to manually draw list box
items, menu items, status bar panels and other objects.
The
StatusBarDrawItemEventArgs class extends this class for use with StatusBar
objects. This class includes a public
Panel property to indicate which panel requires drawing.
Public Properties
Bounds
Gets the
Rectangle of the area to be drawn
with respect to the entire graphical area for the
object.
Font Gets a suggested
Font to use for any text.
Typically, this is the parent’s
Font property.
ForeColor Gets a suggested
Color to use for foreground
elements, such as text. Typically, this is
SystemColors.WindowText, or
SystemColors.HighlightText if the object
is selected.
Graphics Gets the
Graphics object to use for painting
the item.
Index Gets the index of the item to be painted. The
exact meaning of this property depends on the
object.
State Gets additional state information on the object,
using the
DrawItemState enumeration.
Examples include whether the item is
selected, enabled, has the focus, or is checked
(for menus).
Public Methods
DrawBackground
Draws the
Bounds rectangle with the default
background color.
DrawFocusRectangle Draws a focus rectangle in the
Bounds area.
120 CHAPTER 4 STATUS BARS
.NET Table 4.5 System.Drawing namespace
The System.Drawing namespace provides access to basic graphics functionality provided by
the graphical device interface (GDI+). The classes in this namespace are used when drawing
to any display device such as a screen or printer, and to represent drawing primitives such as
rectangles and points.
Classes
Brush An abstract class representing an object used to fill the interior
of a graphical shape. For example, the
Graphics.FillRectangle method uses a brush to fill a
rectangular area on a drawing surface. Classes derived from
this class include the
SolidBrush and TextureBrush classes.
Brushes
A sealed class that provides
Brush objects for all standard
colors. For example, the
Brushes.Red property can be used to
fill shapes with a solid red color.
Font Represents a font that defines how text is drawn. This includes
the font style and size as well as the font face.
Graphics Represents a GDI+ drawing surface. Members are provided to
draw shapes, lines, images, and other objects onto the drawing
surface.
Image An abstract class for image objects such as
Bitmap.
Pen Represents an object used to draw lines and curves. A pen can
draw a line in any color and specify various styles such as line
widths, dash styles, and ending shapes (such as arrows). For
example, the
Graphics.DrawRectangle method uses a pen
to draw the outline of a rectangular area on a drawing surface.
Region Represents the interior of a graphics shape composed of
rectangles and paths.
SystemColors A sealed class that provides
Color objects for the colors
configured in the local Windows operating system. For
example, the
SystemColors.Control property returns the
color configured for filling the surface of controls. Similar
classes also exist for
Brush, Pen, and Icon objects based on
the local system configuration.
Color Stores a color value. A number of static colors are defined,
such as
Color.Red, or a custom color can be created from an
alpha component value and a set of RGB values.
Structures
Point A two-dimensional point as an integral x and y coordinate.
PointF A two-dimensional point as a floating point x and y coordinate.
Rectangle Stores the location and size of a rectangular region within a
two-dimensional area. All coordinates are integral values.
Size Represents the size of a rectangular region as an integral width
and height.
SizeF Represents the size of a rectangular region as a floating point
width and height.
OWNER-DRAWN PANELS 121
A number of classes are available in the
System.Drawing namespace for drawing
status bar panels, menu items, and other objects. An overview of this namespace is
provided in .NET Table 4.5. Rather than provide detailed coverage of this namespace
in any one chapter of the book, we will visit members of this namespace as required
by our application. In particular, we will use this namespace again in chapter 7 when
drawing on
Form and Panel controls, and also in chapter 10 when discussing
owner-drawn list boxes.
4.4.2 D
RAWING A PANEL
So let’s draw the panel in our application. If you recall, we want this panel to show
what percentage of the image is shown in the
PictureBox control. To do this, we
need to handle the
DrawItem event. We will build this code step by step. The com-
plete code for the handler is shown following the table.
Set the version number of the application to 4.4.
ADD DRAWITEM HANDLER
Action Result
1 Handle the
DrawItem event
for the
StatusBar control in
the MainForm.cs [Design]
window.
An event handler for the
DrawItem event is added to the
control.
protected void statusBar1_DrawItem
(object sender,
StatusBarDrawItemEventArgs sbdevent)
{
2 In this handler, check that the
panel to draw is the
sbpnlImagePercent panel.
Note: This
if statement is
not strictly necessary. Still,
since the event relates to the
entire status bar and not just
this panel, this provides
some robustness against
future changes.
if (sbdevent.Panel == sbpnlImagePercent)
{
// Calculate the percent of the image shown
// Calculate the rectangle to fill
// Draw the rectangle in the panel
// Draw the text on top of the rectangle
}
}
Note: The four comments here are the four steps that
must be performed to draw the panel. Each step is
performed in the subsequent four steps of this table.
How-to
In the Properties window for
the status bar, double-click
the DrawItem entry.
122 CHAPTER 4 STATUS BARS
The complete code for this handler is shown as follows:
protected void statusBar1_DrawItem (object sender,
StatusBarDrawItemEventArgs sbdevent)
{
if (sbdevent.Panel == sbpnlImagePercent)
3 Calculate what percentage of
the image appears in the
window.
// Calculate the percent of the image shown
int percent = 100;
if (pbxPhoto.SizeMode
!= PictureBoxSizeMode.StretchImage)
{
Rectangle dr = pbxPhoto.ClientRectangle;
int imgWidth = pbxPhoto.Image.Width;
int imgHeight = pbxPhoto.Image.Height;
percent = 100 * Math.Min(dr.Width, imgWidth)
* Math.Min(dr.Height, imgHeight)
/ (imgWidth * imgHeight);
}
4 Calculate the rectangular
region to fill.
// Calculate the rectangle to fill
Rectangle fillRect = sbdevent.Bounds;
fillRect.Width = sbdevent.Bounds.Width
* percent / 100;
5 Draw this rectangle in the
panel.
// Draw the rectangle in the panel
sbdevent.Graphics.FillRectangle(
Brushes.SlateGray, fillRect);
Note: We could also have used the ForeColor prop-
erty of the event as the color here. This code illus-
trates using the
Brushes class, which provides access
to a
Brush object for all standard colors available in the
framework.
6 Draw the percentage value in
the panel.
// Draw the text on top of the rectangle
sbdevent.Graphics.DrawString(
percent.ToString() + "%",
sbdevent.Font,
Brushes.White,
sbdevent.Bounds);
Note: White is a good color choice if used with the
default desktop colors. It may not be a good choice if
custom desktop colors are used.
ADD DRAWITEM HANDLER (continued)
Action Result
How-to
a. If the SizeMode setting for
the image is
StretchIm-
age, use 100% of the
panel.
b. Otherwise, divide the
smaller of the display area
and the image size by the
total image area.
c. For simplicity, use integer
percent values.
How-to
Use the event’s Bounds
property and adjust its
Width
based on the calculated
percent.
How-to
a. Use the Graphics object
for the event.
b. Paint the rectangle with the
FillRectangle method,
using a
SlateGray brush.
How-to
Use the DrawString
method for the
Graphics
object.
OWNER-DRAWN PANELS 123
{
// Calculate the percent of the image shown
int percent = 100;
if (pbxPhoto.SizeMode != PictureBoxSizeMode.StretchImage)
{
Rectangle dr = pbxPhoto.ClientRectangle;
int imgWidth = pbxPhoto.Image.Width;
int imgHeight = pbxPhoto.Image.Height;
percent = 100 * Math.Min(dr.Width, imgWidth)
* Math.Min(dr.Height, imgHeight) / (imgWidth * imgHeight);
}
// Calculate the rectangle to fill
Rectangle percentRect = sbdevent.Bounds;
percentRect.Width = sbdevent.Bounds.Width * percent / 100;
// Draw the rectangle in the panel
sbdevent.Graphics.FillRectangle(Brushes.SlateGray, percentRect);
// Draw the text on top of the rectangle
sbdevent.Graphics.DrawString(percent.ToString() + "%",
sbdevent.Font, Brushes.White, sbdevent.Bounds);
}
}
The Graphics class used in this handler provides a rich set of drawing capabilities,
from circles, ellipses, and rectangles to polygons, pie shapes, and bezier curves. Here
we use the
FillRectangle method, which requires a Brush object to use when
“painting” the rectangle. In chapter 7, we will make additional use of this class. See
.NET Table 4.6 for an overview of some of the more interesting members of this class.
It should be noted that the
statusBar1_DrawItem handler is invoked each
time a panel must be redrawn. As a result, care should be taken in handlers such as
this to avoid expensive calculations or other operations that might adversely affect the
performance of the application. For example, if we had generated a custom
Brush
object while filling the rectangle here, such an operation would be performed each
time the handler is invoked, potentially using an excessive amount of memory over the
life of the application. Of course, our choice of the
SlateGray color might not be
the best choice either, as it might interfere with colors the user has selected for their
desktop. A better option here might be to determine a color programmatically based
on the user’s desktop settings, and generate a single
Brush object the first time the
event handler is invoked that is reused for the life of the application.
You can compile and run this code so far if you like, but we do need to make one
more change. When the
PictureBox.SizeMode property is StretchImage, the
complete image (100%) is always shown. When
SizeMode is set to Normal, the
amount of image shown varies as the size of the client area changes. As a result, when
the user changes this setting, we need to make sure that our panel is redrawn by inval-
idating the contents of the status bar.
124 CHAPTER 4 STATUS BARS
.NET Table 4.6 Graphics class
The Graphics class is a drawing object that encapsulates a drawing surface , or more specif-
ically a graphical device interface (GDI+) drawing surface. This class is part of the
Sys-
tem.Drawing namespace, and inherits from the System.MarshalByRefObject class.
Drawing the outline of a shape typically requires a
Pen object, while drawing a filled-in shape
typically requires a
Brush object.
This class contains a large number of members, but the list here should provide some
idea of the supported functionality.
Public Static
Properties
FromHdc Returns a
Graphics instance from a given handle
to a device context.
FromHwnd Returns a
Graphics instance from a given
window handle.
Public Properties
Clip Gets or sets as a
Region object the portion of the
graphics area available for visible drawing.
DpiX Gets the horizontal resolution supported by the
object.
DpiY Gets the vertical resolution supported by the
object.
PageUnit Gets or sets the
GraphicsUnit value specifying
the unit of measure for page coordinates.
SmoothingMode Gets or sets the
SmoothingMode value indicating
how shapes are rendered with this object.
TextRenderingHint Gets or sets the
TextRenderingHint value
indicating how text is rendered with this object.
Public Methods
Clear Fills the entire drawing surface with a specified
color.
DrawCurve Draws a curve specified as an array of points using
a given
Pen.
DrawEllipse Draws the outline of an ellipse (which might be a
circle) bounded by a given rectangle using a given
Pen.
DrawLine Draws a line using a given
Pen.
DrawRectangle Draws the outline of a rectangle using a given Pen.
FillClosedCurve Fills the interior of a closed curve specified as an
array of points using a given
Brush.
FillEllipse Fills the interior of an ellipse (which might be a
circle) bounded by a given rectangle using a given
Brush.
FillRectangle Fills the interior of a rectangle using a given
Brush.
MeasureString Returns the size a given string would occupy using
a given
Font.
RECAP 125
If you recall, our menus invoke the
menuImage_ChildClick method to alter the
display mode by assigning a new
SizeMode value.
Now the status bar will be redrawn whenever the
SizeMode property is altered.
Note that this change highlights another advantage of our decision in chapter 3 to
handle the
Click of an Image submenu item with a shared handler. If we decided to
add additional display modes in the future, this code will ensure that the status bar is
redrawn correctly each time it changes.
Compile and run your application to verify that the code works as expected. Dis-
play an image in both Stretch to Fit and Actual Size mode to see how the owner-drawn
status bar panel behaves when the application is resized.
4.5 RECAP
This chapter introduced the StatusBar class and showed how both text and panel
information are displayed in this control. We looked at how to switch between the
display of text and panels in a status bar, and discussed how various properties can be
used to alter the appearance and behavior of status bar panels.
We also presented the base class of all Windows Forms controls by looking at the
Control class in some detail. A discussion of owner-drawn panels and the use of the
DrawItem and Paint events led to a discussion of the System.Drawing namespace
in general, and the
Graphics class in particular.
The next chapter takes us out of the Windows Forms namespace briefly in order
to discuss reusable libraries.
INVALIDATE STATUS BAR
Action Result
7 Modify the
menuImage_Child-
Click method to force a redraw
of the status bar.
protected void menuImage_ChildClick(object sender,
System.EventArgs e)
{
if (sender is MenuItem)
{
MenuItem mi = (MenuItem)sender;
nSelectedImageMode = mi.Index;
pbxPhoto.SizeMode
= this.modeMenuArray[mi.Index];
pbxPhoto.Invalidate();
statusBar1.Invalidate();
}
}
126
CHAPTER 5
Reusable libraries
5.1 C# classes and interfaces 127
5.2 Class libraries 133
5.3 Interfaces revisited 145
5.4 Robustness issues 151
5.5 Recap 160
This chapter is our chance to lean back in our respective chairs, take stock of where
we’ve been, and plan for the future. Before we jump back into the Windows Forms
classes in chapter 6, we will build some infrastructure and introduce some important
programming concepts. Some of you may be familiar or comfortable with these con-
cepts; others may not. The discussion will attempt to provide enough material to
review what is needed without getting too bogged down in the minute details.
Looking at our MyPhotos application, it would be great if this application turned
out to be somewhat useful. As such, it is worth laying the proper groundwork for the
road ahead. So far, we have built an application with the following features:
• A title bar where the name and version number of the program are displayed.
• A menu bar where the user can access commands such as loading an image.
• A main window that displays a single photo at a time (stretched and distorted,
but displayed nonetheless).
• A status bar where information about the displayed photo appears.
So now what? In this book, there are a number of features that still need to be cov-
ered. Tool bars, dialog boxes, splitters, and printing, to name a few. In order to do
C# CLASSES AND INTERFACES 127
this we will need more than a single photograph in our application. If we can display
one, why not more than one. Let’s display multiple photos. We will call this, of
course, a photo album.
To keep this chapter somewhat manageable, we will not muck with our main
application window here. We will focus instead on creating a photo album abstraction,
and wait until chapter 6 to integrate it into our application. Specifically, we will per-
form the following tasks in this chapter:
• Create a
PhotoAlbum class to represent a collection of photograph files.
• Create a
Photograph class to represent a single photograph.
• Compile the
PhotoAlbum and Photograph classes into an external library.
Before we write any code for these classes, a short design discussion is in order.
5.1 C# CLASSES AND INTERFACES
Within our application, we need to represent the album in a way that facilitates the
required actions, such as “add an image,” “move to the next photo,” and so forth. You
may immediately think of some sort of array, and this will be our approach. This sec-
tion will present a short design discussion as a way to introduce some terminology we
require and lay the groundwork for writing our code.
Each photo is an image file located somewhere on disk. While a simple list of files
could be stored in an array of strings, we should not be too hasty here. Requirements
change, as do applications. We may want to add additional features to our photo
album later, so it makes sense to encapsulate our album in a class to make this possible.
Classes in C# are very similar to classes in the C++ and Java languages. We will create
a
PhotoAlbum class to represent a single photo album, and provide a set of methods
that external users of the class, such as our MyPhotos application, can use to retrieve
and modify the contents of the album.
What will our album contain? We already mentioned the idea of array file names.
Since we would like to provide quick access to the images, we could also consider an
array of
Bitmap objects. Not a bad idea, except that a bitmap can be pretty large. A
full color image such as a photograph uses 24 bits, or three bytes per pixel: one each
for a red, blue, and green color. Do the math and you’ll find that a 640×480 pixel
image takes up around 900K in memory, or almost 1 MB. A system with 32 MB of
RAM will run out of memory fairly quickly, and even 128 or 256 MB systems will
feel the pinch. Of course, virtual memory will allow us to use more than the available
physical memory, but the performance will not make our users happy. Instead of bit-
maps, we will stick with the file names of our images, and create
Bitmap objects as
required. To accommodate both types of information, and to extend this definition
in the future, we will create a
Photograph class to encapsulate the concept of a single
photograph. Our album will contain zero or more photographs.
One more feature here: once we build our
PhotoAlbum and Photograph
classes, they could be useful in other programs that wish to use our concept of a photo
128 CHAPTER 5 REUSABLE LIBRARIES
album. For example, a genealogy program for creating family trees might want to link
to a photo album of a specific person or family. So we will place our new classes in a
library that other programs can reuse. In Windows parlance, such a library is called a
Dynamic Link Library, or DLL.
5.1.1 I
NTERFACES
As you might expect, the .NET Framework provides a number of classes that can
help us here. These classes implement common data structures such as arrays, stacks,
queues, and hash tables. Before the ever-appropriate table summarizing such classes,
this is a good place to introduce the idea of an interface.
An interface is an abstraction of an abstraction, and should be familiar to pro-
grammers of COM or its UNIX ancestor, the distributed computing environment
(DCE). While a class encapsulates a data structure and its operations, an interface
encapsulates a type of data structure and its operations. This is very similar to an
abstract class, except that an interface does not provide any implementations for its
members, it just defines the properties, methods, and events that a class should imple-
ment in order to support the interface. In practice, an interface is a good way to encap-
sulate a common idea for use by a number of possibly unrelated classes, while an
abstract class is a good way to encapsulate a common idea for use by a number of
related classes.
For example, the .NET
ICloneable interface defines a type of class that can be
cloned, or copied, from an existing class instance to a new one.
1
This concept applies
to the
Array, Brush, Font, String, and a number of other classes throughout the
.NET Framework. Languages such as C++ provide multiple inheritance for this type of
support. In C++,
ICloneable could be an abstract class and inherited where needed.
In C# and Java, only single inheritance is supported, so this is not possible. Instead,
both languages provide interfaces as a way to encapsulate common functionality that
can be used by a wide range of classes.
For example, the
Brush class supports the ICloneable interface. We used this
abstract class in chapter 4 to create an owner-drawn status bar panel.
Brush objects
can be cloned to create a new copy of an existing
Brush. You can create an instance
of a
Brush, since it is a class, but you cannot create an instance of an ICloneable
except as a by-product of an existing class that happens to support this interface.
The .NET Framework provides interfaces for everything from enumerating
members of a set to transferring data between applications. Some interfaces related to
our current discussion on albums are listed in the following table.
1
Generally speaking, cloning in .NET always produces a deep copy of an object, as we saw for the menu
classes in chapter 3.
C# CLASSES AND INTERFACES 129
5.1.2 DATA COLLECTION CLASSES
Looking over the interfaces in the table, the IList interface seems particularly
appropriate for the task at hand. This allows elements to be added and removed from
the collection, and supports array-style indexing. Some of the data collection classes
in the .NET Framework are shown in the following table. Note, in particular, those
classes in the table that support the
IList interface.
Interfaces related to data collections
Interface Description Sample Members
IEnumerable
Interface that supports the creation of
an enumerator class for iterating over
the elements in a collection.
Usage
Supporting this interface allows the C#
foreach statement to be used with
instances of a class or structure.
GetEnumerator method, which returns a
class that supports the
IEnumerator
interface.
IEnumerator
Interface for stepping through the
elements in a collection.
Current property, to retrieve the current
element from the collection.
MoveNext method, which advances to
the next element in the collection.
Reset method, which sets the
enumerator just before the first element.
ICollection
An IEnumerable interface that
provides sizing and synchronization
capabilities. This interface is the basis
for all collections in the .NET
Framework.
Count property, to retrieve the number
of elements in the collection.
SyncRoot property, to retrieve an object
for synchronizing multi-threaded access
to the collection.
CopyTo method, which copies the
elements in the collection into an
Array
object.
IList
An ICollection interface that
provides indexing of its elements.
Usage
Supporting this interface allows a class
or structure to be treated as an array.
This permits objects to be used as
targets of data bound controls, as
discussed in chapter 17.
Item property, to support array-style
indexing of elements using [brackets],
much like a
[] override in C++.
Add method, which adds a new element
to the collection.
Contains method, which determines if
the collection contains a specific object.
Remove method, to remove the element
from the collection at a given index value.
130 CHAPTER 5 REUSABLE LIBRARIES
Since we do not have a database here, the DataView class is not appropriate. If all we
wanted was a collection of file names, the
StringCollection class would work,
but then our
PhotoAlbum would not be very extensible. This leaves us with a simple
array or the
ArrayList or CollectionBase classes. A simple fixed-size array is
not appropriate since we would like our album to grow dynamically. So we are left to
choose between the
ArrayList and CollectionBase classes.
Either class would work here, and both classes can be quite useful. An overview
of the
ArrayList class is shown in .NET Table 5.1. Deriving our PhotoAlbum class
from
ArrayList would look like this:
// Deriving PhotoAlbum from ArrayList (not our approach)
public class PhotoAlbum : System.Collections.ArrayList
{
// Inherits all properties and methods from ArrayList
}
An advantage of this approach is that we would not need to implement many of the
methods, since they would be directly inherited from
ArrayList. A disadvantage is
that all methods would accept any
object, and not just our Photograph objects. If
you look at the documentation, you will see that the methods in
ArrayList operate
on
object instances. For example, the PhotoAlbum.Add method would have the
following signature:
Some .NET classes related to data collections
Class Description Interfaces supported
Array
The base class for all array objects.
This class is abstract.
ICloneable, IList, ICollec-
tion, IEnumerable
ArrayList
A dynamically-sized array. ICloneable, IList,
ICollection, IEnumerable
CollectionBase
An abstract class for creating a
strongly typed collection.
IList, ICollection, IEnumera-
ble
DataView
A customized view of a database
table.
IList, ICollection,
IEnumerable, and others
Hashtable
A collection of values stored based on
a hash code of the value, called a key.
ICloneable, ICollection,
IEnumerable, IDictionary, and
others
Queue
A FIFO queue; a first in, first out
collection of objects.
ICloneable, ICollection,
IEnumerable
SortedList
A sorted collection of keys and values
accessible by both key and index.
ICloneable, ICollection,
IEnumerable, IDictionary
StringCollection
A collection of string objects. IList, ICollection,
IEnumerable
Stack
A LIFO queue; a last in, first out
collection of objects.
ICloneable, ICollection,
IEnumerable
C# CLASSES AND INTERFACES 131
// PhotoAlbum.Add when derived from ArrayList
public int Add( object value );
So while this would be a very easy implementation, the methods in our PhotoAlbum
class would not be type-safe, and therefore not so robust.
Let’s instead take a look at the
CollectionBase class. An overview of this class is
shown in .NET Table 5.2. This class is an abstract class, and requires derived classes
to implement the additional methods required to support the appropriate interfaces.
This requires a little more work on our part, but creates a nicer interface that works
with
Photograph objects directly.
Before we create our implementation, note that an alternative implementation
would incorporate a private
ArrayList object in a class derived directly from Sys-
tem.Object
. This alternative would look something like the following:
// PhotoAlbum implementation with private ArrayList (not our approach)
class PhotoAlbum
{
// internal (not inherited) ArrayList
.NET Table 5.1 ArrayList class
The ArrayList class is a collection of indexed objects where the number of objects can
change dynamically. This class is part of the
System.Collections namespace, and is very
similar to the
Array class for fixed-length collections of objects. The ArrayList class sup-
ports the
ICloneable, IEnumerable, ICollection, and IList interfaces.
Public
Properties
Capacity
Gets or sets the maximum number of objects the list can contain.
Count Gets or sets the actual number of objects in the array.
Public
Methods
Add Adds an object to the end of the array.
AddRange Adds the elements from an
ICollection interface to the end of
the array.
Clear Removes all objects from the array.
Contains Determines if an object is in the array. Comparison is done using
the
Object.Equals method.
CopyTo Copies the ArrayList, or a portion of it, into a one-dimensional
Array object.
IndexOf Returns the zero-based index of the first occurrence of the given
object in the array, or –
1 if the object is not found. Comparison is
done using the
Object.Equals method.
Remove Removes an object from the array.
RemoveAt Removes the object at a given index from the array.
Sort Sorts the array, using an
IComparable interface to compare
objects.
TrimToSize Sets the capacity of the array to the actual number of objects in it.
132 CHAPTER 5 REUSABLE LIBRARIES
private ArrayList _photoArray;
// Constructor and other wrappers
// Custom Add wrapper
public int Add(Photograph photo)
{
return _photoArray.Add(photo);
}
}
This would work just fine and be similar to our actual implementation derived from
CollectionBase. Our implementation is more appropriate than this alternative,
since the
CollectionBase class is designed for just this purpose, and does in fact
provide access to an
ArrayList member through a protected property.
.NET Table 5.2 CollectionBase class
The CollectionBase class is an abstract class for creating strongly typed collections. A
class is strongly typed if it only allows a specific type or types in its methods, rather than a
generic type such as an
object. Strongly typed classes allow the compiler to ensure that the
proper objects are passed to methods in the class, and can prevent errors that would other-
wise occur only at runtime.
The
CollectionBase class is part of the System.Collections namespace. It supports
the
IEnumerable, ICollection, and IList interfaces. A complete list of the public mem-
bers defined by this class is as follows. Derived classes must implement the additional meth-
ods to support the required interfaces.
Public
Properties
Count
Gets or sets the actual number of objects in the array.
Public
Methods
Clear Removes all objects from the array.
GetEnumerator Returns an enumerator that can iterate through the
elements in the collection using the
IEnumerator
interface.
RemoveAt Removes the object at a given index from the array.
Protected
Properties
InnerList Gets an
ArrayList instance representing the collection
instance. This can be used when implementing derived
classes to modify the collection.
List Gets an
IList instance representing the collection
instance. This can be used when implementing derived
classes to modify the collection.
Protected
Methods
OnClear Performs additional custom processing before clearing the
contents of the collection. This can be used by derived
classes to perform any required actions before the
collection is cleared.
OnInsert Performs additional custom processing before inserting an
element into a collection. A number of other protected
methods are provided, with a similar purpose.
CLASS LIBRARIES 133
5.2 CLASS LIBRARIES
Finally, we are ready to specify our album class. We have decided to base this on Col-
lectionBase
, and use our own Photograph object for the elements. As we dis-
cussed in the previous section, the
CollectionBase class provides a limited set of
methods, so it will be up to us to implement the appropriate class members to sup-
port the required interfaces.
As a result, our
PhotoAlbum class will look something like the following. Since
this is a photo album and we expect to display photos from it, we will also add some
methods to manage the current position within the album.
public class PhotoAlbum : CollectionBase
{
// Default constructor
// The IEnumerable interface is provided by CollectionBase
// This allows the use of foreach with an album
// ICollection members
// IList members
// Position operations
// - Get/Set current position (as index).
// - Get photograph at current position.
// - Move to the next photograph.
// - Move to the previous photograph.
}
Some syntactic points here:
b As already mentioned, classes in C# support inheritance from a single class only, in
this case from the
CollectionBase class, although multiple interfaces can be speci-
fied. This is the same as Java, and a break from C++. Also unlike the C++ language,
C# classes do not support private or protected inheritance.
c If you haven’t realized it by now, also note that there are no header files in C#. Like
Java, the entire class is specified in a single file. For C++ programmers, also note that
a semicolon (;) is not required after the class definition.
The
Photograph class will hold the original file name for the image, and the Bit-
map
object when necessary. Its definition will look something like this:
public class Photograph
{
// Create a new instance from a file name.
// Properties:
// - get the file name for the Photograph
// - get the Bitmap for the Photograph
// Methods:
// - see if two Photographs are equal
}
b
Inherit from
CollectionBase class
c
End of PhotoAlbum class
d
Inherit from System.Object
134 CHAPTER 5 REUSABLE LIBRARIES
One additional point here:
d It is worth noting that all classes in C# implicitly inherit from the object class even
when it is not specified. This ensures that all classes have a common ancestor. So even
though it is not shown, our
Photograph class inherits from the base Sys-
tem.Object
class implicitly, which is equivalent to the C# object class.
Now that we understand the framework for our classes, let’s perform the actual
implementation. This section will create the class library in Visual Studio, discuss cre-
ating such a library using the command line tools, and provide the initial implemen-
tation of our
PhotoAlbum and Photograph classes.
5.2.1 C
REATING THE CLASS LIBRARY
Enough preparation: time to create our library. If you are not using Visual Studio
.NET here, create your library as a separate directory and place the files discussed
here in it. We’ll give you some hints for building this from the command line later in
the chapter.
In this section we will create a new project as part of our MyPhotos solution. This
project will build the new MyPhotoAlbum library. We will create a top-level
namespace called
Manning for this project, and reference the new library from our
MyPhotos project.
Set the version number of the application to 5.2.
CREATE A REUSABLE LIBRARY IN VISUAL STUDIO .NET
Action Result
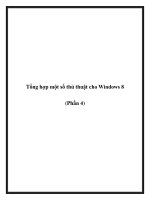
1 Add a new project to the
MyPhotos solution.
How-to
a. Click the File menu in
Visual Studio .NET.
b. Click on the Add Project
menu.
c. Select the New Project…
item.
CLASS LIBRARIES 135
That’s all it takes. The solution MyPhotos now contains two projects: a MyPhotoAl-
bum project to create a DLL library, and a MyPhotos project to create a Windows
Forms application. You will note that the new project has its own AssemblyInfo.cs file
to support an independent version number for the library.
2 Configure the new project
as a class library named
“MyPhotoAlbum.”
3 Click the OK button to
create the new project.
In the Solution Explorer window, the new project appears with
a default initial class named
Class1. The main window displays
the Class1.cs source file.
Note: The MyPhotos project is in bold to indicate that it
is the default project, or the startup project in Visual Stu-
dio .NET terms.
CREATE A REUSABLE LIBRARY IN VISUAL STUDIO .NET (continued)
Action Result
How-to
a. Select Visual C# Projects
as the Project Type.
b. Select Class Library as
the Template.
c. Enter “MyPhotoAlbum”
for the name of the
project.
136 CHAPTER 5 REUSABLE LIBRARIES
We do not want a class called Class1, so let’s rename it to PhotoAlbum. We will
also adjust the version number of our new project to reflect the current section number.
Visual Studio automatically uses the project name as the namespace for all files in the
project. Here, the
PhotoAlbum class is in the MyPhotoAlbum namespace, so that
our class called
PhotoAlbum will not interfere with anyone else who may have a class
called
PhotoAlbum. By convention, namespaces should specify the company name,
followed by the project name. Since our library might be used outside of this book
(hey, you never know!), we should follow this convention as well. We will use the
publisher’s name
Manning as our top-level namespace.
RENAME THE CLASS1.CS CLASS FILE
Action Result
4 Set the MyPhotoAlbum
version number to 5.2.
When you compile the MyPhotoAlbum library, the new version
number is included, and will be visible when displaying the
properties for the generated library assembly.
Note: Your main window now displays two Assembly-
Info.cs tabs for the corresponding files in each project.
Make sure you keep track of which is which. The dis-
played file is always selected in the Solution Explorer win-
dow, which identifies the project that contains the file. To
display the Solution Explorer window while editing a file,
use the keyboard shortcut Ctrl+Alt+L.
5 Rename the Class1.cs file
name to PhotoAlbum.cs.
The Class1.cs tab in the main window is renamed as well.
6 Rename the
Class1 class
name to
PhotoAlbum.
The PhotoAlbum.cs file should look like this:
using System;
namespace MyPhotoAlbum
{
/// <summary>
/// Summary description for PhotoAlbum.
/// </summary>
public class PhotoAlbum
{
public PhotoAlbum()
{
//
// TODO: Add Constructor Logic here
//
}
}
}
How-to
a. Double-click the Assem-
blyVersion.cs file.
b. Modify the
Assembly-
Version
line to contain
the desired version
number.
How-to
a. Right-click on the
Class1.cs file.
b. Select Rename.
c. Enter “PhotoAlbum.cs”
for the file name.
How-to
a. Double-click the PhotoAl-
bum.cs file.
b. Change the three
instances of “Class1” to
“PhotoAlbum” in the
code.
CLASS LIBRARIES 137
Our library is now ready; all we need to do is add code. One last task before we do
this is to make certain we can use our library from within the MyPhotos application
project. For this to work, the MyPhotos project must include a reference to the
MyPhotoAlbum class. This corresponds to the
/reference switch on the C# com-
piler (csc.exe) that we saw in chapter 1, and is a bit like linking a library into your
program in C++. Since there are no header files in C#, a reference is all we need to
start using classes from the library in our project.
MODIFY THE CLASS NAMESPACE
Action Result
7 Modify the entire
MyPhotoAlbum namespace to
exist within the
Manning
namespace
How-to
Enter the bolded text into the
PhotoAlbum.cs file. When you
type the final brace, Visual
Studio will automatically
reformat the lines as shown.
Note: We have not made a sim-
ilar change in the MyPhotos
application since in this project
the namespace is not likely to
be used outside of the applica-
tion itself.
The PhotoAlbum.cs file should now look as follows:
using System;
namespace Manning
{
namespace MyPhotoAlbum
{
/// <summary>
/// Summary description for PhotoAlbum.
/// </summary>
public class PhotoAlbum
{
public PhotoAlbum()
{
//
// TODO: Add Constructor Logic here
//
}
}
}
}
REFERENCE MYPHOTOALBUM FROM THE MYPHOTOS PROJECT
Action Result
8 Display the Add Reference
dialog box for the MyPhotos
project.
Alternately
Right-click on the
References entry under the
MyPhotos project in the
Solution Explorer window,
and select Add Reference.
How-to
a. Click the MyPhotos
project in the Solution
Explorer window.
b. Click on the Project menu.
c. Select the Add Reference
item.
138 CHAPTER 5 REUSABLE LIBRARIES
It is important to realize that our new reference refers to the assembly produced by
the MyPhotoAlbum project, and not the project itself. Visual Studio automatically
uses the correct path when compiling the MyPhotos project to pick up the most
recent MyPhotoAlbum library from the corresponding project.
If you are not using Visual Studio .NET to build your program, you will need
to establish the correct library location manually. The command-line tools discussed
in chapter 1 are used for this purpose. The next section provides a short discussion on
this topic.
5.2.2 U
SING THE COMMAND-LINE TOOLS
As we saw in chapter 1, you can build Windows Forms applications without using
Visual Studio .NET. The interactive environment makes a number of tasks easier, but
also uses memory and other system resources. On a computer with limited resources,
this can present some problems. If you have a favorite editor and are comfortable
working with makefiles, you can create the examples in this book without using
Visual Studio .NET.
To create a class library such as MyPhotoAlbum.dll, create a MyPhotoAlbum
directory for the library and place the required source files in it. In this case you would
create a PhotoAlbum.cs file to hold the PhotoAlbum class source code, and create other
files as required. You can create an AssemblyInfo.cs file as well, or simply include the
version number and other assembly information at the top of your file as we did in chap-
ter 1. The C# compiler (csc.exe) discussed in chapter 1 is used to produce both execut-
ables and libraries. The
/target switch specifies the type of output file to produce.
9 Reference the
MyPhotoAlbum project.
The MyPhotoAlbum assembly appears in Solution Explorer
under the References entry for the MyPhotos project.
REFERENCE MYPHOTOALBUM FROM THE MYPHOTOS PROJECT (continued)
Action Result
How-to
a. Click the Projects tab.
b. Click the MyPhotoAlbum
project.
c. Click the Select button.
d. Click OK to add the
selected project.
CLASS LIBRARIES 139
The
/out switch can be used to specify the output file name. Both /out and /target
must appear before any source file names.
For example, the following line will create a library assembly called MyPhotoAl-
bum.dll using a single source file PhotoAlbum.cs.
> csc /target:library /out:MyPhotoAlbum.dll PhotoAlbum.cs
/r:System.dll
To use this library with your MyPhotos application, you will need to include a /r ref-
erence when compiling the application. For example, if your library was in a directory
called
C:\MyProjects\MyPhotoAlbum, then you would use the following switch
when compiling the MyPhotos application:
/r:C:\MyProjects\MyPhotoAlbum
5.2.3 CREATING THE PHOTOALBUM CLASS
No matter how you compile your library, we are now ready to implement the Pho-
toAlbum
class. These next two sections take us through the initial implementation of
this and the
Photograph class. If you find typing all this code a bit tedious (or are a
really bad typist!), don’t be afraid to download the final code from the book’s web site
and simply read the accompanying text. For the rest of us, let’s forge ahead.
C# compiler output options (/target switch)
Switch Output Comments
/target:exe Creates a console
application (.exe).
This is the default.
/target:library Creates a library file (.dll). The library generated is an assembly that can be
referenced by other .NET applications.
/target:module Creates a library module
(.dll).
This option does not produce an assembly manifest
for the file. Such a file cannot be loaded by the .NET
runtime until it is incorporated in an assembly
manifest using the
/addmodule switch. This
permits collections of files to become a single
assembly.
/target:winexe Creates a Windows
application (.exe).
When a Windows application is run in a console
window, the console does not wait for the
application to exit. This is different than a console
application, where the console does in fact wait.
IMPLEMENT PHOTOALBUM CLASS
Action
Result
1 Display the PhotoAlbum.cs
file in the main window.
2 Add some class
documentation.
/// <summary>
/// The PhotoAlbum class represents a
/// collection of Photographs.
/// </summary>
140 CHAPTER 5 REUSABLE LIBRARIES
You may notice here that the MyPhotoAlbum project does not compile. Try to do so
and the compiler returns an error something like the following:
This is because
CollectionBase is part of the System.Collections namespace.
It turns out this namespace is part of the system library, so there is no need for another
reference in our project. We could fix the error by declaring the class as follows:
public PhotoAlbum : System.Collections.CollectionBase
{
. . .
Since we may use other objects or names from the System.Collections
namespace, we will instead simply indicate that our class will use this namespace at
the top of the file.
Now the project should compile with no errors. Before we implement any members
for this class, let’s also take a look at the
Photograph class.
3 Define CollectionBase
as the base class.
public class PhotoAlbum : CollectionBase
{
4 Create an empty default
constructor.
public PhotoAlbum()
{
// Nothing to do
}
Note: It’s a good idea to add a short comment in situa-
tions like this to inform the poor guy or gal who eventu-
ally supports your code that you created an empty
constructor on purpose.
IMPLEMENT PHOTOALBUM CLASS (continued)
Action
Result
Error The type or namespace name 'CollectionBase' could not be
found (are you missing a using directive or an assembly ref-
erence?)
USE SYSTEM.COLLECTIONS NAMESPACE
Action Result
5 Add a
using directive to
the PhotoAlbum.cs file for
the
System.Collections
namespace.
You should now have two
using directives present:
using System;
using System.Collections;