Netframwork 2.0 (phần 4) potx
Bạn đang xem bản rút gọn của tài liệu. Xem và tải ngay bản đầy đủ của tài liệu tại đây (523.9 KB, 50 trang )
Lesson 2: Creating and Configuring Value-Setting, Date-Setting, and Image-Display Controls 125
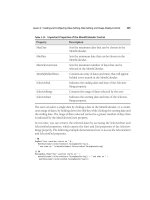
Table 3-14 Important Properties of the MonthCalendar Control
Property Description
MaxDate Sets the maximum date that can be chosen in the
MonthCalendar.
MinDate Sets the minimum date that can be chosen in the
MonthCalendar.
MaxSelectionCount Sets the maximum number of days that can be
selected in the MonthCalendar.
MonthlyBoldedDates Contains an array of dates and times that will appear
bolded every month in the MonthCalendar.
SelectionEnd Indicates the ending date and time of the Selection-
Range property.
SelectionRange Contains the range of dates selected by the user.
SelectionStart Indicates the starting date and time of the Selection-
Range property.
The user can select a single date by clicking a date in the MonthCalendar, or a contin-
uous range of dates, by holding down the Shift key while clicking the starting date and
the ending date. The range of dates selected cannot be a greater number of days than
is indicated by the MaxSelectionCount property.
At run time, you can retrieve the selected dates by accessing the SelectionStart and
SelectionEnd properties, which expose the Start and End properties of the Selection-
Range property. The following example demonstrates how to access the SelectionStart
and SelectionEnd properties.
' VB
MsgBox("Your vacation starts on " & _
MonthCalendar1.SelectionStart.ToLongDateString & _
" and ends on " & MonthCalendar1.SelectionEnd.ToLongDateString)
// C#
MessageBox.Show("Your vacation starts on " +
monthCalendar1.SelectionStart.ToLongDateString() + " and ends on " +
monthCalendar1.SelectionEnd.ToLongDateString());
126 Chapter 3 Advanced Windows Forms Controls
Working with Images
Images allow you to liven up your user interface as well as provide important informa-
tion to the user. Visual Studio contains several components and controls that facilitate
the display of images. The PictureBox control is an all-around control that displays pic-
tures in several different formats. The ImageList manages and organizes a collection of
images and can be used to display images in ListView or to organize images for other
controls.
PictureBox Control
The PictureBox control is the basic control used for displaying images in the user inter-
face. The PictureBox control can display pictures in a variety of formats, including .bmp,
.jpg, .gif, metafiles, and icons. You can display images that are present in application
resource files or compiled into the application, or you can load images from a Web or
disk address. Table 3-15 details important properties of the PictureBox control.
Table 3-15 Important Properties of the PictureBox Control
Property Description
ErrorImage The image that will be displayed if the selected image fails
to load.
Image The image to be loaded in the PictureBox.
ImageLocation A Web or disk address to load the image from.
InitialImage The image to be displayed in the PictureBox while the
image is loading.
SizeMode Determines how the control handles image placement
and sizing.
You can set the Image property at design time by clicking it in the Properties window,
which opens the Select Resource dialog box, shown in Figure 3-10.
Lesson 2: Creating and Configuring Value-Setting, Date-Setting, and Image-Display Controls 127
Figure 3-10 The Select Resource dialog box
You can select an image resource that is already present in a project resource file by
selecting the Project Resource File radio button and selecting the .resx file that con-
tains the image, or you can import a new image into a resource file by clicking the
Import button and navigating to the image you want to import. The selected image
will be added to the selected .resx file. You can also import the image as a local
resource by selecting the Local Resource radio button and clicking the Import button
to browse to the image you want to import. Importing an image as a local resource
will make it available only to the PictureBox control and unavailable to the rest of the
application.
Instead of loading an image from a resource, you can specify a URL from which to
load an image by setting the ImageLocation property. When the ImageLocation prop-
erty is set, the image is loaded from the specified address, and the Image property is
set to that image.
At run time, you can set the Image property to an instance of an image, as shown in the
following example:
' VB
Dim anImage As New System.Drawing.Bitmap("C:\anImage.bmp")
PictureBox1.Image = anImage
// C#
System.Drawing.Bitmap anImage = new
System.Drawing.Bitmap(@"C:\anImage.bmp");
pictureBox1.Image = anImage;
128 Chapter 3 Advanced Windows Forms Controls
ImageList Component
The ImageList component is not a control as such, but it is a component that allows
you to organize groups of images. Although it has no visual representation itself, it can
supply images to other controls, such as ListView, or serve as a repository for images
to be loaded into a picture box. You can set the size and color depth for the images and
iterate through them as you would a collection. Table 3-15 shows important proper-
ties of the ImageList component.
Table 3-16 Important Properties of the ImageList Component
Property Description
ColorDepth Sets the color depth for the images contained in the ImageList
component.
Images The collection of images organized by the ImageList component.
ImageSize Sets the size for the images contained in the ImageList control.
You can add new items to the ImageList control by clicking the Images property in the
Properties window. This opens the Images Collection Editor, as shown in Figure 3-11.
Figure 3-11 The Image Collection Editor
The Images Collection Editor images can be added, removed, or their order in the
collection changed via the Images Collection editor. Once images have been added to
the ImageList component, you can set the color depth for each image by setting the
Lesson 2: Creating and Configuring Value-Setting, Date-Setting, and Image-Display Controls 129
ColorDepth property, and you can set all of the images to a specified size by setting
the ImageSize property.
At run time, you can access the images contained in the ImageList component via the
Images collection, as shown in the following example:
' VB
PictureBox1.Image = ImageList1.Images(0)
// C#
pictureBox1.Image = imageList1.Images[0];
ImageList components can be used to provide images to other controls in your user
interface. Several controls, such as Button, CheckBox, RadioButton, and others, host
ImageList, ImageKey, and ImageIndex properties. You can provide images from an
ImageList component to these controls by setting these properties.
� To provide an image to a control from an ImageList component
1. Set the ImageList property of the control to the ImageList component that hosts
the image you want to provide.
2. Set either the ImageIndex property or the ImageKey property to the appropriate
image in the ImageList.
Quick Check
1. What is the difference between how a RadioButton control and a CheckBox
control are used?
2. What is the purpose of an ImageList control and how is it used?
Quick Check Answers
1. Radio buttons are used to allow the user to choose a single option from a
set of exclusive options. Checkbox controls allow the user to select multiple
options, usually without regard to whether any other options in the group
are selected.
2. An ImageList control is used to organize a set of related images. An ImageList
is generally used to provide images to the controls on a form. You can set
the ImageList property of the controls on a form to an instance of the Image-
List and then set either the ImageIndex or the IndexKey property to specify
the image.
130 Chapter 3 Advanced Windows Forms Controls
Lab: Adventure Works Ski Instructor Reservation Form
In this lab, you will build on the solution you created in the lab in Chapter 1. You will
add a group of CheckBox controls to allow the user to indicate required ski rental
equipment, a group of RadioButton controls to allow the user to indicate his ski skill
level, and an ImageList component to integrate with the ListView control so the user
will be able to see faces to go with the names.
� Exercise 1: Adding to the Ski Instructor Reservation Form
1. Open the solution you completed in Lesson 1, or open the Lesson 1 completed
solution from the CD.
2. Open Form1 in designer view. Drag a GroupBox onto the form. Set the Text prop-
erty of the GroupBox to Rental Equipment.
3. Drag three CheckBox controls into the GroupBox. Set the Text properties of the
CheckBox controls to Skis, Poles, and Boots.
4. Drag a GroupBox onto the form. Set the Text property of the GroupBox to Skill
Level.
5. Drag three RadioButton controls into the GroupBox. Set the Text properties of the
RadioButton controls to Beginner, Intermediate, and Advanced.
6. Drag a Label control and a DateTimePicker control onto the form. Set the Text
property of the Label to Select Lesson Time.
7. Set the Format property of the DateTimePicker to Time.
8. Drag an ImageList component from the Toolbox onto the Form.
9. In the Properties window, set the ImageSize property of the ImageList component
to 32,32, and set the ColorDepth property to Depth16Bit.
10. In the Properties window, add four images to the ImageList component. You will
find sample images on the Companion CD in the Images sub-folder of the Code
folder.
11. In the Designer, select the ListView control. In the Properties window, set the
SmallImageList property to ImageList1.
12. In the Properties window, click Items to open the ListViewItem Collection Edi-
tor. In the ListViewItem Collection Editor, set the ImageIndex property for List-
ViewItems 0,1,2, and 3 to 0,1,2, and 3, respectively. Images should now display
next to the icons in the ListView control.
13. Press F5 to build and test your application.
Lesson 2: Creating and Configuring Value-Setting, Date-Setting, and Image-Display Controls 131
Lesson Summary
■ The CheckBox control allows users to select options non-exclusively. You can use
groups of CheckBox controls to allow the user to select multiple options.
■ The RadioButton control allows you to present a group of exclusive options to
the user. You can use groups of RadioButton controls to present a list of options,
only one of which can be chosen.
■ The TrackBar control allows the user to rapidly and graphically set a numeric value
by adjusting a slider with mouse or keyboard commands.
■ The DateTimePicker control allows the user to set a date or time. When set to Time
format, times can be typed into the DateTimePicker. Days can be chosen from the
drop-down calendar interface.
■ The MonthCalendar control is a highly configurable control that allows the user to
select a range of dates from an intuitive user interface. You can configure bolded
dates and set the maximum length of the date range to be selected by the user.
■ The PictureBox control is an all-purpose control for displaying images in the user
interface and can display images in a variety of formats. The ImageList compo-
nent organizes a collection of images and can set images to a common size and
color depth.
Lesson Review
The following questions are intended to reinforce key information presented in this
lesson. The questions are also available on the companion CD if you prefer to review
them in electronic form.
NOTE Answers
Answers to these questions and explanations of why each answer choice is right or wrong are
located in the “Answers” section at the end of the book.
1. Which of the following are possible values for the Checked property of a Check-
Box control? (Choose all that apply.)
A. Checked
B. False
C. Indeterminate
132 Chapter 3 Advanced Windows Forms Controls
D. Unchecked
E. True
F. NotChecked
2. You are designing an application that asks the user to select a period ranging
from one day to seven days in a given month. Which of the following configura-
tions for a MonthCalendar control are best choices to facilitate this functionality?
(Choose all that apply.)
A. Set the MaxSelectionCount property to 7.
B. Set the SelectionRange property to the first and last days of the month in
question.
C. Set the MaxDate property to the last day of the month in question.
D. Set the MinDate property to the first day of the month in question.
3. Which of the following code examples correctly associates an image from an
ImageList component with a Button control? Assume an ImageList component
named ImageList1 and a Button control named Button1. (Choose all that apply.)
A.
' VB
Button1.Image = ImageList1
// C#
button1.Image = imageList1;
B. ' VB
Button1.ImageList = ImageList1
Button1.ImageKey = ImageList1.Images(0)
// C#
button1.ImageList1 = imageList1;
button1.ImageKey = imageList1.Images(0);
C. ' VB
Button1.ImageList = ImageList1
Button1.ImageIndex = 0
// C#
button1.ImageList = imageList1;
button1.ImageIndex = 0;
D. ' VB
Button1.ImageList = ImageList1
Button1.ImageKey = "myImage"
// C#
button1.ImageIndex = imageList1;
button1.ImageKey = "myImage";
Lesson 3: Configuring the WebBrowser Control and the NotifyIcon Component and Creating Access Keys 133
Lesson 3: Configuring the WebBrowser Control and the
Notif yIcon Component and Creating Access Keys
Visual Studio provides several ways to extend the user interface. The WebBrowser con-
trol provides an all-purpose control for viewing HTML files and loading content from
the World Wide Web. The NotifyIcon component allows you to notify users when pro-
cesses are running in the background, and access keys provide additional options to
the user for navigating between controls.
After this lesson, you will be able to:
■ Configure properties and use methods of the WebBrowser control.
■ Add application icons to the task bar with NotifyIcon.
■ Associate a context menu with a NotifyIcon component.
■ Create an access key for a control.
Estimated lesson time: 30 minutes
The WebBrowser Control
The WebBrowser control provides all of the functionality required to load and display
HTML pages and other file types, as well as the functionality needed to navigate to
locations on the World Wide Web. You can configure the WebBrowser to expose
online help for your application, to load and print documents, or to display files in a
variety of formats. Table 3-17 shows important properties of the WebBrowser control.
Table 3-17 Important Properties of the WebBrowser Control
Property Description
AllowWebBrowserDrop Determines if documents dropped into the Web-
Browser control are automatically opened.
CanGoBack Returns whether the WebBrowser control is able to nav-
igate backward.
CanGoForward Returns whether the WebBrowser control is able to nav-
igate forward.
Document Returns the current HTML document in the Web-
Browser control.
134 Chapter 3 Advanced Windows Forms Controls
Table 3-17 Important Properties of the WebBrowser Control
Property Description
DocumentStream Returns the stream associated with the current
document.
DocumentText Returns a string representation of the current
document.
DocumentTitle Returns the title of the current document.
DocumentType Returns the type of the current document.
IsOffline Returns whether the system is offline.
IsWebBrowserContext- Determines if the standard Microsoft Internet
MenuEnabled Explorer context menu is enabled for the WebBrowser.
ScriptErrorsSuppressed Determines whether script errors that occur in the
document are suppressed or shown in a dialog box.
ScrollBarsEnabled Determines whether scrollbars are enabled for the
control.
URL Gets or sets the URL for the current document.
WebBrowserShortcuts- Gets or sets whether standard Internet Explorer key-
Enabled board shortcuts are enabled for the WebBrowser.
The WebBrowser control also contains a variety of methods that enable navigation
within the WebBrowser. Table 3-18 details important methods of the WebBrowser
control.
Table 3-18 Important Methods of the WebBrowser Control
Method Description
GoBack Navigates to the previous page in the navigation his-
tory if one is available.
GoForward Navigates to the next page in the navigation history if
one is available.
GoHome Navigates to the browser’s home page.
Lesson 3: Configuring the WebBrowser Control and the NotifyIcon Component and Creating Access Keys 135
Table 3-18 Important Methods of the WebBrowser Control
Method Description
GoSearch Navigates to the browser’s search page.
Navigate Navigates to the specified URL.
Print Prints the current document.
ShowPageSetupDialog Displays the Internet Explorer page setup dialog box.
ShowPrintDialog Displays the Internet Explorer print dialog box.
ShowPrintPreviewDialog Displays the Internet Explorer print preview dialog
box.
ShowPropertiesDialog Displays the Internet Explorer properties dialog box.
ShowSaveAsDialog Displays the Internet Explorer Save As dialog box if
the document is of a type other than an HTML page.
Stop Cancels any pending navigation and stops any
dynamic page elements.
Navigating the Web with the WebBrowser Control
The WebBrowser control provides methods that enable navigation of the Web in your
application. The primary method for navigation is the Navigate method. This method
takes a string argument that indicates the URL for the document to be loaded into the
WebBrowser control. The following example demonstrates the Navigate method.
' VB
WebBrowser1.Navigate("www.microsoft.com")
// C#
webBrowser1.Navigate("www.microsoft.com");
Once navigation is complete, the WebBrowser control raises the DocumentCompleted
event. By handling this event, you can execute code after the document has loaded.
You can use other methods of the WebBrowser control to access your document his-
tory. The GoBack method navigates to the previous page in the document history, and
the GoForward method navigates to the next page in the document history. If no page
is available in the document history, there is no effect.
136 Chapter 3 Advanced Windows Forms Controls
Working with Documents in the WebBrowser Control
You can also use the Navigate method to load other documents into the WebBrowser
control. The following example demonstrates how to load a Microsoft Office Word
document into the WebBrowser control.
' VB
WebBrowser1.Navigate("C:\Test.doc")
// C#
webBrowser1.Navigate(@"C:\Test.doc");
When working with documents in the WebBrowser control, you can allow the user to
save the document by using the ShowSaveAsDialog method. This method displays the
Save As dialog box and allows the user to choose a format to save the document.
You can also use the WebBrowser control for printing documents. You can call the
ShowPrintDialog and ShowPrintPreview methods to enable printing of the document.
These methods show the Print dialog box and the Print Preview dialog box, respec-
tively, and allow the user to continue on to printing the document.
The NotifyIcon Component
The NotifyIcon component is not a control but, rather, a component that represents an
icon that appears in the system tray. The NotifyIcon component is usually used with
applications that run in the background. They can provide information about the pro-
gram execution by displaying balloon tips, and you can associate a ContextMenuStrip
with the NotifyIcon to allow the user to execute commands from a context menu.
Table 3-19 shows important properties of the NotifyIcon component.
Table 3-19 Important Properties of the NotifyIcon Component
Property Description
BallonTipIcon The icon that will be shown in the balloon tip. This
property can be set to None, which displays no icon, or
to Info, Warning, or Error.
BalloonTipText Sets the text that is displayed in the balloon tip.
BalloonTipTitle Sets the title of the balloon tip.
ContextMenuStrip Gets or sets the ContextMenuStrip associated with the
NotifyIcon.
Lesson 3: Configuring the WebBrowser Control and the NotifyIcon Component and Creating Access Keys 137
Table 3-19 Important Properties of the NotifyIcon Component
Property Description
Icon The icon that is shown in the system tray.
Text The text that is shown when the user’s mouse rests on
the icon in the system tray.
Visible Indicates whether the icon is visible in the system tray.
To display a NotifyIcon in the system tray, you must set the Icon property to the icon
you want to display and set the Visible property to True. You can add icons to your
project by creating a new instance of the System.Drawing.Icon class, or by adding exist-
ing icon files to your project from the Project>Add Existing Item menu option.
The NotifyIcon component contains properties that govern the display of the balloon
tip. The balloon tip can be used to display information to the user. You can set the
Icon, Text, and Title of the balloon tip by setting the BalloonTipIcon, BalloonTipText, and
BalloonTipTitle properties, respectively. After the appropriate properties are set, you
can display the balloon tip by calling the ShowBalloonTip method. The ShowBalloon-
Tip method takes a parameter that indicates the number of seconds that the balloon
tip is shown. Following is an example of the ShowBalloonTip method:
' VB
NotifyIcon1.ShowBalloonTip(12)
// C#
notifyIcon1.ShowBalloonTip(12);
You can associate a ContextMenuStrip with the NotifyIcon component to allow users to
execute commands from the menu by right-clicking the icon. You can associate a Con-
textMenuStrip with the NotifyIcon component by clicking the ContextMenuStrip prop-
erty in the Properties window and setting the property to a ContextMenuStrip in your
solution. Creating ContextMenuStrips will be discussed in detail in Chapter 4, “Tool-
Strips, Menus, and Events.”
Creating Access Keys
Access keys enable the user to move the focus to a particular control by pressing the
Alt key and the access key you have defined for a particular control. In Chapter 2, you
learned how to use a Label control to create an access key for another control. The fol-
lowing procedure describes how to create access keys for individual controls.
138 Chapter 3 Advanced Windows Forms Controls
NOTE Creating an Access Key for a Control
To create an access key for a control with this procedure, the control must be capable of receiving
the focus, it must have a Text property, and it must have a UseMnemonic property. If the control you
want to create an access key for does not have a UseMnemonic property, use the procedure
described in Chapter 2. If the control cannot receive the focus, you cannot create an access key for
it by any procedure.
� To create an access key for a control
1. Set the Text property to the text you want the control to display.
2. In the Text property, prepend the letter that you want to make the access key
with the ampersand (&) symbol.
3. In the Properties window, set the UseMnemonic property to True. The letter pre-
ceded by the ampersand symbol will appear underlined, and, at run time, the
user will be able to shift the focus to the control by pressing the Alt key along
with the underlined key.
Quick Check
■ What is the purpose of access keys?
Quick Check Answers
■ Access keys allow you to provide keyboard shortcuts that move the focus to
the control that the access key is associated with.
Lab: Creating a WebBrowser
In this lab, you will create a limited but functional Web browser. You will add controls
to facilitate backward and forward navigation, as well as allowing a user to type a URL
and navigate to the specified location.
� Exercise 1: Creating a Web Browser
1. In Visual Studio, start a new Windows Forms project.
2. In the Properties window for Form1, set the Size property to 600,400.
3. From the Toolbox, drag a SplitContainer onto the Form.
4. From the Toolbox, drag a WebBrowser control onto Panel2.
5. From the Toolbox, drag three Button controls and a TextBox control onto Panel1.
6. Set the Text property of the Button controls to &Back, &Forward, and &Navigate.
Lesson 3: Configuring the WebBrowser Control and the NotifyIcon Component and Creating Access Keys 139
7. Set the UseMnemonic property of each Button control to True.
8. Select the SplitContainer. In the Properties window, set the Orientation property
to Horizontal and adjust the size of Panel1 so that just the buttons are showing.
Set the FixedPanel property to Panel1.
9. In the Designer, double-click the Back button to open the Button_Click event
handler for this button. Add the following line of code:
' VB
WebBrowser1.GoBack()
// C#
webBrowser1.GoBack();
10. In the Designer, double-click the Forward button to open the Button_Click event
handler for this button. Add the following line of code:
' VB
WebBrowser1.GoForward()
// C#
webBrowser1.GoForward();
11. In the Designer, double-click the Navigate button to open the Button_Click event
handler for this button. Add the following line of code:
' VB
WebBrowser1.Navigate(TextBox1.Text)
// C#
webBrowser1.Navigate(textBox1.Text);
12. Press F5 to build and test your application.
Lesson Summary
■ The WebBrowser control encapsulates all of the functionality necessary to access
the Internet and load a variety of document types. It contains methods that facil-
itate navigation of the World Wide Web and the file system.
■ The NotifyIcon component allows you to set an icon in the system tray and pro-
vide notifications to users regarding processes running in the background. You
can display messages to the user via balloon tips and can enable commands by
associating a ContextMenuStrip with the NotifyIcon.
■ You can use the Text and UseMnemonic properties to define access keys for con-
trols that can receive the focus. Only controls that are capable of receiving the
focus can have access keys defined for them. If a control can receive the focus but
does not have Text or UseMnemonic properties, you can define an access key with
a Label control, as described in Chapter 2.
140 Chapter 3 Advanced Windows Forms Controls
Lesson Review
The following questions are intended to reinforce key information presented in this
lesson. The questions are also available on the companion CD if you prefer to review
them in electronic form.
NOTE Answers
Answers to these questions and explanations of why each answer choice is right or wrong are
located in the “Answers” section at the end of the book.
1. Which of the following methods can be used to print the current document in a
WebBrowser control? (Choose all that apply.)
A. WebBrowser.Print
B. WebBrowser.ShowPrintDialog
C. WebBrowser.ShowPrintPreviewDialog
D. WebBrowser.ShowPropertiesDialog
2. You are designing an application that runs in the background and want to
enable the application to notify the user when a severe error occurs. Which of
the following properties of the NotifyIcon component can facilitate this function-
ality? (Choose all that apply.)
A. BalloonTipIcon
B. BalloonTipText
C. BalloonTipTitle
D. Text
3. Which of the following are required to create an access key for a control without
using an associated label? (Choose all that apply.)
A. The Enabled property must be set to True.
B. The control must have a Text property.
C. The UseMnemonic property must be set to True.
D. The control must be of a type that is able to receive the focus.
Chapter 3 Review 141
Chapter Review
To further practice and reinforce the skills you learned in this chapter, you can perform
the following tasks:
■ Review the chapter summary.
■ Review the list of key terms introduced in this chapter.
■ Complete the case scenarios. These scenarios set up real-world situations involv-
ing the topics of this chapter and ask you to create a solution.
■ Complete the suggested practices.
■ Take a practice test.
Chapter Summary
■ List-based controls are used to organize and present lists of information to the
user. Basic list-based controls such as ListBox, ComboBox, and CheckedListBox
organize their contents in the Items property, which exposes common methods
for adding, removing, and otherwise manipulating contained items.
■ Specialized list-based controls, such as ListView and TreeView, are designed to fill
specific roles. The ListView control allows you to display icons and other informa-
tion about its contained members. The TreeView control displays contained mem-
bers in a hierarchical tree display that the user can expand or collapse as needed.
■ Value-setting controls allow the user to set a value that can later be read by the
program through the user interface. CheckBox and RadioButton controls set Bool-
ean values for their Checked property, allowing the user to choose yes or no to a
set of presented options.
■ The ImageList component organizes images and makes them available to con-
trols in the application. Controls that expose an ImageList property can reference
a given image list and display contained images.
■ The WebBrowser control is an all-purpose control for browsing the Web and file
system. It allows you to work with a variety of document types and contains
methods that facilitate navigation, printing, and saving documents.
■ The NotifyIcon component can display information about a process that is run-
ning in the background. You can display information by setting the BalloonTip
properties and showing the balloon tip. You can expose commands to the user
by associating a ContextMenuStrip with the NotifyIcon component.
142 Chapter 3 Review
■ You can use the Text and UseMnemonic properties to designate access keys for a
control. Any control that can receive the focus and has Text and UseMnemonic
properties can define its own access key. If a control can receive the focus but
does not have Text or UseMnemonic properties, you can define an access key
using a Label control as shown in Chapter 2.
Key Terms
Do you know the what these key terms mean? You can check your answers by looking
up the terms in the glossary at the end of the book.
■ access keys
■ list
■ list-based control
■ value-setting control
Case Scenarios
In the following case scenarios, you will apply what you’ve learned about how to use
controls to design user interfaces. You can find answers to these questions in the
“Answers” section at the end of this book.
Case Scenario 1: Incorporating List-Based Controls into the User
Interface
Humongous Insurance has grown so large that they need some help keeping track of
their employees. You have been put on the team that will design the new human
resources application. Other developers will supply a programmatic representation of
the organization chart and a database of information about the employees. Your job is to
create a user interface that allows the organization chart to be browsed by the user and
allows additional information about each employee to be displayed in the user interface.
Questions
Answer the following questions for your manager:
1. What is your suggested control layout for the user interface? How will you be
able to display the organization chart in a compact, easy-to-browse format?
2. How can we display photos of our employees as part of this application?
Chapter 3 Review 143
Case Scenario 2: Working with Files and Background Processes
As part of their document backup plan, Humongous Insurance has created an auto-
mated program that reads their electronic documents in a variety of different formats
(such as .doc, .txt, and .htm), saves them to a backup location, and prints a hard copy
on a high-throughput printer. For the most part, this application works fine without
user interaction and displays no user interface. Occasionally, however, a problem
occurs with a document that requires user intervention. You have been put in charge
of designing the user interface for the rare occasions that do arise.
Technical Requirements
■ The user interface must display only when there is a problem, and cannot be
launched without action by a user.
■ The user must be able to examine the document and manually save and print it.
Questions
Answer the following questions for your manager:
1. How can we warn the user of a problem without displaying the user interface at
all times? How will we allow the user to launch a user interface when there is a
problem?
2. When there is a problem, how can we design the user interface so that the user
is able to examine, print, and save individual files?
Suggested Practices
To successfully master the Add and Configure a Windows Forms Control exam objec-
tive, complete the following practices, as well as the practices in Chapter 2.
■ Practice 1 Build an application that duplicates the functionality of Windows
Explorer. You should be able to display a directory tree in one pane and files in
a particular directory in another pane.
■ Practice 2 Build an application that acts like an appointment book. It should
allow the user to choose a date and time, add information about the appoint-
ment, track and display details about the appointment, and visually display to
the user on a MonthCalendar control what days have appointments set.
144 Chapter 3 Review
■ Practice 3 Expand the Web browser you created in Lesson 3 to disable the Back
and Forward buttons if webBrowser1.CanGoBack or webBrowser1.CanGoForward
are False. You can do this by handling the WebBrowser.CanGoBackChanged and
WebBrowser.CanGoForwardChanged events. Also, allow the user to navigate to a
page by typing an address in the TextBox control and pressing Enter.
Take a Practice Test
The practice tests on this book’s companion CD offer many options. For example, you
can test yourself on just the content covered in this chapter, or you can test yourself on
all the 70-526 certification exam content. You can set up the test so that it closely sim-
ulates the experience of taking a certification exam, or you can set it up in study mode
so that you can look at the correct answers and explanations after you answer each
question.
MORE INFO Practice Tests
For details about all the practice test options available, see the “How to Use the Practice Tests” sec-
tion in this book’s Introduction.
Chapter 4
Tool Strips, Menus, and Events
This chapter describes additional ways to extend the user interface. Tool strips allow
you to create useful toolbars in a manner consistent with the look and feel of
Microsoft Office. Menus allow you to define custom commands that can be executed
by the user. Events are raised by controls in response to changes in application con-
ditions or user interaction, and, by handling events, you can write code that executes
in response to events.
Exam objectives in this chapter:
■ Add and configure a Windows Forms control.
❑ Display images by using Windows Forms controls.
■ Create and configure menus.
❑ Create and configure a MenuStrip component on a Windows Form.
❑ Change the displayed menu structure programmatically.
❑ Create and configure the ContextMenuStrip on a Windows Form.
■ Create event handlers for Windows Forms and controls.
❑ Use the Windows Forms Designer to create event handlers.
❑ Manage mouse and keyboard events within Windows Forms applications.
❑ Program a Windows Forms application to recognize modifier keys.
❑ Use the Windows Forms Designer to create default event handlers.
❑ Create event handlers at run time to respond to system or user events
dynamically.
❑ Connect multiple events to a single event handler.
❑ Use the Code Editor to override methods defined in the base class.
Lessons in this chapter:
■ Lesson 1: Configuring Tool Strips. . . . . . . . . . . . . . . . . . . . . . . . . . . . . . . . . . . . 147
■ Lesson 2: Creating and Configuring Menus . . . . . . . . . . . . . . . . . . . . . . . . . . . 161
■ Lesson 3: Using Events and Event Handlers . . . . . . . . . . . . . . . . . . . . . . . . . . . 180
145
146 Chapter 4 Tool Strips, Menus, and Events
Before You Begin
To complete the lessons in this chapter, you must have:
■ A computer that meets or exceeds the minimum hardware requirements listed in
the “Introduction” at the beginning of the book.
■ Microsoft Visual Studio 2005 Professional Edition installed on your computer.
■ An understanding of Microsoft Visual Basic or C# syntax and familiarity with
the Microsoft .NET Framework.
■ Completed Chapter 3, “Advanced Windows Forms Controls,” or have a good
understanding of Windows Forms controls and the Visual Studio IDE.
Real World
Matt Stoecker
The new ToolStrip and MenuStrip controls in the .NET Framework 2.0 have dra-
matically improved the speed with which I can develop a user interface. The
ToolStrip control allows me to create user interfaces that are consistent with
Microsoft Office applications and to create a more familiar experience for the
user, which leads to more rapid adoption and, ultimately, increased productivity.
Lesson 1: Configuring Tool Strips 147
Lesson 1: Configuring Tool Strips
The ToolStrip control is a new control in the .NET Framework version 2.0 that was
designed to facilitate the creation of custom toolbars that have the look and feel of
Microsoft Office and Microsoft Internet Explorer toolbars. Using the ToolStrip control,
you can rapidly develop highly configurable, professional-looking toolbars that
expose your custom functionality.
After this lesson, you will be able to:
■ Configure a tool strip to create a tool bar.
■ Configure a status strip to create a status bar.
■ Add various tool strip items to a ToolStrip control.
■ Add an image to a tool strip item.
■ Enable repositioning of tool strip items by the user.
■ Add a ToolStrip control to a ToolStripContainer.
■ Merge two tool strips.
Estimated lesson time: 30 minutes
Overview of the ToolStrip Control
The ToolStrip control enables you to create toolbars that have a professional and con-
sistent look and feel. ToolStrip controls are containers for ToolStripItems, which are
controls that are designed to be hosted inside a tool strip. ToolStripItems can be used
to provide a wide variety of options and functionality to the user.
ToolStrip controls encapsulate much of the functionality required for management of
a toolbar. They manage the layout and positioning of their contained tool strip con-
trols, enable reordering of the tool strip items by the user, manage rendering, and cre-
ate overflow buttons when more tool strip items are hosted on a tool strip than can be
displayed. Table 4-1 shows some of the important properties of the ToolStrip control.
Table 4-1 Important Properties of the ToolStrip Control
Property Description
AllowItemReorder Indicates whether items can be reordered by the user.
When set to True, contained tool strip items can be reor-
dered when the user holds down the Alt key and grabs
the item with the mouse.
148 Chapter 4 Tool Strips, Menus, and Events
Table 4-1 Important Properties of the ToolStrip Control
Property Description
AllowMerge Indicates whether this tool strip can be merged with
another tool strip.
CanOverflow Indicates whether tool strip items can be automatically
moved to the overflow button when needed.
Dock Indicates how the tool strip is docked. Although ToolStrip
controls can be free in the form, they are most commonly
docked to one of the form edges.
LayoutStyle Indicates how the controls on the tool strip are laid out. A
value of HorizontalStackWithOverFlow indicates that items
are stacked horizontally and overflow as needed. Vertical-
StackWithOverFlow stacks items vertically and overflows
as needed. StackWithOverflow determines the stack model
appropriate to the Dock property of the tool strip. Flow
allows the items to stack horizontally or vertically as
needed, and Table arranges all of the items flush left.
RenderMode Determines how the tool strip items are rendered. System
uses system settings, Professional indicates a Microsoft
Office–style appearance, and ManagerRenderMode gets
the setting automatically.
ShowItemToolTips Indicates whether tooltips for individual tool strip items
are displayed.
Stretch When hosted in a ToolStripContainer, indicates whether
the tool strip will stretch to the full length of the Tool-
StripPanel.
TextDirection Indicates the direction of the text in controls hosted in the
tool strip.
The StatusStrip control is very similar to the ToolStrip control and can host the same
controls that a ToolStrip control can. The primary differences are in the default setting
for the properties. StatusStrip controls are designed to dock at the bottom of the form
and provide status updates to the user and have default properties set to values that
Lesson 1: Configuring Tool Strips 149
facilitate this functionality. ToolStrip controls are designed for a variety of tool-based
roles and have default values for properties that indicate a more generalized role.
Adding Tool Strip Items to a Tool Strip
At design time, you can add tool strip items to a tool strip by choosing appropriate
items from the drop-down menu in the Designer as shown in Figure 4-1.
Figure 4-1 Adding a tool strip item at design time
The item you choose from the menu will be added to the tool strip, and an instance
of it will be added to your application. You can set properties for the item in the Prop-
erties window and refer to the item in code.
At run time, you can dynamically add items to a tool strip by using the ToolStrip.Items
.Add method. This method allows you to specify a reference to an existing tool strip item
and add it to the toolbar, or it will create and add a new tool strip item when you specify
text or an image. An example is shown here:
' VB
Dim aToolStripItem As ToolStripItem
Dim bToolStripItem As ToolStripItem
aToolStripItem = myToolStrip.Items.Add("New Item")
bToolStripItem = myToolStrip.Items.Add(anImage)
// C#
ToolStripItem aToolStripItem;
ToolStripItem bToolStripItem;
aToolStripItem = myToolStrip.Items.Add("New Item");
bToolStripItem = myToolStrip.Items.Add(anImage);
In this example, a new tool strip item is added when text or an image is specified. When
items are added in this way, the resulting item is always a ToolStripButton object. The