Netframwork 2.0 (phần 2) doc
Bạn đang xem bản rút gọn của tài liệu. Xem và tải ngay bản đầy đủ của tài liệu tại đây (570.78 KB, 50 trang )
25 Lesson 2: Managing Control Layout with Container Controls
The Controls Collection
Each form and container control has a property called Controls, which represents the
collection of controls contained by that form or control. When a control is added to
a form or container control at design time, the Designer automatically adds it to the
controls collection of that form or container control and sets the location property as
appropriate. You can also dynamically add a new control at run time by manually cre-
ating a new control and adding the control to the controls collection.
To Add a Control to a Form or Container Control in the Designer
There are four ways to add a control to a form or container control in the Designer:
■ Drag the control from the Toolbox to the surface of the form or container control.
■ Select a control in the Toolbox, and then draw it on the form with the mouse.
■ Select a control in the Toolbox and double-click the form.
■ Double-click the control in the Toolbox.
To Add a Control to a Form or Container Control at Run Time
To add a control to a form or container control at run time, manually instantiate a new
control and add it to the Controls collection of the form, as shown in the following
example. You must set any properties of the control, such as the Location or Text prop-
erties, before adding it to the controls collection. The following sample code assumes
that you have added a Panel container named Panel1.
' VB
Dim aButton As New Button()
' Sets the relative location in the containing control or form
aButton.Location = New Point(20,20)
aButton.Text = "Test Button"
' Adds the button to a panel called Panel1
Panel1.Controls.Add(aButton)
' Adds the button to a form called Form1
Me.Controls.Add(aButton)
// C#
Button aButton = new Button();
// Sets the relative location in the containing control or form
aButton.Location = new Point(20,20);
aButton.Text = "Test Button";
// Adds the button to a panel called Panel1
Panel1.Controls.Add(aButton);
// Adds the button to a form called Form1
this.Controls.Add(aButton);
26 Chapter 1 Windows Forms and the User Interface
The Anchor Property
The Anchor and Dock properties of a control dictate how it behaves inside its form or
parent control. The Anchor property allows you to define a constant distance between
one or more edges of a control and one or more edges of a form or other container.
Thus, if a user resizes a form at run time, the control edges will always maintain a spe-
cific distance from the edges. The default setting for the Anchor property is Top, Left,
meaning that the top and left edges of the control always maintain a constant distance
from the top and left edges of the form. If the Anchor property were set to Bottom,
Right, for example, the control would “float” when the form was resized to maintain
the constant distance between the bottom and right-hand edges of the form. If oppo-
site properties are set for the Anchor property, such as Top and Bottom, the control will
stretch to maintain the constant distance of the control edges to the form edges.
You can set the Anchor property to any combination of Top, Bottom, Left, Right, or none
of these. In the Properties window, you are presented with a visual interface that aids
in choosing the value for the Anchor property. This interface is shown in Figure 1-6.
Figure 1-6 Choosing the Anchor property
The Dock Property
The Dock property enables you to attach your control to the edge of a parent control.
The parent control can be a form or a container control such as a Panel control or a
TabControl control.
27 Lesson 2: Managing Control Layout with Container Controls
Like the Anchor property, the Dock property provides a special visual interface that allows
you to graphically choose the property value. This interface is shown in Figure 1-7.
Figure 1-7 Choosing the Dock property
To set the Dock property, click the section of the interface that corresponds to where
you want your control to dock. For example, to dock your control to the right-hand
side of the form, click the bar on the right of the interface. To release docking, choose
None. Clicking the center of the Dock property interface sets the Dock property to a
value of Fill, which means the the control will dock to all four sides of the form and fill
the control in which it resides.
The GroupBox Control
The GroupBox control is a container control that appears as a subdivision of the
form surrounded by a border. It does not provide scrollbars, like the Panel control,
nor does it provide any kind of specialized layout capabilities. A GroupBox can have
a caption, which is set by the Text property, or it can appear without a caption when
the Text property is set to an empty string.
The most common use for GroupBox controls is for grouping RadioButton controls.
RadioButton controls placed within a single GroupBox are mutually exclusive but are
not exclusive of other RadioButtons in the form or other GroupBox controls.
RadioButtons will be discussed in greater detail in Chapter 3, “Advanced Windows
28 Chapter 1 Windows Forms and the User Interface
Forms Controls.” Table 1-4 describes Text, the most important unique property of
the GroupBox control.
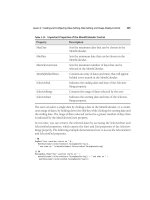
Table 1-4 The Text Property of the GroupBox Control
Property Description
Text Represents the caption of the GroupBox enclosure. If no cap-
tion is desired, this property should be set to an empty string.
The Panel Control
The Panel control creates a subsection of a form that can host other controls. The
Panel can be indistinguishable from the rest of the surrounding form, or it can be sur-
rounded by a border as determined by the BorderStyle property. A Panel can have a
BorderStyle property of None, which indicates no border; FixedSingle, which indicates
a single edge around the Panel; or Fixed3D, which represents a border with a three-
dimensional appearance.
The Panel control is a scrollable control, which means that it supports horizontal and
vertical scroll bars. Controls can be hosted in the Panel outside of its visible bounds.
When the AutoScroll property is set to True, scroll bars will automatically be available
if any controls are placed outside of the visible bounds of the control. If the AutoScroll
property is set to False, controls outside the visible bounds of the panel are inaccessi-
ble. Important properties of the Panel control are shown in Table 1-5.
Table 1-5 Important Properties of the Panel Control
Property Description
AutoScroll Determines if the Panel will display scroll bars when controls
are hosted outside the visible bounds of the Panel. Scroll bars
are displayed when this property is set to True and are not dis-
played when it is set to False.
BorderStyle Represents the visual appearance of the Panel border. This
property can be set to None, which indicates no border;
FixedSingle, which creates a single-line border; or Fixed3D,
which creates a border with a three-dimensional appearance.
29 Lesson 2: Managing Control Layout with Container Controls
The FlowLayoutPanel Control
The FlowLayoutPanel is a subclass of the Panel control. Like the Panel control, it is most
commonly used to create a distinct subsection of the form that hosts related controls.
Unlike the Panel control, however, the FlowLayoutPanel dynamically repositions the
controls it hosts when it is resized at either design time or run time. This provides a
great aid to user interface design because control positions are automatically adjusted as
the size and dimensions of the FlowLayoutPanel are adjusted, and it provides dynamic
realignment of the user interface (much like an HTML page) if the FlowLayoutPanel is
resized at run time.
Like the Panel control, the FlowLayoutPanel control is a scrollable control. Scroll bars
are enabled when AutoScroll is set to True and are disabled when AutoScroll is set to
False.
The default flow direction of the FlowLayoutPanel is from left to right, meaning that
controls placed in the FlowLayoutPanel will locate in the upper left-hand corner and
then flow to the right until they reach the edge of the panel. This behavior is con-
trolled by the FlowDirection property. The FlowDirection property can be set to four
possible values: LeftToRight, which is the default; RightToLeft, which provides flow
from right to left; TopDown, in which the controls flow from the top of the control to
the bottom; and BottomUp, in which controls flow from the bottom to the top of the
FlowLayoutPanel.
Once the end of a row (in the case of LeftToRight and RightToLeft FlowDirections) or
column (in the case of TopDown and BottomUp FlowDirections) is reached, the flow
will wrap or not wrap to the next row or column as determined by the value of the
WrapContents property. If WrapContents is set to True (which is the default), controls
will automatically wrap to the next column or row. If set to False, controls will not
automatically form new rows or columns.
You can manually create breaks in the flow of the controls that are analogous to line
breaks in text. When the WrapContents property of a FlowLayoutPanel control is set to
False, you must manually set flow breaks to manage the flow, but you can also set flow
breaks when WrapContents is set to True if you desire individual breaks. You can set a
flow break on a control by calling the SetFlowBreak method of the FlowLayoutPanel.
30 Chapter 1 Windows Forms and the User Interface
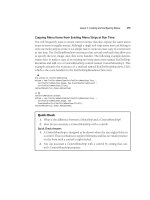
� To set a flow break on a control hosted in a FlowLayoutPanel
1. Set the flow break by using the SetFlowBreak method as shown in the following
example (which assumes a FlowLayoutPanel control named Flp and a Button
named aButton have already been created):
' VB
Flp.SetFlowBreak(aButton, True)
// C#
Flp.SetFlowBreak(aButton, true);
2. Regardless of whether there is room in the FlowLayoutPanel to continue the flow
of controls, a control that has had a flow break set by this method will start a new
row (or column, depending on the value of the FlowDirection property) in the
FlowLayoutPanel.
3. You can query a particular control to determine if it has had a flow break set for
it by calling the GetFlowBreak method as shown in the following example:
' VB
If Flp.GetFlowBreak(aButton) Then
' Continue processing
End If
// C#
if (Flp.GetFlowBreak(aButton))
{ // Continue processing
}
Table 1-6 lists important properties and methods of the FlowLayoutPanel control.
Table 1-6 Important Members of the FlowLayoutPanel Control
Property/Method Description
AutoScroll Property. Determines if the FlowLayoutPanel will
display scroll bars when controls are hosted out-
side the visible bounds of the Panel. Scroll bars are
displayed when set to True and are not displayed
when set to False.
BorderStyle Property. Represents the visual appearance of the
Panel border. It can be set to None, which indicates
no border; FixedSingle, which creates a single-line
border; or Fixed3D which creates a border with a
three-dimensional appearance.
31 Lesson 2: Managing Control Layout with Container Controls
Table 1-6 Important Members of the FlowLayoutPanel Control
Property/Method Description
FlowDirection Property. Determines the direction of flow in the
FlowLayoutPanel. Can be set to LeftToRight, Right-
ToLeft, TopBottom, or BottomUp.
WrapContents Property. Determines whether controls will auto-
matically wrap to the next column or row when
the FlowLayoutPanel is resized.
GetFlowBreak Method. This method returns a Boolean value that
indicates whether a particular control has had a
flow break set.
SetFlowBreak Method. This method sets a flow break on a con-
trol contained in the FlowLayoutPanel.
The TableLayoutPanel Control
Like the FlowLayoutPanel control, the TableLayoutPanel control is a specialized panel
that aids in the design and layout of the user interface. The TableLayoutPanel is essen-
tially a table that provides cells for the individual hosting of controls. Like other pan-
els, it is a scrollable container that provides scroll bars when the AutoScroll property is
set to True.
At design time, the TableLayoutPanel appears on the form as a table of individual cells.
You can drag controls from the Toolbox into each of the cells. Generally, only one con-
trol can be hosted in a single cell although, for complicated user interface designs, you
can nest other container controls inside TableLayoutPanel cells, each of which can
host multiple controls.
At run time, the appearance of the cells is determined by the CellBorderStyle property.
This property can be set to None, which displays no cell lines, or to Single, Inset, Inset-
Double, Outset, OutsetDouble, or OutsetPartial, each of which provides a distinctive
look and feel to the table cells.
The columns and rows of the TableLayoutPanel control are managed by the ColumnStyle
and RowStyle collections. At design time, you can set the styles of the rows and columns
by choosing the ColumnStyles or RowStyles collection in the Property Grid and launch-
ing the Columns And Rows Styles editor, shown in Figure 1-8.
32 Chapter 1 Windows Forms and the User Interface
Figure 1-8 The Columns and Rows Styles editor
You can alter column and row size styles with this editor. Column and row styles can
be set to Absolute, which indicates a fixed size in pixels, or they can be set to Relative,
which indicates a percentage of the size of all columns or rows whose style is set to
Relative. Columns and rows can also be set to AutoSize. When set to this value, the col-
umns and rows will automatically adjust to the correct size.
Column and row styles can also be set manually in code by accessing the ColumnStyles
and RowStyles collections in code. You can access the style for a particular column or
row by the index of that column or row. Styles can be set as shown in the following
example:
' VB
TableLayoutPanel1.ColumnStyles(0).SizeType = SizeType.Absolute
TableLayoutPanel1.ColumnStyles(0).Width = 20
TableLayoutPanel1.RowStyles(0).SizeType = SizeType.Percent
TableLayoutPanel1.RowStyles(0).Height = 50
// C#
TableLayoutPanel1.ColumnStyles[0].SizeType = SizeType.Absolute;
TableLayoutPanel1.ColumnStyles[0].Width = 20;
TableLayoutPanel1.RowStyles[0].SizeType = SizeType.Percent;
TableLayoutPanel1.RowStyles[0].Height = 50;
If you set a row or column style to a size type of anything other than SizeType.Absolute,
you can also set the Width (for columns) or Height (for rows). These values are set in
either pixels or percentages as is appropriate for the SizeType of the ColumnStyle.
33 Lesson 2: Managing Control Layout with Container Controls
When adding new controls to a TableLayoutPanel at run time, you can use either of
two overloads of the TableLayoutPanel.Controls.Add method. The first is the standard
Add method, as follows:
' VB
TableLayoutPanel1.Controls.Add(aButton)
// C#
TableLayoutPanel1.Controls.Add(aButton);
This method simply adds the control to the controls collection of the TableLayoutPanel,
and the control is inserted into the next open cell in the table. If there are no more open
cells, the behavior of the TableLayoutPanel is determined by the value of the GrowStyle
property. If the GrowStyle property is set to AddRows, additional rows will be added to
accommodate new controls. If the GrowStyle property is set to AddColumns, new col-
umns will be added when needed. If the GrowStyle property is set to FixedSize, no new
cells may be added. If you attempt to add a control to a TableLayoutPanel with a
GrowStyle value of FixedSize, an exception will be thrown.
You can also add a control to a specific cell by using the Controls.Add method, as follows:
' VB
TableLayoutPanel1.Controls.Add(aButton,3,3)
// C#
TableLayoutPanel1.Controls.Add(aButton,3,3);
Columns in a TableLayoutPanel are numbers starting at 1, while rows start at 0. Thus,
the example shown above adds aButton to the cell in column 3 at row 3, which is actu-
ally the 3rd column and the 4
th
row the user sees. Note, however, that if a cell is
already occupied by a control, your control might not be added to that cell. Controls
added to cells at design time generally have precedence over controls added at run
time. In these cases, the control is simply added to the next available cell. If you add
the control to a cell that contains another control that has been added at run time, the
cell already in that position will usually be moved down to the next available cell in
favor of the control just added. As always, careful testing is important.
� To add a control to a TableLayoutPanel control at run time
1. Declare and instantiate a new control in code.
34 Chapter 1 Windows Forms and the User Interface
2. Use the TableLayoutPanel.Controls.Add method to add the control. An example
follows:
' VB
Dim aButton As New Button()
' Adds the Button to the next available cell
TableLayoutPanel1.Controls.Add(aButton)
' Adds the Button to a cell at (2,2)
TableLayoutPanel1.Controls.Add(aButton, 2, 2)
// C#
Button aButton = new Button();
// Adds the Button to the next available cell
TableLayoutPanel1.Controls.Add(aButton);
// Adds the Button to a cell at (2,2)
TableLayoutPanel1.Controls.Add(aButton, 2, 2);
Table 1-7 lists important properties and methods of the TableLayoutPanel control.
Table 1-7 Important Members of the TableLayoutPanel Control
Property/Method Description
AutoScroll Property. Determines if the TableLayoutPanel will
display scroll bars when controls are hosted out-
side the visible bounds of the Panel. Scroll bars are
displayed when this property is set to True and are
not displayed when it is set to False.
CellBorderStyle Property. Determines the style of the cell borders.
This property can be set to None, which indicates
no cell borders, or to a variety of different visual
styles.
ColumnCount Property. Indicates the number of columns. You
can add or remove columns by incrementing or
decrementing the ColumnCount property.
Columns Property. Represents the collection of columns.
Available only at design time; accessing this prop-
erty launches the Columns And Rows Styles editor.
ColumnStyles Property. Represents the collection of column
styles. Available only at run time.
35 Lesson 2: Managing Control Layout with Container Controls
Table 1-7 Important Members of the TableLayoutPanel Control
Property/Method Description
GrowStyle Property. Represents how the TableLayoutPanel
grows when new controls are added to it. This
property can be set to AddColumns, AddRows, or
FixedSize.
RowCount Property. Indicates the number of rows. You can
add or remove rows by incrementing or decre-
menting the RowCount property.
Rows Property. Represents the collection of rows. Avail-
able only at design time; accessing this property
launches the Columns And Rows Styles editor.
RowStyles Property. Represents the collection of row styles.
Available only at run time.
Controls.Add Method of the Controls collection. Can be used to
add a control, either to the next available cell or to
a specific cell identified by its column and row
coordinates.
The TabControl Control
The TabControl control enables you to group sets of controls on tabs, rather like files
in a filing cabinet or dividers in a notebook. For example, you might create property
pages for an application in which each page represents the properties of a specific
component. The TabControl serves as a host for one or more TabPage controls, which
themselves contain controls. The user can switch between tab pages (and the controls
contained therein) by clicking the tabs on the TabControl.
The most important property of the TabControl is the TabPages property. TabPage con-
trols are specialized container controls that are hosted only inside TabControl con-
trols. Each TabPage has its own set of properties, and you can access these properties
by editing the TabPages property at design time. This launches the TabPage Collection
Editor as shown in Figure 1-9.
36 Chapter 1 Windows Forms and the User Interface
Figure 1-9 The TabPage Collection Editor
Individual TabPage controls are a lot like Panel controls. They are scrollable controls
and will generate scroll bars as needed if the AutoScroll property is set to True. Individ-
ual TabPage controls also have a Text property, which represents the text that is shown
on the tab that represents this page in the TabControl. Also like Panel controls,
TabPages have a BorderStyle property that can be set to None, FixedSingle, or Fixed3D,
with results similar to those in the the Panel control.
The TabControl has several properties that can be used to customize the look and feel
of the control. The Appearance property controls how the tabs look. This property can
be set to Normal, Buttons, or FlatButtons, each of which generates a different visual
style. The Alignment property determines whether the tabs appear on the Top, Bottom,
Left, or Right of the TabControl. The TabControl also has a property called Multiline,
which indicates if more than one row of tabs is allowed. When set to True, multiple
rows of tabs are supported. When False, only a single row of tabs is allowed. Impor-
tant properties of the TabControl control and TabPage control are shown in Table 1-8
and Table 1-9, respectively.
Table 1-8 Important Properties of the TabControl Control
Property Description
Appearance Determines the visual style of the TabControl.
Alignment Determines whether the tabs appear on the Top, Bottom, Left,
or Right of the TabControl.
37 Lesson 2: Managing Control Layout with Container Controls
Table 1-8 Important Properties of the TabControl Control
Property Description
Multiline Determines whether more than one row of tabs is allowed
on the TabControl.
TabPages Represents the collection of TabPage controls hosted by the
TabControl.
Table 1-9 Important Properties of the TabPage Control
Property Description
AutoScroll Determines if the TabPage will display scroll bars when con-
trols are hosted outside the visible bounds of the Panel.
Scroll bars are displayed when set to True and are not dis-
played when set to False.
BorderStyle Represents the visual appearance of the TabPage border. It
can be set to None, which indicates no border; FixedSingle,
which creates a single-line border; or Fixed3D, which creates
a border with a three-dimensional appearance.
Text Represents the text displayed on the tab in the TabControl
that represents this TabPage.
The SplitContainer Control
The SplitContainer control creates a subsection of the form where a Splitter divides the
SplitContainer into two SplitterPanel controls that function similarly to Panel controls.
The user can grab the Splitter with the mouse and move its location, thus changing the
relative size of each SplitterPanel. The SplitContainer.Dock property is set to Fill by
default because the most common use for SplitContainers is to create divided Windows
Forms.
The SplitContainer exposes its two child SplitterPanel controls through its Panel1 and
Panel2 properties. These properties allow you to access the properties of the con-
tained SplitterPanel controls.
Each SplitterPanel contained by the SplitContainer control functions in basically the
same way as a Panel control. They can host controls and are distinct from the rest of the
38 Chapter 1 Windows Forms and the User Interface
form. They can display scroll bars when the AutoScroll property is set to True. The indi-
vidual SplitterPanel controls of a SplitContainer do not have individual borders, so they
expose no BorderStyle property like standalone Panel controls do, but the SplitContainer
control itself does have a BorderStyle property. Like the BorderStyle property of the Panel
control, this property can be set to None, FixedSingle, or Fixed3D. When the BorderStyle
property is set, it affects the appearance of the Splitter also.
The orientation of the Splitter is determined by the Orientation property. When set to
Vertical, the Splitter stretches from the top to the bottom of the SplitContainer. When
set to Horizontal, the Splitter stretches from left to right.
The FixedPanel property allows you to designate a panel in the SplitContainer that will
remain constant in size if the control is resized. This property can be set to Panel1 so
that only Panel2 will be resized, to Panel2 so that only Panel1 will be resized, or to None
so that both panels will be resized proportionally when the control is resized. Note that
a panel is fixed by the FixedPanel property only in instances when the SplitContainter
control is resized. The user is still able to resize the panels by grabbing and moving the
Splitter with the mouse.
You can disable the ability of the user to move the Splitter by setting the IsSplitterFixed
property. When set to True, the Splitter is fixed in its location and cannot be moved by
the user. You can manually move the Splitter in code by changing the SplitterDistance
property in code. This property represents the distance, in pixels, of the Splitter from the
left edge (when Orientation is Horizontal) or the top edge (when Orientation is Vertical).
You can change the thickness of the Splitter by setting the SplitterWidth property, which
is also represented in pixels.
You can hide one of the panels in a SplitContainer by setting either the Panel1Collapsed
or Panel2Collapsed properties to True. When one of these properties is set to True, the
corresponding panel is collapsed and the other panel expands to fill the SplitContainer.
Note that you cannot set both of these controls to False. For example, if you set
Panel1Collapsed to False when the Panel2Collapsed is already set to False, Panel2Collapsed
will be set to True.
You can set a minimum size for individual panels by setting the Panel1MinSize and
Panel2MinSize properties. These properties represent the minimum number of pixels
to which a panel can be sized. Important properties of the SplitContainer control are
shown in Table 1-10.
39 Lesson 2: Managing Control Layout with Container Controls
Table 1-10
Important Properties of the SplitContainer Control
Property Description
BorderStyle Represents the visual appearance of the TabPage border. It
can be set to None, which indicates no border; FixedSingle,
which creates a single-line border; or Fixed3D, which cre-
ates a border with a three-dimensional appearance.
FixedPanel Represents the panel of the SplitContainer that is fixed in
size. This property can be set to Panel1, Panel2, or None, in
which case, no panel has a fixed size.
IsSplitterFixed Determines whether the location of the Splitter is fixed
and cannot be moved by the user.
Orientation Determines whether the Splitter is oriented horizontally or
vertically in the SplitContainer. It can be set to Horizontal or
Vertical.
Panel1 Exposes the properties of the SplitContainer control’s
SplitterPanel1.
Panel1Collapsed Determines whether SplitterPanel1 is collapsed or regular
size. The panel is collapsed when this property is set to
True.
Panel1MinSize Gets or sets the minimum size for Panel1.
Panel2 Exposes the properties of the SplitContainer control’s
SplitterPanel2.
Panel2Collapsed Determines whether SplitterPanel2 is collapsed or regular
size. Panel is collapsed when this property is set to True.
Panel2MinSize Gets or sets the minimum size for Panel2.
SplitterDistance Represents the distance of the Splitter from either the top
or left edge of the form, depending on the value of the Ori-
entation property.
SplitterWidth Gets or sets the width of the Splitter in pixels.
40 Chapter 1 Windows Forms and the User Interface
Quick Check
1. What is the purpose of the Dock property?
2.
What are Containers and what are they used for?
Quick Check Answers
1. The Dock property allows you to attach a control to one of the sides of the
form, or to fill all available space in the form.
2.
Containers are specialized controls that can be used to host other controls.
They can be used to provide a variety of different control-display layouts.
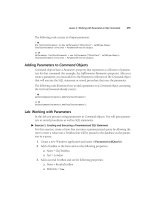
Lab: Practice with Container Controls
In this lab, you will practice using container controls by creating a Windows Form
with a variety of Container controls.
� Exercise: Practice with Container Controls
1. Open Visual Studio and create a new Windows Forms project.
2. From the Toolbox, drag a TabControl to the surface of the Form. In the Property
Grid, set the Dock property to Fill.
3. In the Property Grid, choose the TabPages property to open the TabPages Collec-
tion Editor. Add tab pages until there is a total of four pages. Set the Text properties
of these four TabPage controls to GroupBox, FlowLayoutPanel, TableLayoutPanel,
and SplitContainer, respectively. Click OK.
4. In the form, select the tab labeled GroupBox. From the Toolbox, drag a Group-
Box control onto the surface of the TabPage control.
5. Drag two RadioButton controls into the GroupBox.
6. In the form, select the tab labeled FlowLayoutPanel. From the Toolbox, drag a
FlowLayoutPanel control onto the surface of the TabPage control. Set the Dock
property of the FlowLayoutPanel to Fill.
7. From the Toolbox, add four Button controls to the FlowLayoutPanel.
8. Double-click Button1 and add the following code to the Button1_Click event
handler:
' VB
FlowLayoutPanel1.SetFlowBreak(Button3, True)
41 Lesson 2: Managing Control Layout with Container Controls
// C#
flowLayoutPanel1.SetFlowBreak(button3, true);
9. Select the Designer for the form. In the form, select the tab labeled TableLayout-
Panel. From the Toolbox, add a TableLayoutPanel control to the TabPage. Set the
CellBorderStyle property to Inset and AutoScroll to True.
10. From the Toolbox, add a Button control to the upper left cell of the TableLayout-
Panel.
11. Double-click the Button and add the following code to the Button5_Click event
handler:
' VB
Dim aButton As New Button
TableLayoutPanel1.Controls.Add(aButton, 1, 1)
// C#
Button aButton = new Button();
tableLayoutPanel1.Controls.Add(aButton, 1, 1);
12. In the Designer, choose the SplitContainer tab. From the Toolbox, add a Split-
Container control to this TabPage. Set the BorderStyle property to Fixed3d.
13. From the Toolbox, add two Button controls to Panel1 of the SplitContainer. Set
the Text properties of these buttons to Fix/Unfix Panel1 and Fix/Unfix Splitter.
Resize the buttons as necessary to display the text.
14. Add a Button to Panel2 and set the Text property to Collapse/Uncollapse Panel1.
Resize the button as necessary to display the text.
15. Double-click the button labeled Fix/Unfix Panel1 and add the following code to
the Click event handler:
' VB
If SplitContainer1.FixedPanel = FixedPanel.Panel1 Then
SplitContainer1.FixedPanel = FixedPanel.None
Else
SplitContainer1.FixedPanel = FixedPanel.Panel1
End If
// C#
if (splitContainer1.FixedPanel == FixedPanel.Panel1)
{
splitContainer1.FixedPanel = FixedPanel.None;
}
else splitContainer1.FixedPanel = FixedPanel.Panel1;
16. Double-click the button labeled Fix/Unfix Splitter and add the following code to
the Click event handler:
42 Chapter 1 Windows Forms and the User Interface
' VB
SplitContainer1.IsSplitterFixed = Not SplitContainer1.IsSplitterFixed
// C#
splitContainer1.IsSplitterFixed = !(splitContainer1.IsSplitterFixed);
17. Double-click the button labeled Collapse/Uncollapse Panel1 and add the follow-
ing code to the Click event handler:
' VB
SplitContainer1.Panel1Collapsed = Not SplitContainer1.Panel1Collapsed
// C#
splitContainer1.Panel1Collapsed = !(splitContainer1.Panel1Collapsed);
18. Press F5 to run the application.
19. On the GroupBox tab, alternately select the radio buttons and note that the radio
buttons are automatically exclusive.
20. On the FlowLayoutPanel tab, resize the form with the mouse. Note the automatic
change in layout that occurs. Click Button1 and note the effect of setting a flow
break on Button3.
21. On the TableLayoutPanel tab, click Button5 to observe how new controls are added
to the TableLayoutPanel.
22. On the SplitContainer tab, resize the form and resize each panel by moving the
Splitter. Click each button in turn and observe the effect on the ability of the con-
trol to resize.
Lesson Summary
■ Container controls can be used to group and arrange controls on a form. Con-
tainer controls include Panel, GroupBox, FlowLayoutPanel, TableLayoutPanel, and
SplitContainer controls.
■ GroupBox controls are usually used to group RadioButton controls.
■ Panel controls create distinct subsections of a form. FlowLayoutPanel controls
and TableLayoutPanel controls are derivatives of the Panel that provide added
layout capabilities.
■ The SplitContainer encapsulates two SplitterPanel controls and a Splitter. The
user can resize the panels by grabbing and moving the Splitter.
■ The TabControl control maintains a collection of TabPage controls that each func-
tion similarly to individual panels. Each tab page can be selected at run time by
choosing the corresponding tab that is displayed on the edge of the tab control.
43 Lesson 2: Managing Control Layout with Container Controls
Lesson Review
You can use the following questions to test your knowledge of the information in this
lesson. The questions are also available on the companion CD if you prefer to review
them in electronic form.
NOTE Answers
Answers to these questions and explanations of why each answer choice is correct or incorrect are
located in the “Answers” section at the end of the book.
1. Which of the following code samples correctly demonstrates how to set a flow
break on a control named aButton in a FlowLayoutPanel named FLPanel1?
A.
' VB
aButton.SetFlowBreak()
// C#
aButton.SetFlowBreak();
B. ' VB
aButton.SetFlowBreak(FLPanel1)
// C#
aButton.SetFlowBreak(FLPanel1);
C. ' VB
FLPanel1.SetFlowBreak(aButton)
// C#
FLPanel1.SetFlowBreak(aButton);
D. ' VB
FLPanel1.aButton.SetFlowBreak
// C#
FLPanel1.aButton.SetFlowBreak();
2. You are designing an application that includes a property page that enables the
user to set properties of the application. These properties are divided into three
categories: Appearance, Execution, and Memory Management. Which container
control represents the best starting point for the user interface?
A. TableLayoutPanel
B. FlowLayoutPanel
C. GroupBox
D. TabControl
44 Chapter 1 Windows Forms and the User Interface
3. Which of the following is the correct way to add a control to a form at design
time? (Choose all that apply.)
A. Select a control in the Toolbox and double-click the form.
B. Select a control in the Toolbox and draw the form with the mouse.
C. Double-click the control in the Toolbox.
D. Select the control in the Toolbox and drag it to the form.
4. Which of the following code samples demonstrates the correct way to add a But-
ton control to a form named Form1 at run time?
A.
' VB
Form1.Controls.Add(Button)
// C#
Form1.Controls.Add(Button);
B. ' VB
Dim aButton As New Button
Form1.Controls.Add(aButton)
// C#
Button aButton = new Button();
Form1.Controls.Add(aButton);
C. ' VB
Dim aButton As New Button
Form1.Add(aButton)
// C#
Button aButton = new Button();
Form1.Add(aButton);
D. ' VB
Form1.Add(New Button)
// C# Form1.Add(new Button);
5. Which code sample correctly demonstrates how to add a new panel to a Split-
Container named SpC1?
A.
' VB
SpC1.Controls.Add(New Panel)
// C#
SpC1.Controls.Add(new Panel());
B. ' VB
SpC1.Controls.Add(New SplitterPanel)
// C#
SpC1.Controls.Add(new SplitterPanel());
Lesson 2: Managing Control Layout with Container Controls 45
C.
D.
' VB
SpC1.Add(New SplitterPanel)
// C#
SpC1.Add(new SplitterPanel());
' VB
None of the above
// C#
None of the above
46 Chapter 1 Review
Chapter Review
To further practice and reinforce the skills you learned in this chapter, you can per-
form the following tasks:
■ Review the chapter summary.
■ Review the list of key terms introduced in this chapter.
■ Complete the case scenarios. These scenarios set up real-world situations involv-
ing the topics of this chapter and ask you to create a solution.
■ Complete the suggested practices.
■ Take a practice test.
Chapter Summary
■ The form is the basic building block of Windows Forms applications. Forms
provide a variety of properties that can be used to affect the appearance of the
user interface, including Text, BorderStyle, Size, Opacity, and the behavior of the
user interface, such as WindowState and TopMost.
■ Forms are generally rectangular, but non-rectangular forms can be created by
setting the Region property to a non-rectangular region.
■ Container controls can host and help manage layout of individual controls.
■ The SplitContainer control can be used to create dynamically sizable sections of
a form, each of which contains its own controls.
■ Controls can be added to a form at design time by selecting a control from the
toolbox or dynamically at run time.
Key Terms
Do you know what these key terms mean? You can check your answers by looking up
the terms in the glossary at the end of the book.
■ container control
■ control
■ toolbox
47 Chapter 1 Review
Case Scenarios
In the following case scenario, you will apply what you’ve learned about Windows
forms and the user interface. You can find answers to these questions in the “Answers”
section at the end of this book.
Case Scenario 1: Designing a User Interface
You are a Windows Forms developer recently hired by Adventure Works to create an
internal Windows Forms application. This application is to be an administrator ver-
sion of a highly successful Web site that uses frames for navigational purposes and
presents a complex user interface with several controls and images. Your job is to
make the look and feel of the Microsoft Windows application user interface match the
Web site experience as closely as possible. What are some possible strategies that
could be used to design this user interface (UI)?
Case Scenario 2: Designing a Web Browser
Adventure Works has asked you be part of the team that will create a Web browser for
their internal site. The .NET control WebBrowser will be used for the actual Web
browsing functionality. One of the primary demands for the user interface is the abil-
ity to have only a single instance of the application running but to be able to have mul-
tiple Web pages open that the user can rapidly switch between without having to
navigate back and forth. How might you use container controls to design this aspect
of the user interface?
Suggested Practices
To master the “Add and Configure a Windows Form” objective, complete the follow-
ing tasks.
Add a Windows Form to a Project at Design Time
For this task, complete Practice 1.
■ Practice 1 Create a custom form that appears as an ellipse at run time. This form
should contain functionality that allows the user to close it at run time.
48 Chapter 1 Review
Configure a Windows Form to Control Accessibility, Appearance,
Behavior, Configuration, Data, Design, Focus, Layout, Style, and Other
Functionality
For this task, complete Practices 1, 2, and 3.
■ Practice 1 Create an application that enables the user to create new instances of
a form by clicking a button.
■ Practice 2 Create an application that enables the user to resize the form and
change visual properties of the form such as BorderStyle and Opacity. Set the
startup form to always be on top of the user interface and to start in the upper
left-hand corner of the screen.
■ Practice 3 Create a multiform application and set the second form to be the star-
tup form. Set the startup form to be maximized at startup.
Manage Control Layout on a Windows Form
For this task, complete Practice 1.
■ Practice 1 Create an application that uses the GroupBox, Panel, TabControl,
FlowLayoutPanel, TableLayoutPanel, and SplitContainer controls to arrange the
layout of controls on a form.
Take a Practice Test
The practice tests on this book’s companion CD offer many options. For example, you
can test yourself on just the content covered in this chapter, or you can test yourself on
all the 70-526 certification exam content. You can set up the test so that it closely sim-
ulates the experience of taking a certification exam, or you can set it up in study mode
so that you can look at the correct answers and explanations after you answer each
question.
MORE INFO Practice tests
For details about all the practice test options available, see the “How to Use the Practice Tests” sec-
tion in this book’s Introduction.
Chapter 2
Configuring Controls and Creating
the User Interface
This chapter explores, in depth, how to configure controls and create the user inter-
face. Controls are graphical components that provide reproducible functionality that
can be used to create a consistent user interface experience over several applications.
Microsoft Visual Studio 2005 provides controls for information display, data input,
user interaction, and a variety of other specialized tasks.
In this chapter, you will learn general procedures for manipulating controls in your
application, and you will learn about the specific properties of command and text
display controls. In Chapter 3, “Advanced Windows Forms Controls,” you will learn
about value-setting controls, list-based controls, and other advanced Windows
Forms controls.
Exam objectives in this chapter:
■ Add and configure a Windows Forms control.
❑ Configure controls on a Windows Form at design time to optimize the user
interface (UI).
❑ Modify control properties.
❑ Configure controls in a Windows Form at run time to ensure that the UI
complies with best practices.
❑ Create and configure command controls on a Windows Form.
❑ Create and configure text edit controls on a Windows Form.
❑ Create and configure text display controls on a Windows Form.
❑ Use the LinkLabel control to add Web-style links to Windows Forms
applications.
49