Highway Bridge Loads and Load Distribution doc
Bạn đang xem bản rút gọn của tài liệu. Xem và tải ngay bản đầy đủ của tài liệu tại đây (573.14 KB, 13 trang )
Hida, S.E. "Highway Bridge Loads and Load Distribution."
Bridge Engineering Handbook.
Ed. Wai-Fah Chen and Lian Duan
Boca Raton: CRC Press, 2000
© 2000 by CRC Press LLC
6
Highway Bridge Loads
and Load Distribution
6.1 Introduction
6.2 Permanent Loads
6.3 Vehicular Live Loads
Design Vehicular Live Load • Permit Vehicles • Fatigue
Loads • Load Distribution for Superstructure
Design • Load Distribution for Substructure Design •
Multiple Presence of Live-Load Lanes • Dynamic
Load Allowance • Horizontal Loads Due to
Vehicular Traffic
6.4 Pedestrian Loads
6.5 Wind Loads
6.6 Effects Due to Superimposed Deformations
6.7 Exceptions to Code-Specified Design Loads
6.1 Introduction
This chapter deals with highway bridge loads and load distribution as specified in the AASHTO
Load and Resistance Factor Design (LRFD) Specifications [1]. Stream flow, ice loads, vessel collision
loads, loads for barrier design, loads for anchored and mechanically stabilized walls, seismic forces,
and loads due to soil–structure interaction will be addressed in subsequent chapters. Load combi-
nations are discussed in Chapter 5.
When proceeding from one component to another in bridge design, the controlling load and the
controlling factored load combination will change. For example, permit vehicles, factored and
combined for one load group, may control girder design for bending in one location. The standard
design vehicular live load, factored and combined for a different load group, may control girder
design for shear in another location. Still other loads, such as those due to seismic events, may
control column and footing design.
Note that in this chapter, superstructure refers to the deck, beams or truss elements, and any
other appurtenances above the bridge soffit. Substructure refers to those components that support
loads from the superstructure and transfer load to the ground, such as bent caps, columns, pier
walls, footings, piles, pile extensions, and caissons. Longitudinal refers to the axis parallel to the
direction of traffic. Transverse refers to the axis perpendicular to the longitudinal axis.
Susan E. Hida
California Department
of Transportation
© 2000 by CRC Press LLC
6.2 Permanent Loads
The LRFD Specification refers to the weights of the following as “permanent loads”:
• The structure
• Formwork which becomes part of the structure
• Utility ducts or casings and contents
•Signs
• Concrete barriers
• Wearing surface and/or potential deck overlay(s)
• Other elements deemed permanent loads by the design engineer and owner
• Earth pressure, earth surcharge, and downdrag
The permanent load is distributed to the girders by assigning to each all loads from superstructure
elements within half the distance to the adjacent girder. This includes the dead load of the girder
itself and the soffit, in the case of box girder structures. The dead loads due to concrete barrier,
sidewalks and curbs, and sound walls, however, may be equally distributed to all girders.
6.3 Vehicular Live Loads
The design vehicular live load was replaced in 1993 because of heavier truck configurations on the
road today, and because a statistically representative, notional load was needed to achieve a “con-
sistent level of safety.” The notional load that was found to best represent “exclusion vehicles,” i.e.,
trucks with loading configurations greater than allowed but routinely granted permits by agency
bridge rating personnel, was adopted by AASHTO and named “Highway Load ’93” or HL93. The
mean and standard deviation of truck traffic was determined and used in the calibration of the load
factors for HL93. It is notional in that it does not represent any specific vehicle [2].
The distribution of loads per the LRFD Specification is more complex than in the Standard
Specifications for Highway Bridge Design [3]. This change is warranted because of the complexity
in bridges today, increased knowledge of load paths, and technology available to be more rational
in performing design calculations. The end result will be more appropriately designed structures.
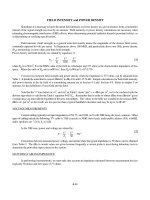
6.3.1 Design Vehicular Live Load
The AASHTO “design vehicular live load,” HL93, is a combination of a “design truck” or “design
tandem” and a “design lane.” The design truck is the former Highway Semitrailer 20-ton design
truck (HS20-44) adopted by AASHO (now AASHTO) in 1944 and used in the previous Standard
Specification. Similarly, the design lane is the HS20 lane loading from the AASHTO Standard
Specifications. A shorter, but heavier, design tandem is new to AASHTO and is combined with the
design lane if a worse condition is created than with the design truck. Superstructures with very short
spans, especially those less than 12 m in length, are often controlled by the tandem combination.
The AASHTO design truck is shown in Figure 6.1. The variable axle spacing between the 145 kN
loads is adjusted to create a critical condition for the design of each location in the structure. In
the transverse direction, the design truck is 3 m wide and may be placed anywhere in the standard
3.6-m-wide lane. The wheel load, however, may not be positioned any closer than 0.6 m from the
lane line, or 0.3 m from the face of curb, barrier, or railing.
The AASHTO design tandem consists of two 110-kN axles spaced at 1.2 m on center. The
AASHTO design lane loading is equal to 9.3 N/mm and emulates a caravan of trucks. Similar to
the truck loading, the lane load is spread over a 3-m-wide area in the standard 3.6-m lane. The lane
loading is not interrupted except when creating an extreme force effect such as in “patch” loading
of alternate spans. Only the axles contributing to the extreme being sought are loaded.
© 2000 by CRC Press LLC
When checking an extreme reaction at an interior pier or negative moment between points of
contraflexure in the superstructure, two design trucks with a 4.3-m spacing between the 145-kN
axles are to be placed on the bridge with a minimum of 15 m between the rear axle of the first truck
and the lead axle of the second truck. Only 90% of the truck and lane load is used. This procedure
differs from the Standard Specification which used shear and moment riders.
6.3.2 Permit Vehicles
Most U.S. states have developed their own “Permit Design Vehicle” to account for vehicles routinely
granted permission to travel a given route, despite force effects greater than those due the design
truck, i.e., the old HS20 loading. California uses anywhere from a 5- to 13-axle design vehicle as
shown in Figure 6.2 [4]. Some states use an HS25 design truck, the configuration being identical
to the HS20 but axle loads 25% greater.
The permit vehicular live load is combined with other loads in the Strength Limit State II as
discussed in Chapter 5. Early editions of the AASHTO Specifications expect the design permit vehicle
to be preceded and proceeded by a lane load. Furthermore, adjacent lanes may be loaded with the
new HL93 load, unless restricted by escort vehicles.
6.3.3 Fatigue Loads
For fatigue loading, the LRFD Specification uses the design truck alone with a constant axle spacing
of 9 m. The load is placed to produce extreme force effects. In lieu of more exact information, the
frequency of the fatigue load for a single lane may be determined by multiplying the average daily
truck traffic by
p,
where
p
is 1.00 in the case of one lane available to trucks, 0.85 in the case of two
lanes available to trucks, and 0.80 in the case of three or more lanes available to trucks. If the average
daily truck traffic is not known, 20% of the average daily traffic may be used on rural interstate
bridges, 15% for other rural and urban interstate bridges, and 10% for bridges in urban areas.
6.3.4 Load Distribution for Superstructure Design
Figure 6.3 summarizes load distribution for design of longitudinal superstructure elements. Load
distribution tables and the “lever rule” are approximate methods and intended for most designs.
FIGURE 6.1
AASHTO-LRFD design truck. (AASHTO LRFD Bridge Design Specifications 2nd. ed., American
Association of State Highway and Transportation Officials. Washington, D.C., 1998. With permission.)
© 2000 by CRC Press LLC
The lever rule considers the slab between two girders to be simply supported. The reaction is
determined by summing the reactions from the slabs on either side of the beam under consideration.
“Refined analysis” refers to a three-dimensional consideration of the loads and is to be used on
more complex structures. In other words, classical force and displacement, finite difference, finite
element, folded plate, finite strip, grillage analogy, series/harmonic, or yield line methods are
required to obtain load effects for superstructure design.
Note that, by definition of the vehicular design live load, no more than one truck can be in one
lane simultaneously, except as previously described to generate maximum reactions or negative
moments. After forces have been determined from the longitudinal load distribution and the
longitudinal members have been designed, the designer may commence load distribution in the
transverse direction for deck and substructure design.
6.3.4.1 Decks
Decks may be designed for vehicular live loads using empirical methods or by distributing loads
on to “effective strip widths” and analyzing the strips as continuous or simply supported beams.
FIGURE 6.2
Caltrans permit truck. (AASHTO LRFD Bridge Design Specifications 2nd. ed., American Association
of State Highway and Transportation Officials. Washington, D.C., 1998. With permission.)
© 2000 by CRC Press LLC
Empirical methods rely on transfer of forces by arching of the concrete and shifting of the neutral
axis. Loading is discussed in Chapter 24, Bridge Decks and Approach Slabs.
6.3.4.2 Beam–Slab Bridges
Approximate methods for load distribution on beam–slab bridges are appropriate for the types of
cross sections shown in Table 4.6.2.2.1-1 of the AASHTO LRFD Specification. Load distribution
FIGURE 6.3
Live-load distribution for superstructure design.
© 2000 by CRC Press LLC
factors, generated from expressions found in AASHTO LRFD Tables 4.6.2.2.2a–f and 4.6.2.2.3a–c,
result in a decimal number of lanes and are used for girder design. Three-dimensional effects are
accounted for. These expressions are a function of beam area, beam width, beam depth, overhang
width, polar moment of inertia, St. Venant’s torsional constant, stiffness, beam span, number of
beams, number of cells, beam spacing, depth of deck, and deck width. Verification was done using
detailed bridge deck analysis, simpler grillage analyses, and a data set of approximately 200 bridges
of varying type, geometry, and span length. Limitations on girder spacing, span length, and span
depth reflect the limitations of this data set.
The load distribution factors for moment and shear at the obtuse corner are multiplied by skew
factors as shown in Tables 6.1 and 6.2, respectively.
6.3.4.3 Slab-Type Bridges
Cast-in-place concrete slabs or voided slabs, stressed wood decks, and glued/spiked wood panels
with spreader beams are designed for an equivalent width of longitudinal strip per lane for both
shear and moment. That width,
E
(mm), is determined from the formula:
(6.1)
when one lane is loaded, and
(6.2)
when more than one lane is loaded.
L
1
is the lesser of the actual span or 18,000 mm,
W
1
is the lesser
of the edge-to-edge width of bridge and 18,000 mm in the case of single-lane loading, and
18,000 mm in the case of multilane loading, and
N
L
is the numbr of design lanes.
6.3.5 Load Distribution for Substructure Design
Bridge substructure includes bent caps, columns, pier walls, pile caps, spread footings, caissons,
and piles. These components are designed by placing one or more design vehicular live loads on
the traveled way as previously described for maximum reaction and negative bending moment, not
exceeding the maximum number of vehicular lanes permitted on the bridge. This maximum may
be determined by dividing the width of the traveled way by the standard lane width (3.6 m), and
“rounding down,” i.e., disregarding any fractional lanes. Note that (1) the traveled way need not be
TABLE 6.1
Reduction of Load Distribution Factors for Moment in Longitudinal Beams on Skewed Supports
Type of Superstructure
Applicable
Cross Section from
Table 4.6.2.2.1-1
Any Number of
Design Lanes Loaded
Range of
Applicability
Concrete deck, filled grid, or
partially filled grid on steel or
concrete beams, concrete
T-beams, or double T-sections
a, e, k 30
°
≤
θ
≤
60
°
1100
≤
S
≤
4900
i, j, if sufficiently
connected to act as
a unit
if
θ
< 30
°
, then
c
1
= 0
if
θ
> 60
°
, use
θ
= 60
°
6000
≤
L
≤
73,000
N
b
≥
4
Concrete deck on concrete spread
box beams, concrete box beams,
and double T-sections used in
multibeam decks
b, c, f, g 1.05 – 0.25 tan
θ
≤
1.0
if
θ
> 60
°
, use
θ
= 60
°
0
≤
θ
≤
60
°
Source
: AASHTO LRFD Bridge Design Specifications, 2nd. ed., American Association of State Highway and
Transportation Officials. Washington, D.C., 1998. With permission.
1
1
15
−
()
c tan
.
θ
c
K
Lt
S
L
g
s
1
3
025
025
025=
.
.
.
ELW=+250 0 42
11
.
ELWWN
L
=+ ≤2100 0 12
11
.
© 2000 by CRC Press LLC
measured from the edge of deck if curbs or traffic barriers will restrict the traveled way for the life
of the structure and (2) the fractional number of lanes determined using the previously mentioned
load distribution charts for girder design is not used for substructure design.
Figure 6.4 shows selected load configurations for substructure elements. A critical load configuration
may result from not using the maximum number of lanes permissible. For example, Figure 6.4a shows
a load configuration that may generate the critical loads for bent cap design and Figure 6.4b shows a
load configuration that may generate the critical bending moment for column design. Figure 6.4c shows
a load configuration that may generate the critical compressive load for design of the piles. Other load
configurations will be needed to complete design of a bridge footing. Note that girder locations are
often ignored in determination of substructure design moments and shears: loads are assumed to be
transferred directly to the structural support, disregarding load transfer through girders in the case of
beam–slab bridges. Adjustments are made to account for the likelihood of fully loaded vehicles occurring
side-by-side simultaneously. This “multiple presence factor” is discussed in the next section.
In the case of rigid frame structures, bending moments in the longitudinal direction will also be
needed to complete column (or pier wall) as well as foundation designs. Load configurations which
generate these three cases must be checked:
1. Maximum/minimum axial load with associated transverse and longitudinal moments;
2. Maximum/minimum transverse moment with associated axial load and longitudinal moment;
3. Maximum/minimum longitudinal moment with associated axial load and transverse moment.
TABLE 6.2
Correction Factors for Load Distribution Factors for Support Shear of the Obtuse Corner
Type of Superstructue
Applicable Cross
Section from
Table 4.6.2.2.1-1 Correction Factor
Range of
Applicability
Concrete deck, filled grid, or partially filled grid
on steel or concrete beams, concrete
T-beams or double T-sections
a, e, k
i, j, if sufficiently
connected to act
as a unit
—0
°
≤
θ
≤
60
°
1100
≤
S
≤
4900
6000
≤
L
≤
73,000
N
b
≥
4
Multicell concrete box beams, box sections d 0
°
≤
θ
≤
60
°
1800
≤
S
≤
4000
6000
≤
L
≤
73000
900
≤
d
≤
2700
N
b
≥
3
Concrete deck on spread concrete box beams b, c 0
°
≤
θ
≤
60
°
1800
≤
S
≤
3500
6000
≤
L
≤
43,000
450
≤
d
≤
1700
N
b
≥
3
Concrete box beams used in multibeam decks f, g 0
°
≤
θ
≤
60
°
6000
≤
L
≤
37,000
430
≤
d
≤
1500
900
≤
b
≤
1500
5
≤
N
b
≤
20
Source
: AASHTO LRFD Bridge Design Specifications, 2nd. ed., American Association of State Highway and
Transportation Officials. Washington, D.C., 1998. With permission.
10 20
3
03
. . tan
.
+
Lt
K
s
g
θ
10 025
70
. . tan++
L
d
θ
10
6
. tan+
Ld
S
θ
10
90
.
tan
+
L
d
θ
© 2000 by CRC Press LLC
If a permit vehicle is also being designed for, then these three cases must also be checked for the
load combination associated with Strength Limit State II (discussed in Chapter 5).
6.3.6 Multiple Presence of Live-Load Lanes
Multiple presence factors modify the vehicular live loads for the probability that vehicular live loads
occur together in a fully loaded state. The factors are shown in Table 6.3.
These factors should be applied prior to analysis or design only when using the lever rule or
doing three-dimensional modeling or working with substructures. Sidewalks greater than 600 mm
can be treated as a fully loaded lane. If a two-dimensional girder line analysis is being done and
distribution factors are being used for a beam-and-slab type of bridge, multiple presence factors
are not used because the load distribution factors already consider three-dimensional effects. For
the fatigue limit state, the multiple presence factors are also not used.
6.3.7 Dynamic Load Allowance
Vehicular live loads are assigned a “dynamic load allowance” load factor of 1.75 at deck joints, 1.15
for all other components in the fatigue and fracture limit state, and 1.33 for all other components
and limit states. This factor accounts for hammering when riding surface discontinuities exist, and
long undulations when settlement or resonant excitation occurs. If a component such as a footing
is completely below grade or a component such as a retaining wall is not subject to vertical reactions
from the superstructure, this increase is not taken. Wood bridges or any wood component is factored
at a lower level, i.e., 1.375 for deck joints, 1.075 for fatigue, and 1.165 typical, because of the energy-
absorbing characteristic of wood. Likewise, buried structures such as culverts are subject to the
dynamic load allowance but are a function of depth of cover,
D
E
(mm):
FIGURE 6.4 Various load configurations for substructure design.
TABLE 6.3 Multiple Presence Factors
Number of Loaded Lanes Multiple Presence Factors m
1 1.20
2 1.00
3 0.85
>3 0.65
Source: AASHTO LRFD Bridge Design Specifications, 2nd.
ed., American Association of State Highway and Transporta-
tion Officials. Washington, D.C., 1998. With permission.
© 2000 by CRC Press LLC
(6.3)
6.3.8 Horizontal Loads Due to Vehicular Traffic
Substructure design of vertical elements requires that horizontal effects of vehicular live loads be
designed for. Centrifugal forces and braking effects are applied horizontally at a distance 1.80 m
above the roadway surface. The centrifugal force is determined by multiplying the design truck or
design tandem — alone — by the following factor:
(6.4)
Highway design speed, v, is in m/s; gravitational acceleration, g, is 9.807 m/s
2
; and radius of curvature
in traffic lane, R, is in m. Likewise, the braking force is determined by multiplying the design truck
or design tandem from all lanes likely to be unidirectional in the future, by 0.25. In this case, the
lane load is not used because braking effects would be damped out on a fully loaded lane.
6.4 Pedestrian Loads
Live loads also include pedestrians and bicycles. The LRFD Specification calls for a 3.6 × 10
–3
MPa
load simultaneous with highway loads on sidewalks wider than 0.6 m. “Pedestrian- or bicycle-only”
bridges are to be designed for 4.1 × 10
–3
MPa. If the pedestrian- or bicycle-only bridge is required
to carry maintenance or emergency vehicles, these vehicles are designed for, omitting the dynamic
load allowance. Loads due to these vehicles are infrequent and factoring up for dynamic loads is
inappropriate.
6.5 Wind Loads
The LRFD Specification provides wind loads as a function of base design wind velocity, V
B
equal
to 100 mph; and base pressures, P
B
, corresponding to wind speed V
B.
Values for P
B
are listed in
Table 6.4. The design wind pressure, P
D
, is then calculated as
(6.5)
where V
DZ
is the design wind velocity at design elevation Z in km/h. V
DZ
is a function of the friction
velocity, V
0
(km/h), multiplied by the ratio of the actual wind velocity to the base wind velocity
both at 10 m above grade, and the natural logarithm of the ratio of height to a meteorological
constant length for given surface conditions:
TABLE 6.4 Base Wind Pressures, P
B
, corresponding to V
B
= 160 km/h
Structural Component Windward Load, MPa Leeward Load, MPa
Trusses, columns, and arches 0.0024 0.0012
Beams 0.0024 NA
Large flat surfaces 0.0019 NA
Source: AASHTO LRFD Bridge Design Specifications, 2nd. ed., American
Association of State Highway and Transportation Officials. Washington,
D.C., 1998. With permission.
IM D
E
=−× ≥
−
4010 41 10 0
4
(. . ) %
C
v
gR
=
4
3
2
PP
V
V
P
V
DB
DZ
B
B
DZ
=
=
2
2
25 600,
© 2000 by CRC Press LLC
(6.6)
Values for V
0
and Z
0
are shown in Table 6.5.
The resultant design pressure is then applied to the surface area of the superstructure as seen in
elevation. Solid-type traffic barriers and sound walls are considered as part of the loading surface.
If the product of the resultant design pressure and applicable loading surface depth is less than a
lineal load of 4.4 N/mm on the windward chord, or 2.2 N/mm on the leeward chord, minimum
loads of 4.4 and 2.2 N/mm, respectively, are designed for.
Wind loads are combined with other loads in Strength Limit States III and V, and Service Limit
State I, as defined in Chapter 5. Wind forces due to the additional surface area from trucks is
accounted for by applying a 1.46 N/mm load 1800 mm above the bridge deck.
Wind loads for substructure design are of two types: loads applied to the substructure and those
applied to the superstructure and transmitted to the substructure. Loads applied to the superstruc-
ture are as previously described. A base wind pressure of 1.9 × 10
–3
MPa force is applied directly to
the substructure, and is resolved into components (perpendicular to the front and end elevations)
when the structure is skewed.
In absence of live loads, an upward load of 9.6 × 10
–4
MPa is multiplied by the width of the
superstructure and applied at the windward quarter point simultaneously with the horizontal wind
loads applied perpendicular to the length of the bridge. This uplift load may create a worst condition
for substructure design when seismic loads are not of concern.
6.6 Effects Due to Superimposed Deformations
Elements of a structure may change size or position due to settlement, shrinkage, creep, or temper-
ature. Changes in geometry cause additional stresses which are of particular concern at connections.
Determining effects from foundation settlement are a matter of structural analysis. Effects due to
shrinkage and creep are material dependent and the reader is referred to design chapters elsewhere
TABLE 6.5 Values of V
o
and Z
o
for Various Upstream
Surface Conditions
Condition Open Country Suburban City
V
o
(km/h) 13.2 15.2 19.4
Z
o
(mm) 70 300 800
Source: AASHTO LRFD Bridge Design Specifications,
2nd. ed., American Association of State Highway and
Transportation Officials. Washington, D.C., 1998. With
permission.
TABLE 6.6 Temperature Ranges, °C
Climate Steel or Aluminum Concrete Wood
Moderate –18 to 50 –12 to 27 –12 to 24
Cold –35 to 50 –18 to 27 –18 to 24
Source: AASHTO LRFD Bridge Design Specifications,
2nd. ed., American Association of State Highway and
Transportation Officials. Washington, D.C., 1998. With
permission.
VV
V
V
Z
Z
DZ
B
=
25
0
10
0
.ln
© 2000 by CRC Press LLC
in this book. Temperature effects are dependent on the maximum potential temperature differential
from the temperature at time of erection. Upper and lower bounds are shown in Table 6.6, where
“moderate” and “cold” climates are defined as having fewer or more than 14 days with an average
temperature below 0°C, respectively.
By using appropriate coefficients of thermal expansion, effects from temperature changes are
calculated using basic structural analysis. More-refined analysis will consider the time lag between
the surface and internal structure temperatures. The LRFD Specification identifies four zones in
the United States and provides a linear relationship for the temperature gradient in steel and
concrete. See Table 6.7 and Figures 6.5 and 6.6.
6.7 Exceptions to Code-Specified Design Loads
The designer is responsible not only for providing plans that accommodate design loads per the
referenced Design Specifications, but also for any loads unique to the structure and bridge site. It
is also the designer’s responsibility to indicate all loading conditions designed for in the contract
documents — preferably the construction plans. History seems to indicate that the next generation
of bridge engineers will indeed be given the task of “improving” today’s new structure. Therefore,
the safety of future generations depends on today’s designers doing a good job of documentation.
TABLE 6.7 Basis of Temperature Gradients
Concrete 50 mm Asphalt 100 mm Asphalt
Zone T
1
(°C) T
2
(°C) T
1
(°C) T
2
(°C) T
1
(°C) T
2
(°C)
1 30 7.8 24 7.8 17 5
2 25 6.7 20 6.7 14 5.5
3 236 186 136
4 215 165 126
Source: AASHTO LRFD Bridge Design Specifications, 2nd. ed.,
American Association of State Highway and Transportation Officials.
Washington, D.C., 1998. With permission.
FIGURE 6.5 Solar radiation zones for the United States. (AASHTO LRFD Bridge Design Specifications 2nd. ed.,
American Association of State Highway and Transportation Officials. Washington, D.C., 1998. With permission.)
© 2000 by CRC Press LLC
References
1. AASHTO, LRFD Bridge Design Specifications 2nd. ed., American Association of State Highway
and Transportation Officials. Washington, D.C., 1998.
2. FHWA Training Course, LRFD Design of Highway Bridges, Vol. 1, 1993.
3. AASHTO, American Association of State Highway and Transportation Officials, Washington,
D.C. Officials, Standard Specifications for Highway Bridges, 16th ed., 1996, as amended by the
Interim Specifications.
4. Caltrans, Bridge Design Specifications, California Department of Transportation, Sacramento, CA,
1999.
FIGURE 6.6 Positive vertical temperature gradient in concrete and steel superstructures. (AASHTO LRFD Bridge
Design Specifications 2nd. ed., American Association of State Highway and Transportation Officials. Washington,
D.C., 1998. With permission.)