giáo trình Java By Example phần 5 ppt
Bạn đang xem bản rút gọn của tài liệu. Xem và tải ngay bản đầy đủ của tài liệu tại đây (166.44 KB, 66 trang )
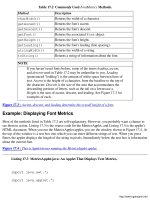
Table 17.2 Commonly Used FontMetrics Methods.
Method Description
charWidth()
Returns the width of a character.
getAscent()
Returns the font's ascent.
getDescent()
Returns the font's descent.
getFont() Returns the associated Font object.
getHeight()
Returns the font's height.
getLeading()
Returns the font's leading (line spacing).
stringWidth()
Returns the width of a string.
toString()
Returns a string of information about the font.
NOTE
If you haven't used fonts before, some of the terms-leading, ascent,
and descent-used in Table 17.2 may be unfamiliar to you. Leading
(pronounced "ledding") is the amount of white space between lines of
text. Ascent is the height of a character, from the baseline to the top of
the character. Descent is the size of the area that accommodates the
descending portions of letters, such as the tail on a lowercase g.
Height is the sum of ascent, descent, and leading. See Figure 17.3 for
examples of each.
Figure 17.3 : Ascent, descent, and leading determine the overall height of a font.
Example: Displaying Font Metrics
Most of the methods listed in Table 17.2 are self-explanatory. However, you probably want a chance to
see them in action. Listing 17.3 is the source code for the MetricsApplet, and Listing 17.4 is the applet's
HTML document. When you run the MetricsApplet applet, you see the window shown in Figure 17.4. At
the top of the window is a text box into which you can enter different strings of text. When you press
Enter, the applet displays the length of the string in pixels. Immediately below the text box is information
about the current font.
Figure 17.4 : This is Appletviewer running the MetricsApplet applet.
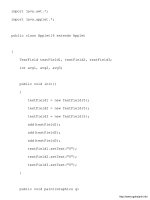
Listing 17.3 MetricsApplet.java: An Applet That Displays Text Metrics.
import java.awt.*;
import java.applet.*;
o
public class MetricsApplet extends Applet
{
TextField textField;
public void init()
{
textField = new TextField(20);
add(textField);
textField.setText("Default string");
}
public void paint(Graphics g)
{
Font font = getFont();
FontMetrics fontMetrics = g.getFontMetrics(font);
int n = fontMetrics.getLeading();
String leading = String.valueOf(n);
n = fontMetrics.getAscent();
String ascent = String.valueOf(n);
n = fontMetrics.getDescent();
String descent = String.valueOf(n);
n = fontMetrics.getHeight();
String height = String.valueOf(n);
o
String s = textField.getText();
n = fontMetrics.stringWidth(s);
String width = String.valueOf(n);
g.drawString("FONT INFO:", 55, 60);
g.drawString("Leading: " + leading, 70, 80);
g.drawString("Ascent: " + ascent, 70, 95);
g.drawString("Descent: " + descent, 70, 110);
g.drawString("Height: " + height, 70, 125);
g.drawString("STRING INFO:", 55, 155);
g.drawString("Width: " + width, 70, 175);
}
public boolean action(Event event, Object arg)
{
repaint();
return true;
}
}
Listing 17.4 METRICSAPPLET.htmL: MetricsApplet's HTML Document.
o
<title>Applet Test Page</title>
<h1>Applet Test Page</h1>
<applet
code="MetricsApplet.class"
width=200
height=200
name="MetricsApplet">
</applet>
NOTE
Because all of the applets you've written so far in this book haven't
used text metrics when displaying text, you may wonder why you
even need to bother with this stuff. Chances are that when you're
running your applets under Windows 95 using the default font,
everything will work fine. But remember that your applets may run
on machines using other operating systems, and their default fonts
may not be exactly the same size. Also, when you create your own
fonts, you may not know the resultant font's size exactly. In order to
position text accurately, you need to use font metrics, as you'll see
later in this chapter.
Creating Fonts
You may think an applet that always uses the default font is boring to look at. In many cases, you'd be
right. An easy way to spruce up an applet is to use different fonts. Luckily, Java enables you to create
and set fonts for your applet. You do this by creating your own font object, like this:
Font font = new Font("TimesRoman", Font.PLAIN, 20);
The constructor for the Font class takes three arguments: the font name, style, and size. The style can be
any combination of the font attributes that are defined in the Font class. Those attributes are
Font.PLAIN, Font.BOLD, and Font.ITALIC.
o
Example: Creating a Font with Multiple Styles
Although you can create fonts with the plain, bold, or italic styles, you may at times need to combine font
styles. Suppose, for example, that you wanted to use both bold and italic styles. The line
Font font = new Font("Courier", Font.BOLD + Font.ITALIC, 18);
gives you an 18-point bold italic Courier font. (A point is a measurement of a font's height and is equal to
1/72 of an inch.)
Using the Font
After you've created the font, you have to tell Java to use the font. You do this by calling the Graphics
class's setFont() method, like this:
g.setFont(font);
At this point, the next text you display in your applet will use the new font. However, although you
request a certain type and size of font, you can't be sure of what you'll get. The system tries its best to
match the requested font, but you still need to know at least the size of the font with which you ended up.
You can get all the information you need by creating a FontMetrics object, like this:
FontMetrics fontMetrics = g.getFontMetrics(font);
To get the height of a line of text, call the FontMetrics object's getHeight() method, like this:
int height = fontMetrics.getHeight();
CAUTION
When creating a font, be aware that the user's system may not have a
particular font loaded. In that case, Java chooses a default font as a
replacement. This possible font substitution is a good reason to use
methods like Font.getName() in order to see whether you got the
font you wanted. You especially need to know the size of the font, so
you can be sure to position your text lines properly.
o
Example: Displaying Different Sized Fonts
You wouldn't create a font unless you had some text to display. The problem is that before you can
display your text, you need to know at least the height of the font. Failure to consider the font's height
may give you text lines that overlap or that are spaced too far apart. You can use the height returned from
the FontMetrics class's getHeight() method as a row increment value for each line of text you
need to print. Listing 17.5, which is the source code for the FontApplet2 applet, shows how this is done.
Listing 17.6 is the applet's HTML document, and Figure 17.5 shows what the applet looks like.
Figure 17.5 : This is Appletviewer running the FontApplet2 applet.
Listing 17.5 FontApplet2.java: Displaying Different Sized Fonts.
import java.awt.*;
import java.applet.*;
public class FontApplet2 extends Applet
{
TextField textField;
public void init()
{
textField = new TextField(10);
add(textField);
textField.setText("32");
}
public void paint(Graphics g)
{
o
String s = textField.getText();
int height = Integer.parseInt(s);
Font font = new Font("TimesRoman", Font.PLAIN, height);
g.setFont(font);
FontMetrics fontMetrics = g.getFontMetrics(font);
height = fontMetrics.getHeight();
int row = 80;
g.drawString("This is the first line.", 70, row);
row += height;
g.drawString("This is the second line.", 70, row);
row += height;
g.drawString("This is the third line.", 70, row);
row += height;
g.drawString("This is the fourth line.", 70, row);
}
public boolean action(Event event, Object arg)
{
repaint();
return true;
}
o
}
Listing 17.6 FONTAPPLET2.htmL: FontApplet2's HTML Document.
<title>Applet Test Page</title>
<h1>Applet Test Page</h1>
<applet
code="FontApplet2.class"
width=400
height=200
name="FontApplet2">
</applet>
When you run FontApplet2, you see the window shown in Figure 17.5. The size of the active font is
shown in the text box at the top of the applet, and a sample of the font appears below the text box. To
change the size of the font, type a new value into the text box and press Enter. Figure 17.6, for example,
shows the applet displaying 12-point font, whereas Figure 17.7 is the applet displaying 120-point
characters. As you can see, no matter what font size you choose, the lines are properly spaced (although
large fonts overrun the boundaries of the applet's canvas).
Figure 17.6 : FontApplet2 can display any size characters you like. This is 12-point text.
Figure 17.7 : This is FontApplet2 displaying 120-point text.
The spacing of the lines is accomplished by first creating a variable to hold the vertical position for the
next line of text:
int row = 80;
Here, the program not only declares the row variable, but also initializes it with the vertical position of
the first row of text.
o
The applet then prints the first text line, using row for drawString()'s third argument:
g.drawString("This is the first line.", 70, row);
In preparation for printing the next line of text, the program adds the font's height to the row variable:
row += height;
Each line of text is printed, with row being incremented by the font's height in between, like this:
g.drawString("This is the second line.", 70, row);
row += height;
g.drawString("This is the third line.", 70, row);
Summary
In regular Windows programming, creating and using fonts is a meticulous and frustrating experience.
Java, however, simplifies this task by offering the Font and FontMetrics classes. With just a few
method calls, you can create the fonts you need for your applet. Displaying text with any font is as easy
setting the font as the current font and getting the font's size. The font's height is especially important
because a font's height determines the line spacing you must use. After you've created and set the font,
any text you display will use the new font.
Review Questions
What method of the Graphics class do you call to get the active font?1.
What method of the Font class do you call to get a font's name?2.
What method of the Font class do you call to get a font's height?3.
Why is it important to determine the height of the current font?4.
How do you get a reference to a FontMetrics object?5.
When would you use a FontMetrics object to obtain information about a font instead of using
the Font object?
6.
How can you determine the width of an entire text string?7.
When referring to fonts, what is a point?8.
o
Define the terms ascent, descent, baseline, and leading.9.
How does a font's height relate to ascent, descent, and leading?10.
How do you create and use a new font?11.
What happens if the font you request is not available on the user's system?12.
Review Exercises
Write an applet that displays three lines of text using the 16-point Helvetica font. Use the height
returned from the Font class's getHeight() method to space your lines of text.
1.
Modify the applet you created in exercise 1 to display bold text.2.
Modify exercise 2's applet so that it uses a FontMetric object to determine the font's height.3.
Write an applet called FontApplet3 that provides a button that the user can click in order to switch
between the Courier, TimesRoman, and Helvetica fonts. The final applet should look like Figure
17.8, displaying the text using the selected font with a height of 32 points and using the bold style.
Figure 17.9 shows what the applet looks like when the user has clicked the button and switched to
the TimesRoman font. (You can find the solution to this problem in the CHAP17 folder of this
book's CD-ROM.
4.
Figure 17.8 : This is FontApplet3 displaying the Courier font.
Figure 17.9 : Here's FontApplet3 displaying the TimesRoman font.
o
Chapter 16
Drawing Graphics
CONTENTS
The Applet's Canvas●
Example: Using the Coordinate System●
Drawing Shapes●
Example: Drawing a Rectangle●
Example: Drawing Other Shapes●
Understanding the ShapeApplet Applet
Drawing Ovals❍
Drawing Arcs❍
Example: Drawing Arcs in an Applet❍
Drawing Polygons❍
●
Summary●
Review Questions●
Review Exercises●
Almost all applets need to create some sort of display, whether that display is as simple as a line of text
or as sophisticated as an animation sequence. Because Windows is a graphical system, everything you
see on the screen during a Windows session is displayed graphically. This is true even of text. Because of
its graphical nature, a system like Java's must include the capability to handle device-independent
graphics. In this chapter, you see not only how you can display various graphical shapes, but also how to
query the system about the characteristics of the display.
The Applet's Canvas
Every applet has an area of the screen, called the canvas, in which it can create its display. The size of an
applet's canvas depends on the size of the applet, which is in turn controlled by the parameters included
in an HTML document's <applet> tag. Generally, the larger the applet appears in the HTML
document, the larger the applet's visible canvas. Anything that you try to draw outside of the visible
canvas doesn't appear on the screen.
You draw graphical images on the canvas by using coordinates that identify pixel locations. Chances are
o
good that you've had some sort of computer-graphics experience before Java, so you know that the
coordinates that define pixel locations on a computer screen can be organized in various ways. Windows,
for example, supports a number of different mapping modes that determines how coordinates are
calculated in a window.
Thankfully, Java does away with the complications of displaying graphics in a window by adopting a
single coordinate system. This coordinate system has its origin (point 0,0) in the upper-left corner, with
the X axis increasing to the right, and the Y axis increasing downward, as shown in Figure 16.1.
Figure 16.1 : An applet's canvas uses the typical computer-display coordinate system.
Example: Using the Coordinate System
When you want to draw something on an applet's canvas, you use the coordinate system shown in Figure
16.1. This coordinate system situates the system's origin in the applet's upper-left corner, just as it's
shown in Figure 16.1. For example, Figure 16.2 shows an applet displaying a single line in its canvas.
This line was drawn starting at coordinates 5,10, as shown in Figure 16.3.
Figure 16.2 : This applet displays a single line.
Figure 16.3 : The line in Figure 16.2 is drawn at the coordinates 5,10.
Drawing Shapes
Java's Graphics class includes methods for drawing many different types of shapes, everything from
straight lines to polygons. You were introduced to the Graphics class in Part II of this book when you
displayed text in an applet's paint() method. As you may recall, a reference to a Graphics object is
passed to the paint() method as its single argument. Because the Graphics class is part of the awt
package, you have to include one of the following lines at the top of your applet's code to use the class:
import java.awt.Graphics
import java.awt.*
The first line in the preceding imports only the Graphics class, whereas the second line imports all the
classes included in the awt package. Table 16.1 lists the most commonly used drawing methods in the
Graphics class.
Table 16.1 Drawing Methods of the Graphics Class.
Method Description
clearRect()
Erases a rectangular area of the canvas.
copyArea()
Copies a rectangular area of the canvas to another area.
o
drawArc()
Draws a hollow arc.
drawLine()
Draws a straight line.
drawOval()
Draws a hollow oval.
drawPolygon()
Draws a hollow polygon.
drawRect()
Draws a hollow rectangle.
drawRoundRect()
Draws a hollow rectangle with rounded corners.
drawString()
Displays a text string.
fillArc()
Draws a filled arc.
fillOval()
Draws a filled oval.
fillPolygon()
Draws a filled polygon.
fillRect()
Draws a filled rectangle.
fillRoundRect()
Draws a filled rectangle with rounded corners.
getColor()
Retrieves the current drawing color.
getFont()
Retrieves the currently used font.
getFontMetrics()
Retrieves information about the current font.
setColor()
Sets the drawing color.
setFont()
Sets the font.
To draw a shape in an applet's display area, you only need to call the appropriate method and supply the
arguments required by the method. These arguments are based on the coordinates at which you want to
draw the shape. For example, the following code example draws a straight line from coordinate 5,10 to
20,30:
g.drawLine(5, 10, 20, 30);
The g in the preceding code line is the Graphics object passed to the paint() method. As you can
see, the drawLine() method takes four arguments, which are X,Y coordinate pairs that specify the
starting and ending points of the line.
TIP
There may be times when you need to retrieve information about the
system's currently set graphical attributes. Java's Graphics class
supplies methods like getColor(), getFont(), and
getFontMetrics() to enable you to obtain this information.
o
Example: Drawing a Rectangle
Most of the shape-drawing methods are as easy to use as the drawLine() method is. Suppose that you
want to write an applet that draws a filled rounded rectangle inside a hollow rectangle. You'd then add
calls to the Graphics class's fillRoundRect() and drawRect() to the applet's paint()
method. Listing 16.1 is just such an applet, whereas Listing 16.2 is the HTML document that displays the
applet. Figure 16.4 shows the applet running under Appletviewer.
Figure 16.4 : This is RectApplet running under Appletviewer.
Listing 16.1 RECTAPPLET.JAVA: Drawing Rectangles.
import java.awt.*;
import java.applet.*;
public class RectApplet extends Applet
{
public void paint(Graphics g)
{
g.drawRect(35, 15, 125, 200);
g.fillRoundRect(50, 30, 95, 170, 15, 15);
}
}
Listing 16.2 RECTAPPLET.htmL: HTML Document for RectApplet.
<title>Applet Test Page</title>
<h1>Applet Test Page</h1>
o
<applet
code="RectApplet.class"
width=200
height=250
name="RectApplet">
</applet>
In RectApplet's paint() method, you can see the method calls that produce the graphical display. The
first line creates the outside rectangle. That method call looks like this:
g.drawRect(35, 15, 125, 200);
The drawRect() method's four arguments are the X,Y coordinates of the rectangle's upper-left corner
and the width and height of the rectangle. The rounded filled rectangle is almost as easy to draw:
g.fillRoundRect(50, 30, 95, 170, 15, 15);
The first four arguments of the fillRoundRect() method are the same as those for the
drawRect() method. The fifth and sixth arguments are the size of the rectangle that represents the
rounded corners. Think of this rectangle as being placed on each corner of the main rectangle and a
curved line drawn between its corners, as shown in Figure 16.5.
Figure 16.5 : The coordinates for the rounded corners are given as the width and height of the rectangle
that encloses the rounded corner.
Example: Drawing Other Shapes
Some shapes you can draw with the Graphics class are more complex than others. For example, the
drawArc() method requires six arguments in order to draw a simple curved line. To see how drawing
other shapes works, you'll now create the ShapeApplet applet, which enables you to switch from one
shape to another in the applet's display. Listing 16.3 is ShapeApplet's source code. Figures 16.6 and 16.7
show what the applet looks like running under the Appletviewer application.
Figure 16.6 : This is what ShapeApplet looks like when it first runs.
o
Figure 16.7 : This is ShapeApplet displaying an oval.
Listing 16.3 ShapeApplet.java: An Applet That Draws Various Shapes.
import java.awt.*;
import java.applet.*;
public class ShapeApplet extends Applet
{
int shape;
Button button;
public void init()
{
shape = 0;
button = new Button("Next Shape");
add(button);
}
public void paint(Graphics g)
{
int x[] = {35, 150, 60, 140, 60, 150, 35};
int y[] = {50, 80, 110, 140, 170, 200, 230};
int numPts = 7;
o
switch(shape)
{
case 0:
g.drawLine(35, 50, 160, 230);
break;
case 1:
g.drawRect(35, 50, 125, 180);
break;
case 2:
g.drawRoundRect(35, 50, 125, 180, 15, 15);
break;
case 3:
g.drawOval(35, 50, 125, 180);
break;
case 4:
g.drawArc(35, 50, 125, 180, 90, 180);
break;
case 5:
g.drawPolygon(x, y, numPts);
break;
case 6:
g.fillPolygon(x, y, numPts);
o
break;
}
}
public boolean action(Event event, Object arg)
{
++shape;
if (shape == 7)
shape = 0;
repaint();
return true;
}
}
Tell Java that the applet uses the classes in the awt package.
Tell Java that the applet uses the classes in the applet package.
Derive the ShapeApplet class from Java's Applet class.
Declare the class's shape data field.
Declare the class's button data field.
Override the init() method.
Initialize the shape counter.
Create the applet's Button object.
Add the Button object to the applet.
Override the paint() method.
Initialize the X and Y coordinates for the polygons.
Initialize the polygon point count.
Display a shape based on the value of the shape counter.
Override the action() method.
Increment the shape counter.
Reset the shape counter if it has reached its maximum value.
Force the applet to repaint its canvas with the next shape.
Tell Java that the method executed okay.
o
To run ShapeApplet, use the HTML document shown in Listing 16.2, except change all occurrences of
RectApplet to ShapeApplet. When you run the applet with Appletviewer, you see the window shown in
Figure 16.6. To change the shape displayed in the applet's canvas, click the Next Shape button.
Understanding the ShapeApplet Applet
You don't need to concern yourself at this point with the button control that ShapeApplet uses to switch
shapes, except to know that just like the TextField controls you've been using, clicking the button
causes Java to call the applet's action() method. The action() method increments the shape
counter, shape, and tells the applet to redraw itself. In the paint() method, the value of shape is
used in a switch statement to determine which shape gets drawn. You learned about switch
statements back in Chapter 9 "The if and switch Statements."
Drawing Ovals
The real meat of this program are the calls to the Graphics object's various shape-drawing methods.
You already know about the first three: drawLine(), drawRect(), and drawRoundRect(). The
call to drawOval(), however, is new and looks like this:
g.drawOval(35, 50, 125, 180);
As you can see, this method, which draws ovals and circles, takes four arguments. These arguments are
the X,Y coordinates, width, and height of a rectangle that can enclose the oval. Figure 16.8 shows how
the resultant oval relates to its enclosing rectangle.
Figure 16.8 : An oval's coordinates are actually the coordinates of an enclosing rectangle.
Drawing Arcs
Next in paint() is the drawArc() method, which is the most complicated (at least, from an
understanding point of view) of the shape-drawing methods. The call to drawArc() looks like this:
g.drawArc(35, 50, 125, 180, 90, 180);
The first four arguments are the same as the arguments for drawOval(): the X,Y coordinates, width,
and height of the enclosing rectangle. The last two arguments are the angle at which to start drawing the
arc and the number of degrees around the arc to draw.
To understand all this angle nonsense, take a look at figure 16.9, which shows how Java relates the arc's
starting angle to the degrees of an oval. In the preceding example call to drawArc(), the fifth argument
is 90, which means Java starts drawing the arc, within the arc's enclosing rectangle, at the 90-degree
o
point. The sixth argument of 180 tells Java to draw around the arc 180 degrees (or halfway around the
full 360 degrees). It doesn't mean that the ending point should be at the 180-degree point. Figure 16.10
shows the resultant arc.
Figure 16.9 : The degrees of an oval start on the right side and travel counter-clockwise around the arc.
Figure 16.10 : The arc shown here starts at the 90-degree point and sweeps 180 degrees around the arc.
Example: Drawing Arcs in an Applet
Because understanding the angles involved in drawing arcs can be a little confusing, in this example
you'll create an applet called ArcApplet that enables you to enter different values for drawArc()'s fifth
and sixth arguments and immediately see the results. Listing 16.4 is the source code for the applet. Use
Listing 16.2 to create ArcApplet's HTML document, by changing each occurrence of RectApplet to
ArcApplet.
Listing 16.4 ARCAPPLET.JAVA: An Arc-Drawing Applet.
import java.awt.*;
import java.applet.*;
public class ArcApplet extends Applet
{
TextField textField1, textField2;
public void init()
{
textField1 = new TextField(10);
textField2 = new TextField(10);
add(textField1);
add(textField2);
o
textField1.setText("0");
textField2.setText("360");
}
public void paint(Graphics g)
{
String s = textField1.getText();
int start = Integer.parseInt(s);
s = textField2.getText();
int sweep = Integer.parseInt(s);
g.drawArc(35, 50, 125, 180, start, sweep);
}
public boolean action(Event event, Object arg)
{
repaint();
return true;
}
}
o
Tell Java that the applet uses the classes in the awt package.
Tell Java that the applet uses the classes in the applet package.
Derive the ArcApplet class from Java's Applet class.
Declare the class's TextField objects.
Override the init() method.
Create the two TextField objects.
Add the TextField objects to the applet.
Set the text for the TextField objects.
Override the paint() method.
Get the starting angle and convert it to an integer.
Get the sweep angle and convert it to an integer.
Display the selected arc.
Override the action() method.
Force the applet to repaint its canvas with the next shape.
Tell Java that the method executed okay.
When you run ArcApplet using Appletviewer, you see the window shown in Figure 16.11. (Looks kind
of like a guy with shifty eyes and a big nose, doesn't it?) Because the starting angle (in the first text box)
is 0 and the drawing degrees (the second box) is 360, the arc is actually a full oval. By changing the
values in the two boxes and pressing Enter, you can cause the applet to display different arcs. For
example, Figure 16.12 shows an arc that has a starting angle of 120 degrees and drawing degrees of 245.
Figure 16.11 : This is ArcApplet at startup.
Figure 16.12 : You can use ArcApplet to experiment with different arc angle settings.
NOTE
Most of the shape-drawing methods come in two versions, one that
draws a hollow shape and one that draws a filled shape. The method
that draws the filled shape has the same name as the one that draws
the hollow shape, except you change the word draw in the name to
fill. For example, because drawArc() draws a hollow arc, the
method fillArc() draws a filled arc.
Drawing Polygons
Polygons are simply many-sided shapes. For example, a triangle is a polygon (it is, in fact, the simplest
polygon). Squares, rectangles, and hexagons are all polygons, as well. Because a polygon comprises
many different lines, before you can draw a polygon in Java, you need to create arrays that contain the
X,Y coordinates for each line in the polygon. In Listing 16.3, ShapeApplet defines those arrays like this:
int x[] = {35, 150, 60, 140, 60, 150, 35};
int y[] = {50, 80, 110, 140, 170, 200, 230};
o
int numPts = 7;
The first array, called x[] in the preceding, is the X coordinates for each X,Y pair, and the second array,
called y[], is the Y coordinates for each X,Y pair. By looking at the values defined in the arrays, you
can see that the first line gets drawn from 35,50 to 150,80. Because all the lines in a polygon are
connected, Java can continue drawing lines by using the previous ending point (in this case, 150,80) and
the next coordinate pair, which is 60,110. Java will continue to work through the arrays until it uses all
the given coordinates. The actual method call that draws the polygon looks like this:
g.drawPolygon(x, y, numPts);
The drawPolygon() method's three arguments are the array holding the X coordinates, the array
holding the Y coordinates, and the number of points defined in the arrays. You can use a literal value for
the third argument, but it's often handy to define a variable as shown in the example (numPts). Then, if
you change the arrays, you can change the variable at the same time and not have to worry about
correcting any method calls that use the arrays along with point count.
Figure 16.13 shows the polygon drawn by the values given in the x[] and y[] arrays in the preceding.
Looks more like a squiggly line than a polygon. That's because when you draw a hollow polygon, Java
doesn't connect the starting and ending point. If you draw a filled polygon, though, you'll see that the
connecting side is really there, as shown in Figure 16.14.
Figure 16.13 : A hollow polygon is always missing one side.
Figure 16.14 : A filled polygon actually looks like a polygon instead of a squiggly line.
NOTE
If you need more control over your polygons, Java includes a
Polygon class from which you can create polygon objects from the
coordinate arrays. The Polygon class includes handy methods that
enable you to add points to a polygon, determine whether a point is
inside the polygon, and retrieve the polygon's bounding rectangle.
You create a Polygon object with a line like Polygon polygon
= new Polygon(x, y, numPts). The arguments for the
class's constructor are the same as those for the drawPolygon()
method. The Polygon class's public methods are addPoint(x,
y), getBoundingBox() (which returns a Rectangle object),
and inside() (which returns a boolean value).
o
Summary
Java's Graphics class enables you to draw many types of shapes, including lines, rectangles, ovals, and
arcs. You can use these shape-drawing methods to enhance the appearance of your applets, drawing
frames around objects, and even putting together simple illustrations. In addition, you can set the drawing
color used by the Graphics class, as well as query the system for its current graphics settings. In the
next chapter, you add to your graphics knowledge by learning how to create, manipulate, and display
graphical text.
Review Questions
What do you call the area of an applet in which you can draw?1.
How is Java's graphical coordinate system organized?2.
What is the difference in the shapes drawn by the drawRect() and fillRect() methods?3.
What are the four arguments for the drawRect() method?4.
How do the arguments for the drawRoundRect() method differ from the arguments for
drawRect()?
5.
Why does the drawPolygon() method require that you set up arrays of coordinates?6.
What are the six arguments required by the drawArc() method?7.
Why would you want to use the polygon class?8.
Review Exercises
Write the code needed to draw a 100´200 rectangle at the coordinates 50,75.1.
Write an applet that displays a square inside a circle.2.
Write an applet that enables the user to choose the width, height, and location of a rectangle. The
applet should display the rectangle at the given coordinates.
3.
Modify the ArcApplet applet so that the user can select not only the arc's drawing points, but also
the size of the arc's bounding rectangle.
4.
Write an applet called FaceApplet that displays a face made from ovals and arcs. The final applet
should look like Figure 16.15. (You can find the solution to this problem in the CHAP16 folder of
this book's CD-ROM.)
Figure 16.15 : This is what FaceApplet should look like when running under Appletviewer.
5.
o
Chapter 9
The if and switch Statements
CONTENTS
Controlling Program Flow●
Program Flow and Branching●
The if statement
Example: The Form of an if Statement❍
Multiple if Statements❍
Multiple-Line if Statements❍
The else Clause❍
Example: Using the if Statement in a Program❍
●
The switch Statement
Example: Using the break Statement Correctly❍
Example: Using the switch Statement in a Program❍
●
Summary●
Review Questions●
Review Exercises●
In previous chapters, you've learned a lot about the way Java works. You now know how to type and compile
programs, how to input and output simple data, how to perform mathematical operations, and how to perform
comparisons using logical expressions. But these techniques are merely the building blocks of a program. To
use these building blocks in a useful way, you have to understand how computers make decisions.
In this chapter, you learn how your programs can analyze data in order to decide what parts of your program
to execute. Until now, your applets have executed their statements in strict sequential order, starting with the
first line of a method and working, line by line, to the end of the method. Now it's time to learn how you can
control your program flow-the order in which the statements are executed-so that you can do different things
based on the data your program receives.
Controlling Program Flow
Program flow is the order in which a program executes its statements. Most program flow is sequential,
meaning that the statements are executed one by one in the order in which they appear in the program or
method. However, there are Java commands that make your program jump forward or backward, skipping
over program code not currently required. These commands are said to control the program flow.
o