macbook for dummies phần 6 doc
Bạn đang xem bản rút gọn của tài liệu. Xem và tải ngay bản đầy đủ của tài liệu tại đây (1.47 MB, 42 trang )
Building the Cinematic Basics
Time to dive in and add the building blocks to create your movie. Along with
video clips, audio tracks, and still images, you can add Hollywood-quality
transitions, optical effects, and animated text titles. In this section, I demon-
strate how to elevate your collection of video clips into a real-life furshlug-
giner movie.
Adding clips to your movie
You can add clips to your movie using the clip viewer or the timeline viewer.
The Dynamic Duo work like this:
ߜ Clip viewer: This displays your clips and still images. Each clip that you
add occupies the same space. This is a great view for rearranging the
clips and still images in your movie.
ߜ Timeline viewer: This displays clips with relative sizes. The length of
each clip in the timeline viewer is relative to the duration of the scene.
(In plain English, a 60-second clip that you add to the timeline viewer
appears half the length of a 120-second clip.)
200
Part IV: Living the iLife
Narration the easy way
Ready to create that award-winning nature
documentary? You can add voice-over narration
to your iMovie HD project that would make
Jacques Cousteau proud. In fact, you can
record your voice as you watch your movie
playing, allowing perfect synchronization with
the action! To add narration, follow these steps:
1. If you’re not already using the timeline
viewer, click the clips viewer/timeline
viewer switch.
2. Drag the playhead in the timeline viewer to
the point where the narration should begin.
3. Click the Media button on the Tools palette.
4. Click the Audio button.
5. Click the Play button in the monitor play-
back controls.
6. Click the Record button in the Audio pane.
You can monitor the volume level of your
voice with the Microphone meter.
7. Watch the video while you narrate, so that
you can coordinate your narration track
with the action.
8. Click Stop in the Audio pane.
iMovie HD adds your recorded audio in the
timeline viewer. If you need to try again,
press Delete to remove the audio clip and
repeat the steps.
20_04859X ch13.qxp 7/20/06 10:38 PM Page 200
To add a clip to your movie
1. Click the Clips button on the Tools palette to display the Clips pane.
2. Drag the desired clip from the Clips pane to the spot where it belongs
in either viewer.
Do this several times, and you have a movie, just like the editors of old used
to do with actual film clips. This is a good point to mention a moviemaking
Mark’s Maxim:
Preview your work — and do it often.
Use the View Fullscreen playback button under the monitor to watch your
project while you add content. If you’ve ever watched directors at work on
today’s movie sets, they’re constantly watching a monitor to see what things
will look like for the audience. You have the same option in iMovie HD!
Removing clips from your movie
Don’t like a clip? Bah. To banish a clip from your movie:
1. Click the clip in the viewer to select it.
2. Press Delete.
The clip disappears, and iMovie HD automatically rearranges the
remaining clips and still images in your movie.
If you remove the wrong clip, don’t panic. Instead, use iMovie HD’s Undo fea-
ture (press Ô+Z) to restore it.
Deleting clips for good
iMovie HD has its own separate trash system (different from Mac OS X trash).
It’s located at the bottom of the application window. If you decide that you
don’t need a clip or still image and you want to delete it from your iMovie HD
project completely, drag the media item from either the Clips pane or from
either viewer and drop it on top of the Trash icon. (Note that deleting a clip
or still image from iMovie HD does not delete it from your hard drive.)
To delete the contents of the iMovie HD trash, choose File➪Empty Trash. To
display the contents of the iMovie HD trash, click the Trash icon; to retrieve
an item that you suddenly decide you still need, drag the item back into the
viewer.
201
Chapter 13: Making Film History with iMovie HD
20_04859X ch13.qxp 7/20/06 10:38 PM Page 201
Reordering clips in your movie
If Day One of your vacation appears after Day Two, you can easily reorder
your clips and stills by dragging them to the proper space in the clip viewer.
When you release the mouse, iMovie HD automatically moves the rest of your
movie aside with a minimum of fuss and bother.
Editing clips in iMovie HD
If a clip has extra seconds of footage at the beginning or end, you don’t want
that superfluous stuff in your masterpiece. Our favorite video editor gives
you the following functions:
ߜ Crop: Deletes everything from the clip except a selected region
ߜ Split: Breaks a single clip into multiple clips
ߜ Trim: Deletes a selected region from the clip
Before you can edit, however, you have to select a section of a clip:
1. Click a clip in the Clips pane to display it in the monitor.
2. Drag the playback head on the scrubber bar (that blue bar below the
monitor) to the beginning of the section that you want to select.
3. Shift-click anywhere on the scrubber bar to the right of the starting
point.
The selected region turns yellow when you select it. You’re ready to edit
that selected part of the clip.
Note the handles that appear at the beginning or ending of the selection. You
can make fine changes to the selected section by dragging them.
ߜ To crop: Choose Edit➪Crop. Everything but the selected region is
removed.
ߜ To split: Choose Edit➪Split Video Clip at Playhead. The clip is divided
into two clips.
ߜ To trim: Choose Edit➪Clear. The selected section disappears.
202
Part IV: Living the iLife
20_04859X ch13.qxp 7/20/06 10:38 PM Page 202
Adding transitions
Many iMovie HD owners approach transitions as visual bookends: They merely
act as placeholders that appear between video clips. Nothing could be further
from the truth because judicious use of transitions can make or break a scene.
For example, which would you prefer after a wedding ceremony — an abrupt,
jarring cut to the reception or a gradual fadeout to the reception?
Today’s audiences are sensitive to transitions between scenes. Try not to
overuse the same transition. Also weigh the visual impact of a transition
carefully.
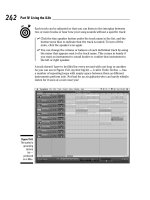
iMovie HD includes a surprising array of transitions, including old favorites
(such as Fade In and Dissolve) and some nifty stuff you may not be familiar
with (such as Billow and Disintegrate). To display your transition collection,
click the Editing button on the Tools palette and then click the Transitions
button in the upper right of the screen, as shown in Figure 13-5.
Scrubber bar
Figure 13-5:
Add
transitions
for flow
between
clips in
iMovie HD.
203
Chapter 13: Making Film History with iMovie HD
20_04859X ch13.qxp 7/20/06 10:38 PM Page 203
To see what a particular transition looks like, click it in the list to display the
transition in the monitor. (If things move too fast, slow down the preview
with the speed slider, which appears at the bottom of the Transition list.)
Adding a transition couldn’t be easier: Drag the transition from the list in
the Transitions pane and drop it between clips or between a clip and a still
image. In iMovie HD 6, transitions are usually applied in real time — however,
if you’re working with an older laptop, the transition may take a few seconds
to render. (If rendering time is required, iMovie HD displays a red progress
bar in the viewer to indicate how much longer rendering will take.)
Oh, we got effects!
iMovie HD offers a number of fun visual effects that you can add to your
clips and stills. These aren’t the full-blown visual effects of the latest
science-fiction blockbuster, but then again, your movie already stars
Uncle Humphrey, and most people would consider him a special effect.
For example, to immediately change a clip (or your entire movie) into an old
classic, you can choose the Aged Film or Sepia effect to add that antique
look.
To view the effects, click the Editing button on the Tools palette, and then click
the Video FX button at the top of the screen. Click an effect from the list in the
pane (see Figure 13-6) to display the options you can customize for that partic-
ular effect. The settings you can change vary for each effect, but most include
the Effect In and Effect Out sliders, which allow you to gradually add an effect
over a certain amount of time from the beginning of the clip and then phase it
out before the clip ends. When you make a change to the settings, you see the
result in the monitor window.
To add an effect to a clip or still image in the timeline viewer:
1. Click the clip or image to select it.
The selection turns blue.
2. Click the desired effect.
3. Make any necessary adjustments to the settings for the effect.
4. When everything looks perfect, click Apply.
Like transitions, effects take a few seconds to render. The faster your laptop,
the shorter the time. Such is the life of a techno-wizard.
204
Part IV: Living the iLife
20_04859X ch13.qxp 7/20/06 10:38 PM Page 204
What’s a masterpiece without titles?
The last stop on our iMovie HD Hollywood Features Tour is the Titles pane.
You’ll find it by clicking the Editing button, as shown in Figure 13-7. You can
add a title with a still image, but iMovie HD also includes everything you need
to add basic animated text to your movie.
Most of the controls you can adjust are the same for each animation style.
You can change the speed of the animation, the font, the size of the text, and
the color of the text. You can even add an optional black background, but
doing so actually inserts a new clip into your movie to show the text, which
may affect the timing of your sound effects or narration.
To add a title
1. Select an animation style from the list.
2. Type one or two lines of text in the text boxes at the bottom of the
Titles pane.
Figure 13-6:
Adding a
favorite
effect of
mine — the
iMovie HD
Aged Film
effect.
205
Chapter 13: Making Film History with iMovie HD
20_04859X ch13.qxp 7/20/06 10:38 PM Page 205
3. Make any changes to the settings specific to the animation style.
iMovie HD displays a preview of the effect in the monitor with the set-
tings that you choose.
4. Drag the animation style from the list to the timeline.
The title appears in the timeline viewer as a clip.
Doing iMovie Things iMagically
iMovie HD makes things just about as easy as can be with Magic iMovie,
which you can use to create your movie automatically from the settings you
choose from just one dialog box. (I know, it sounds like a corny name, but the
feature is truly cool.) If you’re in a hurry or you want to produce something
immediately after an event (and you can do without the creative extras that I
discuss earlier in this chapter), a Magic iMovie is the perfect option.
In fact, the close integration of iMovie HD and iDVD 6 can automate the
process of downloading video from your DV camcorder and producing a
finished DVD. As you can read in Chapter 14, iDVD has a similar feature
called OneStep DVD that can create a DVD video from your Magic iMovie!
Figure 13-7:
Add
subtitles for
your next
foreign
language
film.
206
Part IV: Living the iLife
20_04859X ch13.qxp 7/20/06 10:38 PM Page 206
Follow these steps to let iMovie HD take care of moviemaking automatically:
1. Connect your DV camcorder to your laptop using a FireWire cable.
2. Turn the camcorder on.
3. Set it to VCR (or VTR) mode.
4. Launch iMovie HD, then:
• If you see the opening top-level dialog box, click Make a Magic iMovie.
• If you had a project open and that project appears instead, choose
File➪Make a Magic iMovie.
5. Type a project name and choose a location.
6. Choose a video format.
Typically, you’ll want to use DV, DV widescreen, or the proper HDV reso-
lution format. (Of course, there’s always the iSight format, if your laptop
has a built-in iSight camera.)
7. Click Create.
iMovie HD displays the Magic iMovie dialog box.
8. In the Movie Title box, type a name for your movie.
9. If your tape needs to be rewound before the capture starts, select the
Rewind the Tape before Capturing the Movie check box.
10. If you want transitions between scenes, select the Use Transitions check
box, and then choose the transition you want from the pop-up menu.
11. If you want a soundtrack, select the Play a Music Soundtrack check
box, and then click the Choose Music button to browse your iTunes
music library or to select an audio CD that you’ve loaded.
12. Select the Send to iDVD check box.
This ships your finished movie directly to iDVD, which launches
automatically.
13. Click Create.
Sharing Your Finished Classic
with Others
Your movie is complete, you’ve saved it to your hard drive, and now you’re
wondering where to go from here. Click Share on the application menu bar,
and you’ll see that iMovie HD can unleash your movie upon your unsuspect-
ing family and friends (and even the entire world) in a number of ways:
207
Chapter 13: Making Film History with iMovie HD
20_04859X ch13.qxp 7/20/06 10:38 PM Page 207
ߜ E-mail: Send your movie to others as an e-mail attachment. iMovie HD
even launches Apple’s Mail application automatically!
ߜ iWeb: Share your movie with the world at large by using it with iWeb and
posting it on your .Mac Web site. (I provide more .Mac details to chew
on in Chapter 9.)
ߜ Videocamera: Transfer your finished movie back to your DV camcorder.
ߜ iPod: Truly the option to choose if you’d like to watch your movie on an
iPod with video support.
ߜ GarageBand: Export your movie to GarageBand, where it can be added
to a podcast for that truly professional look.
ߜ iDVD: iMovie HD can export your movie into an iDVD project, where you
can use it to create a DVD video.
ߜ QuickTime: Any computer with an installed copy of QuickTime can dis-
play your movies, and you can use QuickTime movies in Keynote pre-
sentations as well.
ߜ Bluetooth: If you have Bluetooth hardware installed on your laptop, you
can transfer your movie to a Bluetooth device.
When you choose a sharing option, iMovie HD displays the video quality
for the option. If you decide to send your movie through e-mail, for example,
it’s reduced as far as possible in file size, and the audio is reduced to mono
instead of stereo. The Videocamera and Bluetooth options give you onscreen
instructions for readying the target device to receive your movie.
If you’re worried about permanently reducing the quality of your project
by sharing it through e-mail or your .Mac Web site, fear not! When you choose
a sharing option to export your movie, your original project remains on your
hard drive, unchanged, so you can share a better quality version at any time
in the future!
After you adjust any settings specific to the desired sharing option, click
Share to start the ball rolling.
208
Part IV: Living the iLife
20_04859X ch13.qxp 7/20/06 10:38 PM Page 208
Chapter 14
Creating DVDs on the
Road with iDVD
In This Chapter
ᮣ Traversing the iDVD window
ᮣ Starting an iDVD project
ᮣ Tweaking and adjusting your DVD Menu
ᮣ Previewing your (nearly) finished DVD
ᮣ Doing things automatically with OneStep DVD and Magic iDVD
ᮣ Burning your finished masterpiece
H
ow does the adage go? Oh, yes, it’s like this:
Any DVD movie must be a pain to create. You’ll need a ton of money for
software, too. And you’ll need hours of training that will cause your brain
to explode.
Funny thing is, DVD authoring — the process of designing and creating a DVD
movie — really was like that for many years. Only video professionals could
afford the software and tackle the training needed to master the intricacies
of DVD Menu design.
Take one guess as to the company that changed all that. Apple’s introduction
of iDVD was a revolution in DVD authoring. Suddenly you, your kids, and Aunt
Harriet could all design and burn DVDs with movies and picture slideshows.
Dear reader, this iDVD thing is huge.
Plus, you’ll quickly find out that iDVD 6 is tightly connected to all the other
slices of your digital hub — in plain English, you can pull content from
iTunes, iPhoto, and iMovie HD as easily as a politician makes promises.
21_04859X ch14.qxp 7/20/06 10:42 PM Page 209
In this chapter, I show you how your Mac laptop can take on Hollywood as
well as how you can produce a DVD movie with content that’s as good as any
you’d rent at the video store!
Introducing You and Your
Laptop to iDVD
Figure 14-1 shows the whole “kit and kaboodle.” (Okay, Mark, drop it.) The
iDVD 6 window was designed by the same smart people who brought you
the iMovie HD window. You have to supply your own digital video clips,
background audio, and digital photographs, of course.
Menu display
Add Motion DVD map
Preview
Burn Media pane
Figure 14-1:
iDVD 6 is a
jewel of an
application
— easy to
use and
powerful to
boot.
210
Part IV: Living the iLife
21_04859X ch14.qxp 7/20/06 10:42 PM Page 210
Take a moment to appreciate iDVD — no secondary windows to fiddle with or
silly palettes strung out everywhere. (Can you tell that I’ve had my fill of old-
style DVD authoring applications?) Allow me to list the highlights of the iDVD
window:
ߜ Menu display: This section takes up the largest part of the iDVD window,
with good reason. You create your project here. In this case, Menu refers
to your DVD Menu, not the menu at the top of your laptop’s display.
ߜ Media pane: You add video, still images, and audio to your project from
here, as well as tweak and fine-tune things. The Media pane actually
comprises four separate panes. To choose a new pane, click one of these
buttons at the bottom of the screen:
• Themes: You apply themes (such as Travel Cards, Wedding White,
and Baby Mobile) to your DVD Menu to give it a certain look and
feel.
• Menu: From here, you can change the look of the menus displayed
by your project by editing text and drop zones.
• Buttons: These options apply to the item currently selected, such
as drop shadows on your text titles or the appearance of your
menu buttons.
• Media: From here, you can add media items, such as video clips
and photos, to your menu.
ߜ Add button: From this drop-down list (which sports a dapper plus sign),
you can choose one of three types of buttons to add to a project. The
choices are
• Add Submenu: Choose this item to add a new submenu button to
your DVD Menu. The person using your DVD Menu can click a
button to display a new submenu that can include additional
movies or slideshows. (If that sounds like ancient Greek, hang on.
All becomes clearer later in the chapter in the section, “Adding
movies.”)
In iDVD 6, a Menu can hold only 12 buttons, so submenus let you
pack more content on your DVD. (Older versions of the application
only allowed 6 buttons, so don’t feel too cheated.) Anyway, each
submenu you create can hold another 12 buttons.
• Add Movie: Yep, this is the most popular button in the whole shoot-
ing match. Click this menu item to add a new movie clip to your
menu.
• Add Slideshow: If you want to add a slideshow to your DVD — say,
using photos from your hard drive or pictures from your iPhoto
library — click this menu item.
211
Chapter 14: Creating DVDs on the Road with iDVD
21_04859X ch14.qxp 7/20/06 10:42 PM Page 211
ߜ Motion: Click this button to watch the animation cycle used with the
current iDVD theme. Note that the animation playhead (the movie’s time-
line marker) moves below the Menu display to indicate where you are in
the animation cycle. Like other playheads in the iLife suite, you can
click-and-drag the diamond-shaped playhead button to move anywhere
in the animation cycle. The animation repeats (just as it will on your fin-
ished DVD) until you click the Motion button again.
ߜ DVD Map: Click the Map button to display the organizational chart for
your DVD Menu. Each button and submenu that you add to your top-
level DVD Menu is displayed here, and you can jump directly to a partic-
ular item by double-clicking it. Use this road map to help design the
layout of your DVD Menu system or to get to a particular item quickly.
To return to the Menu display, click the Map button again.
ߜ Preview: To see how your DVD Menu project looks when burned to a
DVD, click Preview. You get a truly nifty onscreen remote control that
you can use to navigate your DVD Menu, just as if you were watching
your DVD on a standard DVD player. To exit Preview mode, click the
Stop button on the remote control. Read more about this control in the
upcoming section, “Previewing Your Masterpiece.”
ߜ Burn: Oh, yeah, you know what this one is for — recording your com-
pleted DVD movie to a blank disc.
That’s the lot! Time to get down to the step-by-step business of making movies.
Starting a New DVD Project
When you launch iDVD 6 for the first time (or if you close all iDVD windows),
you get the sporty menu shown in Figure 14-2. Let’s take a moment to dis-
cover more about these four choices.
Creating a new project
If you choose Create a New Project, iDVD prompts you to type a name for
your new DVD project and to set a location where the project files should be
saved. By default, the very reasonable choice is your Documents folder. You
also get to choose whether your project will display in a Standard (full
screen) aspect ratio of 4:3, or a Widescreen aspect ratio of 16:9. If you’ve
been watching DVD movies for some time, you recognize these two terms.
You’ll probably crave Widescreen format if you have a widescreen TV — go
figure — but both formats will display on both types of televisions.
Click Create, and the iDVD window appears in all its glory.
212
Part IV: Living the iLife
21_04859X ch14.qxp 7/20/06 10:42 PM Page 212
Opening an existing project
If you’ve used iDVD and had a DVD project open the last time you quit the
application, iDVD automatically loads the DVD project you were working on.
However, you can open any DVD you’ve created by clicking Open an Existing
Project. (To choose a different existing project from the iDVD window, press
Ô+O, or choose File➪Open Recent.)
Automating the whole darn process
If you are a fan of click-it-and-forget-it (or are in a hurry), you can throw cau-
tion to the wind and allow iDVD to create your latest epic for you! iDVD offers
two automated methods of creating a DVD movie disc. One method has been
around since the last version of the application, and the other is brand new
with iDVD 6.
Using OneStep DVD
With OneStep, iDVD does most of the work automatically, using the media
clips and photos that you specify. To allow iDVD to help you create a movie,
click the OneStep DVD button on the top-level menu (refer to Figure 14-2). If
you’ve already opened a project, choose File➪OneStep DVD from the applica-
tion’s menu bar (to import clips directly from your camera) or OneStep DVD
from Movie (to select a clip to import from your hard drive).
I tell you more about the OneStep DVD feature later in the “A Word about
Automation” section.
Figure 14-2:
Will that
be create
or edit,
manual or
automatic?
213
Chapter 14: Creating DVDs on the Road with iDVD
21_04859X ch14.qxp 7/20/06 10:42 PM Page 213
Using Magic iDVD
Magic iDVD is the newcomer on the block, and it falls neatly between total
automation (with OneStep DVD) and total manual control. Click the Magic
iDVD button on the top-level menu (as shown in Figure 14-2). If you’ve
already opened a project, you can choose File➪Magic iDVD from the menu
bar to choose a theme, drop specific movies and photos into filmstrips, and
choose an audio track.
Unlike OneStep DVD, you get to preview the finished product. If it’s to your
liking, you can choose to either burn the disc directly or create a full-blown
iDVD project with the results. Sweet.
You’ll find out more about the new Magic iDVD feature later in the “A Word
about Automation” section.
Creating a DVD from Scratch
Doing things the old-fashioned, creative, and manual way (following the
examples in this section) involves four basic steps:
1. Design the DVD Menu.
Choose a theme and any necessary buttons or links.
2. Add media.
iTunes.
3. Tweak.
Adjust and fine-tune your DVD Menu settings.
4. Finish things up.
Preview and burn your DVD, or save it to your hard drive.
Choosing just the right theme
The first step to take when manually designing a new DVD Menu system is to
add a theme. In the iDVD world, a theme is a preset package that helps deter-
mine the appearance and visual appeal of your DVD Menu, including a back-
ground image, menu animation, an audio track, and a group of settings for
text fonts and button styles.
iDVD helps those of us who are graphically challenged by including a wide
range of professionally designed themes for all sorts of occasions, ranging
from old standbys such as weddings, birthdays, and vacations to more
214
Part IV: Living the iLife
21_04859X ch14.qxp 7/20/06 10:42 PM Page 214
generic themes with the accent on action, friendship, and technology. To
view the included themes, click the Themes button in the lower-right corner
of the iDVD window (see Figure 14-3).
To choose a theme for your project — or to see what a theme looks like on
your menu — click any thumbnail and watch iDVD update the Menu display.
If you decide while creating your DVD Menu that you need a different theme,
you can change themes at any time. iDVD won’t lose a single button or video
clip that you add to your DVD Menu. You’ll be amazed at how the look and
sound of your DVD Menu completely changes with just the click of a theme
thumbnail.
Adding movies
Drop zones and themes are cool, but most folks want to add video to their
DVD. To accomplish this, iDVD uses buttons as links to your video clips. In
fact, some iDVD Movie buttons display a preview of the video they will dis-
play! To play the video on a DVD player, you select the Movie button with
the remote control, just like you do for a commercial DVD.
Figure 14-3:
Select a
new theme
from the
Themes
pane.
215
Chapter 14: Creating DVDs on the Road with iDVD
21_04859X ch14.qxp 7/20/06 10:42 PM Page 215
To add a Movie button, drag a QuickTime movie file from the Finder and drop
it onto your DVD Menu display. (Note that only MPEG-4 QuickTime movies
are supported — older MPEG-1 and MPEG-2 movie clips may be rejected.)
Alternatively, launch iMovie HD and drag a clip from the iMovie HD clip
palette into the iDVD window, or click the Add button and choose Add Movie
from the drop-down menu.
iDVD and iMovie HD are soul mates, so you can also display the iDVD Media
pane and then click Movies from the pop-up menu. Now you can drag clips
from your Movies folder.
No matter the source of the clip, when you drop it onto your DVD menu,
iDVD adds a Movie button, as you can see in Figure 14-4. Note that some but-
tons appear as text links rather than actual buttons. The appearance of a
Movie button in your DVD menu is determined by the theme you choose.
A Movie button doesn’t have to stay where iDVD places it! To move a Movie
button to another location, click-and-drag it to the desired spot. By default,
iDVD aligns buttons to an invisible grid. If you don’t want such order imposed
on your creativity, turn off this grid function by clicking the button to select
it, clicking the Buttons button (at the bottom of the Media pane), and select-
ing the Free Positioning radio button.
216
Part IV: Living the iLife
Taking advantage of drop zones
Most of Apple’s animated themes include spe-
cial bordered areas marked as drop zones.
These locations have nothing to do with skydiv-
ing; rather, a
drop zone
is a placeholder in the
Menu that can hold a single video clip or photo-
graph. When you drag a video clip or an image
to a drop zone, that clip or picture is added to
the animation in Apple’s theme! Think about that
for a moment; I know I did. You can actually per-
sonalize a Hollywood-quality animated DVD
menu with
your own photos and video!
Most of the themes included with iDVD 6
include at least one drop zone, and some are
practically jam-packed with drop zones. For
example, the amazing Baby Mobile theme has
a whopping six drop zones! If you think a menu
looks just fine without anything in a drop zone,
however, you don’t have to put anything there.
The words
Drop Zone
disappear when you pre-
view or burn your DVD.
To add a video clip or image to a drop zone,
simply drag the clip or photo from a Finder
window and drop it on the drop zone. You can
also drag clips or photos from other sources,
including the Movie and iPhoto panes in iDVD,
the iMovie HD window, or the iPhoto window.
(Remember, Apple is anything but strict on
these matters.) Remember, drop zones don’t act
as links or buttons to other content — the stuff
you add to a menu’s drop zones appear only as
part of the theme’s animation cycle.
If you’re adding something to a dynamic drop
zone (which disappears and reappears during
the menu animation cycle), click the Motion
button to activate the animation, and then click
it again to stop the animation cycle. Now click-
and-drag the scrubber bar until the desired drop
zone is in view. To delete the contents of a drop
zone, Control-click (or right-click) the drop zone
and choose Clear.
21_04859X ch14.qxp 7/20/06 10:42 PM Page 216
You can have up to 12 buttons on your iDVD Menu. To add more content than
12 buttons allow, add a submenu by clicking the Add button and choosing
Add Submenu from the drop-down menu. Now you can click the submenu
button to jump to that screen and drag up to another 12 movie files into it.
Keep in mind your target audience while you create your DVD. Standard TV
sets have a different aspect ratio (height to width) and resolution (number of
pixels on the screen) than a digital video clip, and a standard TV isn’t as pre-
cise in focusing that image on the tube. If you selected the Standard aspect
ratio when you created the project, you can make sure that your DVD content
looks great on a standard TV screen by following these steps:
1. Click View on the old-fashioned iDVD menu (the one at the top of the
screen).
2. Choose the Show TV Safe Area command.
You can also press the convenient Ô+T shortcut. iDVD adds a smaller
rectangle within the iDVD window to mark the screen dimensions of a
standard TV.
If you take care that your menu buttons and (most of) your background
image fit within this smaller rectangle, you’re assured that folks with a stan-
dard television can enjoy your work. To turn off the TV Safe Area rectangle,
press Ô+T again.
Figure 14-4:
A new
Movie
button
appears on
your pristine
DVD Menu.
217
Chapter 14: Creating DVDs on the Road with iDVD
21_04859X ch14.qxp 7/20/06 10:42 PM Page 217
If your entire family is blessed with a fleet of HD TVs (or you chose the
Widescreen aspect ratio for this project), leave the Show TV Safe Area option
off. Today’s widescreen displays can handle just about any orientation.
Great, now my audience
demands a slideshow
Many Mac owners don’t realize that iDVD can use not only video clips but
also digital photos as content. In fact, you can add a group of images to your
DVD Menu by using Slideshow buttons, which allow the viewer to play back a
series of digital photographs. iDVD handles everything for you, so there’s no
tricky timing to figure out or weird scripts to write. Just click the Add button
at the bottom of the iDVD window and choose Add Slideshow. iDVD places a
Slideshow button on your DVD Menu.
After the Slideshow button is on tap, you need to add the content — in this
case, by choosing the images that iDVD adds to your DVD Menu. Follow these
steps to select your slideshow images:
1. Double-click the Slideshow Menu button — the one you just added to
the menu — to open the Slideshow display (see Figure 14-5).
Figure 14-5:
Who needs
a projector
anymore?
iDVD can
create a
great
slideshow.
218
Part IV: Living the iLife
21_04859X ch14.qxp 7/20/06 10:42 PM Page 218
2. Click the Media button (bottom right of the screen).
3. Click the Photos button (top right of the screen) to display your iPhoto
library and photo albums.
4. Drag your favorite image thumbnails from the Photos list and drop
them into the My Slideshow window.
You can also drag images straight from a Finder window or the iPhoto
window itself. (Those Apple folks are sooooo predictable.)
5. Drag the photos in the My Slideshow window around to set their
order of appearance in your slideshow.
6. To add audio to these pictures, drag your favorite audio file from the
Finder and drop it in the Audio well in the My Slideshow window.
The Audio well is the box bearing the speaker icon, next to the volume
control below the My Slideshow window.
Alternatively, click the Audio button to select an audio track from your
iTunes library, iTunes playlists, or GarageBand creations.
7. Click the Return button to return to your DVD Menu.
You can choose which image you want to appear on the Slideshow button.
Click the Slideshow button that you added and see the slider that appears
above the Slideshow button. Drag this slider to scroll through the images
you added. When you find the image that you want to use for the Slideshow
button in the DVD Menu, click the Slideshow button again to save your
changes.
Now for the music . . .
Most of the Apple-supplied themes already have their own background music
for your menu, so you might not even need to add music to your DVD Menu.
However, if you want to change the existing background music (or if your
menu currently doesn’t have any music), adding your own audio to the cur-
rent menu is child’s play!
1. Click the Media button.
2. Click the Audio button to reveal the musical Shangri-La shown in
Figure 14-6.
3. Drag an audio file from the iTunes playlist or GarageBand folder dis-
play and drop it on the menu background.
iDVD 6 accepts every sound format that you can use for importing (or
encoding) in iTunes: AIFF, MP3, AAC, Apple Lossless, and WAV audio
files.
219
Chapter 14: Creating DVDs on the Road with iDVD
21_04859X ch14.qxp 7/20/06 10:42 PM Page 219
Alternately, you can click the song you’d like to use and then click Apply.
4. Click the Motion button (labeled in Figure 14-1) to watch your DVD
Menu animation cycle set to the new background audio.
5. Click the Motion button again to stop the animation and return to seri-
ous work.
Giving Your DVD the Personal Touch
You can easily make changes to the default settings provided with the theme
you chose. iDVD offers all sorts of controls that allow you to change the
appearance and behavior of buttons, text, and the presentation of your con-
tent. In this section, I show you how to cast out iDVD’s (perfectly good)
defaults and then tweak things to perfection.
Figure 14-6:
You’ll do a
lot of fine-
tuning from
the Settings
pane.
220
Part IV: Living the iLife
21_04859X ch14.qxp 7/20/06 10:42 PM Page 220
Using Uncle Morty for your
DVD Menu background
Hey, Uncle Morty might not be a supermodel, but he has birthdays and
anniversaries, and iDVD is more than happy to accommodate you in docu-
menting those milestones! Follow these steps to change the background
of your DVD Menu:
1. Click the Menu button.
2. Get an image using one of the following methods:
• Drag an image from the Finder and drop it into the Background
well in the Menu section.
• Drag the image directly into the Menu display.
• To use an image from your iPhoto library, click the Media button
and choose Photos, and then drag the desired image into the Menu
display.
iDVD updates the DVD menu to reflect your new background choice.
Adding your own titles
The one tweak you’ll probably have to perform in every iDVD project is
changing titles. Unfortunately, the default labels provided by iDVD are pretty
lame, and they appear in two important places:
ߜ Menu title: Your large main title usually appears at the top of the DVD
Menu.
ߜ Button captions: Each Movie and Slideshow button that you add to your
menu has its own title.
To change the text in your Menu title or the titles below your buttons, follow
these steps:
1. Select the text by clicking it.
2. Click it again to edit it.
A rectangle with a cursor appears to indicate that you can now edit the
text.
3. Type the new text and press Return to save the change.
221
Chapter 14: Creating DVDs on the Road with iDVD
21_04859X ch14.qxp 7/20/06 10:42 PM Page 221
Changing buttons like a
highly paid professional
Customizing Movie buttons? You can do it with aplomb! Follow these steps:
1. Click Buttons.
2. Click any Movie button from the DVD Menu to select it.
A slider appears above the button, which you can drag to set the thumb-
nail picture for that button in your DVD Menu. (Naturally, this is only for
animated buttons, not text buttons.)
Enable the Movie check box to animate the button.
3. To create a Movie button with a still image, drag a picture from a
Finder window or the Media pane and drop it on top of the button.
4. Adjust the properties for the button as desired with the controls in the
Button section of the Media panel.
Table 14-1 describes the button properties.
Table 14-1 Button Settings You Can Customize
Movie Button Property What It Does
Style thumbnail Changes the frame shape of the Movie button.
Snap to Grid Forces placement of a Movie button on an imaginary grid.
Free Positioning Unlike Snap to Grid, allows Movie buttons to be placed in
a freeform arrangement.
Transition Determines the transition that occurs when the button is
clicked (before the action occurs).
Size Adjusts the size of the button and the caption text. Move
the slider to the right to increase the button and caption
size.
Give my creation motion!
Earlier in this chapter, you found out how to use a different image for your
background, but what about using an animated background? You can use any
QuickTime movie from your iMovie HD library to animate your DVD Menu
background! Didn’t I tell you that this iDVD thing was huge?
222
Part IV: Living the iLife
21_04859X ch14.qxp 7/20/06 10:42 PM Page 222
Keep in mind that your background movie should be a short clip; 20–30 sec-
onds is optimal. A clip with a fade-in at the beginning and a fade-out at the
end is the best choice because iDVD loops your background clip continu-
ously, and your animated background flows seamlessly behind your menu.
I’m not talking drop zones here. (See the sidebar, “Taking advantage of drop
zones.”) By using a movie clip as a background, you’re replacing the entire
animation sequence rather than just a single area of the background.
Follow these steps to add a new animated background:
1. Click your old friend, the Menu button.
2. Drag a movie from the Finder and drop it into the Background well.
You can click the Movies button in the Media pane to instantly display
your iMovie collection.
3. Click the Motion button in the iDVD window to try out your new
background.
4. Click the Motion button again to stop the animation cycle.
Previewing Your Masterpiece
Figure 14-7 captures the elusive Preview remote control — truly an awesome
sight. When you click Preview, the Media pane disappears, and your DVD
Menu appears exactly as it will on the finished DVD.
Ah, but appearances aren’t everything: You can also use your DVD Menu!
Click the buttons on the remote control to simulate the remote on your DVD
player, or think outside the box and click a menu button directly with your
mouse pointer. iDVD presents the video clip, runs the slideshow, or jumps to
a submenu, just as it will with the completed disc.
This is a great time to test-drive a project before you burn it to disc. To make
sure you don’t waste a blank DVD, make certain that everything you expect
to happen actually happens. Nothing worse than discovering that Aunt
Edna’s slideshow from her Hong Kong trip actually displays your family’s
summer trip to the zoo (whoops). If you made a mistake or something needs
tweaking, click the Preview button again, and you’re back to the iDVD
window proper, where you can edit or fine-tune your project.
223
Chapter 14: Creating DVDs on the Road with iDVD
21_04859X ch14.qxp 7/20/06 10:42 PM Page 223
iDVD 6 allows you to save your project as a standard Mac OS X disc image
rather than as a simple project file (or a physical DVD) — a good idea for
those laptops without a SuperDrive on board, because you can use Apple’s
Disk Utility to open and mount the disc image as if it were a burned disc. If
you move the disc image to another Mac with a SuperDrive, you can use Disk
Utility to burn it on that machine. To save an iDVD project as a disc image,
choose File➪Save as Disc Image (or press Ô+Shift+R). For the complete word
on disc images, visit Chapter 21 — hey, you didn’t think I’d leave you out in
the cold, did you?
A Word about Automation
At the beginning of the chapter, I mention the easy way to produce an iDVD
disc or project, using either OneStep DVD (for complete automation) or
Magic iDVD (for partial automation). In this section, I provide you with the
details.
Figure 14-7:
Preview
mode — an
incredible
simulation
indeed.
224
Part IV: Living the iLife
21_04859X ch14.qxp 7/20/06 10:42 PM Page 224