SUSE Linux 10 for dummies phần 6 ppt
Bạn đang xem bản rút gọn của tài liệu. Xem và tải ngay bản đầy đủ của tài liệu tại đây (1.51 MB, 40 trang )
Connecting Your LAN to the Internet
If you have a LAN with several PCs, you can connect the entire LAN to the
Internet by using DSL or a cable modem. Basically, you can share the high-
speed DSL or cable modem connection with all the PCs in the LAN.
In Chapter 7, I explain how to set up a DSL or cable modem. In this section, I
briefly explain how to connect a LAN to the Internet so that all the PCs can
access the Internet.
The most convenient way to connect a LAN to the Internet via DSL or cable
modem is to buy a hardware device called DSL/Cable Modem NAT Router
with a 4- or 8-port Ethernet hub. NAT stands for Network Address Translation,
and the NAT router can translate many private IP addresses into a single
externally known IP address. The Ethernet hub part appears to you as a
number of RJ-45 Ethernet ports where you can connect the PCs to set up a
LAN. In other words, you need only one extra box besides the DSL or cable
modem.
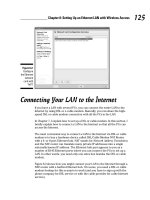
Figure 8-3 shows how you might connect your LAN to the Internet through a
NAT router with a built-in Ethernet hub. Of course, you need a DSL or cable
modem hookup for this scenario to work (and you have to sign up with the
phone company for DSL service or with the cable provider for cable Internet
service).
Figure 8-2:
Configure
the Ethernet
network
card with
YaST.
125
Chapter 8: Setting Up an Ethernet LAN with Wireless Access
13_754935 ch08.qxp 11/7/05 9:40 PM Page 125
When you connect a LAN to the Internet, the NAT router acts as a gateway for
your LAN. The NAT router also dynamically provides IP addresses to the PCs
in your LAN. Therefore, on each PC, you have to set up the networking
options to obtain the IP address dynamically.
Your LAN can mix and match all kinds of computers — some may be running
Linux and some may be running Microsoft Windows or any other operating
system that supports TCP/IP. When configuring the network settings, remem-
ber to select the option that enables Linux to automatically obtain IP address
settings and DNS information with DHCP.
Extending Your LAN with
a Wireless Network
If you have a laptop computer that you want to connect to your LAN — or if
you don’t want to run a rat’s nest of wires to connect a PC to the LAN — you
have the option of using a wireless Ethernet network. In a typical scenario,
you have a cable modem or DSL connection to the Internet, and you want to
connect one or more laptops with wireless network cards to access the
Internet through the cable or DSL modem. In the following sections, I explain
wireless networking and how to set it up on your network.
Ethernet cables
(10BaseT)
NAT router and Ethernet hub
Cable or DSL modem
Ethernet cable
(10BaseT)
PCs in a local area network (LAN).
Each PC must have a 10BaseT
Ethernet card.
To Internet
Figure 8-3:
Connect
your LAN to
the Internet
through a
NAT router
with a built-
in Ethernet
hub.
126
Part II: Test-Driving SUSE
13_754935 ch08.qxp 11/7/05 9:40 PM Page 126
Understanding wireless
Ethernet networking
You’ve probably heard about Wi-Fi. Wi-Fi stands for Wireless Fidelity network —
a short-range wireless network similar to the wired Ethernet networks. A
number of standards from an organization known as IEEE (the Institute of
Electrical and Electronics Engineers) defines the technical details of how Wi-Fi
networks work. Manufacturers use these standards to build the components
that you can buy to set up a wireless network, also known as WLAN for short.
Until mid-2003, there were two popular IEEE standards — 802.11a and
802.11b — for wireless Ethernet networks. These two standards were final-
ized in 1999. A third standard — 802.11g — was finalized by the IEEE in the
summer of 2003. All these standards specify how the wireless Ethernet net-
work works over the radio waves. You don’t have to fret over the details of
these standards to set up a wireless network, but knowing some pertinent
details is good so that you can buy the right kind of equipment for your wire-
less network.
The three wireless Ethernet standards have the following key characteristics:
ߜ 802.11b: Operates in the 2.4 GHz radio band (2.4 GHz to 2.4835 GHz) in
up to three nonoverlapping frequency bands or channels. Supports a
maximum bit rate of 11 Mbps per channel. One disadvantage of 802.11b
is that the 2.4 GHz frequency band is crowded — many devices such as
microwave ovens, cordless phones, medical and scientific equipment, as
well as Bluetooth devices — all work within the 2.4 GHz frequency band.
Nevertheless, 802.11b is very popular in corporate and home networks.
ߜ 802.11a: Operates in the 5 GHz radio band (5.725 GHz to 5.850 GHz) in
up to eight nonoverlapping channels. Supports a maximum bit rate of
54 Mbps per channel. The 5 GHz band is not as crowded as the 2.4 GHz
band, but the 5 GHz band is not approved for use in Europe. Products
conforming to the 802.11a standard are available on the market, and
wireless access points are designed to handle both 802.11a and 802.11b
connections.
ߜ 802.11g: Supports up to 54 Mbps data rate in the 2.4 GHz band. (The
same band that 802.11b uses.) 802.11g achieves the higher bit rate by
using a technology called OFDM (orthogonal frequency-division multi-
plexing), which is also used by 802.11a. Although 802.11g was only
recently finalized, equipment that complies with it is already on the
market. That’s because 802.11.g has generated excitement by working in
the same band as 802.11b but promising much higher data rates and by
being backward-compatible with 802.11b devices. Vendors currently
offer access points that can support both the 802.11b and 802.11g con-
nection standards.
127
Chapter 8: Setting Up an Ethernet LAN with Wireless Access
13_754935 ch08.qxp 11/7/05 9:40 PM Page 127
There is a third standard — 802.11n — under development that would support
100-Mbps data rates in either the 2.4 GHz or the 5 GHz band, depending on
which of the two proposals garner the required membership approval. Two
equally matched groups of companies — known by the titles TGn Sync (Task
Group n Synchronization) and WWiSE (Worldwide Spectrum Efficiency) —
have each authored proposals for the 802.11n standard. TGn Sync proposes to
use the 5 GHz band, the same one used by 802.11a, whereas WWiSE’s proposal
is for the 2.4 GHz that’s used by 802.11b and g. Both groups agree that some
form of multiple input multiple output (MIMO, pronounced “my-mo”) antenna
technology would be needed to achieve the 100-Mbps data rate. (Some MIMO
access points are already becoming available on the market.) At a May 2005
balloting, the TGn Sync proposal obtained the majority votes, but it did not
receive the 75 percent votes required to be the basis for the first draft. You
can read the latest news about the IEEE 802.11n project at grouper.ieee.
org/groups/802/11/Reports/tgn_update.htm.
If you are buying a new wireless access point, get an 802.11g one. An 802.11g
access point can also communicate with older (and slower) 802.11b devices.
You can also consider a MIMO access point that supports multiple 802.11
standards and implements techniques for getting higher throughputs and
better range.
The maximum data throughput that a user actually sees is much less because
all users of that radio channel share the capacity of the channel. Also, the
data transfer rate decreases as the distance between the user’s PC and the
wireless access point increases.
To find out more about wireless Ethernet, visit www.wi-fi.org, the home
page of the Wi-Fi Alliance — a nonprofit international association formed in
1999 to certify interoperability of wireless LAN products based on IEEE 802.11
standards.
Understanding infrastructure
and ad hoc modes
The 802.11 standard defines two modes of operation for wireless Ethernet
networks: infrastructure and ad hoc. Ad hoc mode is simply two or more wire-
less Ethernet cards communicating with each other without an access point.
Infrastructure mode refers to the approach in which all the wireless Ethernet
cards communicate with each other and with the wired LAN through an
access point. For the discussions in this chapter, I assume that you set your
wireless Ethernet card to infrastructure mode. In the configuration files, this
mode is referred to as managed mode.
128
Part II: Test-Driving SUSE
13_754935 ch08.qxp 11/7/05 9:40 PM Page 128
Understanding Wired Equivalent
Privacy (WEP)
The 802.11 standard includes Wired Equivalent Privacy (WEP) for protecting
wireless communications from eavesdropping. WEP relies on a 40-bit or 104-bit
secret key that is shared between a mobile station (such as a laptop with a wire-
less Ethernet card) and an access point (also called a base station). The secret
key is used to encrypt data packets before they transmit, and an integrity
check is performed to ensure that packets are not modified in transit. The
802.11 standard does not explain how the shared key is established. In prac-
tice, most wireless LANs use a single key that is shared between all mobile sta-
tions and access points. Such an approach, however, does not scale up very
well to an environment such as a college campus because the keys are shared
with all users — and you know how it is if you share a “secret” with hundreds
of people. That’s why WEP is typically not used on large wireless networks
such as the ones at universities. In such wireless networks, you have to use
other security approaches such as SSH (Secure Shell) to log in to remote sys-
tems. WEP, however, is good to use on your home wireless network.
WEP has its weaknesses, but it’s better than nothing. You can use it in smaller
wireless LANs where sharing the same key among all wireless stations is not
an onerous task.
Work is underway to provide better security than WEP for wireless networks.
A standard called 802.11i is in the works that provides better security
through public-key encryption. While the 802.11i standard is in progress, the
Wi-Fi Alliance — a multivendor consortium that supports Wi-Fi — has devel-
oped an interim specification called Wi-Fi Protected Access (WPA) that’s a
precursor to 802.11i. WPA replaces the existing WEP standard and improves
security by making some changes. For example, unlike WEP (which uses fixed
keys), the WPA standard uses something called the Temporal Key-Integrity
Protocol (TKIP), which generates new keys for every 10K of data transmitted
over the network. TKIP makes WPA more difficult to break. In 2004, the Wi-Fi
Alliance introduced a follow-on to WPA called the Wi-Fi Protected Access 2
(WPA2) — the second generation of WPA security. WPA2 is based on the final
IEEE 802.11i standard, which uses public key encryption with digital certifi-
cates and an authentication, authorization, and accounting RADIUS (Remote
Authentication Dial-In User Service) server to provide better security for
wireless Ethernet networks. WPA2 uses the Advanced Encryption Standard
(AES) for data encryption.
129
Chapter 8: Setting Up an Ethernet LAN with Wireless Access
13_754935 ch08.qxp 11/7/05 9:40 PM Page 129
Setting up the wireless hardware
To set up the wireless connection, you need a wireless access point and a
wireless network card in each PC. You can also set up an ad hoc wireless
network among two or more PCs with wireless network cards, but that is a
stand-alone wireless LAN among those PCs only. In this section, I focus on the
scenario where you want to set up a wireless connection to an established
LAN that has a wired Internet connection through a cable modem or DSL.
In addition to the wireless access point, you also need a cable modem or DSL
connection to the Internet, along with a NAT router/hub. Figure 8-4 shows a
typical setup for wireless Internet access through an existing cable modem or
DSL connection.
As Figure 8-4 shows, the LAN has both wired and wireless PCs. In this exam-
ple, either a cable or DSL modem connects the LAN to the Internet through a
NAT router/hub. Laptops with wireless network cards connect to the LAN
through a wireless access point attached to one of the RJ-45 ports on the
hub. To connect desktop PCs to this wireless network, you can use a USB
wireless network card (which connects to a USB port).
If you have not yet purchased a NAT router/hub for your cable or DSL con-
nection, consider buying a router/hub that has a built-in wireless access
point.
Ethernet cables
(10BaseT)
Laptop PC
with wireless
Ethernet card
Wireless
Access
Point
NAT router and Ethernet hub
Cable or DSL modem
Ethernet cable
(10BaseT)
PCs in a local area network (LAN).
Each PC must have a 10BaseT
Ethernet card.
To Internet
Figure 8-4:
Typical
connection
of a mixed
wired and
wireless
Ethernet
LAN to the
Internet.
130
Part II: Test-Driving SUSE
13_754935 ch08.qxp 11/7/05 9:40 PM Page 130
Configuring the wireless access point
Configuring the wireless access point involves the following tasks:
ߜ Setting a name for the wireless network (the technical term is ESSID).
ߜ Setting the frequency or channel on which the wireless access point
communicates with the wireless network cards. The access point and
the cards must use the same channel.
ߜ Deciding whether to use encryption.
ߜ If encryption is to be used, setting the number of bits in the encryption
key and the value of the encryption key. For the encryption key, 24 bits
are internal to the access point; you specify only the remaining bits. Thus,
for 64-bit encryption, you have to specify a 40-bit key, which comes to ten
hexadecimal digits (a hexadecimal digit is an integer from 0 through 9 or a
letter from A through F). For a 128-bit encryption key, you specify 104 bits,
or 26 hexadecimal digits.
ߜ Setting the access method that wireless network cards must use when
connecting to the access point. You can opt for either open access
or shared key. The open-access method is typical (even when using
encryption).
ߜ Setting the wireless access point to operate in infrastructure (managed)
mode (because that’s the way you connect wireless network cards to an
existing Ethernet LAN).
The exact method of configuring a wireless access point depends on the
make and model; the vendor provides instructions to configure the wireless
access point. You typically work through a graphical client application on a
Windows PC to do the configuration. If you enable encryption, make note of
the encryption key; you have to specify that same key for each wireless net-
work card on your laptops or desktops.
Configuring wireless networking
On your SUSE Linux laptop, the PCMCIA manager recognizes the wireless net-
work card and loads the appropriate driver for the card (PCMCIA or PC Card
is the name of the plug-in card devices). Linux treats the wireless network
card like another Ethernet device and assigns it a device name such as eth0
or eth1. If you already have an Ethernet card in the laptop, that card gets the
eth0 device name, and the wireless PC card becomes the eth1 device.
When you plug in the wireless Ethernet PC Card, SUSE Linux detects the hard-
ware and prompts you if you want to configure the network card. Click Yes
and YaST prompts you for the root password. Then YaST opens the network
card configuration window. You should see the wireless Ethernet card listed,
as shown in Figure 8-5.
131
Chapter 8: Setting Up an Ethernet LAN with Wireless Access
13_754935 ch08.qxp 11/7/05 9:40 PM Page 131
From the screen shown in Figure 8-5, follow these steps:
1. Click Add (see Figure 8-5).
YaST displays the Manual Network Card Configuration screen. If the card
was not correctly detected, click Select from List and select the card
from the list that appears. Click Next to continue. YaST displays the
Network Address Setup screen. You can click Next to leave this at the
default setting of automatic address setup via DHCP (Dynamic Host
Configuration Protocol). YaST displays the Wireless Network Card
Configuration screen (see Figure 8-6).
2. Enter the needed wireless network card parameters and click OK.
You can leave the Operating Mode as Managed, but you do have to enter
certain parameters to enable the wireless network card to communicate
with the wireless access point. For example, you have to specify the
wireless network name assigned to the access point — and the encryp-
tion settings must match those on the access point.
That should get the wireless card ready to go.
To check the status of the wireless network interface, type su - to become
root and then type the following command:
iwconfig
Figure 8-5:
Configuring
a new
wireless
Ethernet
card in
SUSE Linux.
132
Part II: Test-Driving SUSE
13_754935 ch08.qxp 11/7/05 9:40 PM Page 132
Here’s a typical output from a SUSE Linux laptop with a wireless Ethernet PC
card:
lo no wireless extensions.
eth0 no wireless extensions.
eth1 IEEE 802.11-DS ESSID:”HOME” Nickname:”linux”
Mode:Managed Frequency:2.437GHz Access Point: 00:30:AB:06:2E:50
Bit Rate:11Mb/s Tx-Power=15 dBm Sensitivity:1/3
Retry limit:4 RTS thr:off Fragment thr:off
Encryption key:AECF-A00F-03
Power Management:off
Link Quality:50/92 Signal level:-39 dBm Noise level:-89 dBm
Rx invalid nwid:0 Rx invalid crypt:0 Rx invalid frag:0
Tx excessive retries:0 Invalid misc:0 Missed beacon:0
Here the eth1 interface refers to the wireless network card. I edited the
encryption key and some other parameters to hide those details, but the
sample output shows you what you’d typically see when the wireless link is
working.
Checking Whether Your Network Is Up
Regardless of whether you use a dialup modem or a cable modem or DSL to
connect to the Internet, sometimes you need to find out whether the network
Figure 8-6:
Enter
parameters
for the
wireless
Ethernet
card in this
screen.
133
Chapter 8: Setting Up an Ethernet LAN with Wireless Access
13_754935 ch08.qxp 11/7/05 9:40 PM Page 133
is working. SUSE Linux includes several commands to help you monitor and
diagnose problems. These tasks are best done by typing commands in a ter-
minal window. I explain a few useful network commands.
Checking the network interfaces
Use the /sbin/ifconfig command to view the currently configured net-
work interfaces. The ifconfig command is used to configure a network
interface (that is, to associate an IP address with a network device). If you
run ifconfig without any command line arguments, the command displays
information about current network interfaces. The following is typical output
when you type /sbin/ifconfig in a terminal window:
eth0 Link encap:Ethernet HWaddr 00:08:74:E5:C1:60
inet addr:192.168.0.6 Bcast:192.168.0.255 Mask:255.255.255.0
inet6 addr: fe80::208:74ff:fee5:c160/64 Scope:Link
UP BROADCAST RUNNING MULTICAST MTU:1500 Metric:1
RX packets:93700 errors:0 dropped:0 overruns:1 frame:0
TX packets:74097 errors:0 dropped:0 overruns:0 carrier:0
collisions:0 txqueuelen:1000
RX bytes:33574333 (32.0 Mb) TX bytes:8832457 (8.4 Mb)
Interrupt:10 Base address:0x3000
eth1 Link encap:Ethernet HWaddr 00:02:2D:8C:F8:C5
inet addr:192.168.0.8 Bcast:192.168.0.255 Mask:255.255.255.0
inet6 addr: fe80::202:2dff:fe8c:f8c5/64 Scope:Link
UP BROADCAST RUNNING MULTICAST MTU:1500 Metric:1
RX packets:3403 errors:0 dropped:0 overruns:0 frame:0
TX packets:22 errors:1 dropped:0 overruns:0 carrier:0
collisions:0 txqueuelen:1000
RX bytes:254990 (249.0 Kb) TX bytes:3120 (3.0 Kb)
Interrupt:3 Base address:0x100
lo Link encap:Local Loopback
inet addr:127.0.0.1 Mask:255.0.0.0
inet6 addr: ::1/128 Scope:Host
UP LOOPBACK RUNNING MTU:16436 Metric:1
RX packets:3255 errors:0 dropped:0 overruns:0 frame:0
TX packets:3255 errors:0 dropped:0 overruns:0 carrier:0
collisions:0 txqueuelen:0
RX bytes:2686647 (2.5 Mb) TX bytes:2686647 (2.5 Mb)
This output shows that three network interfaces — the loopback interface
(lo) and two Ethernet cards (eth0 and eth1) — are currently active on this
system. For each interface, you can see the IP address, as well as statistics on
packets delivered and sent. If the SUSE Linux system has a dialup link up and
running, you also see an item for the ppp0 interface in the output.
134
Part II: Test-Driving SUSE
13_754935 ch08.qxp 11/7/05 9:40 PM Page 134
Checking the IP routing table
Another network configuration command, /sbin/route, provides status
information when it is run without any command line argument. If you’re
having trouble checking a connection to another host (that you specify with
an IP address), check the IP routing table to see whether a default gateway is
specified. Then check the gateway’s routing table to ensure that paths to an
outside network appear in that routing table.
A typical output from the /sbin/route command looks like the following:
/sbin/route
Kernel IP routing table
Destination Gateway Genmask Flags Metric Ref Use Iface
192.168.0.0 * 255.255.255.0 U 0 0 0 eth0
192.168.0.0 * 255.255.255.0 U 0 0 0 eth1
169.254.0.0 * 255.255.0.0 U 0 0 0 eth1
127.0.0.0 * 255.0.0.0 U 0 0 0 lo
default 192.168.0.1 0.0.0.0 UG 0 0 0 eth0
As this routing table shows, the local network uses the eth0 and eth1
Ethernet interfaces, and the default gateway is the eth0 Ethernet interface.
The default gateway is a routing device that handles packets addressed to
any network other than the one in which the Linux system resides. In this
example, packets addressed to any network address other than those begin-
ning with 192.168.0 are sent to the gateway — 192.168.0.1. The gateway for-
wards those packets to other networks (assuming, of course, that the
gateway is connected to another network, preferably the Internet).
Checking connectivity to a host
To check for a network connection to a specific host, use the ping command.
ping is a widely used TCP/IP tool that uses a series of Internet Control Message
Protocol (ICMP, pronounced eye-comp) messages. ICMP provides for an Echo
message to which every host responds. Using the ICMP messages and replies,
ping can determine whether or not the other system is alive and can compute
the round-trip delay in communicating with that system.
The following example shows how I run ping to see whether a system on my
network is alive:
ping 192.168.0.1
135
Chapter 8: Setting Up an Ethernet LAN with Wireless Access
13_754935 ch08.qxp 11/7/05 9:40 PM Page 135
Here is what this command displays on my home network:
PING 192.168.0.1 (192.168.0.1) 56(84) bytes of data.
64 bytes from 192.168.0.1: icmp_seq=1 ttl=63 time=0.256 ms
64 bytes from 192.168.0.1: icmp_seq=2 ttl=63 time=0.267 ms
64 bytes from 192.168.0.1: icmp_seq=3 ttl=63 time=0.272 ms
64 bytes from 192.168.0.1: icmp_seq=4 ttl=63 time=0.267 ms
64 bytes from 192.168.0.1: icmp_seq=5 ttl=63 time=0.275 ms
192.168.0.1 ping statistics
5 packets transmitted, 5 received, 0% packet loss, time 3999ms
rtt min/avg/max/mdev = 0.256/0.267/0.275/0.016 ms
In SUSE Linux, ping continues to run until you press Ctrl+C to stop it; then
it displays summary statistics showing the typical time it takes to send a
packet between the two systems. On some systems, ping simply reports
that a remote host is alive. However, you can still get the timing information
by using appropriate command line arguments.
The ping command relies on ICMP messages that many firewalls are config-
ured to block. Therefore, ping may not always work and is no longer a reli-
able way to test network connectivity. If ping fails for a specific host, do not
assume that the host is down or not connected to the network. You can still
use ping to successfully check connectivity within your local area network.
136
Part II: Test-Driving SUSE
13_754935 ch08.qxp 11/7/05 9:40 PM Page 136
Part III
Doing Stuff
with SUSE
14_754935 pt3.qxp 11/7/05 9:40 PM Page 137
In this part . . .
S
o what’s this SUSE Linux thing good for? Can you do
anything useful with it? This part answers your ques-
tions about how to do some productive (and maybe even
entertaining) work in SUSE Linux. I cover a number of
things that you might want to do with a computer —
browse the Web, e-mail, read newsgroups, and do office
work (write reports, prepare spreadsheets, and make pre-
sentations). I also describe some fun things such as play-
ing music, burning CDs, and using digital cameras. Finally,
I introduce you to the shell and the command line. (GUI
desktops are great, but in a pinch, you need to know what
to do at the command prompt.)
14_754935 pt3.qxp 11/7/05 9:40 PM Page 138
Chapter 9
Browsing the Web
In This Chapter
ᮣ Discovering the World Wide Web
ᮣ Understanding a URL
ᮣ Taking stock of Web browsers in SUSE Linux
ᮣ Web browsing with Konqueror in KDE
ᮣ Web browsing with Mozilla in GNOME
ᮣ Introducing Epiphany and Firefox in GNOME
Y
ou probably already know about the Web, but did you know that the
Web, or more formally the World Wide Web, made the Internet what it is
today? The Internet has been around for quite a while, but it did not reach a
mass audience until the Web came along in 1993.
Before the Web came along, you had to use arcane UNIX commands to down-
load and use files, which were simply too complicated for most of us. With
the Web, however, anyone can enjoy the benefits of the Internet by using a
Web browser — a graphical application that downloads and displays Web
documents. A click of the mouse is all you need to go from reading a docu-
ment from your company Web site to downloading a video clip from across
the country.
In this chapter, I briefly describe the Web and introduce you to the Web
browsers in KDE and GNOME. In KDE, the primary Web browser is
Konqueror, which also doubles as a file manager. In GNOME, you have a
choice of three Web browsers — Mozilla, Firefox, and Epiphany. I introduce
you to all of these Web browsers in this chapter, but after you have used one
Web browser, you can easily use any other Web browser.
Understanding the World Wide Web
If you have used a file server at work, you know the convenience of sharing
files. You can use the word processor on your desktop to get to any docu-
ment on the shared server.
15_754935 ch09.qxp 11/7/05 9:58 PM Page 139
Now imagine a word processor that enables you to open and view a document
that resides on any computer on the Internet. You can view the document in its
full glory, with formatted text and graphics. If the document makes a reference
to another document (possibly residing on yet another computer), you can
open that linked document by clicking the reference. That kind of easy access
to distributed documents is essentially what the World Wide Web provides.
Of course, the documents have to be in a standard format, so that any com-
puter (with the appropriate Web browser software) can access and interpret
the document. And a standard protocol is necessary for transferring Web
documents from one system to another.
The standard Web document format is Hypertext Markup Language (HTML),
and the standard protocol for exchanging Web documents is Hypertext
Transfer Protocol (HTTP). HTML documents are text files and don’t depend on
any specific operating system, so they work on any system from Windows
and Mac to any type of UNIX and Linux.
A Web server is software that provides HTML documents to any client that
makes the appropriate HTTP requests. A Web browser is the client software
that actually downloads an HTML document from a Web server and displays
the contents graphically.
Links and URLs
Like the pages of real books, Web pages contain text and graphics. Unlike real
books, however, Web pages can include multimedia, such as video clips, sound,
and links to other Web pages that can actually take you to those Web pages.
The links in a Web page are references to other Web pages that you can
follow to go from one page to another. The Web browser typically displays
these links as underlined text (in a different color) or as images. Each link is
like an instruction to you — something like, “For more information, please
consult Chapter 4,” that you might find in a real book. In a Web page, all you
have to do is click the link; the Web browser brings up the referenced page,
even though that document may actually reside on a faraway computer
somewhere on the Internet.
The links in a Web page are referred to as hypertext links because when you
click a link, the Web browser jumps to the Web page referenced by that link.
This arrangement brings up a question. In a real book, you might refer the
reader to a specific chapter or page in the book. How does a hypertext link
indicate the location of the referenced Web page? In the World Wide Web,
each Web page has a special name, called a Uniform Resource Locator (URL).
A URL uniquely specifies the location of a file on a computer. Figure 9-1 shows
the parts of a URL.
140
Part III: Doing Stuff with SUSE
15_754935 ch09.qxp 11/7/05 9:58 PM Page 140
As Figure 9-1 shows, a URL has the following parts:
ߜ Protocol: Name of the protocol that the Web browser uses to access the
data from the file the URL specifies. In Figure 9-1, the protocol is
http://, which means that the URL specifies the location of a Web
page. Here are some of the common protocol types and their meanings:
• file:// means the URL is pointing to a local file. You can use this
URL to view HTML files without having to connect to the Internet.
For example, file:///srv/www/html/index.html opens the
file /srv/www/html/index.html from your Linux system.
• ftp:// means that you can download a file using the File Transfer
Protocol (FTP). For example, />uns/NASA/nasa.jpg refers to the image file nasa.jpg from the
/pub/uns/NASA directory of the FTP server ftp.purdue.edu. If
you want to access a specific user account via FTP, use a URL in
the following form:
ftp://username:/
with the username and password embedded in the URL. (Note that
the password is in plain text and not secure.)
• http:// means that the file is downloaded using the Hypertext
Transfer Protocol (HTTP). This protocol is the well-known format
of URLs for all Web sites, such as for
Novell’s home page. If the URL does not have a filename, the Web
server sends a default HTML file named index.html. (That’s the
default filename for the popular UNIX-based Apache Web servers;
Microsoft Windows Web servers use a different default filename.)
• https:// specifies that the file is accessed through a Secure
Sockets Layer (SSL) connection — a protocol designed by
Netscape Communications for encrypted data transfers across the
Internet. This form of URL is typically used when the Web browser
sends sensitive information (such as a credit card number, user-
name, and password) to a Web server. For example, a URL such as
/>Protocol
Domain name
Directory
path
HTML
anchor
Filename
Port
Figure 9-1:
The parts of
a Uniform
Resource
Locator
(URL).
141
Chapter 9: Browsing the Web
15_754935 ch09.qxp 11/7/05 9:58 PM Page 141
may display an HTML form that requests credit card information
and other personal information (such as name, address, and phone
number).
• mailto:// specifies an e-mail address that you can use to send an
e-mail message. This URL opens your e-mail program from where
you can send the message. For example, mailto:webmaster@
someplace.com refers to the Webmaster at the host
someplace.com.
• news:// specifies a newsgroup that you can read by means of the
Network News Transfer Protocol (NNTP). For example,
news://newsgroups.comcast.net/comp.os.linux.setup
accesses the comp.os.linux.setup newsgroup at the news
server newsgroups.comcast.net. If you have a default
news server configured for the Web browser, you can omit the
news server’s name and use the URL news:comp.os.linux.
setup to access the newsgroup.
ߜ Domain name: Contains the fully qualified domain name of the com-
puter that has the file this URL specifies. You can also provide an IP
address in this field. The domain name is not case-sensitive.
ߜ Port: Port number that is being used by the protocol listed in the first
part of the URL. This part of the URL is optional; all protocols have
default ports. The default port for HTTP, for example, is 80. If a site con-
figures the Web server to listen to a different port, the URL has to
include the port number.
ߜ Directory path: Directory path of the file being referred to in the URL.
For Web pages, this field is the directory path of the HTML file. The
directory path is case-sensitive.
ߜ Filename: Name of the file. For Web pages, the filename typically ends
with .htm or .html. If you omit the filename, the Web server returns a
default file (often named index.html). The filename is case-sensitive.
ߜ HTML anchor: Optional part of the URL that makes the Web browser
jump to a specific location in the file. If this part starts with a question
mark (?) instead of a hash mark (#), the browser takes the text following
the question mark to be a query. The Web server returns information
based on such queries.
Web servers and Web browsers
The Web server serves up the Web pages, and the Web browser downloads
them and displays them to the user. That’s pretty much the story with these
two cooperating software packages that make the Web work.
142
Part III: Doing Stuff with SUSE
15_754935 ch09.qxp 11/7/05 9:58 PM Page 142
In a typical scenario, the user sits in front of a computer that’s connected to
the Internet and runs a Web browser. When the user clicks a link or types a
URL into the Web browser, the browser connects to the Web server and
requests a document from the server. The Web server sends the document
(usually in HTML format) and ends the connection. The Web browser inter-
prets and displays the HTML document with text, graphics, and multimedia
(if applicable). Figure 9-2 illustrates this typical scenario of a user browsing
the Web.
The Web browser’s connection to the Web server ends after the server sends
the document. When the user browses through the downloaded document
and clicks another hypertext link, the Web browser again connects to the
Web server named in the hypertext link, downloads the document, ends the
connection, and displays the new document. That’s how the user can move
from one document to another with ease.
A Web browser can do more than simply “talk” HTTP with the Web server —
in fact, Web browsers can also download documents using FTP, and many
have integrated mail and newsreaders as well.
Web server sends
back the requested
Web page
Web browser connects
to the server and
requests a Web page
User
Web Browser
Web Server
Internet
HTTP
Figure 9-2:
The Web
browser
requests
documents,
and the
Web server
sends them.
143
Chapter 9: Browsing the Web
15_754935 ch09.qxp 11/7/05 9:58 PM Page 143
Web Browsing in SUSE Linux
Web browsing is fun because so many of today’s Web pages are so full of graph-
ics and multimedia. Then there’s the element of surprise — you can click a link
and end up at an unexpected Web page. Links are the most curious (and
useful) aspect of the Web. You can start at a page that shows today’s weather
and a click later, you can be reading this week’s issue of Time magazine.
To browse the Web, all you need is a Web browser and an Internet connec-
tion. I assume that you’ve already taken care of the Internet connection (see
Chapter 7 if you haven’t yet set up your Internet connection), so all you need
to know are the Web browsers in SUSE Linux.
SUSE Linux comes with the Firefox Web browser. Firefox is Mozilla’s next-
generation browser that blocks popup ads, provides tabs for easily viewing
multiple Web pages in a single window, and includes a set of privacy tools. On
KDE desktops you can also use the Konqueror file manager as a Web browser.
Both Firefox and Konqueror are intuitive to use. I introduce them in the next
few sections.
Web Browsing with Konqueror
Konqueror is not only a file manager, but also a Web browser. Konqueror
starts with a Web browser view if you start Konqueror by clicking the Web
browser icon on the KDE panel (mouse over and read the help balloon to find
it). On the other hand, if you start Konqueror by clicking the home folder
icon (the second icon from left on the KDE panel), you can switch to a Web
browser view by choosing Settings➪Load View Profile➪Web Browsing from
Konqueror’s menu. Yet another way to start the Konqueror Web browser is to
select Main Menu➪Internet➪Web Browser➪Web Browser (Konqueror) from
the KDE desktop.
To browse the Web using Konqueror, click the Web browser button on the
KDE panel. Konqueror starts with the initial Web browser view that shows
Konqueror’s About page — a Web page with information about Konqueror
itself, as shown in Figure 9-3.
To visit a specific Web page, simply enter the URL (the “link”) in the Location
bar (refer to Figure 9-3). You can type the URL without the http:// prefix.
For example, if the URL is , you can simply type
www.irs.gov in the Location bar and then press Enter. Konqueror opens the
new Web page in a new tab.
144
Part III: Doing Stuff with SUSE
15_754935 ch09.qxp 11/7/05 9:58 PM Page 144
To open another tab to load a new Web page, choose Location➪New Tab
from the Konqueror menu. You can then type a new URL in the Location box,
and that Web page appears in the new tab. Figure 9-4 shows Konqueror’s Web
browser view with a few Web pages loaded in different tabs (notice the tabs
just below the Location field). This style of browsing is called tabbed Web
browsing and, as you can see, Konqueror can do tabs. By the way, you can
switch between Web pages by clicking the tabs.
Figure 9-4 shows the key parts of the Konqueror Web browser’s window. Here
is a quick rundown of some of the features:
ߜ Search: You can perform a Google search by typing search words in the
text field on the right end of the Location bar.
ߜ Font size: Click the magnifying glass icon to increase or decrease the
font size.
ߜ Tabs: Click the button on the left end of the tabs to open a new tab, and
the one on the rightmost edge to close the current tab.
ߜ Clone window: Click the K button on the top right to clone the current
Konqueror window, including all the tabs.
ߜ Location: Type the URL in the Location bar and press Enter or click the Go
button (on the right end of the Location bar) to load that URL. To clear the
Location bar, click the button with an X at the left end of the Location bar.
Play around with Konqueror and you will realize that it’s more powerful than
it first appears.
Figure 9-3:
Konqueror
starts with
its initial
Web
browser
view.
145
Chapter 9: Browsing the Web
15_754935 ch09.qxp 11/7/05 9:58 PM Page 145
Web Browsing with Firefox
You can start Firefox by choosing Main Menu➪Internet➪Web Browser➪
Web Browser (Firefox) from the GUI desktop.
Back
Go to URL
typ ed in
Location bo x
Goog le search
(typ e search words
and press Enter)
Security
information
Download
manager
Decrease font size
Increase font siz e
Fin d text
Reload
Hom e Folder
Forward
Clone this Konquer or windo w
Close current tab
Menu bar
Toolbar
Location bar
Click to clear Location
Tabs
Open a new tab
Figure 9-4:
Konqueror
supports
tabbed Web
browsing.
146
Part III: Doing Stuff with SUSE
15_754935 ch09.qxp 11/7/05 9:58 PM Page 146
When Firefox starts, it displays a browser window with a default home page.
(The home page is a Web page that a Web browser loads when you first start it.)
You can configure Firefox to use a different Web page as the default home page.
Figure 9-5 shows a Web page from a U.S. government Web site (www.gao.gov),
as well as the main elements of the Firefox browser window. Note that Firefox
supports tabbed browsing, which means that you can open a new tab (by
pressing Ctrl+T or by selecting File➪New Tab) and view a Web page in that tab.
That way, you can view multiple Web pages in a single window.
Go to URL
typed in the
Location
text box
Google search
(type search
words and
press Enter)
Location text box
Home page
Stop
Reload
Forward
Back
Navigation toolbar
Menu bar
Bookmarks
bar
Tabs
Current Web page
Status bar
Figure 9-5:
The Firefox
Web
browser in
action.
147
Chapter 9: Browsing the Web
15_754935 ch09.qxp 11/7/05 9:58 PM Page 147
Getting familiar with Firefox
The Firefox Web browser includes lots of features in its user interface, but
you can master it easily. You can turn off some of the items that make it look
busy. You can also start with just the basics to get going with Firefox and then
gradually expand to areas that you haven’t yet explored.
Firefox toolbars
Starting from the top of the window, you see a menu bar with the standard
menus (File, Edit, and so forth), followed by the two toolbars — the
Navigation toolbar and the Bookmarks toolbar. The area underneath the
Bookmarks toolbar is where the current Web page appears.
Here’s what you can do with the buttons on the Navigation toolbar that
appear just below the menu bar, from left to right:
ߜ Back: Move to the previous Web page.
ߜ Forward: Move to the page from which you may have gone backward.
ߜ Reload: Reload the current Web page.
ߜ Stop: Stop loading the current page.
ߜ Home Page: Open the home page (you can change the home page from
the Edit➪Preferences menu).
ߜ Location text box: Show the URL of the current Web page. (Type a URL
in this box to view that Web page.)
ߜ Go: Go to the URL typed in the Location text box.
ߜ Google Search: Click to display search engines; type text and press
Enter to search using currently selected search engine (default search
engine is Google).
Immediately below the Navigation toolbar is the Bookmarks toolbar with but-
tons that take you to specific Web pages.
Status bar
You can think of the bar along the bottom edge of the Firefox window as the
status bar because the left part of that area displays status information as
Firefox loads a Web page.
In the right corner of Firefox’s status bar, a security padlock icon appears when
you access a secure Web site. Firefox supports a secure version of HTTP that
uses a protocol called Secure Sockets Layer (SSL) to transfer encrypted data
between the browser and the Web server. When Firefox connects to a Web
server that supports secure HTTP, a locked security padlock icon appears on
the right edge of the status bar. Otherwise the security padlock is open, signify-
ing an insecure connection. The URL for secure HTTP transfers begins with
https:// instead of the usual http://. (Note the extra s in https.)
148
Part III: Doing Stuff with SUSE
15_754935 ch09.qxp 11/7/05 9:58 PM Page 148
Firefox displays status messages in the left part of the status bar. You can
watch the messages in this area to see what’s going on. If you mouse over a
link on the Web page, the status bar displays the URL for that link.
Firefox menus
I haven’t mentioned the Firefox menus much. That’s because you can usually
get by without having to go to them. Nevertheless, taking a quick look through
the Firefox menus is worthwhile so you know what each one offers. In partic-
ular, you can use the Edit➪Preferences menu to change settings such as your
home page.
Changing your home page
Your home page is the Web page that Firefox loads when you start it. By
default, Firefox displays a blank page. Changing the home page is easy.
First locate the page on the Web that you want to be the home page. You can
get to that page any way you want. You can search with a search engine to
find the page you want, you can type the URL in the Location text box, or you
may even accidentally end up on a page that you want to make your home
page. It doesn’t matter.
When you’re viewing the Web page that you want to make your home page in
Firefox, choose Edit➪Preferences from the Firefox menu. The Preferences
dialog box appears, as shown in Figure 9-6.
Figure 9-6:
Click the
Use Current
Page button
to make the
current Web
page your
home page.
149
Chapter 9: Browsing the Web
15_754935 ch09.qxp 11/7/05 9:58 PM Page 149