Rapid GUI Development with QtRuby phần 4 docx
Bạn đang xem bản rút gọn của tài liệu. Xem và tải ngay bản đầy đủ của tài liệu tại đây (460.79 KB, 12 trang )
F
ridays
CHAPTER 4. GET YOUR FEET WET THE QT::APPLICATION CLASS 31
child_3 = Qt::Label.new(child_1) { setText(
"Some Text"
) }
4.5 The Qt::Application class
In Section 4.1, Your first program, on page 19, we briefly discussed
the necessity of a Qt::Application class. Let’s examine this a little fur-
ther.
Qt::Application is the heart of the QtRuby application. It handles most
Qt::Application has a number of global application
prop
erties that may be of interest.
of the underlying details that make up a GUI application—things
l
ike maintaining a common look and feel amongst widgets, manag-
ing an interprogram clipboard, mouse cursor settings, and interna-
tionalization of user visible text. It also talks with the window system
With a few exceptions, every QtRuby program must have
one instance of the Qt::Application class. Because of its
importance, the
Qt::Application object must be created
befo
re any other GUI relat e d object.
and dispatches events to the widgets in the program.
The
Qt:
:Application object is the first QtRuby object your program
s
houl
d initialize. Otherwise, your application most likely will abort.
irb(main):001:0> require 'Qt'
=> true
irb(main):002:0> w = Qt::Widget.new(nil)
QPaintDevice: Must construct a QApplication before a QPaintDevice
user@localhost ~ $
irb(main):001:0>
require 'Qt'
=> true
irb(main):002:0> app = Qt::Application.new(ARGV)
=> #<Qt::Application:0xb6aa095c
name="irb">
irb(main):003:0> w = Qt::Widget.new(nil)
=> #<Qt::Widget:0xb6a9d914 name="unnamed">
Starting the Event Loop
After the Qt::Application instance has been created, you can initialize
the widgets that make up the program.
Report erratum
BOOKLEET ©
F
ridays
CHAPTER 4. GET YOUR FEET WET THE QT::APPLICATION CLASS 32
After the program has been completely set up, you call the exec( )
method of the Qt::Application object. The ex ec( ) method start s t he
event
loop processing of the application. The event loop waits for
Note: it’s OK to d e fine custom widgets b e f o r e creating your
Qt::Application instance—just don’t try to initial i ze one.
GUI events to happen and processes them accordingly. For exam-
ple, it might see that a keyboard button was pressed a nd attempt
to send t he information about the button press event t o the widget
which is interested in receiving it.
The
exec( ) method only returns when the mainWidget o f the applica-
tion
is destroyed or Qt::Application’s exit( ) is called.
The exec( ) method returns the Qt::Application exit( )
code.
app = Qt::Application.new(ARGV)
widget = Qt::Widget.new(nil)
app.setMainWidget(widget)
app.exec
# We only get to this point if widget gets
# destroyed, meaning our application is
# closing.
Event driven programming
Many programmers, even experienced ones, struggle the first time
t
hey w
rite a GUI application. Most GUI applications have event driven
flow, which differs from the linear flow that most common pr o gram-
ming languages are written in.
In a QtRuby application, the event loop handles all of the process-
ing of information. Prior to starting the event loop (using the
exec( )
method of the Qt::Application class), we specify the types of events we
are i
nterested in and what to do when these events happen. In the
most basic for m, this is handled by signal and slot connections as
described in Section 5.5, S
ignals and Slots,
o
n
page 47.
We’d like to stress that once the event loop has sta rted, there is
Report erratum
BOOKLEET ©
F
ridays
CHAPTER 4. GET YOUR FEET WET SUMMARY 33
no real direct control over what’s happening. That is, we don’t have
a sec
tion of Ruby code that is looping over and over again like in
a linear flow program. Instead, we predefine the processing we’d
like to have happen when events occur and we let the event loop
take care of looking for these events and dispatching them to us
accordingly.
We’ll see examples of how t his works shortly.
Well, it seems like we’ve been pretty thorough in our discussion on
the basics of Qt’s widgets. When you’re ready, let’s tie together what
we’ve learned.
4.6 Summary
• All QtRuby widgets inherit from the base class Qt::Widget. This
in tu
rn inherits from Qt::Object.
• All QtRuby widgets fit into an overall family tree structure.
Child w idgets are contained within the physical geometry of
the parent. Destruction of a widget cau ses all of its descen-
dants to be destroyed as well.
• Every QtRuby program needs one and only one Qt::Application
instance. It must be created before any GU I widgets are initial-
i
zed
.
• The application event loop starts with a call to
Qt::Application’s
exec( ) method. The method only returns w hen the main appli-
c
ation widget is destroyed.
Report erratum
BOOKLEET ©
F
ridays
Chapter 5
Take the Plunge
As we discussed in the last chapter, widgets are the building blocks
of GUI applications. With QtRuby, we can use widgets fr o m the
toolkit and combine them into more complex widgets, encapsulating
their functionality.
5.1 Your First Custom Widget
Let’s take a look at a more complicated program, in which we create
When creating your own widget classes, it is
important to remem ber not to give them
names in the Qt namespace, such as
Qt::MyWidget. While not technically wrong,
classes you create in this namespace could
conflict with existing classes already in the
namespace, causing erratic program
behavior.
our own custom widget. See if you can figure out what’s going on.
require
'Qt'
class MyWidget < Qt::Widget
def initialize(parent=nil)
super(parent)
@label = Qt::Label.new(
self)
@button = Qt::PushButton.new(self)
@layout = Qt::VBoxLayout.new(self)
@layout.addWidget(@label)
@layout.addWidget(@button)
@clicked_times = 0
@label.setText(
"The button has been clicked "
+
@clicked_times.to_s +
" times"
)
@button.setText(
"My Button"
)
end
end
a = Qt::Application.new(ARGV)
mw = MyWidget.new
a.setMainWidget(mw)
mw.show
BOOKLEET ©
F
ridays
CHAPTER 5. TAKE THE PLUNGE YOUR FIRST CUSTOM WIDGET 35
a.exec
Some of the concepts discussed before are repeated in this code.
Howe
ver, there’s some new stuff. First, note that we create a new
widget, MyWidget, from an existing widget class.
class MyWidget < Qt::Widget
When creating a new GUI widget, it is important to inherit from a
base QtRuby widget class such as Qt::Widget. By doing so, we gain
the bu
ilt in methods and properties that all widgets should have,
such as a size.
Since our goal is to make a new widget that is the
combination of a couple of other widgets, we base our
widget o ff of
Qt::Widget. If we wanted to extend an
already existing widget, we c o uld have based our new class
directly off of it instead.
In the next part, we define the initialization code for o ur widget.
def initialize(parent=nil)
super(parent)
@label = Qt::Label.new(self)
@button = Qt::PushButton.new(self)
@layout = Qt::VBoxLayout.new(
self)
The first thing we do in our initializer is make a call to super( ). This
step is very important. Calling super( ) explicitly runs the initializer
in our inherited class (Qt::Widget in this case). Setu p code defined
within our base class initializer will only be executed with a call to
super( ).
Note: Supplying the argument list to super
( ) is optional in
Ruby, as long as the superclass has the same argument list
as the su bclass.
We also create some child widgets in our MyWi dget class. In this case,
we are creating a Qt::Label, Qt::PushButton, Qt::VBoxLayout.
When creating new widgets, we pass
self as their parent argument.
Okay, we fibbed a little. Some items that get
used from the toolkit aren’t technically
widgets. In the example above,
Qt::Label and
Qt::PushButton are both widgets, because they
i
n
h
er
it from the Qt::Widget class. However, items
such
as the Qt::VBoxLayout class don’t inherit from
Qt::Widget (because they don’t need to).
This tells each of the new widgets that their parent is the instance
o
f the
widget currently being defined.
In the next section, we add our child widgets to the layout:
Report erratum
BOOKLEET ©
F
ridays
CHAPTER 5. TAKE THE PLUNGE WIDGET GEOMETRY 36
@layout.addWidget(@label)
@layout.addWidget(@button)
We p
ut our widgets into the layout because we want to make use of
the layout’s ability to automatically resize and maintain our w idgets
within the program boundaries.
Finally, we put a few finishing touches on our widgets:
@clicked_times = 0
@
label.setText(
"The button has been clicked "
+
@clicked_times.to_s +
" times"
)
@button.setText(
"My Button"
)
Both the Qt::Label and Qt::PushButton classes have setText( ) methods
that, well, set the text displayed on the widget.
With our
MyWidget widget class fully defined, we can finally create a
Qt::Application to display the w idget on screen.
In these examples, we could have gotten
away with not creating a layout, but the
widgets would not change size if we resized
the application window and they may have
overlapped each other. This is usually not
desirable behavior.
a = Qt::Application.new(ARGV)
mw = MyWidget.new
a.setMainWidget(mw)
mw.show
a.exec
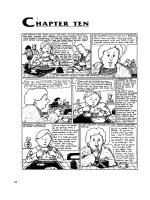
Finally, we can run the code and see our program pop up a window
like
that in Figure 5.1, on the following page
5.2 Wid get Geometry
Qt::Widget classes provide several functions used in dealing with the
w
i
d
g
et geometry. The methods width( ) and height( ) return the width
Report erratum
BOOKLEET ©
F
ridays
CHAPTER 5. TAKE THE PLUNGE WIDGET GEOMETRY 37
Figure 5.1: Screenshot of Example 2
and height of the widget, in pixels. The width and height values do
not ta
ke into account a window frame which may surround a top
level widget.
The method
size( ), which returns a Qt::Size object, contains the same
i
nformation encapsulated inside of a Qt::Size object.
Another method,
geometry( ) returns a Qt::Rect object containing both
t
he wi
dget’s size and relative position within its parent. The position
is defined in x and y coordinates, with x being the pixel distance
from the left side of the parent and y being the pixel distance from
the top of the parent.
Other methods include: x( ), y( ), and pos( ) which also return the wid-
Since some methods take into account
window frame geometr y (for top level widgets)
and others don’t, we recommend reading
over
Qt’s Window Geometry documentation. I t
also
includes ti ps on how to save an d restore a
widget’s geometry between applica tion
sessions.
get’s relat ive position from within its parent. These methods, how-
ever
, do take into account a window frame if the widget happens to
be a top level widget.
Changing Geometry
It is possible to move a widget around within its parent using the
metho
ds move(int x,int y) and move(Qt::Point). You can also resize a wid-
get using the methods resize(int x,int y) and resize(Qt::Size).
Report erratum
BOOKLEET ©
F
ridays
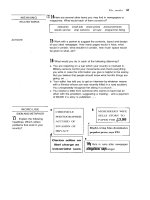
CHAPTER 5. TAKE THE PLUNGE UNDERSTANDING LAYOUTS 38
widget
x(), y()
height()
width()
size()
geometry()
pos()
Figure 5.2: Widget Geometry
To perform both operations at the same time, use the methods set-
Geometry(int x,int y,int h, int w) or setGeometry(Qt::Rect).
5.3 Understanding Layouts
As we’ve seen, we can set the widget size and position within its par-
ent ma
nually. However, manual geometry management of widgets is
tough. Each application is only given a select amount of screen real
estate to work with and each widget in that application has to have
its geometry managed. If a parent widget gets resized smaller, for
example, at least one child will need to be r esized as well, or some
clipping of the child will occur.
Fortunately, QtRuby comes with a rich set of layout management
classes which greatly simplify this task.
The class
Qt::Layout is at the heart of layout management. Qt::Layout
provides a very robust interface for management of widget layout .
I
n ma
ny cases, there is no need for the complex interfa ce provided
by Qt::Layout. For the simpler cases, QtRuby provides three conve-
Report erratum
BOOKLEET ©
F
ridays
CHAPTER 5. TAKE THE PLUNGE UNDERSTANDING LAYOUTS 39
Qt::HBoxLayout Qt::VBoxLayout
Qt::BoxLayout Qt::GridLayout
Qt::Layout
Figure 5.3: Layout class inheritance diagram
nience classes based on Qt::Layout: Qt::HBoxLayout, Qt::VBoxLayout, and
Qt::GridLayout.
The Qt Layout Classes guide gives some more
insight into the use of these classes.
Layout classes
The BoxLayout classes handle laying out widgets in a straight line
(vertically with Qt::VBoxLayout or horizontally with Qt::HBoxLayout). To
utilize a BoxLayout class, simply create an instance of whichever lay-
out i
s desired and use its addWidget( ) method to add widgets into the
layout.
Alternatively, the
Qt::GridLayout allows you to place widgets into a grid
a
s shown in Figure 5.4, on the next page.
w = Qt::Widget.new(nil)
g
l
=
Qt::GridLayout.new(3,4) #
3 rows by 4 columns
# put w into the first row and column
Report erratum
BOOKLEET ©
F
ridays
CHAPTER 5. TAKE THE PLUNGE UNDERSTANDING LAYOUTS 40
w
Qt::GridLayout
Figure 5.4: Qt::GridLayout Example
gl.addWidget(w, 0, 0)
Sublayouts
Layouts can also have sublayouts contained wit hin them. For exam-
ple t
his code creates a sublayout as shown on Figure 5.5, on the
following page.
@layout = Qt::HBoxLayout.new
@sublayout = Qt::VBoxLayout.new
@w1 = Qt::Widget.new
@w2 = Qt::Widget.new
@w3 = Qt::Widget.new
@sublayout.addWidget(w1)
@sublayout.addWidget(w2)
@layout.addLayout(@sublayout)
@layout.addWidget(@w3)
Report erratum
BOOKLEET ©
F
ridays
CHAPTER 5. TAKE THE PLUNGE UNDERSTANDING LAYOUTS 41
@w1
@w2
@w3
@layout
@sublayout
Figure 5.5: Layout and Sublayout Example
In Figure 5.6, on the next page we demonstrate why sublayouts
are c
onvenient. On the left side we created a Qt::VBoxLayout con-
taining three Qt::CheckBoxes. Then we nested this layout inside of
a Qt::HBoxLayout and also put in a Qt::Dial. As you can see, the sublay-
out allows us to group r elated items together in a logical wa y and
maintain the size and spacing policies we desire.
Layout properties
All layouts have two fundamental properties, margin and spacing.
These
are shown on Figure 5.7, on page 43. Spacing represents the
pixel space between each of the items within the layout. Margin rep-
resents an outer ring of pixel space surrounding t he layout. Both are
settable properties using the
setMargin( ) and setSpacing( ) methods.
In lieu of adding a widget or a sublayout into a Qt::Layout, there are
Report erratum
BOOKLEET ©
F
ridays
CHAPTER 5. TAKE THE PLUNGE UNDERSTANDING LAYOUTS 42
Figure 5.6: A Layout with a Nested Sublayout
some other interesting additions. addSpacing( ) allows you to add a
fixed amount of space directly in t he widget. addStretch( ) adds a
stetchable space in the widget.
Sizing up the situation
We highly recommend using the layout classes ov e r manual
mani
pulation of wid get geometry.
Layouts only define the placement of o bjects, not the space that they
are allotted. Fro m an outside perspective it may seem as though
all of the widgets should t ake up a proportionate amount of space
based on how many other widgets are in the layout. This layout
style, though, is not always ideal.
Report erratum
BOOKLEET ©