giới thiều ebook HTML5 và CSS3 in the real world phần 10 docx
Bạn đang xem bản rút gọn của tài liệu. Xem và tải ngay bản đầy đủ của tài liệu tại đây (1.64 MB, 88 trang )
localStorage["email"] = email;
localStorage["remember"] = "true";
}
Now that we have a function to save the visitor’s name and email address, let’s call
it if they check the “Remember me on this computer” checkbox. We’ll do this by
watching for the change event on the checkbox—this event will fire whenever the
checkbox’s state changes, whether due to a click on it, a click on its label, or a key-
board press:
js/rememberMe.js (excerpt)
$('document').ready(function() {
$('#rememberme').change(saveData);
});
Next, let’s make sure the checkbox is actually checked, since the change event will
fire when the checkbox is unchecked as well:
js/rememberMe.js (excerpt)
function saveData() {
if ($("#rememberme").attr("checked"))
{
var email = $("#address").val();
var name = $("#register-name").val();
localStorage["name"] = name;
localStorage["email"] = email;
localStorage["remember"] = “true”;
}
}
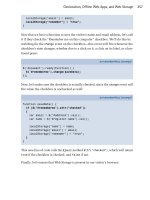
This new line of code calls the jQuery method attr("checked"), which will return
true if the checkbox is checked, and false if not.
Finally, let’s ensure that Web Storage is present in our visitor’s browser:
257Geolocation, Offline Web Apps, and Web Storage
js/rememberMe.js (excerpt)
function saveData() {
if (Modernizr.localstorage) {
if ($("#rememberme").attr("checked"))
{
var email = $("#address").val();
var name = $("#register-name").val();
localStorage["name"] = name;
localStorage["email"] = email;
localStorage["remember"] = “true”;
}
}
else
{
// no support for Web Storage
}
}
Now we’re saving our visitor’s name and email whenever the checkbox is checked,
so long as local storage is supported. The problem is, we have yet to actually do
anything with that data!
Let’s add another function to check and see if the name and email have been saved
and, if so, fill in the appropriate input elements with that information. Let’s also
precheck the “Remember me” checkbox if we’ve set the key "remember" to "true"
in local storage:
js/rememberMe.js (excerpt)
function loadStoredDetails() {
var name = localStorage["name"];
var email = localStorage["email"];
var remember = localStorage["remember"];
if (name) {
$("#name").val(name);
}
if (email) {
$("#email").val(name);
}
if (remember =="true") {
HTML5 & CSS3 for the Real World258
$("#rememberme").attr("checked", "checked");
}
}
Again, we want to check and make sure Web Storage is supported by the browser
before taking these actions:
js/rememberMe.js (excerpt)
function loadStoredDetails() {
if (Modernizr.localstorage) {
var name = localStorage["name"];
var email = localStorage["email"];
var remember = localStorage["remember"];
if (name) {
$("#name").val(name);
}
if (email) {
$("#email").val(name);
}
if (remember =="true") s{
$("#rememberme").attr("checked", "checked");
}
} else {
// no support for Web Storage
}
}
As a final step, we call the loadStoredDetails function as soon as the page loads:
js/rememberMe.js (excerpt)
$('document').ready(function(){
loadStoredDetails();
$('#rememberme').change(saveData);
});
Now, if the user has previously visited the page and checked “Remember me on
this computer,” their name and email will already be populated on subsequent
visits to the page.
259Geolocation, Offline Web Apps, and Web Storage
Viewing Our Web Storage Values with the Web
Inspector
We can use the Safari or Chrome Web Inspector to look at, or even change, the values
of our local storage. In Safari, we can view the stored data under the Storage tab, as
shown in Figure 10.6.
Figure 10.6. Viewing the values stored in local and session storage
In Chrome, the data can be viewed through the Resources tab.
Since the user owns any data saved to their hard drive, they can actually modify
the data in Web Storage, should they choose to do so.
Let’s try this ourselves. If you double-click on the “email” value in Web Inspector’s
Storage tab while viewing the register.html page, you can actually modify the value
stored there, as Figure 10.7 shows.
Figure 10.7. Modifying the values stored in Web Storage
HTML5 & CSS3 for the Real World260
There’s nothing we as developers can do to prevent this, since our users own the
data on their computers. We can and should, however, bear in mind that savvy
users have the ability to change their local storage data. In addition, the Web Storage
spec states that any dialogue in browsers asking users to clear their cookies should
now also allow them to clear their local storage. The message to retain is that we
can’t be 100% sure that the data we store is accurate, nor that it will always be there.
Thus, sensitive data should never be kept in local storage.
If you’d like to learn more about Web Storage, here are a few resources you can
consult:
■
The W3C’s Web Storage specification
18
■
The Mozilla Developer Network’s Web Storage documentation
19
■
Web Storage tutorial from IBM’s developerWorks
20
Additional HTML5 APIs
There are a number of other APIs that are outside the scope of this book. However,
we’d like to mention them briefly here, to give you an overview of what they are,
as well as give you some resources should you want to learn more.
Web Workers
The new Web Workers API allows us to run large scripts in the background without
interrupting our main page or web app. Prior to Web Workers, it was impossible to
run multiple JavaScript scripts concurrently. Have you ever come across a dialogue
like the one shown in Figure 10.8?
Figure 10.8. A script that runs for too long freezes the whole page
18
/>19
/>20
/>261Geolocation, Offline Web Apps, and Web Storage
With Web Workers, we should see less of these types of warnings. The new API
allows us to take scripts that take a long time to run, and require no user interaction,
and run them behind the scenes concurrently with any other scripts that do handle
user interaction. This concept is known as threading in programming, and Web
Workers brings us thread-like features. Each “worker” handles its own chunk of
script, without interfering with other workers or the rest of the page. To ensure the
workers stay in sync with each other, the API defines ways to pass messages from
one worker to another.
Web Workers are supported in:
■
Safari 4+
■
Chrome 5+
■
Firefox 3.5+
■
Opera 10.6+
Web Workers are currently unsupported in all versions of IE, iOS, and Android.
To learn more about Web Workers, see:
■
HTML5 Rocks, “The Basics of Web Workers”
21
■
Mozilla Developer Network, “Using Web Workers”
22
■
The W3C Web Workers’ specification
23
Web Sockets
Web Sockets defines a “protocol for two-way communication with a remote host.”
24
We’ll skip covering this topic for a couple of reasons. First, this API is of great use
to server-side developers, but is less relevant to front-end developers and designers.
Second, Web Sockets are still in development and have actually run into some se-
curity issues. Firefox 4 and Opera 11 have disabled Web Sockets by default due to
these issues.
25
21
/>22
/>23
/>24
/>25
See and
.
HTML5 & CSS3 for the Real World262
Web Sockets are supported in:
■
Safari 5+
■
Chrome 4+
■
Firefox 4+ (but disabled by default)
■
Opera 11+ (but disabled by default)
■
iOS (Mobile Safari) 4.2+
Web Sockets are currently unsupported in all versions of IE and on Android.
To learn more about Web Sockets, see the specification at the W3C:
/>Web SQL and IndexedDB
There are times when the 5MB of storage and simplistic key/value pairs offered by
the Web Storage API just aren’t enough. If you need to store substantial amounts of
data, and more complex relationships between your data, you likely need a full-
fledged database to take care of your storage requirements.
Usually databases have been unique to the server side, but there are currently two
database solutions proposed to fill this need on the client side: Web SQL and the
Indexed Database API (called IndexedDB for short). The Web SQL specification is
no longer being updated, and though it currently looks like IndexedDB is gaining
steam, it remains to be seen which of these will become the future standard for
serious data storage in the browser.
Web SQL is supported in:
■
Safari 3.2+
■
Chrome
■
Opera 10.5+
■
iOS (Mobile Safari) 3.2+
■
Android 2.1+
Web SQL is currently unsupported in all versions of IE and Firefox. IndexedDB,
meanwhile, is currently only supported in Firefox 4.
If you would like to learn more, here are a few good resources:
263Geolocation, Offline Web Apps, and Web Storage
■
Mark Pilgrim’s summary of local storage in HTML5
26
■
The W3C’s IndexedDB specification
27
■
The W3C’s Web SQL specification
28
Back to the Drawing Board
In this chapter, we’ve had a glimpse into the new JavaScript APIs available in the
latest generation of browsers. While these might for some time lack full browser
support, tools like Modernizr can help us gradually incorporate them into our real-
world projects, bringing an extra dimension to our sites and applications.
In the next—and final—chapter, we’ll look at one more API, as well as two tech-
niques for creating complex graphics in the browser. These open up a lot of potential
avenues for creating web apps that leap off the page.
26
/>27
/>28
/>HTML5 & CSS3 for the Real World264
Chapter
11
Canvas, SVG, and Drag and Drop
The HTML5 Herald is really becoming quite dynamic for an “ol’ timey” newspaper!
We’ve added a video with the new video element, made our site available offline,
added support to remember the user’s name and email address, and used geolocation
to detect the user’s location.
But there’s still more we can do to make it even more fun. First, the video is a little
at odds with the rest of the paper, since it’s in color. Second, the geolocation feature,
while fairly speedy, could use a progress indicator that lets the user know we haven’t
left them stranded. And finally, it would be nice to add just one more dynamic
piece to our page. We’ll take care of all three of these using the APIs we’ll discuss
in this chapter: Canvas, SVG, and Drag and Drop.
Canvas
With HTML5’s Canvas API, we’re no longer limited to drawing rectangles on our
sites. We can draw anything we can imagine, all through JavaScript. This can im-
prove the performance of our websites by avoiding the need to download images
off the network. With canvas, we can draw shapes and lines, arcs and text, gradients
and patterns. In addition, canvas gives us the power to manipulate pixels in images
and even video. We’ll start by introducing some of the basic drawing features of
canvas, but then move on to using its power to transform our video—taking our
modern-looking color video and converting it into conventional black and white to
match the overall look and feel of The HTML5 Herald.
The Canvas 2D Context spec is supported in:
■
Safari 2.0+
■
Chrome 3.0+
■
Firefox 3.0+
■
Internet Explorer 9.0+
■
Opera 10.0+
■
iOS (Mobile Safari) 1.0+
■
Android 1.0+
A Bit of Canvas History
Canvas was first developed by Apple. Since they already had a framework—Quartz
2D—for drawing in two-dimensional space, they went ahead and based many of
the concepts of HTML5’s canvas on that framework. It was then adopted by Mozilla
and Opera, and then standardized by the WHATWG (and subsequently picked up
by the W3C, along with the rest of HTML5).
There’s some good news here. If you aspire to do development for the iPhone or
iPad (referred to jointly as iOS), or for the Mac, what you learn in canvas should
help you understand some of the basics concepts of Quartz 2D. If you already develop
for the Mac or iOS and have worked with Quartz 2D, many canvas concepts will
look very familiar to you.
Creating a canvas Element
The first step to using canvas is to add a canvas element to the page:
canvas/demo1.html (excerpt)
<canvas>
Sorry! Your browser doesn’t support Canvas.
</canvas>
HTML5 & CSS3 for the Real World266
The text in between the canvas tags will only be shown if the canvas element is
not supported by the visitor’s browser.
Since drawing on the canvas is done using JavaScript, we’ll need a way to grab the
element from the DOM. We’ll do so by giving our canvas an id:
canvas/demo1.html (excerpt)
<canvas id="myCanvas">
Sorry! Your browser doesn’t support Canvas.
</canvas>
All drawing on the canvas happens via JavaScript, so let’s make sure we’re calling
a JavaScript function when our page is ready. We’ll add our jQuery document ready
check to a script element at the bottom of the page:
canvas/demo1.html (excerpt)
<script>
$('document').ready(function(){
draw();
});
</script>
The canvas element takes both a width and height attribute, which should also be
set:
canvas/demo1.html (excerpt)
<canvas id="myCanvas" width="200" height="200">
Sorry! Your browser doesn’t support Canvas.
</canvas>
Finally, let’s add a border to our canvas to visually distinguish it on the page, using
some CSS. Canvas has no default styling, so it’s difficult to see where it is on the
page unless you give it some kind of border:
css/canvas.css (excerpt)
#myCanvas {
border: dotted 2px black;
}
267Canvas, SVG, and Drag and Drop
Now that we’ve styled it, we can actually view the canvas container on our page
—Figure 11.1 shows what it looks like.
Figure 11.1. An empty canvas with a dotted border
Drawing on the Canvas
All drawing on the canvas happens via the Canvas JavaScript API. We’ve called a
function called draw() when our page is ready, so let’s go ahead and create that
function. We’ll add the function to our script element. The first step is to grab hold
of the canvas element on our page:
canvas/demo1.html (excerpt)
<script>
⋮
function draw() {
var canvas = document.getElementById("myCanvas");
}
</script>
Getting the Context
Once we’ve stored our canvas element in a variable, we need to set up the canvas’s
context. The context is the place where your drawing is rendered. Currently, there’s
only wide support for drawing to a two-dimensional context. The W3C Canvas spec
defines the context in the CanvasRenderingContext2D object. Most methods we’ll
be using to draw onto the canvas are methods of this object.
HTML5 & CSS3 for the Real World268
We obtain our drawing context by calling the getContext method and passing it
the string "2d", since we’ll be drawing in two dimensions:
canvas/demo1.html (excerpt)
function draw() {
var canvas = document.getElementById("myCanvas");
var context = canvas.getContext("2d");
}
The object that’s returned by getContext is a CanvasRenderingContext2D object.
In this chapter, we’ll refer to it as simply “the context object” for brevity.
WebGL
WebGL is a new API for 3D graphics being managed by the Khronos Group, with
a WebGL working group that includes Apple, Mozilla, Google, and Opera.
By combining WebGL with HTML5 Canvas, you can draw in three dimensions.
WebGL is currently supported in Firefox 4+, Chrome 8+, and Safari 6. To learn
more, see />Filling Our Brush with Color
On a regular painting canvas, before you can begin, you must first saturate your
brush with paint. In the HTML5 Canvas, you must do the same, and we do so with
the strokeStyle or fillStyle properties. Both strokeStyle and fillStyle are
set on a context object. And both take one of three values: a string representing a
color, a CanvasGradient, or a CanvasPattern.
Let’s start by using a color string to style the stroke. You can think of the stroke as
the border of the shape you’re going to draw. To draw a rectangle with a red border,
we first define the stroke color:
canvas/demo1.html (excerpt)
function draw() {
var canvas = document.getElementById("myCanvas");
var context = canvas.getContext("2d");
context.strokeStyle = "red";
}
269Canvas, SVG, and Drag and Drop
To draw a rectangle with a red border and blue fill, we must also define the fill
color:
canvas/demo1.html (excerpt)
function draw() {
⋮
context.fillStyle = "blue";
}
We can use any CSS color value to set the stroke or fill color, as long as we specify
it as a string: a hexadecimal value like #00FFFF, a color name like red or blue, or
an RGB value like rgb(0, 0, 255). We can even use RGBA to set a semitransparent
stroke or fill color. Let’s change our blue fill to blue with a 50% opacity:
canvas/demo1.html (excerpt)
function draw() {
⋮
context.fillStyle = "rgba(0, 0, 255, 0.5)";
}
Drawing a Rectangle to the Canvas
Once we’ve defined the color of the stroke and the fill, we’re ready to actually start
drawing! Let’s begin by drawing a rectangle. We can do this by calling the fillRect
and strokeRect methods. Both of these methods take the X and Y coordinates where
you want to begin drawing the fill or the stroke, and the width and the height of
the rectangle. We’ll add the stroke and fill 10 pixels from the top and 10 pixels from
the left of the canvas’s top left corner:
canvas/demo1.html (excerpt)
function draw() {
⋮
context.fillRect(10,10,100,100);
context.strokeRect(10,10,100,100);
}
This will create a semitransparent blue rectangle with a red border, like the one in
Figure 11.2.
HTML5 & CSS3 for the Real World270
Figure 11.2. A simple rectangle—not bad for our first canvas drawing!
The Canvas Coordinate System
As you may have gathered, the coordinate system in the canvas element is different
from the Cartesian coordinate system you learned in math class. In the canvas co-
ordinate system, the top-left corner is (0,0). If the canvas is 200 pixels by 200 pixels,
then the bottom-right corner is (200, 200), as Figure 11.3 illustrates.
Figure 11.3. The canvas coordinate system goes top-to-bottom and left-to-right
Variations on fillStyle
Instead of a color as our fillStyle, we could have also used a CanvasGradient or
a CanvasPattern.
271Canvas, SVG, and Drag and Drop
We create a CanvasPattern by calling the createPattern method. createPattern
takes two parameters: the image to create the pattern with, and how that image
should be repeated. The repeat value is a string, and the valid values are the same
as those in CSS: repeat, repeat-x, repeat-y, and no-repeat.
Instead of using a semitransparent blue fillStyle, let’s create a pattern using our
bicycle image. First, we must create an Image object, and set its src property to our
image:
canvas/demo2.html (excerpt)
function draw() {
⋮
var img = new Image();
img.src = " /images/bg-bike.png";
}
Setting the src attribute will tell the browser to start downloading the image—but
if we try to use it right away to create our gradient, we’ll run into some problems,
because the image will still be loading. So we’ll use the image’s onload property to
create our pattern once the image has been fully loaded by the browser:
canvas/demo2.html (excerpt)
function draw() {
⋮
var img = new Image();
img.src = " /images/bg-bike.png";
img.onload = function() {
};
}
In our onload event handler, we call createPattern, passing it the Image object
and the string repeat, so that our image repeats along both the X and Y axes. We
store the results of createPattern in the variable pattern, and set the fillStyle
to that variable:
HTML5 & CSS3 for the Real World272
canvas/demo2.html (excerpt)
function draw() {
⋮
var img = new Image();
img.src = " /images/bg-bike.png";
img.onload = function() {
pattern = context.createPattern(img, "repeat");
context.fillStyle = pattern;
context.fillRect(10,10,100,100);
context.strokeRect(10,10,100,100);
};
}
Anonymous Functions
You may be asking yourself, “what is that function statement that comes right
before the call to img.onload?” It’s an anonymous function. Anonymous functions
are much like regular functions except, as you might guess, they don’t have names.
When you see an anonymous function inside of an event listener, it means that
the anonymous function is being bound to that event. In other words, the code
inside that anonymous function will be run when the load event is fired.
Now, our rectangle’s fill is a pattern made up of our bicycle image, as Figure 11.4
shows.
Figure 11.4. A pattern fill on a canvas
273Canvas, SVG, and Drag and Drop
We can also create a CanvasGradient to use as our fillStyle. To create a
CanvasGradient, we call one of two methods: createLinearGradient(x0, y0,
x1, y1) or createRadialGradient(x0, y0, r0, x1, y1, r1); then we add one
or more color stops to the gradient.
createLinearGradient’s x0 and y0 represent the starting location of the gradient.
x1 and y1 represent the ending location.
To create a gradient that begins at the top of the canvas and blends the color down
to the bottom, we’d define our starting point at the origin (0,0), and our ending point
200 pixels down from there (0,200):
canvas/demo3.html (excerpt)
function draw() {
⋮
var gradient = context.createLinearGradient(0, 0, 0, 200);
}
Next, we specify our color stops. The color stop method is simply
addColorStop(offset, color).
The offset is a value between 0 and 1. An offset of 0 is at the starting end of the
gradient, and an offset of 1 is at the other end. The color is a string value that, as
with the fillStyle, can be a color name, a hexadecimal color value, an rgb() value,
or an rgba() value.
To make a gradient that starts as blue and begins to blend into white halfway down
the gradient, we can specify a blue color stop with an offset of 0 and a purple
color stop with an offset of 1:
canvas/demo3.html (excerpt)
function draw() {
⋮
var gradient = context.createLinearGradient(0, 0, 0, 200);
gradient.addColorStop(0,"blue");
gradient.addColorStop(1,"white");
context.fillStyle = gradient;
context.fillRect(10,10,100,100);
context.strokeRect(10,10,100,100);
}
HTML5 & CSS3 for the Real World274
Figure 11.5 is the result of setting our CanvasGradient to be the fillStyle of our
rectangle.
Figure 11.5. Creating a linear gradient with Canvas
Drawing Other Shapes by Creating Paths
We’re not limited to drawing rectangles—we can draw any shape we can imagine!
Unlike rectangles and squares, however, there’s no built-in method for drawing
circles, or other shapes. To draw more interesting shapes, we must first lay out the
path of the shape.
Paths create a blueprint for your lines, arcs, and shapes, but paths are invisible until
you give them a stroke! When we drew rectangles, we first set the strokeStyle and
then called fillRect. With more complex shapes, we need to take three steps: lay
out the path, stroke the path, and fill the path. As with drawing rectangles, we can
just stroke the path, or fill the path—or we can do both.
Let’s start with a simple circle:
canvas/demo4.html (excerpt)
function draw() {
var canvas = document.getElementById("myCanvas");
var context = canvas.getContext("2d");
context.beginPath();
}
275Canvas, SVG, and Drag and Drop
Now we need to create an arc. An arc is a segment of a circle; there’s no method for
creating a circle, but we can simply draw a 360° arc. We create it using the arc
method:
canvas/demo4.html (excerpt)
function draw() {
var canvas = document.getElementById("myCanvas");
var context = canvas.getContext("2d");
context.beginPath();
context.arc(50, 50, 30, 0, Math.PI*2, true);
}
The arguments for the arc method are as follows: arc(x, y, radius, startAngle,
endAngle, anticlockwise).
x and y represent where on the canvas you want the arc’s path to begin. Imagine
this as the center of the circle that you’ll be drawing. radius is the distance from
the center to the edge of the circle.
startAngle and endAngle represent the start and end angles along the circle’s cir-
cumference that you want to draw. The units for the angles are in radians, and a
circle is 2π radians. We want to draw a complete circle, so we will use 2π for the
endAngle. In JavaScript, we can get this value by multiplying Math.PI by 2.
anticlockwise is an optional argument. If you wanted the arc to be drawn counter-
clockwise instead of clockwise, you would set this value to true. Since we are
drawing a full circle, it doesn’t matter which direction we draw it in, so we omit
this argument.
Our next step is to close the path, since we’ve now finished drawing our circle. We
do that with the closePath method:
canvas/demo4.html (excerpt)
function draw() {
var canvas = document.getElementById("myCanvas");
var context = canvas.getContext("2d");
context.beginPath();
HTML5 & CSS3 for the Real World276
context.arc(100, 100, 50, 0, Math.PI*2, true);
context.closePath();
}
Now we have a path! But unless we stroke it or fill it, we’ll be unable to see it. Thus,
we must set a strokeStyle if we would like to give it a border, and we must set a
fillStyle if we’d like our circle to have a fill color. By default, the width of the
stroke is 1 pixel—this is stored in the lineWidth property of the context object.
Let’s make our border a bit bigger by setting the lineWidth to 3:
canvas/demo4.html (excerpt)
function draw() {
var canvas = document.getElementById("myCanvas");
var context = canvas.getContext("2d");
context.beginPath();
context.arc(50, 50, 30, 0, Math.PI*2, true);
context.closePath();
context.strokeStyle = "red";
context.fillStyle = "blue";
context.lineWidth = 3;
}
Lastly, we fill and stroke the path. Note that this time, the method names are different
than those we used with our rectangle. To fill a path, you simply call fill, and to
stroke it you call stroke:
canvas/demo4.html (excerpt)
function draw() {
var canvas = document.getElementById("myCanvas");
var context = canvas.getContext("2d");
context.beginPath();
context.arc(100, 100, 50, 0, Math.PI*2, true);
context.closePath();
context.strokeStyle = "red";
context.fillStyle = "blue";
context.lineWidth = 3;
context.fill();
context.stroke();
}
277Canvas, SVG, and Drag and Drop
Figure 11.6 shows the finished circle.
Figure 11.6. Our shiny new circle
To learn more about drawing shapes, the Mozilla Developer Network has an excellent
tutorial.
1
Saving Canvas Drawings
If we create an image programmatically using the Canvas API, but decide we’d like
to have a local copy of our drawing, we can use the API’s toDataURL method to save
our drawing as a PNG or JPEG file.
To preserve the circle we just drew, we could add a new button to our HTML, and
open the canvas drawing as an image in a new window once the button is clicked.
To do that, let’s define a new JavaScript function:
canvas/demo5.html (excerpt)
function saveDrawing() {
var canvas = document.getElementById("myCanvas");
window.open(canvas.toDataURL("image/png"));
}
Next, we’ll add a button to our HTML and call our function when it’s clicked:
1
/>HTML5 & CSS3 for the Real World278
canvas/demo5.html (excerpt)
<canvas id="myCanvas" width="200" height="200">
Sorry! Your browser doesn’t support Canvas.
</canvas>
<form>
<input type="button" name="saveButton" id="saveButton"
➥value="Save Drawing">
</form>
⋮
<script>
$('document').ready(function(){
draw();
$('#saveButton').click(saveDrawing);
});
⋮
When the button is clicked, a new window or tab opens up with a PNG file loaded
into it, as shown in Figure 11.7.
Figure 11.7. Our image loads in a new window
279Canvas, SVG, and Drag and Drop
To learn more about saving our canvas drawings as files, see the W3C Canvas spec
2
and the “Saving a canvas image to file” section of Mozilla’s Canvas code snippets.
3
Drawing an Image to the Canvas
We can also draw images into the canvas element. In this example, we’ll be redraw-
ing into the canvas an image that already exists on the page.
For the sake of illustration, we’ll be using the HTML5 logo
4
as our image for the
next few examples. Let’s start by adding it to our page in an img element:
canvas/demo6.html (excerpt)
<canvas id="myCanvas" width="200" height="200">
Your browser does not support canvas.
</canvas>
<img src=" /images/html5-logo.png" id="myImageElem">
Next, after grabbing the canvas element and setting up the canvas’s context, we can
grab an image from our page via document.getElementById:
canvas/demo6.html (excerpt)
function draw() {
var canvas = document.getElementById("myCanvas");
var context = canvas.getContext("2d");
var image = document.getElementById("myImageElem");
}
We’ll use the same CSS we used before to make the canvas element visible:
css/canvas.css (excerpt)
#myCanvas {
border: dotted 2px black;
}
Let’s modify it slightly to space out our canvas and our image:
2
/>3
/>4
/>HTML5 & CSS3 for the Real World280
css/canvas.css (excerpt)
#myCanvas {
border: dotted 2px black;
margin: 0px 20px;
}
Figure 11.8 shows our empty canvas next to our image.
Figure 11.8. An image and a canvas sitting on a page, not doing much
We can use canvas’s drawImage method to redraw the image from our page into the
canvas:
canvas/demo6.html (excerpt)
function draw() {
var canvas = document.getElementById("myCanvas");
var context = canvas.getContext("2d");
var image = document.getElementById("myImageElem");
context.drawImage(image, 0, 0);
}
Because we’ve drawn the image to the (0,0) coordinate, the image appears in the
top-left of the canvas, as you can see in Figure 11.9.
281Canvas, SVG, and Drag and Drop