C++ Programming for Games Module II phần 1 pps
Bạn đang xem bản rút gọn của tài liệu. Xem và tải ngay bản đầy đủ của tài liệu tại đây (542.72 KB, 30 trang )
C++ Programming for
Game Developers
Module II
e-Institute Publishing, Inc.
©Copyright 2005 e-Institute, Inc. All rights reserved. No part of this book may be reproduced or
transmitted in any form or by any means, electronic or mechanical, including photocopying, recording,
or by any information storage or retrieval system without prior written permission from e-Institute Inc.,
except for the inclusion of brief quotations in a review.
Editor: Susan Nguyen
Cover Design: Adam Hoult
E-INSTITUTE PUBLISHING INC
www.gameinstitute.com
Frank Luna, C++ Programming for Games II
All brand names and product names mentioned in this book are trademarks or service marks of their
respective companies. Any omission or misuse of any kind of service marks or trademarks should not be
regarded as intent to infringe on the property of others. The publisher recognizes and respects all marks
used by companies, manufacturers, and developers as a means to distinguish their products.
E-INSTITUTE PUBLISHING titles are available for site license or bulk purchase by institutions, user
groups, corporations, etc. For additional information, please contact the Sales Department at
i
Table of Contents
MODULE II OVERVIEW 1
CHAPTER 10: INTRODUCTION TO TEMPLATES 2
INTRODUCTION 3
CHAPTER OBJECTIVES 3
10.1 CLASS TEMPLATES 4
10.1.1 Class Template Definition 7
10.1.2 Class Template Implementation 7
10.1.3 Class Template Instantiation 8
10.2 EXAMPLE: A TABLE TEMPLATE CLASS 9
10.2.1 Table Data 9
10.2.2 Class Interface 10
10.2.3 The destroy Method 11
10.2.4 The resize Method 11
10.2.5 The Overloaded Parenthesis Operator 13
10.2.6 The Table Class 13
10.3 FUNCTION TEMPLATES 17
10.3.1 Example Program 18
10.4 SUMMARY 21
10.5 EXERCISES 21
10.5.1 Template Array Class 21
10.5.2 Template Bubble Sort Function 22
10.5.3 Table Driver 22
CHAPTER 11: ERRORS AND EXCEPTION HANDLING 23
INTRODUCTION 24
CHAPTER OBJECTIVES 24
11.1 ERROR CODES 24
11.2 EXCEPTION HANDLING BASICS 26
11.3 ASSERT 29
11.4 SUMMARY 31
11.5 EXERCISES 31
11.5.1 Exception Handling 31
CHAPTER 12: NUMBER SYSTEMS 33
INTRODUCTION 34
CHAPTER OBJECTIVES 34
12.1 NUMBER SYSTEMS 34
12.1.1 The Windows Calculator 35
12.2 THE BINARY NUMBER SYSTEM 37
12.2.1 Counting in Binary 37
12.2.2 Binary and Powers of 2 38
12.2.3 Binary Arithmetic 39
Addition 39
Subtraction 41
Multiplication 43
12.2.4 Converting Binary to Decimal 43
12.2.5 Converting Decimal to Binary 44
12.3 THE HEXADECIMAL NUMBER SYSTEM 45
12.3.1 Counting in Hexadecimal 45
12.3.2 Hexadecimal Arithmetic 46
Addition 46
ii
Subtraction 47
Multiplication 48
12.3.3 Converting Hexadecimal to Binary 48
12.3.4 Converting Binary to Hexadecimal 49
12.4 BITS AND MEMORY 50
12.5 BIT OPERATIONS 51
12.5.1 AND 51
12.5.2 Inclusive OR 52
12.5.3 NOT 52
12.5.4 Exclusive OR 53
12.5.5 Shifting 53
12.5.6 Compound Bit Operators 54
12.6 FLOATING-POINT NUMBERS 54
12.7 SUMMARY 56
12.8 EXERCISES 57
12.8.1 Binary Arithmetic 57
12.8.2 Hex Arithmetic 57
12.8.3 Base Conversions 58
12.8.4 Bit Operations 59
12.8.5 Binary to Decimal 61
12.8.6 Decimal to Binary 61
12.8.7 Bit Operation Calculator 61
12.9 REFERENCES 62
CHAPTER 13: STL PRIMER 63
INTRODUCTION 64
CHAPTER OBJECTIVES 64
13.1 PROBLEMS WITH ARRAYS 64
13.2 LINKED LISTS 66
13.2.1 Theory 66
13.2.2 Traversing 71
13.2.3 Insertion 72
13.2.4 Deletion 73
13.3 STACKS 74
13.3.1 Theory 74
13.3.2 Stack Operations 76
13.4 QUEUES 78
13.4.1 Theory 78
13.4.2 Queue Operations 78
13.5 DEQUES 80
13.5.1 Theory 80
13.5.2 Deque Operations 81
13.6 MAPS 81
13.6.1 Theory 81
13.6.2 Insertion 81
13.6.3 Deletion 82
13.6.4 Traversal 82
13.6.5 Searching 83
13.7 SOME ALGORITHMS 84
13.7.1 Functors 84
13.7.2 Some More Algorithms 88
13.7.3 Predicates 90
13.8 SUMMARY 91
13.9 EXERCISES 93
13.9.1 Linked List 93
13.9.2 Stack 93
iii
13.9.3 Queue 94
13.9.4 Algorithms 94
CHAPTER 14: INTRODUCTION TO WINDOWS PROGRAMMING 95
INTRODUCTION 96
CHAPTER OBJECTIVES 97
14.1 YOUR FIRST WINDOWS PROGRAM 97
14.2 THE EVENT DRIVEN PROGRAMMING MODEL 103
14.2.1 Theory 103
14.2.2 The MSG Structure 103
14.3 OVERVIEW OF CREATING A WINDOWS APPLICATION 104
14.3.1 Defining the Window Procedure 105
14.3.2 The WNDCLASS Structure 108
14.3.3 WNDCLASS Registration 110
14.3.4 CreateWindow 110
14.3.5 Showing and Updating the Window 112
14.3.6 The Message Loop 113
14.4 YOUR SECOND WINDOWS PROGRAM 113
14.5 SUMMARY 116
14.6 EXERCISES 117
14.6.1 Exit Message 117
14.6.2 Horizontal and Vertical Scroll Bars 117
14.6.3 Multiple Windows 117
14.6.4 Change the Cursor 117
14.6.5 Blue Background 118
14.6.6 Custom Icon 119
CHAPTER 15: INTRODUCTION TO GDI AND MENUS 122
INTRODUCTION 123
CHAPTER OBJECTIVES 123
15.1 TEXT OUTPUT 124
15.1.1 The WM_PAINT Message 124
15.1.2 The Device Context 124
15.1.3 TextOut 125
15.1.3 Example Program 126
15.2 SHAPE PRIMITIVES 131
15.2.1 Drawing Lines 131
15.2.2 Drawing Rectangles 137
15.2.3 Drawing Ellipses 141
15.3 LOADING AND DRAWING BITMAPS 142
15.3.1 Loading 142
15.3.2 Rendering 145
15.3.3 Deleting 146
15.3.4 Sample Program 146
15.4 PENS AND BRUSHES 150
15.4.1 Pens 150
15.4.2 Brushes 151
15.5 SHAPE CLASSES 152
15.5.1 Class Definitions 152
15.5.2 Class Implementations 154
15.6 MENUS 157
15.6.1 Creating a Menu Resource 157
15.6.2 Loading a Menu and Attaching it to a Window 160
15.6.3 Checking Menu Items 160
15.6.4 Selecting Menu Items 161
iv
15.7 THE PAINT SAMPLE 161
15.8 SUMMARY 171
15.9 EXERCISES 172
15.9.1 Colors 172
15.9.2 Styles 172
15.9.3 Cube 172
15.9.4 Undo Feature 172
CHAPTER 16: INTRODUCTION TO DIALOGS AND CONTROLS 173
INTRODUCTION 174
CHAPTER OBJECTIVES 174
16.1 MODAL DIALOG BOXES; THE STATIC TEXT CONTROL; THE BUTTON CONTROL 175
16.1.1 Designing the Dialog Box 175
16.1.2 Modal Dialog Box Theory 179
16.1.3 The About Box Sample 181
16.2 MODELESS DIALOG BOXES; THE EDIT CONTROL 184
16.2.1 Modeless Dialog Box Theory 184
16.2.2 The Edit Box Sample: Designing the Dialog Resource 186
16.2.3 The Edit Box Sample 187
16.3 RADIO BUTTONS 191
16.3.1 Designing the Radio Dialog Resource 191
16.3.2 Implementing the Radio Button Sample 192
16.4 COMBO BOXES 196
16.4.1 Designing the Combo Box Dialog Resource 197
16.4.2 Implementing the Combo Box Sample 197
16.5 SUMMARY 201
16.6 EXERCISES 202
16.6.1 List Box 202
16.6.2 Checkbox Controls 202
16.6.3 File Save and Open Dialogs 204
16.6.4 Color Dialog 206
CHAPTER 17: TIMING, ANIMATION, AND SPRITES 207
INTRODUCTION 208
CHAPTER OBJECTIVES 208
17.1 TIMING AND FRAMES PER SECOND 208
17.1.1 The Windows Multimedia Timer Functions 208
17.1.2 Computing the Time Elapsed Per Frame 211
17.1.3 Computing the Frames Per Second 213
17.2 DOUBLE BUFFERING 214
17.2.1 Motivation 214
17.2.2 Theory 214
17.2.3 Implementation 215
17.3 TANK ANIMATION SAMPLE 220
17.3.1 Creation 222
17.3.2 Destruction 222
17.3.3 Input 223
17.3.4 Updating and Drawing 224
17.3.5 Point Rotation 228
17.3.6 Tank Application Code 229
17.4 SPRITES 237
17.4.1 Theory 237
17.4.2 Implementation 241
17.5 SHIP ANIMATION SAMPLE 245
17.5.1 Art Resources 245
17.5.2 Program Code 246
v
17.6 SUMMARY 254
17.7 EXERCISES 255
17.7.1 Colors 255
17.7.2 Draw Order 255
17.7.3 Masking 255
17.7.4 Make Your Own Sprite 256
17.7.5 Bouncing Ball 256
17.7.6 Modify the Ship Program 256
17.7.7 Pong 256
17.7.8 More on Animation 257
CHAPTER 18: THE AIR HOCKEY GAME 259
INTRODUCTION 260
CHAPTER OBJECTIVES 260
18.1 ANALYSIS 261
18.1.1 Object Identification 262
18.1.2 Game Behavior and Corresponding Problems to Solve 262
18.2 DESIGN 264
18.2.1 Algorithms 264
18.2.1.1 Mouse Velocity 264
18.2.1.2 Red Paddle Artificial Intelligence 265
18.2.1.3 Puck Paddle Collision 267
18.2.1.4 Puck Wall Collision 272
18.2.1.5 Paddle Wall Collision 273
18.2.1.6 Pausing/Unpausing 275
18.2.1.7 Detecting a Score 275
18.2.2 Software Design 276
18.3 IMPLEMENTATION 280
18.3.1 Circle 280
18.3.2 Rect 281
18.3.3 AirHockeyGame 282
18.3.4 Main Application Code 288
18.4 COLLISION PHYSICS EXPLANATION (OPTIONAL) 295
18.4.1 Linear Momentum 296
18.4.2 Newton’s Second Law of Motion 297
18.4.3 Impulse Defined 297
18.4.4 Newton’s Third Law of Motion 298
18.4.5 Kinetic Energy and Elastic Collisions 300
18.4.6 Collision and Response 304
18.5 CLOSING REMARKS 308
1
Module II Overview
Module II is the second course in the C++ Programming for Game Developers series. Recall that in
Module I we started off by studying fundamental programming concepts like variables, console input
and output, arrays, conditional statements, strings, loops, and file input and output. We then pursued
higher level programming methodologies such as classes, object oriented programming design, operator
overloading, inheritance, and polymorphism. By now you should feel competent with the fundamentals
and at least comfortable with the higher level subject matter.
Our aim in Module II is twofold. Our first objective is to finish our study of C++ by examining
templates, error handling, the standard template library, and bitwise operations. Templates can be
thought of as a class factory, which allows us to generate similar yet unique classes, based on a code
template; this allows us to avoid duplicating code that is only slightly different. Error handling is an
important topic because things rarely work out as planned, and we will need to be able to detect
hardware failures, illegal operations, invalid input, corrupted and missing files, and the like in our code.
The standard template library is a set of generic ready to use C++ code that simplifies many day-to-day
programming tasks. In the STL chapter you will learn about several useful STL data structures and
algorithms, and the ideas behind them. The chapter on bitwise operations provides a deeper
understanding of computer memory and how numbers are represented internally. You will also learn
how to work in several other numbering systems such as binary and hexadecimal, which are more
natural from a computer’s point of view.
The second key theme in Module II is Windows programming. Here we will learn how to make familiar
Windows applications with resizable windows, mouse input, graphics, menus, dialog boxes, and
controls. In addition, we will learn how to implement 2D flicker free animation with double buffering,
and how to render 2D sprite images (i.e., graphical representation of game objects such as the main
character, landscape, and enemies). Finally, we conclude Module II by walking the reader through the
design and analysis of a fully functional 2D Air Hockey game, complete with graphics, physics,
artificial intelligence, and input via the mouse. This final project culminates much of the course
material.
By the end of this course, you will be well prepared for a first course in 3D game programming, as well
as many other interesting computer related fields that require an understanding of computer
programming as a qualification.
2
Chapter 10
Introduction to Templates
3
Introduction
You should recall from our discussions in Chapter 4 that std::vector can be thought of as a
“resizable array” (Section 4.6). However, what is interesting about std::vector is that we can
specify the type of vector to create with the angle bracket syntax:
vector<int> intVec;
vector<float> floatVec;
vector<bool> boolVec;
vector<string> stringVec;
Thus we can create vectors of different types, just as we can create elementary arrays of different types.
But, also recall that a std::vector is not some magical entity—it is just a class with methods that
handle the internal dynamic memory array resizing. So the question is: how can we create a generic
class that can work with any type (or at least, some types), like std::vector can? The answer to this
question leads us to C++ templates and, more generally, generic programming.
Before continuing on, we would like to say that the subject of templates is vast, and we can only
introduce the basics in this chapter. For advanced/interested readers, we refer you to C++ Templates:
The Complete Guide by David Vandevoorde and Nicolai M. Josuttis. This book should prove to be an
excellent resource for you and is a highly recommended supplement to the material we will study in this
chapter.
Chapter Objectives
• Learn how to design and implement generic classes.
• Learn how to define generic functions.
4
10.1 Class Templates
Consider this small data structure, which represents an interval [a, b]:
struct FloatInterval
{
FloatInterval();
FloatInterval(float start, float end);
float midpoint();
float a;
float b;
};
FloatInterval::FloatInterval()
{
a = 0.0f;
b = 0.0f;
}
FloatInterval::FloatInterval(float start, float end)
{
a = start;
b = end;
}
float FloatInterval::midpoint()
{
// return the midpoint between a and b.
return (a + b) * 0.5;
}
Although very simple, it is not hard to imagine the need for other types of intervals. For example, we
may want to describe integer intervals, character intervals, 3D vector intervals, and color intervals (color
values between two colors). The most obvious solution would be just to define these additional interval
classes. Here are a few of them:
struct IntInterval
{
IntInterval();
IntInterval(int start, int end);
int midpoint();
int a;
int b;
};
IntInterval::IntInterval()
{
a = 0.0f;
b = 0.0f;
}
5
IntInterval::IntInterval(int start, int end)
{
a = start;
b = end;
}
int IntInterval::midpoint()
{
// return the midpoint between a and b.
return (a + b) * 0.5;
}
struct CharInterval
{
CharInterval();
CharInterval(char start, char end);
char midpoint();
char a;
char b;
};
CharInterval::CharInterval()
{
a = 0.0f;
b = 0.0f;
}
CharInterval::CharInterval(char start, char end)
{
a = start;
b = end;
}
char FloatInterval::midpoint()
{
// return the midpoint between a and b.
return (a + b) * 0.5;
}
This approach results in a lot of additional code. Moreover, we may need to create new interval types
later on, and we would then have to define additional classes. It does not take long to realize that this
process can become cumbersome pretty quickly.
Let us instead analyze the interval class to see if we can make any observations that will help us simplify
our task. We note that the only difference between FloatInterval and IntInterval is that
everywhere we see a float in FloatInterval, we see an int in IntInterval—and similarly with
FloatInterval and CharInterval. That is, these classes are essentially the same—only the type
they work with is different.
This gives us an idea. We could create a generic Interval class using a variable-type like so:
6
Struct Interval
{
Interval();
Interval(variable-type start, variable-type end);
variable-type midpoint();
variable-type a;
variable-type b;
};
Interval::Interval()
{
a = 0.0f;
b = 0.0f;
}
Interval::Interval(variable-type start, variable-type end)
{
a = start;
b = end;
}
variable-type Interval::midpoint()
{
// return the midpoint between a and b.
return (a + b) * 0.5;
}
Then, if we could specify a type-argument, we could generate new Interval classes that worked the
same way, but with different types. All we have to do is substitute the type-argument for the variable-
type. For example, if we specified type float as the type argument (assume argument types are
specified in angle brackets < >), then the following class would be generated:
Interval<float> ==
struct Interval
{
Interval();
Interval(float start, float end);
float midpoint();
float a;
float b;
};
Note: The previous two code boxes do not use actual C++ syntax (though it is similar); pseudo-code
was used to illustrate the idea of how template classes work.
This behavior is exactly what template classes allow us to do. Returning to std::vector, when we
specify the type in the angle brackets, we instruct the compiler to create a vector class based on the
specified type by substituting the type-argument (type in angle brackets) into the type-variables of the
template vector class.
7
10.1.1 Class Template Definition
Now that we know what we would use templates for and the basic idea behind how they work, let us
examine the actual C++ template syntax. Here is how we would define a template
Interval class in
C++:
template <typename T>
struct Interval
{
Interval();
Interval(T start, T end);
T midpoint();
T a;
T b;
};
The first line, template <typename T> indicates that the class is a template class. The parameter
inside the angle brackets <typename T> denotes a variable-type name—in this case, we named the
variable-type, T. Later, when we want to instantiate an Interval of, say, ints, the compiler will
substitute int everywhere there is a T.
10.1.2 Class Template Implementation
There is some special syntax required when implementing the methods of a template class. In particular,
we must prefix the method with the template <typename T> syntax, and refer to the class name as
ClassName<T>. The following shows how we would implement the methods of Interval:
template <typename T>
Interval<T>::Interval()
{
a = T(); // Initialize with default
b = T(); // constructors of whatever type.
}
template <typename T>
Interval<T>::Interval(T start, T end)
{
a = start;
b = end;
}
template <typename T>
T Interval<T>::midpoint()
{
return (a + b) * 0.5; // return the midpoint between a and b.
}
Again, observe how we use
T to refer to the type, which will eventually be substituted into the template.
Note: The template functionality of C++ is not easy for compiler writers to implement.
8
10.1.3 Class Template Instantiation
We have already instantiated template classes earlier in Module I of this course, without your even
realizing it. For example, the following code generates two classes:
vector<int> intVec;
vector<float> floatVec;
It generates a vector class, where type int is substituted into the typename parameter, and it
generates a second vector class, where type float is substituted into the typename parameter. The
compiler generates these classes at compile time—after all, we specify the type-argument at compile
time. Once the int-vector and float-vector classes are generated (remember, generating these
classes is merely a matter of substituting the typename variable-type with the specified argument-
type), we can create instances of them. That is what intVec and floatVec are—they are instances of
the matching vector class generated by the compiler.
Note: To further clarify, classes of a particular type are generated only once. That is, if you write:
vector<float> f1;
vector<float> f2;
A
float version of vector is not generated twice—it only needs to be generated once to instantiate
any number of
float-vector object instances.
With our template Interval class defined and implemented, we can instantiate objects of various types
the same way we do with std::vector:
Interval<float> floatInterval(0.0f, 10.0f);
Interval<int> intInterval(2, 4);
float fMidPt = floatInterval.midpoint();
int iMidPt = intInterval.midpoint();
cout << "fMidPt = " << fMidPt << endl;
cout << "iMidPt = " << iMidPt << endl;
Note: A class can contain more than one typename. For example, we can define a class like so:
template <typename T1, typename T2>
struct Foo
{
T1 a;
T2 b;
};
When we instantiate a member, we have to specify two types:
Foo<float, int> foo;
The above substitutes
float for T1, and int for T2.
9
10.2 Example: A Table Template Class
For additional template practice, we will create a template Table class. A Table is sort of like
std::vector, except that instead of representing a resizable array, it represents a resizable 2D array—
or matrix. This table class will be very useful, as there are many datasets in game development that are
represented by a table (a game board/grid and 2D image immediately come to mind). We will want
tables of many kinds of data types, so naturally we will make a template
Table class.
10.2.1 Table Data
As we start off the design of our Table class, let us first discuss how we shall represent our table. For
starters, our table size will not be fixed—it will have m rows and n columns. Since the number of rows
and columns is variable, we must use dynamic memory. In this case, we use a pointer to an array of
pointers to arrays.
This probably sounds confusing, and it is definitely a bit tricky at first, but it will be pretty intuitive once
you think about it. We first have a pointer to an array, which we allocate dynamically. This array
describes the rows of the table. Now each element in this array is also a pointer. These pointers, in turn,
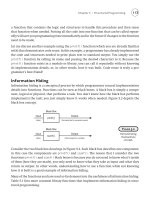
each point to another dynamic array, which forms the columns of the table. Figure 10.1 illustrates.
Figure 10.1: A 5x7 table represented with a pointer to an array of pointers to arrays. That is, we first have a pointer
to a “row” array. Each element in this row array, in turn, points to a “column,” thereby forming a 2D table.
10
Essentially, to have a variable sized 1D array, we needed one pointer to an array. To have a variable
sized 2D array (variable in both rows and columns), we need a pointer to an array of pointers to arrays.
Furthermore, we will want to maintain the number of rows and columns our table has. This yields the
following data members:
int mNumRows;
int mNumCols;
T** mDataMatrix;
The double star notation ** means “pointer to a pointer.” This is how we can describe a pointer to an
array of pointers to arrays.
10.2.2 Class Interface
As far as methods go, we need to be able to resize a table, construct tables, get the number of rows and
columns a table has, provide access to entries in the table, and overload the assignment operator and
copy constructor to provide deep copies since our class contains pointer data. The following definition
provides these features via the interface:
template <typename T>
class Table
{
public:
Table();
Table(int m, int n);
Table(int m, int n, const T& value);
Table(const Table<T>& rhs);
~Table();
Table<T>& operator=(const Table& rhs);
T& operator()(int i, int j);
int numRows()const;
int numCols()const;
void resize(int m, int n);
void resize(int m, int n, const T& value);
private:
// Make private because this method should only be used
// internally by the class.
void destroy();
private:
int mNumRows;
int mNumCols;
T** mDataMatrix;
};
11
The next three subsections discuss three non-trivial methods of Table. The implementations for the rest
of the methods are shown in Section 10.2.6.
10.2.3 The destroy Method
The first method we will examine is the destroy method. This method is responsible for destroying
the dynamic memory allocated by a Table object. What makes this method a bit tricky is the pointer to
an array of pointers to arrays, which stores our table data. The method is implemented as follows:
template <typename T>
void Table<T>::destroy()
{
// Does the matrix exist?
if( mDataMatrix )
{
// Iterate over each row i.
for(int i = 0; i < _m; ++i)
{
// Does the ith column array exist?
if(mDataMatrix[i] )
{
// Yes, delete it.
delete[]mDataMatrix[i];
mDataMatrix[i] = 0;
}
}
// Now delete the row-array.
delete[] mDataMatrix;
mDataMatrix = 0;
}
// Table was destroyed, so dimensions are zero.
mNumRows = 0;
mNumCols = 0;
}
Be sure to read the comments slowly and deliberately. First, we traverse over each row and delete the
column array that exists in each element of the row array (See Figure 10.1). Once we have deleted the
column arrays, we delete the row array.
10.2.4 The resize Method
In this section, we examine the resize method, which is relatively more complicated than the other
methods of the
Table class. This method is somewhat tricky because it handles the memory allocation
of the pointer to an array of pointers to arrays; the method is presented below:
12
template <typename T>
void Table<T>::resize(int m, int n, const T& value)
{
// Destroy the previous data.
destroy();
// Save dimensions.
mNumRows = m;
mNumCols = n;
// Allocate a row (array) of pointers.
mDataMatrix = new T*[mNumRows];
// Now, loop through each pointer in this row array.
for(int i = 0; i < mNumRows; ++i)
{
// And allocate a column (array) for the ith row to build
// the table.
mDataMatrix[i] = new T[mNumCols];
// Now loop through each element in this row[i]
// and copy 'value' into it.
for(int j = 0; j < mNumCols; ++j)
mDataMatrix[i][j] = value;
}
}
Again, be sure to read the comments slowly and deliberately. The method takes three parameters: the
first two specify the dimensions of the table; that is m by n. The third parameter is a default value to
which we initialize all the elements of the table.
The very first thing the method does is call the destroy method, as discussed in Section 10.2.3. This
makes one thing immediately clear we lose the data in the table whenever we call resize. If you
want to maintain the data, you will need to copy it into a separate table for temporary storage, resize the
current table, and then copy the data in the temporary storage back into the newly resized table.
After the resize method, we simply save the new dimensions. The next line:
// Allocate a row (array) of pointers.
mDataMatrix = new T*[mNumRows];
allocates an array of pointers (see the row in Figure 10.1). What we must do now is iterate over each of
these pointers and allocate the column array:
// Now, loop through each pointer in this row array.
for(int i = 0; i < mNumRows; ++i)
{
// And allocate a column (array) for the ith row to build
// the table.
mDataMatrix[i] = new T[mNumCols];
13
After we have done this, we iterate over each column in the i-th row, and initialize the table entry with
value:
// Now loop through each element in this row[i]
// and copy 'value' into it.
for(int j = 0; j < mNumCols; ++j)
mDataMatrix[i][j] = value;
On the whole, it is not too complex if you break the method down into parts, and use Figure 10.1 as a
guide.
10.2.5 The Overloaded Parenthesis Operator
The final method we wish to discuss is the overloaded parenthesis operator. Although the
implementation is straightforward, we draw attention to this method because we have not overloaded the
parenthesis operator before.
template <typename T>
T& Table<T>::operator()(int i, int j)
{
return mDataMatrix[i][j];
}
Because C++ does not have a double bracket operator [][], which we can overload, we cannot index into
a table as we would a 2D array. We instead overload the parenthesis operator to take two arguments,
and instruct the method to use these arguments to index into the internal 2D array, in order to return the
i-th table entry. This allows us to index into a table “almost” like the double bracket operator would:
Table<float> myTable(4, 4);
MyTable(1, 1) = 2.0f; // Access entry [1][1]
MyTable(3, 0) = -1.0f; // Access entry [3][0]
10.2.6 The Table Class
For reference, we provide the entire Table definition and implementation together here. Note in
particular how the definition and implementation are in the same file—this is necessary for templates.
You will be asked to use this class in one of the exercises, so be sure to give it a thorough examination.
// Table.h
#ifndef TABLE_H
#define TABLE_H
template <typename T>
class Table
{
14
public:
Table();
Table(int m, int n);
Table(int m, int n, const T& value);
Table(const Table<T>& rhs);
~Table();
Table<T>& operator=(const Table& rhs);
T& operator()(int i, int j);
int numRows()const;
int numCols()const;
void resize(int m, int n);
void resize(int m, int n, const T& value);
private:
// Make private because this method should only be used
// internally by the class.
void destroy();
private:
int mNumRows;
int mNumCols;
T** mDataMatrix;
};
template <typename T>
Table<T>::Table<T>()
{
mDataMatrix = 0;
mNumRows = 0;
mNumCols = 0;
}
template <typename T>
Table<T>::Table<T>(int m, int n)
{
mDataMatrix = 0;
mNumRows = 0;
mNumCols = 0;
resize(m, n, T());
}
template <typename T>
Table<T>::Table<T>(int m, int n, const T& value)
{
mDataMatrix = 0;
mNumRows = 0;
mNumCols = 0;
resize(m, n, value);
}
template <typename T>
Table<T>::Table<T>(const Table<T>& rhs)
{
mDataMatrix = 0;
15
mNumRows = 0;
mNumCols = 0;
*this = rhs;
}
template <typename T>
Table<T>::~Table<T>()
{
// Destroy any previous dynamic memory.
destroy();
}
template <typename T>
Table<T>& Table<T>::operator=(const Table& rhs)
{
// Check for self assignment.
if( this == &rhs ) return *this;
// Reallocate the table based on rhs info.
resize(rhs.mNumRows, rhs.mNumCols);
// Copy the entries over element-by-element.
for(int i = 0; i < mNumRows; ++i)
for(int j = 0; j < mNumCols; ++j)
mDataMatrix[i][j] = rhs.mDataMatrix[i][j];
// return a reference to *this so we can do chain
// assignments: x = y = z = w =
return *this;
}
template <typename T>
T& Table<T>::operator()(int i, int j)
{
return mDataMatrix[i][j]; // return the ijth table entry.
}
template <typename T>
int Table<T>::numRows()const
{
return mNumRows; // Return the number of rows.
}
template <typename T>
int Table<T>::numCols()const
{
return mNumCols; // Return the number of columns.
}
template <typename T>
void Table<T>::resize(int m, int n)
{
// Call resize and use default constructor T()
// as 'value'.
resize(m, n, T());
}
16
template <typename T>
void Table<T>::resize(int m, int n, const T& value)
{
// Destroy the previous data.
destroy();
// Save dimensions.
mNumRows = m;
mNumCols = n;
// Allocate a row (array) of pointers.
mDataMatrix = new T*[mNumRows];
// Now, loop through each pointer in this row array.
for(int i = 0; i < mNumRows; ++i)
{
// And allocate a column (array) to build the table.
mDataMatrix[i] = new T[mNumCols];
// Now loop through each element in this row[i]
// and copy 'value' into it.
for(int j = 0; j < mNumCols; ++j)
mDataMatrix[i][j] = value;
}
}
template <typename T>
void Table<T>::destroy()
{
// Does the matrix exist?
if( mDataMatrix )
{
for(int i = 0; i < _m; ++i)
{
// Does the ith row exist?
if(mDataMatrix[i] )
{
// Yes, delete it.
delete[]mDataMatrix[i];
mDataMatrix[i] = 0;
}
}
// Delete the row-array.
delete[] mDataMatrix;
mDataMatrix = 0;
}
mNumRows = 0;
mNumCols = 0;
}
#endif // TABLE_H
17
10.3 Function Templates
Template functions extend the idea of template classes. Sometimes you will have a function which
performs an operation that can be performed on a variety of data types. For example, consider a search
function; naturally, we will want to search arrays of all kinds of data types. It would be cumbersome to
implement a search function for each type, especially since the implementation would essentially be the
same—only the types would be different. So a search function is a good candidate for a template
design.
The general syntax of a function template is as follows:
template <typename T>
return-type FunctionName(parameter-list )
{
// Function body
}
Next we see two template function examples, one that performs a linear search and a second template
function that prints an array.
template <typename T>
int LinearSearch(T dataArray[], int arraySize, T searchItem)
{
// Search through array.
for(int i = 0; i < arraySize; ++i)
{
// Find it?
if( dataArray[i] == searchItem )
{
// Yes, return the index we found it at.
return i;
}
}
// Did not find it, return -1.
return -1;
}
template <typename T>
void Print(T data[], int arraySize)
{
for(int i = 0; i < arraySize; ++i)
cout << data[i] << " ";
cout << endl;
}
The only operator LinearSearch uses on the type T is the equals == operator. Thus, any type we use
with LinearSearch (i.e., substitute in for T) must have that operator defined (i.e., overloaded). All the
built-in types have the equals operator defined, so they pose no problem, and similarly with
18
std::string. But if we wish to use user-defined types (i.e., classes) we must overload the equals
operator if we want to be able to use LinearSearch with them.
Similarly, the only operator
Print uses on T is the insertion operator. Thus, any type we use with
Print (i.e., substitute in for T) must have that operator defined (i.e., overloaded). All the built-in types
have the insertion operator defined, so they pose no problem, and similarly with
std::string. But if
we wish to use user-defined types (i.e., classes) we must overload the insertion operator if we want to be
able to use Print with them.
10.3.1 Example Program
What follows is a sample program illustrating our template functions. We set up two arrays, a
std::string array, and an int array. We then use the Print function to print both of these arrays,
and we allow the user to search these arrays via LinearSearch. The key idea here is that we are using
the same template function for different types—that is, these functions are generic and work on any
types that implement the stated conditions (overloads the less than operator/insertion operator).
Program 10.1: Template Functions.
#include <iostream>
#include <string>
using namespace std;
template <typename T>
int LinearSearch(T dataArray[], int arraySize, T searchItem)
{
// Search through array.
for(int i = 0; i < arraySize; ++i)
{
// Find it?
if( dataArray[i] == searchItem )
{
// Yes, return the index we found it at.
return i;
}
}
// Did not find it, return -1.
return -1;
}
template <typename T>
void Print(T data[], int arraySize)
{
for(int i = 0; i < arraySize; ++i)
cout << data[i] << " ";
cout << endl;
}