C++ Programming for Games Module II phần 4 pptx
Bạn đang xem bản rút gọn của tài liệu. Xem và tải ngay bản đầy đủ của tài liệu tại đây (985.05 KB, 31 trang )
100
MB_OKCANCEL: Instructs the message box to display an OK and CANCEL button.
Figure 14.5: The MB_OKCANCEL message box style.
MB_YESNO: Instructs the message box to display a YES and NO button.
Figure 14.6: The MB_YESNO message box style.
MB_YESNOCANCEL: Instructs the message box to display a YES, NO, and CANCEL button.
Figure 14.7: The YESNOCANCEL message box style.
Finally, the message box’s return value depends on which button the user pressed; here is an abridged
list of return values (see the Win32 documentation for more details):
IDOK: The user pressed the OK button.
IDCANCEL: The user pressed the CANCEL button.
IDYES: The user pressed the YES button.
IDNO: The user pressed the NO button.
You can test which value was returned using an “if” statement and thus determine which button the user
selected and then take appropriate action.
Note: Many of the Win32 functions will have different style flags or values that enable you to customize
various things. However, because there are so many different flags for the different API functions, we
cannot cover all of them in this text. Therefore, it is important that you learn to use the Win32
documentation to obtain further info on a Win32 function or type. The documentation is typically
included in the help file of Visual C++. For example, in Visual C++ .NET, you would go to the
Menu->Help->Index
(Figure 14.8).
101
Figure 14.8: Launching the documentation index.
The index help should then open to the right of the interface. Enter the function of type you
would like more information on, as Figure 14.9 shows we search for
MessageBox.
Figure 14.9: Searching for the MessageBox documentation.
102
Finally, selecting (double click) on the found MessageBox entry gives us several subcategories
more information can be found:
Figure 14.10: Selecting the MessageBox documentation for the Win32 API.
Here, we want to select the “Windows User Interface: Platform SDK;” this is essentially the
Win32 API documentation guide. So selecting that yields the complete documentation for the
MessageBox function:
Figure 14.11: The MessageBox documentation.
103
14.2 The Event Driven Programming Model
14.2.1 Theory
One of the key differences between the console programming we have been doing since Module I and
Windows programming is the
event driven programming model. In console programming, your code
begins at
main and then executes line-by-line, while looping, branching, or jumping to function calls
along the way. Windows programming is different. Instead, a Windows program typically sits and
waits for something to happen—an
event. An event can be a mouse click, a button press, a menu item
selection, a key press, and so on. Once Windows recognizes an event, it adds a message to the
application’s
priority message queue for which the event was targeted (remember Windows can be
running several applications concurrently). A Windows application constantly scans the message queue
for messages and when one is received it is forwarded to the window it was intended for (a single
Windows application can consists of multiple windows itself—a main window and child windows, for
example). More specifically, a message in the application message queue is forwarded to the
window
procedure of the window it was intended for.
The window procedure (also called a message handler) is a special function each window has (though
several windows can share the same message procedure), which contains the code necessary to handle
the specified event the message originated from. For example, if a button is pressed (a button is a child
window to the parent window it lies on) then the button’s window procedure will contain the code that
gets executed when that button is pressed.
14.2.2 The MSG Structure
A message in Windows is represented with the following MSG structure:
struct MSG {
HWND hwnd;
UINT message;
WPARAM wParam;
LPARAM lParam;
DWORD time;
POINT pt;
};
hwnd: This member is the handle to the window for which the message is designated.
message: This member is a predefined unique unsigned integer symbol that denotes the specific type of
message.
wParam: A 32-bit value that contains extra information about the message. The exact information is
specific to the particular message.
104
lParam: Another 32-bit value that contains extra information about the message. The exact information
is specific to the particular message.
time: The time stamp at which time the message was generated.
pt: The (x, y) coordinates, in screen space, of the mouse cursor at the time the message was generated.
The
POINT structure is defined by the Win32 API and looks like this:
struct POINT {
LONG x; // x-coordinate
LONG y; // y-coordinate
};
Here are some example message types, which would be placed in
message:
WM_QUIT: This message is sent when the user has indicated their desire to quit the application (by
pressing the close ‘X’ button, for example).
WM_COMMAND: This message is sent to a window when the user selects an item from the window’s menu.
Some child windows, such as button controls, also send this message when they are pressed.
WM_LBUTTONDBLCLK: This message is sent to a window when the user double-clicks with the left
mouse button over the window’s client area.
WM_LBUTTONDOWN: This message is sent to a window when the user presses the left mouse button over
the window’s client area.
WM_KEYDOWN: This message is sent to the window with keyboard focus when the user presses a key.
The
wParam of the message denotes the specific key that was pressed.
WM_SIZE: This message is sent to a window when the user resizes the window.
14.3 Overview of Creating a Windows Application
The creation of even a simple Windows application is quite lengthy in terms of lines of code, but not too
lengthy when we consider the amount of functionality we will get in return. We will have actually
drawn a window (we have not done any drawing in this course so far), and moreover, the window can be
resized, minimized, maximized, and other such things. The key steps for creating a basic Windows
application are outlined below:
1.
Define the window procedure for the main application window. Recall that a window procedure
is a special function each window has (though several windows can share the same message
procedure), which contains the code necessary to handle the specified event the message
originated from.
105
2.
Fill out a WNDCLASS instance. By filling out this structure you are able to define some core
properties that your window will have.
3.
Register the WNDCLASS instance. Before you can create a window based on the WNDCLASS
instance you have filled out, you must register it with Windows.
4.
Create the window. Now that you have registered a WNDCLASS instance with Windows, you can
create a window. Creating a window is done with a single function call, which again allows you
to customize some of the features of the window.
5.
Show and update the window. In this step, you need to actually instruct Windows to display
(show) your window (by default it will not be visible). In addition, you must update the window
for the first time.
6.
Finally, enter the message loop. After you have created the main window of your application,
you are ready to enter the message loop. The message loop will constantly check for and handle
messages as the message queue gets filled. The message loop will not exit until a quit message
(
WM_QUIT) is received.
With the preceding basic roadmap in place, we can now discuss the details of each step.
14.3.1 Defining the Window Procedure
As already stated, a window procedure is a special function each window has (though several windows
can share the same message procedure), which contains the code necessary to handle the specified event
from which the message originated. However, the window procedure must follow some Win32 API
guidelines. In particular, all window procedures must have a certain declaration:
LRESULT CALLBACK
WndProc(HWND hWnd, UINT msg, WPARAM wParam, LPARAM lParam);
You can name the window procedure whatever you want; here we call it
WndProc. Additionally, you
can name the parameters whatever you want as well (although the names used above are very commonly
used); however, all four parameters of the shown types must be present. The return type of the window
procedure must be of type
LRESULT, which is simply typedefed as a long—an error code will be
returned via this return value. Observe that the function name is prefixed with the symbol
CALLBACK.
This denotes that the window procedure is a
callback function. A callback function is a function that
we do not directly call ourselves. Rather, the Win32 API will call this function automatically. In
particular, the Win32 API will call the window procedure function when a message from the message
loop is dispatched to it.
As you can see, the window procedure takes four parameters. Together, these parameters provide you
with enough information to handle the message.
106
hWnd: The handle to the window the message is aimed for. This parameter corresponds with the
MSG::hwnd member.
msg: A predefined unique unsigned integer symbol that denotes the specific type of message. This
parameter corresponds with the
MSG::message member.
wParam: A 32-bit value that contains extra information about the message. The exact information is
specific to the particular message. This parameter corresponds with the
MSG::wParam member.
lParam: Another 32-bit value that contains extra information about the message. The exact information
is specific to the particular message. This parameter corresponds with the
MSG::lParam member.
And again, just to reiterate, the Win32 API will call the window procedure passing the appropriate
arguments into the window procedure’s parameters.
Now that we know how the window procedure must be declared, how would we go about implementing
it? A window procedure is typically implemented as one large switch statement. The switch statement
is used to determine which block of code should be executed based on the specific message. For
example, if the left mouse button was pressed, then the code to handle a
WM_LBUTTONDOWN message
should be executed. Likewise, if a key was pressed then the code to handle a
WM_KEYDOWN message
should be executed. Here is an example:
LRESULT CALLBACK
WndProc(HWND hWnd, UINT msg, WPARAM wParam, LPARAM lParam)
{
switch( msg )
{
case WM_LBUTTONDOWN:
MessageBox(0, "WM_LBUTTONDOWN message.", "Msg", MB_OK);
return 0;
case WM_KEYDOWN:
if( wParam == VK_ESCAPE )
DestroyWindow(hWnd);
return 0;
case WM_DESTROY:
PostQuitMessage(0);
return 0;
}
return DefWindowProc(hWnd, msg, wParam, lParam);
}
The switch statement grows as you add different kinds of messages to handle. In the above code we
only directly handle three types of messages. Let us now examine the components of this function
definition.
107
case WM_LBUTTONDOWN:
::MessageBox(0, "Hello, World", "Hello", MB_OK);
return 0;
If the sent message is of type
WM_LBUTTONDOWN, then our particular window (remember window
procedures are window specific—you define one, unless you share them, for each window) displays a
message box. Once we handle the message, we are done and, therefore, can return out of the function
(return 0).
case WM_KEYDOWN:
if( wParam == VK_ESCAPE )
::DestroyWindow(hWnd);
return 0;
If the sent message is of type
WM_KEYDOWN and the key pressed was the escape key (symbolically
defined in code as
VK_ESCAPE) then we have specified that the window should be destroyed
(
DestroyWindow(hWnd)). The only parameter for DestroyWindow is a handle to the window that is
to be destroyed. This function sends a
WM_DESTROY message to the window identified by hWnd.
Observe that for the
WM_KEYDOWN message, the wParam contains the key code for the key that was
pressed. Again,
wParam and lParam provide extra message specific information—some messages do
not need extra information and these values are zeroed out.
case WM_DESTROY:
PostQuitMessage(0);
return 0;
The last type of message we specifically handle is the
WM_DESTROY message. This message would be
sent if the user presses the escape key (we defined the window to be destroyed if the escape key was
pressed in the previous message) or if the user pressed the ‘X’ button on the window to close it. In
response to this message, we use the
PostQuitMessage API function to add a WM_QUIT message to
the application message queue. This will effectively terminate the loop so that the program can end. The
only parameter to
PostQuitMessage is an exit code and this is almost always zero.
There is also some functionality that is common to almost every window. For example, just about every
window can be resized, minimized and maximized. It seems redundant to define this behavior
repeatedly for each window. Consequently, the Win32 API provides a default window procedure that
implements this common generic functionality. So for any message we do not specifically handle, we
can just forward the message off the default window procedure:
return DefWindowProc(hWnd, msg, wParam, lParam);
This buys us some extra, albeit generic, functionality for free. If you do not like the default behavior,
then you simply handle the message yourself in the window procedure so that it never gets forwarded to
the default window procedure.
Note: While small Windows programs typically only have one window procedure, large windows
programs will usually have much more. Games usually only have one, because games do not typically
work much with the Win32 API; rather they use a lower level API such as DirectX.
108
14.3.2 The WNDCLASS Structure
An instance of the WNDCLASS structure is used to define the properties of your window, such as styles,
the background color, the icon image, the cursor image, and the window procedure associated with any
window you create based on this
WNDCLASS instance. Here is the definition:
typedef struct _WNDCLASS {
UINT style;
WNDPROC lpfnWndProc;
int cbClsExtra;
int cbWndExtra;
HINSTANCE hInstance;
HICON hIcon;
HCURSOR hCursor;
HBRUSH hbrBackground;
LPCTSTR lpszMenuName;
LPCTSTR lpszClassName;
} WNDCLASS, *PWNDCLASS;
style: A combination of style flags for customization. There exists a myriad of bit flags that can be
combined to create various styles; see the Win32 documentation for details. Generally, the flag
combination
CS_HREDRAW and CS_VREDRAW are used as the style (combined via a bitwise OR), which
means the window will repaint itself when either the horizontal or vertical window size changes.
lpfnWndProc: Pointer to the window procedure you want to associate with the windows that are built
based on this
WNDCLASS instance.
cbClsExtra: Extra 32-bit memory slot to reserve custom information. We do not use this value in this
course.
cbWndExtra: Extra 32-bit memory slot to reserve custom information. We do not use this value in this
course.
hInstance: A handle to the application with which you want the windows you create to be associated.
Recall that
WinMain passes in the application instance handle through its first parameter.
hIcon: A handle to an icon which will be used for the window. You can get a handle to an icon via the
API function
LoadIcon. To load the default application icon, for example, you would write:
LoadIcon(0, IDI_APPLICATION); // returns an HICON
Some other intrinsic icons are:
•
IDI_WINLOGO – Windows logo icon
•
IDI_QUESTION – Question mark icon
•
IDI_INFORMATION – Information icon
•
IDI_EXCLAMATION – Exclamation icon
109
hCursor: A handle to a cursor which will be used for the window. You can get a handle to a cursor
with the API function
LoadCursor. To load the default arrow cursor, for example, you would write:
LoadCursor(0, IDC_ARROW); // returns an HCURSOR
Some other intrinsic cursors are:
• IDC_CROSS – Crosshair cursor
•
IDC_WAIT – Hourglass cursor
hbrBackground: A handle to a brush which specifies the windows background color. You can get a
handle to a brush with the API function
GetStockObject. To get a handle to a white brush, for
example, you would write:
(HBRUSH)GetStockObject(WHITE_BRUSH); // returns a HBRUSH
Note that we have to cast the return value to an
HBRUSH. Some other intrinsic brush types are:
•
BLACK_BRUSH – Black brush
•
DKGRAY_BRUSH – Dark gray brush
•
GRAY_BRUSH – Gray brush
•
LTGRAY_BRUSH – Light gray brush
lpszMenuName: The name of the window menu. We will be creating and enabling menus via another
method, so we will be setting this value to zero.
lpszClassName: A unique string name (identifier) we want to give the WNDCLASS instance, so that we
can refer to it later. This can be any name you want.
A typical
WNDCLASS instance would be created and filled out like so:
WNDCLASS wc;
wc.style = CS_HREDRAW | CS_VREDRAW;
wc.lpfnWndProc = WndProc;
wc.cbClsExtra = 0;
wc.cbWndExtra = 0;
wc.hInstance = hInstance;
wc.hIcon = ::LoadIcon(0, IDI_APPLICATION);
wc.hCursor = ::LoadCursor(0, IDC_ARROW);
wc.hbrBackground = (HBRUSH)::GetStockObject(WHITE_BRUSH);
wc.lpszMenuName = 0;
wc.lpszClassName = "MyWndClassName";
110
14.3.3 WNDCLASS Registration
Before you can create a window based on the WNDCLASS instance you have filled out, you must register
it with Windows. To register a
WNDCLASS instance, you use the RegisterClass function:
RegisterClass( &wc );
This is how we pass in a pointer to the
WNDCLASS instance which we want to register.
14.3.4 CreateWindow
After we have registered a WNDCLASS instance with Windows, we can create a window. To create a
window, we use the
CreateWindow function:
HWND CreateWindow(
LPCTSTR lpClassName,
LPCTSTR lpWindowName,
DWORD dwStyle,
int x,
int y,
int nWidth,
int nHeight,
HWND hWndParent,
HMENU hMenu,
HINSTANCE hInstance,
LPVOID lpParam
);
lpClassName: The name of the WNDCLASS instance to use in order to create the window (i.e., the name
we specified for
wc.lpszClassName).
lpWindowName: A unique string name to give the window we are creating. This is the name that will
appear in the window’s title/caption bar.
dwStyle: A combination of style flags specifying how the window should look. Typically, this is set to
WS_OVERLAPPEDWINDOW, which is a combination of styles WS_OVERLAPPED, WS_CAPTION,
WS_SYSMENU, WS_THICKFRAME, WS_MINIMIZEBOX, and WS_MAXIMIZEBOX. See the Win32 API
documentation for complete details on window styles.
x: The x-coordinate position of the upper-left corner of the window, relative to the screen, and measured
in pixels.
y: The y-coordinate position of the upper-left corner of the window, relative to the screen, and measured
in pixels.
111
nWidth: The width of the window, measured in pixels.
nHeight: The height of the window, measured in pixels.
hWndParent: Handle to a parent window. Windows can be arranged in a hierarchical fashion. For
example, controls such as buttons are child windows, and the window they lie on is the parent window.
If you wish to create a window with no parent (e.g., the main application window) then specify null for
this value.
hMenu: Handle to a menu which would be attached to the window. We will examine menus in later
chapters. For now we set this to null.
hInstance: Handle to the application instance the window is associated with.
lpParam: A pointer to optional user-defined data; this is optional and can be set to null.
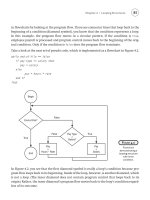
Note: Windows uses a different coordinate system than those which you may be familiar with. Typical
mathematics uses a coordinate system where +y goes “up” and –y goes “down.” However, Windows
uses a coordinate system where +y goes “down” and –y goes “up.” Moreover, the upper-left corner of
the screen corresponds to the origin. This system is referred to as screen space. Figure 14.12
illustrates the differences:
Figure 14.12: A typical coordinate system on the left, and the Windows coordinate system on the right.
Another simple but important structure in the Win32 API is the RECT structure. It is defined like so:
typedef struct _RECT {
LONG left;
LONG top;
LONG right;
LONG bottom;
} RECT, *PRECT;
The members describe a rectangle in screen space. Figure 14.13 illustrates:
112
Figure 14.13: A rectangle in screen space coordinates.
As Figure 14.13 shows, the point (left, type) defines the upper-left vertex of the rectangle and the point
(right, bottom) defines the lower-right vertex of the rectangle.
This function returns a window handle (
HWND) to the newly created window if the function is successful.
If the function fails then it returns null (0). Here is a typical example call:
hWnd = ::CreateWindow("MyWndClassName", "MyWindow",
WS_OVERLAPPEDWINDOW, 0, 0, 500, 500, 0, 0, hInstance, 0);
if(hWnd == 0)
{
::MessageBox(0, "CreateWindow - Failed", 0, 0);
return false;
}
14.3.5 Showing and Updating the Window
A window is not shown by default, so after we create it we must show it and, in addition, update it for
the first time:
ShowWindow(hWnd, showCmd);
UpdateWindow(hWnd);
Both of these functions require an
HWND argument that identifies the window that should be shown and
updated. Additionally,
ShowWindow requires a second argument that specifies how the window should
be shown. Some valid values are:
•
SW_SHOW – Shows the window in the position and dimensions specified in
CreateWindow
•
SW_MAXIMIZE – Shows the window maximized
•
SW_MINIMIZE – Shows the window minimized.
It is actually good form to show the window as Windows instructs; that is, using the value the
showCmd
parameter, from
WinMain, contains.
113
14.3.6 The Message Loop
We said that a Windows application constantly checks the message queue for messages; this is done
with the
message loop. A typical message loop looks like this:
MSG msg;
ZeroMemory(&msg, sizeof(MSG));
while(GetMessage(&msg, 0, 0, 0) )
{
TranslateMessage(&msg);
DispatchMessage(&msg);
}
First,
ZeroMemory is a Win32 function that clears out all the bits of a variable to zero, thereby “zeroing
out” the object; the first parameter is a pointer to the object to zero out and the second parameter is the
size, in bytes, of the object to zero out.
Moving on to the loop, for every loop cycle we call the API function
GetMessage, which extracts the
next message from the message queue and stores it in the passed-in
msg object. The remaining three
parameters of
GetMessage are uninteresting and we can specify null (0) for them all. If the message
extracted was a quit message (
WM_QUIT) then GetMessage returns false, thereby causing the while
loop to end. If the message was not a quit message then
GetMessage returns true.
Inside the while loop, we call two more API functions:
TranslateMessage and DispatchMessage.
TranslateMessage does some key code translations into character code translations. Finally,
DispatchMessage forwards the message off to the window procedure it is aimed for. In summary, for
each cycle, the message loop gets the next message from the message queue. If the message is not a quit
message then the message is sent to the appropriate window procedure to be handled.
14.4 Your Second Windows Program
The following annotated program ties in everything we have discussed in this chapter to create a basic
Windows program using the steps described in the previous section:
Program 14.2: Your Second Windows Program.
#include <windows.h>
// Store handles to the main window and application
// instance globally.
HWND ghMainWnd = 0;
HINSTANCE ghAppInst = 0;
// Step 1: Define and implement the window procedure.
LRESULT CALLBACK
114
WndProc(HWND hWnd, UINT msg, WPARAM wParam, LPARAM lParam)
{
switch( msg )
{
// Handle left mouse button click message.
case WM_LBUTTONDOWN:
MessageBox(0, "WM_LBUTTONDOWN message.", "Msg", MB_OK);
return 0;
// Handle key down message.
case WM_KEYDOWN:
if( wParam == VK_ESCAPE )
DestroyWindow(ghMainWnd);
return 0;
// Handle destroy window message.
case WM_DESTROY:
PostQuitMessage(0);
return 0;
}
// Forward any other messages we didn't handle to the
// default window procedure.
return DefWindowProc(hWnd, msg, wParam, lParam);
}
// WinMain: Entry point for a Windows application.
int WINAPI
WinMain(HINSTANCE hInstance, HINSTANCE hPrevInstance,
PSTR cmdLine, int showCmd)
{
// Save handle to application instance.
ghAppInst = hInstance;
// Step 2: Fill out a WNDCLASS instance.
WNDCLASS wc;
wc.style = CS_HREDRAW | CS_VREDRAW;
wc.lpfnWndProc = WndProc;
wc.cbClsExtra = 0;
wc.cbWndExtra = 0;
wc.hInstance = ghAppInst;
wc.hIcon = ::LoadIcon(0, IDI_APPLICATION);
wc.hCursor = ::LoadCursor(0, IDC_ARROW);
wc.hbrBackground = (HBRUSH)::GetStockObject(WHITE_BRUSH);
wc.lpszMenuName = 0;
wc.lpszClassName = "MyWndClassName";
// Step 3: Register the WNDCLASS instance with Windows.
RegisterClass( &wc );
// Step 4: Create the window, and save handle in globla
// window handle variable ghMainWnd.
ghMainWnd = ::CreateWindow("MyWndClassName", "MyWindow",
WS_OVERLAPPEDWINDOW, 0, 0, 500, 500, 0, 0, ghAppInst, 0);
if(ghMainWnd == 0)
{
::MessageBox(0, "CreateWindow - Failed", 0, 0);
return false;
}
115
// Step 5: Show and update the window.
ShowWindow(ghMainWnd, showCmd);
UpdateWindow(ghMainWnd);
// Step 6: Enter the message loop and don't quit until
// a WM_QUIT message is received.
MSG msg;
ZeroMemory(&msg, sizeof(MSG));
while( GetMessage(&msg, 0, 0, 0) )
{
TranslateMessage(&msg);
DispatchMessage(&msg);
}
// Return exit code back to operating system.
return (int)msg.wParam;
}
Program 14.2 outputs a window with a caption “My Window,” a minimize button, a maximize button,
and a close button. If you click the client area (white rectangle) a message box is displayed that
indicates you generated a
WM_LBUTTONDOWN message. Finally, you can close the window by pressing
the close ‘X’ button or by pressing the escape key. Figure 14.14 shows the output after the left mouse
button was pressed:
Figure 14.14: Program 14.2 output after the user left mouse clicked the client area.
116
14.5 Summary
1. The primary characteristic of a Win32 application is the GUI (Graphical User Interface). “GUI”
refers to the menus, buttons, scroll bars, and other graphical objects users interact with.
2.
The Win32 library is a large low-level set of functions, structures, and types that allow you to
create and customize windows.
3.
In order to write Win32 programs you need to include the Windows header file (#include
<windows.h>); this header file gives the prototypes and definitions of various functions and
types you will need to program the Win32 API.
4.
Win32 programs no longer start with the main function. Instead, they start with the WinMain
function.
WinMain returns an integer, which specifies the code that is returned to the Windows
operating system.
5.
An HWND is an ID to a particular window, just like an HINSTANCE is an ID to a particular
application. The ‘H’ in both of these stands for “handle”:
HWND means “windows handle” and
HINSTANCE means “application instance handle.” We need these IDs or handles, so that we can
refer to individual Windows objects, such as applications and windows, which are internally
maintained by the Win32 API.
6.
Windows programs are event driven; that is, they sit and wait for an event to occur, and then
execute some code in response to that event. An event can be a key press, a mouse click, a
button press, a menu selection, scrolling the scroll bars, etc. When an event occurs, Windows
adds a message to the application’s message queue for which the event was aimed for. The
application’s message loop then retrieves and processes the messages from the message queue.
When a message is processed it is dispatched to the window procedure of the window the event
was targeted for. The window procedure then handles the message by executing some code in
response to the message.
7.
Creating and displaying a window requires several steps:
a.
You must define the window procedure of the main application window
b.
You must fill out a WNDCLASS instance describing some of the properties of your window
c.
You must register the WNDCLASS instance with Windows using the RegisterClass
function
d.
You must create the window with the CreateWindow function
e.
You must show and update the window with ShowWindow and UpdateWindow,
respectively
f.
You must enter the message loop so that your application can retrieve and process
messages.
117
14.6 Exercises
These exercises should be done as modification to Program 4.2.
14.6.1 Exit Message
When the user presses the escape key, instead of exiting immediately, display a “YES/NO” style
message box asking the user if he really wants to quit. If the user selects “Yes” then exit, else if the user
selects “No” then do not exit.
14.6.2 Horizontal and Vertical Scroll Bars
Add horizontal and vertical scroll bars to the main window. These scroll bars only need to be
displayed—they do
not need to be functional. (Hint: See the CreateWindow style flags in the Win32
documentation.)
14.6.3 Multiple Windows
Instead of just displaying one window, make the application create and show two more windows. The
windows’ positions and dimensions should be set so that they occupy different regions of the screen,
thereby making all three visible at once. Give all three windows their own window procedure. When
the user left mouse clicks in one of the windows, display a message box with the message “You clicked
Window #
x,” where x should be replaced with 1, 2, or 3 depending on which window was selected.
(Hint: Create and fill out three
WNDCLASS instances that correspond to each window and which contain
the corresponding window procedure. Also create three
HWNDs (one for each window) and call
CreateWindow three times to create each window. You will also need to show and update each
window.)
14.6.4 Change the Cursor
Change the mouse cursor to something other than the arrow cursor.
118
14.6.5 Blue Background
Change the background of the window (or the three windows if you did Exercise 14.6.3) from white to
blue (or red, green, and blue if you did Exercise 14.6.3). You will need to create a blue brush for this (or
red, green, and blue if you did Exercise 14.6.3). You can create a custom brush with the following
function:
HBRUSH CreateBrushIndirect(
CONST LOGBRUSH *lplb // brush information
);
Observe that this function returns an
HBRUSH. This function has a parameter that specifies the details of
the brush to create. Specifically,
LOGBRUSH looks like this:
typedef struct tagLOGBRUSH {
UINT lbStyle;
COLORREF lbColor;
LONG lbHatch;
} LOGBRUSH, *PLOGBRUSH;
The style allows you to specify a brush style. We want a solid brush, so we select
BS_SOLID.
A
COLORREF is a 32-bit value, where 1 byte is used to describe the shade of red, 1 byte is used to
describe the shade of green, and 1 byte is used to describe the shade of blue—the so-called RGB color—
and one byte is not used. We can use the following macro to create a
COLORREF:
COLORREF RGB(
BYTE byRed, // red component of color in the range [0, 255].
BYTE byGreen, // green component of color in the range [0, 255].
BYTE byBlue // blue component of color in the range [0, 255].
);
BYTE is typedefed as an unsigned char. For the color ranges, 0 would mean zero color
intensity/shade (i.e., black) and 255 would mean full intensity—bright red, green, or blue. Thus, we
have 256 shades of each color component. The mixing of various shades of red, green, and blue allows
us to describe millions of different colors.
The hatch member of
LOGBRUSH is another value that allows you to describe a hatch pattern. Since we
are using a solid brush, we can ignore this value—see the Win32 documentation if you are curious about
why.
With all that said, we can create our blue brush like so:
LOGBRUSH lb;
lb.lbStyle = BS_SOLID;
lb.lbColor = RGB(0, 0, 255);
HBRUSH blueBrush = CreateBrushIndirect(&lb);
119
After you have made a window with a blue background color, try experimenting with different colors
(i.e., changing the values in the RGB macro).
14.6.6 Custom Icon
Instead of using the default Windows icon, let us make our own. To do this, we need to add an icon
resource to our project. To do this, go to the menu, select
View->Resource View, as Figure 14.15 shows.
Figure 14.15: Opening the Resource View panel.
On the right hand side of Visual C++ .NET, you should see a “Resource View” panel, with the name of
your project. Right click the name, select Add, then Add Resource, as Figure 14.16 shows.
Figure 14.16: Adding a resource to the project.
A dialog box appears (Figure 14.17). Select the Icon selection and press the “New” button.
120
Figure 14.17: Adding an icon resource.
An icon resource will be added to your project, and the Visual C++ .NET icon editor will launch,
thereby allowing you to paint your icon. Figure 14.18 shows a quick Game Institute icon that was
painted in the editor.
Figure 14.18: Painting an icon in the Visual C++ Resource Editor.
As you can see from the “Resource View” panel (Figure 14.19), the icon that we added was given the
default name IDI_ICON1. We can change this name, but it is fine for now.
121
Figure 14.19: The Resource View panel shows the project resources.
To get a
HICON handle to our icon, we use the LoadIcon function like so:
::LoadIcon(ghAppInst, MAKEINTRESOURCE(IDI_ICON1));
Because we are not using a system icon, we must specify the application instance for the first parameter.
For the second parameter, we must pass our icon name through a macro, which will convert a numeric
ID to the icon name. Also note that when we add a new resource, a new header file called “resource.h”
is automatically created, which contains our resource names and symbols. In order for the application to
recognize the symbol
IDI_ICON1, you will need to #include “resource.h”. Figure 14.20 shows our
window, now with a custom icon:
Figure 14.20: Our window with a custom icon.
122
Chapter 15
Introduction to GDI and Menus
123
Introduction
The primary theme of this chapter is GDI (Graphics Device Interface). GDI is the component of the
Win32 API that is concerned with drawing graphics; it provides all the necessary structures and
functions for drawing graphics onto your windows.
This is definitely one of the more “fun” chapters we have encountered so far this course, as we finally
have enough C++ background and Windows background to make an interesting application. Moreover,
the basic graphics and menu features we learn about here will provide us with a solid foundation when
we begin to make some Windows games. By the end of this chapter, you will have learned how to
create a basic paint program that allows you to draw various shapes with different colors and styles.
Figure 15.1 shows our ultimate goal for this chapter.
Figure 15.1: A screenshot of the paint program that we will develop in this chapter.
Chapter Objectives
• Learn how to output text onto a window, and how to draw several GDI shape primitives like
lines, rectangles and ellipses.
•
Understand how different pens and brushes can be used to change the way in which the GDI
shapes are colored and drawn.
•
Learn how to load bitmap (.bmp) images from file into our Windows programs, and how to draw
them on the client area of our windows.
•
Become familiar with the Visual C++ menu resource editor, and learn how to create menus with
it.
124
15.1 Text Output
15.1.1 The WM_PAINT Message
Before we can begin a discussion of outputting text to a window’s client area (which is a form of
drawing), we need to talk about the
WM_PAINT message. First, note that in Windows, you can have
several windows open at once. For example, you may have a web browser open, a word processor open,
and perhaps a couple different windows displaying the contents of various folders. You have certainly
observed a time where a window
A was partially or fully obscured by another window B (or even
obscured by several windows, but let us keep it simple).
The key idea is that when B obscures a part
of A’s client area (call the obscured region R), the data drawn on R is not saved by Windows.
Consequently, when we move B off of A’s client area, so that a part of R becomes visible, the data
previously drawn to R no longer exists—it was not saved.
However, you might argue that this is not
what happens. That is, you have obscured windows, and then made them visible again and nothing was
lost. What is actually happening is that the windows “know” when previously obscured parts become
visible, and they then redraw themselves to restore the previous data. Thus, it looks like nothing was
really lost. Note though, that this functionality is not automatic—the applications were programmed to
repaint themselves at the appropriate time.
Note: Resizing a window so that it becomes smaller can also hide a region you once painted to. When
you resize back to a larger size, the data drawn to the previously hidden region will not be “remembered”
by Windows—you will have to redraw it yourself. Window also sends a
WM_PAINT message when a
window is resized.
The window knows to redraw itself when part of it becomes visible because Windows will send the
window a
WM_PAINT message informing the window that it needs to repaint its client area (or a region
of the client area). This means that we need to structure our programs so that the drawing code occurs in
response to a
WM_PAINT message. By placing all the drawing code in the WM_PAINT message handler,
we can ensure that the window will repaint itself whenever necessary; that is, whenever a
WM_PAINT
occurs.
15.1.2 The Device Context
A device context is a software abstraction of a display device, such as the video card or a printer. We
do all drawing operations through the device context (abbreviated as DC). The first question is how to
obtain a DC. There are several ways. We will look at one method now, and then look at another
method a few chapters down the road.
As said, we will try to structure our programs so that all the drawing will be done in the
WM_PAINT
handler. Because the
WM_PAINT handler is a common place for drawing, the Win32 API provides a
special function, which can be used there that returns a handle to a device context. More specifically, in
a
WM_PAINT handler, we can get a handle to device context (HDC) with the BeginPaint function: