C++ Programming for Games Module II phần 9 pot
Bạn đang xem bản rút gọn của tài liệu. Xem và tải ngay bản đầy đủ của tài liệu tại đây (4.85 MB, 31 trang )
236
// Destroy the window when the user selects the 'exit'
// menu item.
case ID_FILE_EXIT:
DestroyWindow(ghMainWnd);
break;
}
return 0;
case WM_KEYDOWN:
switch(wParam)
{
// Move left.
case 'A':
gTankPos.x -= 5.0f;
break;
// Move right.
case 'D':
gTankPos.x += 5.0f;
break;
// Move up remember in Windows coords, -y = up.
case 'W':
gTankPos.y -= 5.0f;
break;
// Move down.
case 'S':
gTankPos.y += 5.0f;
break;
// Rotate tank gun to the left.
case 'Q':
gGunDir.rotate(-0.1f);
break;
// Rotate tank gun to the right.
case 'E':
gGunDir.rotate(0.1f);
break;
// Fire a bullet.
case VK_SPACE:
gBulletList.push_back(gTankPos + gGunDir);
break;
}
return 0;
// Destroy application resources.
case WM_DESTROY:
DeleteObject(gGunPen);
delete gBackBuffer;
PostQuitMessage(0);
return 0;
}
// Forward any other messages we didn't handle to the
// default window procedure.
return DefWindowProc(hWnd, msg, wParam, lParam);
}
237
17.4 Sprites
17.4.1 Theory
Although the tank from the tank sample is reminiscent of early classic computer gaming, its graphics are
obviously extremely primitive. A more contemporary solution is for an artist to paint a detailed tank
image using some image editing software, such as Adobe Photoshop™, and perhaps base it on a
photograph of a real tank. The artist can then save the image, say as a .bmp file, which we can load and
use in our programs. This can lead us to some better-looking graphics. For example, Figure 17.6 shows
a bitmap of a military jet we could use in a 2D jet fighter style game.
Figure 17.6: A bitmap of a fighter jet.
However, there is a problem. Bitmaps are rectangular, by definition. The actual jet part of Figure 17.6
is not rectangular, but as you can see, it lies on a rectangular background. However, when we draw
these bitmaps we do not want this black background to be drawn—Figure 17.7 illustrates the problem
and Figure 17.8 shows the desired “correct” output.
238
Figure 17.7: Drawing bitmaps incorrectly. The problem is that the bitmap pixels that are not part of the actual image
show through; that is, the black background pixels are visible.
Figure 17.8: Drawing bitmaps correctly—only the desired image pixels are drawn.
239
The task at hand is to figure out a way to not draw the black background part of the bitmap. These
images we use to represent game objects, such as jets, missiles and such, are commonly referred to as
sprites.
The solution to this problem lies in the way we combine the pixels of the source bitmap (sprite) and the
pixels of the destination bitmap (backbuffer). First, for each sprite we will create a corresponding
mask
bitmap. This bitmap will mark the pixels of the sprite which should be drawn to the backbuffer and
mark the pixels of the sprite which should not be drawn to the backbuffer. It is important to realize that
the mask bitmap must be of the same dimensions as the image bitmap so that the ijth pixel in the image
corresponds with the ijth pixel in the mask. Figure 17.9a shows a jetfighter bitmap image, Figure 17.9b
shows its mask, and Figure 17.9c shows the result when the image is combined with the mask. (We
show how this combination is done in the next paragraph; our goal here is to intuitively show what is
happening.)
Figure 17.9: (a) The image bitmap. (b) The mask, marking the pixels that should be drawn. (c) The result after
combining the image and the mask.
In the mask, the black pixels mark the pixels of the sprite that should be drawn to the backbuffer and the
white pixels mark the pixels of the sprite that should not be drawn to the backbuffer.
To draw a sprite, we first draw the mask to the backbuffer using the raster operation
SRCAND, instead of
SRCCOPY. Recall that SRCCOPY simply copies the source pixels directly over the destination pixels—it
overwrites whatever is there. On the other hand,
SRCAND combines each source pixel with its
corresponding destination pixel to produce the new final destination color, like so: F = D & S, where F
is the final color eventually written to the destination pixel, D was the previous destination pixel color,
and S is the source pixel color. This combination is a bitwise AND. (Hopefully your bitwise operations
are well understood. If they are not, you may wish to review Chapter 12
.) The AND operation is a key
point because when we AND a pixel color with a black pixel we get black (zero) in all
circumstances, and when we AND a pixel color with a white pixel we do not modify the original
pixel (it is like multiplying by one):
1.
D & S = 0x00?????? & 0x00000000 = 0x00000000 (S = Black)
2.
D & S = 0x00?????? & 0x00FFFFFF = 0x00?????? (S = White)
240
The question marks simply mean the left-hand-side can be any value.
What does this amount to? It means that when we draw the mask to the backbuffer, we draw black to
the backbuffer where the mask is black (D & Black = Black) and we leave the backbuffer pixels
unchanged where the mask is white (D & White = D).
Note: In case you are wondering how we can AND colors, recall that colors are typically represented as
32-bit integers, where 8-bits are used for the red component, 8-bits are used for the green component,
and 8-bits are used for the blue component. (8-bits are not used.) That is what a
COLORREF is: it is
typedefed as a 32-bit integer. In hexadecimal, the format of the COLORREF type looks like so:
0x00bbggrr
Where red takes the rightmost 8-bits, green takes the next 8-bits, blue takes the next 8-bits, and the top
8-bits is not used and just set to zero.
We can do bitwise operations on integers and thus
COLORREFs. Incidentally, the color black would be
described as 0x00000000 (each 8-bit color component is 0), and white is represented as 0x00FFFFFF
(each 8-bit color component is 255).
At this point, we have drawn black to the backbuffer pixels that correspond to the pixels in the sprite
image we wish to draw—Figure 17.10. The next step is to draw the actual sprite image onto the
backbuffer.
Figure 17.10: The backbuffer after the mask bitmap is drawn to it. It marks the pixels black where we will copy the
image bitmap to.
241
However, when we draw the sprite image, we need to use the raster operation
SRCPAINT, which
specifies that the destination and source pixels be combined like so: F = D | S. The OR operation is a
key point because, where the destination (backbuffer) is black, it copies all the source pixels: F = Black |
S = S. This is exactly what we want, because we marked the pixels black (when we drew the mask)
which correspond to the spite pixels we want to draw. Moreover, where the source (sprite) is black, it
leaves the destination backbuffer color unchanged because, F = D | Black = D. Again, this is exactly
what we want. We do not want to draw the black background part of the sprite bitmap. The end result
is that only the sprite pixels we want to draw are drawn to the backbuffer—Figure 17.8.
17.4.2 Implementation
To facilitate the drawing of sprites, we will create a Sprite class, which will handle all the drawing
details discussed in the previous section. In addition, it will handle the allocation and deallocation of the
resources associated with sprites. Here is the class definition:
// Sprite.h
// By Frank Luna
// August 24, 2004.
#ifndef SPRITE_H
#define SPRITE_H
#include <windows.h>
#include "Circle.h"
#include "Vec2.h"
class Sprite
{
public:
Sprite(HINSTANCE hAppInst, int imageID, int maskID,
const Circle& bc, const Vec2& p0, const Vec2& v0);
~Sprite();
int width();
int height();
void update(float dt);
void draw(HDC hBackBufferDC, HDC hSpriteDC);
public:
// Keep these public because they need to be
// modified externally frequently.
Circle mBoundingCircle;
Vec2 mPosition;
Vec2 mVelocity;
private:
// Make copy constructor and assignment operator private
// so client cannot copy Sprites. We do this because
// this class is not designed to be copied because it
242
// is not efficient copying bitmaps is slow (lots of memory).
Sprite(const Sprite& rhs);
Sprite& operator=(const Sprite& rhs);
protected:
HINSTANCE mhAppInst;
HBITMAP mhImage;
HBITMAP mhMask;
BITMAP mImageBM;
BITMAP mMaskBM;
};
#endif // SPRITE_H
We will begin by analyzing the data members first.
1.
mBoundingCircle: A circle that approximately describes the area of the sprite. We will
discuss and implement the
Circle class in the next chapter. It is not required in this chapter yet.
2.
mPosition: The center position of the sprite rectangle.
3.
mVelocity: The velocity of the sprite—the direction and speed the sprite is moving in.
4.
mhAppInst: A handle to the application instance.
5.
mhImage: A handle to the sprite image bitmap.
6.
mhMask: A handle to the sprite mask bitmap.
7.
mImageBM: A structure containing the sprite image bitmap info.
8.
mMaskBM: A structure containing the sprite mask bitmap info.
Now we describe the methods.
1.
Sprite(HINSTANCE hAppInst, int imageID, int maskID,
const Circle& bc, const Vec2& p0, const Vec2& v0);
The constructor takes several parameters. The first is a handle to the application instance, which
is needed for the
LoadBitmap function. The second and third parameters are the resource IDs
of the image bitmap and mask bitmap, respectively. The fourth parameter specifies the sprite’s
bounding circle; the fifth parameter specifies the sprite’s initial position, and the sixth parameter
specifies the sprite’s initial velocity. This constructor does four things. First, it initializes some
of the sprite’s data members. It also loads the image and mask bitmaps given the resource IDs.
Additionally, it obtains the corresponding
BITMAP structures for both the image and mask
bitmaps. Finally, it verifies that the image bitmap dimensions equal the mask bitmap
dimensions. Here is the implementation:
243
Sprite::Sprite(HINSTANCE hAppInst, int imageID, int maskID,
const Circle& bc, const Vec2& p0, const Vec2& v0)
{
mhAppInst = hAppInst;
// Load the bitmap resources.
mhImage = LoadBitmap(hAppInst, MAKEINTRESOURCE(imageID));
mhMask = LoadBitmap(hAppInst, MAKEINTRESOURCE(maskID));
// Get the BITMAP structure for each of the bitmaps.
GetObject(mhImage, sizeof(BITMAP), &mImageBM);
GetObject(mhMask, sizeof(BITMAP), &mMaskBM);
// Image and Mask should be the same dimensions.
assert(mImageBM.bmWidth == mMaskBM.bmWidth);
assert(mImageBM.bmHeight == mMaskBM.bmHeight);
mBoundingCircle = bc;
mPosition = p0;
mVelocity = v0;
}
2. ~Sprite();
The destructor is responsible for deleting any resources we allocated in the constructor. The only
resources we allocated were the bitmaps, and so we delete those in the destructor:
Sprite::~Sprite()
{
// Free the resources we created in the constructor.
DeleteObject(mhImage);
DeleteObject(mhMask);
}
3.
int width();
This method returns the width, in pixels, of the sprite.
int Sprite::width()
{
return mImageBM.bmWidth;
}
4.
int height();
This method returns the height, in pixels, of the sprite.
int Sprite::height()
{
return mImageBM.bmHeight;
}
244
5.
void update(float dt);
The
update function essentially does what we did in the tank sample for the bullet. That is, it
displaces the sprite’s position by some small displacement vector, given the sprite velocity (data
member) and a small change in time (
dt).
void Sprite::update(float dt)
{
// Update the sprites position.
mPosition += mVelocity * dt;
// Update bounding circle, too. That is, the bounding
// circle moves with the sprite.
mBoundingCircle.c = mPosition;
}
6.
void draw(HDC hBackBufferDC, HDC hSpriteDC);
This function draws the sprite as discussed in Section 17.4.1. This method takes two parameters.
The first is a handle to the backbuffer device context, which we will need to render onto the
backbuffer. The second is a handle to a second system memory device context with which we
will associate our sprites. Remember, everything in GDI must be done through a device context.
In order to draw a sprite bitmap onto the backbuffer, we need a device context associated with
the sprite, as well as the backbuffer.
void Sprite::draw(HDC hBackBufferDC, HDC hSpriteDC)
{
// The position BitBlt wants is not the sprite's center
// position; rather, it wants the upper-left position,
// so compute that.
int w = width();
int h = height();
// Upper-left corner.
int x = (int)mPosition.x - (w / 2);
int y = (int)mPosition.y - (h / 2);
// Note: For this masking technique to work, it is assumed
// the backbuffer bitmap has been cleared to some
// non-zero value.
// Select the mask bitmap.
HGDIOBJ oldObj = SelectObject(hSpriteDC, mhMask);
// Draw the mask to the backbuffer with SRCAND. This
// only draws the black pixels in the mask to the backbuffer,
// thereby marking the pixels we want to draw the sprite
// image onto.
BitBlt(hBackBufferDC, x, y, w, h, hSpriteDC, 0, 0, SRCAND);
// Now select the image bitmap.
SelectObject(hSpriteDC, mhImage);
245
// Draw the image to the backbuffer with SRCPAINT. This
// will only draw the image onto the pixels that where previously
// marked black by the mask.
BitBlt(hBackBufferDC, x, y, w, h, hSpriteDC, 0, 0, SRCPAINT);
// Restore the original bitmap object.
SelectObject(hSpriteDC, oldObj);
}
17.5 Ship Animation Sample
We will now describe how to make the Ship sample, which is illustrated by the screenshot shown in
Figure 17.8. In this program, the user can control only the F-15 jet. The other jets remain motionless
(animating the other jets will be left as an exercise for you to complete). The user uses the ‘A’ and ‘D’
keys to move horizontally, and the ‘W’ and ‘S’ keys to move vertically. The spacebar key fires a
missile. In essence, this program is much like the tank program, but with better graphics.
17.5.1 Art Resources
We require the following art assets:
• A background image with mask—Figure 17.11a.
•
An F-15 Jet image with mask—Figure 17.11b.
•
An F-18 Jet image with mask—Figure 17.11c.
•
An F-117 Jet image with mask—Figure 17.11d.
•
A missile image with mask—Figure 17.11e.
Observe that for the background image, the mask is all black, indicating that we want to draw the entire
background image. Although this is somewhat wasteful since we do not need to mask the background,
it allows us to work generally with the
Sprite class. We will use the Sprite class to draw the
background as well.
We use the following resource IDs for these art assets:
Background image bitmap:
IDB_BACKGROUND
Background mask bitmap: IDB_BACKGROUNDMASK
F-15 image bitmap: IDB_F15
F-15 mask bitmap: IDB_F15MASK
F-18 image bitmap: IDB_F18
F-18 mask bitmap: IDB_F18MASK
F-117 image bitmap: IDB_F117
F-117 mask bitmap: IDB_F117MASK
Missile image bitmap: IDB_BULLET
Missile mask bitmap: IDB_BULLETMASK
246
Figure 17.11: Art assets used in the Ship sample.
17.5.2 Program Code
There is not much to explain for the Ship sample. The only real difference between this sample and the
Tank sample is that we are using sprites now instead of GDI shape functions. Other than that, it follows
the same format. Moreover, the program is heavily commented. Therefore, we will simply present the
main application code.
Program 17.2: The Ship Sample Main Application Code. You still need the other files like Sprite.h/.cpp,
BackBuffer.h/.cpp, Circle.h/.cpp and Vec2.h/.cpp to compile. To obtain these files download the entire project off of
the Game Institute C++ Course Website.
// ship.cpp
// By Frank Luna
// August 24, 2004.
247
//=========================================================
// Includes
//=========================================================
#include <string>
#include "resource.h"
#include "Sprite.h"
#include "BackBuffer.h"
#include <list>
using namespace std;
//=========================================================
// Globals
//=========================================================
HWND ghMainWnd = 0;
HINSTANCE ghAppInst = 0;
HMENU ghMainMenu = 0;
HDC ghSpriteDC = 0;
BackBuffer* gBackBuffer = 0;
Sprite* gBackground = 0;
Sprite* gF15 = 0;
Sprite* gF18 = 0;
Sprite* gF117 = 0;
Sprite* gBullet = 0;
list<Vec2> gBulletPos;
RECT gMapRect = {0, 0, 800, 600};
string gWndCaption = "Game Institute Ship Sample";
// Client dimensions exactly equal dimensions of
// background bitmap. This is found by inspecting
// the bitmap in an image editor, for example.
const int gClientWidth = 800;
const int gClientHeight = 600;
// Center point of client rectangle.
const POINT gClientCenter =
{
gClientWidth / 2,
gClientHeight / 2
};
// Pad window dimensions so that there is room for window
// borders, caption bar, and menu.
const int gWindowWidth = gClientWidth + 6;
const int gWindowHeight = gClientHeight + 52;
//=========================================================
// Function Prototypes
//=========================================================
bool InitMainWindow();
int Run();
void DrawFramesPerSecond(float deltaTime);
LRESULT CALLBACK
WndProc(HWND hWnd, UINT msg, WPARAM wParam, LPARAM lParam);
248
//=========================================================
// Name: WinMain
// Desc: Program execution starts here.
//=========================================================
int WINAPI
WinMain(HINSTANCE hInstance, HINSTANCE hPrevInstance,
PSTR cmdLine, int showCmd)
{
ghAppInst = hInstance;
// Create the main window.
if( !InitMainWindow() )
{
MessageBox(0, "Window Creation Failed.", "Error", MB_OK);
return 0;
}
// Enter the message loop.
return Run();
}
//=========================================================
// Name: InitMainWindow
// Desc: Creates the main window upon which we will
// draw the game graphics onto.
//=========================================================
bool InitMainWindow()
{
WNDCLASS wc;
wc.style = CS_HREDRAW | CS_VREDRAW;
wc.lpfnWndProc = WndProc;
wc.cbClsExtra = 0;
wc.cbWndExtra = 0;
wc.hInstance = ghAppInst;
wc.hIcon = ::LoadIcon(0, IDI_APPLICATION);
wc.hCursor = ::LoadCursor(0, IDC_ARROW);
wc.hbrBackground = (HBRUSH)::GetStockObject(NULL_BRUSH);
wc.lpszMenuName = 0;
wc.lpszClassName = "MyWndClassName";
RegisterClass( &wc );
// WS_OVERLAPPED | WS_SYSMENU: Window cannot be resized
// and does not have a min/max button.
ghMainMenu = LoadMenu(ghAppInst, MAKEINTRESOURCE(IDR_MENU));
ghMainWnd = ::CreateWindow("MyWndClassName",
gWndCaption.c_str(), WS_OVERLAPPED | WS_SYSMENU,
200, 200, gWindowWidth, gWindowHeight, 0,
ghMainMenu, ghAppInst, 0);
if(ghMainWnd == 0)
{
::MessageBox(0, "CreateWindow - Failed", 0, 0);
return 0;
}
ShowWindow(ghMainWnd, SW_NORMAL);
249
UpdateWindow(ghMainWnd);
return true;
}
//=========================================================
// Name: Run
// Desc: Encapsulates the message loop.
//=========================================================
int Run()
{
MSG msg;
ZeroMemory(&msg, sizeof(MSG));
// Get the current time.
float lastTime = (float)timeGetTime();
while(msg.message != WM_QUIT)
{
// IF there is a Windows message then process it.
if(PeekMessage(&msg, 0, 0, 0, PM_REMOVE))
{
TranslateMessage(&msg);
DispatchMessage(&msg);
}
// ELSE, do game stuff.
else
{
// Get the time now.
float currTime = (float)timeGetTime();
// Compute the differences in time from the last
// time we checked. Since the last time we checked
// was the previous loop iteration, this difference
// gives us the time between loop iterations
// or, I.e., the time between frames.
float deltaTime = (currTime - lastTime)*0.001f;
// Clamp speed to 100 units per second.
if(gF15->mVelocity.length() > 100.0f)
gF15->mVelocity.normalize() *= 100.0f;
// Update ship.
gF15->update(deltaTime);
// Make sure F15 stays in the map boundary.
if( gF15->mPosition.x < gMapRect.left )
{
gF15->mPosition.x = (float)gMapRect.left;
gF15->mVelocity.x = 0.0f;
gF15->mVelocity.y = 0.0f;
}
if( gF15->mPosition.x > gMapRect.right )
{
gF15->mPosition.x = (float)gMapRect.right;
gF15->mVelocity.x = 0.0f;
gF15->mVelocity.y = 0.0f;
250
}
if( gF15->mPosition.y < gMapRect.top )
{
gF15->mPosition.y = (float)gMapRect.top;
gF15->mVelocity.x = 0.0f;
gF15->mVelocity.y = 0.0f;
}
if( gF15->mPosition.y > gMapRect.bottom )
{
gF15->mPosition.y = (float)gMapRect.bottom;
gF15->mVelocity.x = 0.0f;
gF15->mVelocity.y = 0.0f;
}
// Draw objects.
gBackground->draw(gBackBuffer->getDC(), ghSpriteDC);
gF15->draw(gBackBuffer->getDC(), ghSpriteDC);
gF18->draw(gBackBuffer->getDC(), ghSpriteDC);
gF117->draw(gBackBuffer->getDC(), ghSpriteDC);
list<Vec2>::iterator i = gBulletPos.begin();
while( i != gBulletPos.end() )
{
Vec2 bulletVelocity(0.0f, -300.0f);
// Update the position.
*i += bulletVelocity * deltaTime;
POINT p = *i;
// Only draw bullet if it is still inside
// the map boundaries.
// Otherwise, delete it.
if( !PtInRect(&gMapRect, p) )
i = gBulletPos.erase(i);
else
{
gBullet->mPosition = *i;
gBullet->draw(
gBackBuffer->getDC(),
ghSpriteDC);
++i; // Next in list.
}
}
DrawFramesPerSecond(deltaTime);
// Now present the backbuffer contents to the main
// window client area.
gBackBuffer->present();
// We are at the end of the loop iteration, so
// prepare for the next loop iteration by making
// the "current time" the "last time."
lastTime = currTime;
// Free 20 miliseconds to Windows so we don't hog
251
// the system resources.
Sleep(20);
}
}
// Return exit code back to operating system.
return (int)msg.wParam;
}
//=========================================================
// Name: DrawFramesPerSecond
// Desc: This function is called every frame and updates
// the frame per second display in the main window
// caption.
//=========================================================
void DrawFramesPerSecond(float deltaTime)
{
// Make static so the variables persist even after
// the function returns.
static int frameCnt = 0;
static float timeElapsed = 0.0f;
static char buffer[256];
// Function called implies a new frame, so increment
// the frame count.
++frameCnt;
// Also increment how much time has passed since the
// last frame.
timeElapsed += deltaTime;
// Has one second passed?
if( timeElapsed >= 1.0f )
{
// Yes, so compute the frames per second.
// FPS = frameCnt / timeElapsed, but since we
// compute only when timeElapsed = 1.0, we can
// reduce to:
// FPS = frameCnt / 1.0 = frameCnt.
sprintf(buffer, " Frames Per Second = %d", frameCnt);
// Add the frames per second string to the main
// window caption that is, we'll display the frames
// per second in the window's caption bar.
string newCaption = gWndCaption + buffer;
// Now set the new caption to the main window.
SetWindowText(ghMainWnd, newCaption.c_str());
// Reset the counters to prepare for the next time
// we compute the frames per second.
frameCnt = 0;
timeElapsed = 0.0f;
}
}
252
//=========================================================
// Name: WndProc
// Desc: The main window procedure.
//=========================================================
LRESULT CALLBACK
WndProc(HWND hWnd, UINT msg, WPARAM wParam, LPARAM lParam)
{
Circle bc; // Not needed in this demo, leave default.
Vec2 p0(gClientCenter);
Vec2 v0(0.0f, 0.0f);
switch( msg )
{
// Create application resources.
case WM_CREATE:
// Create the sprites
gBackground = new Sprite(ghAppInst,
IDB_BACKGROUND, IDB_BACKGROUNDMASK, bc, p0, v0);
gF15 = new Sprite(ghAppInst, IDB_F15, IDB_F15MASK,
bc, p0, v0);
p0.x = 100;
p0.y = 100;
gF18 = new Sprite(ghAppInst, IDB_F18, IDB_F18MASK,
bc, p0, v0);
p0.x = 600;
p0.y = 100;
gF117 = new Sprite(ghAppInst, IDB_F117, IDB_F117MASK,
bc, p0, v0);
p0.x = 0.0f;
p0.y = 0.0f;
gBullet = new Sprite(ghAppInst, IDB_BULLET, IDB_BULLETMASK,
bc, p0, v0);
// Create system memory DCs
ghSpriteDC = CreateCompatibleDC(0);
// Create the backbuffer.
gBackBuffer = new BackBuffer(
hWnd,
gClientWidth,
gClientHeight);
return 0;
case WM_COMMAND:
switch(LOWORD(wParam))
{
// Destroy the window when the user selects the 'exit'
// menu item.
case ID_FILE_EXIT:
253
DestroyWindow(ghMainWnd);
break;
}
return 0;
case WM_KEYDOWN:
switch(wParam)
{
// Accelerate left.
case 'A':
gF15->mVelocity.x -= 5.0f;
break;
// Accelerate right.
case 'D':
gF15->mVelocity.x += 5.0f;
break;
// Accelerate up (remember +y goes down and -y goes up)
case 'W':
gF15->mVelocity.y -= 5.0f;
break;
// Accelerate down.
case 'S':
gF15->mVelocity.y += 5.0f;
break;
case VK_SPACE:
// Add a bullet to the bullet list.
gBulletPos.push_back(gF15->mPosition);
break;
}
return 0;
// Destroy application resources.
case WM_DESTROY:
delete gBackground;
delete gF15;
delete gF18;
delete gF117;
delete gBullet;
delete gBackBuffer;
DeleteDC(ghSpriteDC);
PostQuitMessage(0);
return 0;
}
// Forward any other messages we didn't handle to the
// default window procedure.
return DefWindowProc(hWnd, msg, wParam, lParam);
}
254
17.6 Summary
1. The Windows media library (#include <mmsystem.h> and link winmm.lib) provides a timer
function called
timeGetTime. This function returns the number of milliseconds that has
elapsed since Windows started. In order to use this function, you will need to link winmm.lib,
which is not linked by default. We can convert a time
ms
t ms in milliseconds to a time
s
t s in
seconds by multiplying
ms
t ms by the ratio 1 s / 1000 ms. The number of milliseconds that has
elapsed since Windows started is not particularly interesting, but what is interesting is that if we
call this function at time
0
t , and then again at a later time
1
t , we can compute the elapsed time
t∆ (change in time) as follows:
01
ttt
−
=
∆
. This is used to determine how much time has
elapsed per frame.
2.
A frame is one complete image in an animation sequence. For example, a game running at sixty
frames per second is displaying sixty slightly different images per second. The rapid successive
display of slightly different images over time gives the illusion of a smooth and continuous
animation.
3.
We create a new message loop, which is more game-friendly, called the game loop. This loop
focuses less on Windows messages and more on processing game tasks. It can be summarized
like so: If there is a Windows message that needs to be processed then process it, otherwise,
execute our game code, which will typically be updating and drawing a frame. In order to
implement this behavior we need a function to determine if there is a message that needs to be
processed. The Win32 API provides such a function called
PeekMessage, which returns true if
there is a message that needs to be processed. Otherwise, it returns false.
4.
Flickering occurs when you draw one thing and then draw something over it quickly afterwards.
The process of drawing over a previously drawn pixel is called overdraw
. The eye, which is
quite sensitive to change and movement, picks up on overdraw and a flickering phenomenon is
seen. To solve the flickering problem we use a double buffering technique. The idea of double
buffering is quite simple: instead of drawing directly to the client area of the window, we instead
draw to an off screen surface called the backbuffer, which will be a blank bitmap that will
represent our virtual “canvas.” Since the backbuffer is not directly visible, overdraw is not a
problem. That is, we will not see the overdraw as it happens because we cannot see the
backbuffer—we are no longer watching the image get “painted.” Once we have drawn all the
graphics to the backbuffer, we will have a completed 2D image on the backbuffer. We can then
copy the backbuffer image contents to the window client area all at once with the
BitBlt
function. Since the backbuffer contains the completed frame, the only thing we will need to
draw to the window client area is the contents of the backbuffer. Therefore, we will have zero
overdraw on the client area window, and thus avoid flicker. To keep consistent with Direct3D
vocabulary, we will refer to the process of copying the backbuffer image to the window client
area as presenting. For example, saying, “we present the backbuffer,” means we copy the
backbuffer to the window client area.
255
5.
Given a velocity
v
r
, the change in position of a point p
r
∆
(displacement) over
t∆
seconds is
tvp ∆⋅=∆
r
r
. Recall that
t∆
is the time elapsed between frames, thus this formula tells us how
much to displace a point per frame given the velocity
v
r
. To displace a point p
r
, we simply add
the displacement vector to it: ppp
r
r
r
∆
+
=
′
.
6.
We can rotate a point (or vector)
(
)
yx, , about the origin of a coordinate system by an angle
θ
,
to a new point
()
yx
′′
,
, using the following equations:
)sin()cos(
)sin()cos(
θθ
θ
θ
xyy
yxx
+=
′
−=
′
7.
We call the images we use to represent game objects “sprites” (e.g., jets, missiles, explosions,
trees, characters). Sprites are not typically rectangular, but bitmaps always are. In order to not
draw the part of the bitmap that does not make up the sprite, we use a mask bitmap, which
essentially marks the pixels on the sprite image bitmap that should be drawn.
17.7 Exercises
17.7.1 Colors
What is the hex value for the colors: red, green, blue, yellow, cyan, magenta, black, and white? (Hint:
Cyan is a mix of green and blue. Yellow is a mix of green and red. Magenta is a mix of red and blue.)
17.7.2 Draw Order
Is the order in which you draw the graphics to the backbuffer important? Explain.
17.7.3 Masking
Explain, in your own words, how a bitmap masking technique prevents the part of the bitmap that does
not make up the sprite from being drawn. Also, why do you think they call the mask bitmap a “mask?”
256
17.7.4 Make Your Own Sprite
Draw your own 2D sprite image and its corresponding mask bitmap in an image editor. Then using the
Sprite class, load and draw your sprite to the window.
17.7.5 Bouncing Ball
Create a ball sprite, or use an ellipse, and write a program where the ball bounces around the client area
rectangle. When the ball hits the edge “wall,” it should reflect off the wall in the correct direction.
17.7.6 Modify the Ship Program
Modify the Ship sample program and animate the other jets. How you move them is up to you. Perhaps
oscillate their movement from side-to-side, or have them follow a circular trajectory—it is open ended.
17.7.7 Pong
Write a pong game as Figure 17.12 shows. If you need to see how this game plays, you can find an
online pong game at />.
Figure 17.12: A Screenshot of a typical pong game.
257
17.7.8 More on Animation
In this chapter, the animation we did consisted of updating the positions of our objects, such as the
tank/ship position, and bullet/missile positions, over time. However, let us recall the traditional
animator’s technique, where the artist actually draws each frame of an animation on a different page of
paper, and where each frame is slightly different then the previous. By doing this, the artist can create
an animation by rapidly flipping the pages (frames) of animation. There is no reason why we cannot do
this in code as well. That is, we can load in an array of sprite images that represent the different sprite
animation frames, and then for each game loop cycle, we cycle to the next sprite animation frame. For
example, Figure 17.13 shows a list of explosion animation frames. When an explosion occurs, we draw
the first explosion frame. On the subsequent game loop cycle, we draw the second explosion frame, and
on the following game loop cycle, we draw the third explosion frame, and so on, until we have drawn all
the explosion frames.
Figure 17.13: Frames of an explosion sprite animation.
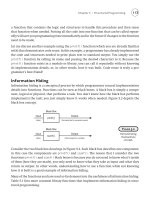
Your assignment for this exercise is to find a sprite animation sequence on the Internet (or make your
own if you are so inclined), and to animate it on the client area of a window. That is, to cycle through
frames of animation every cycle of the game loop until the animation is over.
Implementation Hints. For each sprite animation frame, you will need a sprite. So if your entire sprite
animation has 16 frames, you will represent it as:
258
Sprite* explosionAnim[16];
// Load all 16 animation frames into the elements
// of explosionAnim
// […]
int currAnim = 0; // Start at first animation frame.
// In the game loop:
// Draw the current sprite animation frame.
explosionAnim[currAnim]->draw(…);
// Draw the next animation frame next cycle
currAnim++;
259
Chapter 18
The Air Hockey Game
260
Introduction
After much hard work, we have finally reached the culmination of this course—the development of a
simple but functional game. Figure 18.1 on the next page shows our goal: a 2D Air Hockey game. In
addition to solidifying many of the course topics with this program, we also take this opportunity to
introduce a three-stage software development guide:
1.
Analysis: In the analysis stage, we spend some time studying the software requirements in detail.
In particular, we identify which problems will need to be solved in order to implement the
software with said requirements; in other words, a feature list. To aid in the identification of all
problems that must be solved, a clear picture of how the program ought to run should be realized.
For games, concept art and storyboards work well.
2.
Design: In the design stage, we do two things. First, we devise algorithmic solutions to the
problems identified in the Analysis stage. Second, we make decisions on how the actual
program should be constructed; that is, what classes of objects do we need to model the
simulation, how are the objects related, how will they interact with each other, and what kind of
data structures do we need? Thus, we say that the design stage consists of an algorithmic part—
that is, devising algorithmic solutions to specific problems—and a software engineering part—
that is, determining how the actual program should be organized.
3.
Implementation: The final stage is implementing our design in a programming language in order
to actually create the software we have designed. If the design step is done correctly, the
transition from design to implementation is rather smooth. In fact, the design stage is where the
real work is done; that is where all the problems are solved. In theory, any competent
programmer should be able to take a design specification and implement the program. Of
course, reality tells a different story: unanticipated problems surface, features need to be
extended and/or added, and miscalculations of software design decisions become detrimental to
the implementation process. On the bright side, at least you know that you are in good company,
as this happens even to the best and the brightest.
Chapter Objectives
• Become familiar with the three-stage software development process of analysis, design, and
implementation.
•
Practice the three-stage software development process by analyzing an Air Hockey game,
designing an Air Hockey game, and implementing an Air Hockey game.