jQuery in Action phần 4 ppsx
Bạn đang xem bản rút gọn của tài liệu. Xem và tải ngay bản đầy đủ của tài liệu tại đây (1.67 MB, 29 trang )
Manipulating element properties and attributes 51
For the most part, the name of a JavaScript attribute property matches that of
any corresponding attribute, but there are some cases where they differ. For
example, the
class
attribute in this example is represented by the
className
attribute property.
jQuery gives us the means to easily manipulate an element’s attributes and
gives us access to the element so that we can also change its properties. Which of
these we choose to manipulate depends on what we want to do and how we want
to do it.
Let’s start by looking at getting and setting element properties.
3.1.1 Manipulating element properties
jQuery doesn’t possess a specific command to obtain or modify the properties
of elements. Rather, we use the native JavaScript notation to access the proper-
ties and their values. The trick is in getting to the element references in the
first place.
The easiest way to inspect or modify the component elements of a matched set
is with the
each()
command. The syntax of this command is as follows:
This command can be used to easily set a property value onto all elements in a
matched set. For example, consider:
$('img').each(function(n){
this.alt='This is image['+n+'] with an id of '+this.id;
});
This statement will invoke the inline function for each image element on the
page, modifying its
alt
property using the order of the element and its
id
value.
Note that, because this is an attribute property tied to an attribute of the same
name, the
alt
attribute is also indirectly updated.
Command syntax: each
each(iterator)
Traverses all elements in the matched set invoking the passed iterator function for each.
Parameters
iterator (Function) A function called for each element in the matched set. The parame-
ter passed to this function is set to the zero-based index of the element
within the set, and the element itself is available as the
this
property of the
function.
Returns
The wrapped set.
52 CHAPTER 3
Bringing pages to life with jQuery
Similarly, we can collect all values for a specific property into an array using
each()
, as follows:
var allAlts = new Array();
$('img').each(function(){
allAlts.push(this.alt);
});
If all we want to do is obtain the property value of a single element, remember
that the matched set can be treated like a JavaScript array; we could obtain the
property via
var altValue = $('#myImage')[0].alt;
Dealing with attributes is a little less straightforward than dealing with properties
in JavaScript, so jQuery provides assistance for dealing with them. Let’s look
at how.
3.1.2 Fetching attribute values
As we’ll find is true with many jQuery commands, the
attr()
command can be
used either as a read or as a write operation. When jQuery commands can per-
form such disparate operations, the number and types of parameters passed into
the command determine the variant of the command used.
The
attr()
command can be used to either fetch the value of an attribute
from the first element in the matched set or set attribute values onto all
matched elements.
The syntax for the fetch variant of the
attr()
command is as follows:
Even though we usually think of attributes as predefined by HTML, we can use
attr()
with custom attributes set through JavaScript or HTML markup. To illustrate
Command syntax: attr
attr(name)
Obtains the values assigned to the specified attribute for the first element in the matched
set.
Parameters
name (String) The name of the attribute whose value is to be fetched.
Returns
The value of the attribute for the first matched element. The value
undefined
is returned if
the matched set is empty or the attribute doesn’t exist on the first element.
Manipulating element properties and attributes 53
this, let’s amend the
<img>
element of our previous example with a custom
markup attribute (highlighted in bold):
<img id="myImage" src="image.gif" alt="An image" class="someClass"
title="This is an image" custom="some value"/>
Note that we have added a custom attribute, unimaginatively named
custom
, to
the element. We can retrieve that attribute’s value, as if it were any of the standard
attributes, with
$("#myImage").attr("custom")
WARNING Using a nonstandard attribute name such as custom, although a com-
mon sleight-of-hand trick, will cause your markup to be considered
invalid; it will fail validation testing. This may have implications for
accessibility, as well as for parsing by programs that expect your site to be
written in valid
HTML or XHTML.
Attribute names are not case sensitive in HTML. Regardless of how an attribute
such as
title
is declared in the markup, we can access (or set, as we shall see)
attributes using any variants of case:
Title
,
TITLE
,
TiTlE
, or any other combina-
tions are all equivalent. In
XHTML, even though attribute names must be lower-
case in the markup, we can retrieve them using any case variant.
At this point you may be asking, “Why deal with attributes at all when access-
ing the properties is so easy (as seen in the previous section)?”
The answer to that question is that the jQuery
attr()
command is much more
than a wrapper around the JavaScript
getAttribute()
and
setAttribute()
meth-
ods. In addition to allowing access to the set of element attributes, jQuery pro-
vides access to some commonly used properties that, traditionally, have been a
thorn in the side of page authors everywhere due to their browser dependency.
This set of normalized-access names is shown in table 3.1.
Table 3.1 jQuery attr() normalized-access names
Normalized name Source name
class className
cssFloat styleFloat for IE, cssFloat for others (when used with .css)
float styleFloat for IE, cssFloat for others (when used with .css)
for htmlFor
continued on next page
➥
54 CHAPTER 3
Bringing pages to life with jQuery
In addition to these helpful shortcuts, the set variant of
attr()
has some of its
own handy features. Let’s take a look.
3.1.3 Setting attribute values
There are two ways to set attributes onto elements in the wrapped set with jQuery.
Let’s start with the most straightforward that allows us set a single attribute at a
time (for all elements in the wrapped set). Its syntax is as follows:
This variant of
attr()
, which may at first seem simple, is rather sophisticated in
its operation.
In its most basic form, when the
value
parameter is any JavaScript expression
that results in a value (including an array), the computed value of the expres-
sion is set as the attribute value.
Things get more interesting when the
value
parameter is a function refer-
ence. In such cases, the function is invoked for each element in the wrapped set,
with the return value of the function used as the attribute value. When the func-
tion is invoked, it’s passed a single parameter that contains the zero-based index
of the element within the wrapped set. Additionally, the element is established
maxlength maxLength
readonly readOnly
styleFloat styleFloat for IE, cssFloat for others (when used with .css)
Table 3.1 jQuery
attr() normalized-access names (continued)
Normalized name Source name
Command syntax: attr
attr(name,value)
Sets the named attribute onto all elements in the wrapped set using the passed value.
Parameters
name (String) The name of the attribute to be set.
value (String|Object|Function) Specifies the value of the attribute. This can be any Java-
Script expression that results in a value, or it can be a function. See the following
discussion for how this parameter is handled.
Returns
The wrapped set.
Manipulating element properties and attributes 55
as the
this
variable for the function invocation, allowing the function to tune
its processing for each specific element—the main power of using functions in
this way.
Consider the following statement:
$('*').attr('title',function(index) {
return 'I am element ' + index + ' and my name is ' +
(this.id ? this.id : 'unset');
});
This command will run through all elements on the page, setting the
title
attribute of each element to a string composed using the index of the element
within the
DOM and the
id
attribute of each specific element.
We’d use this means of specifying the attribute value whenever that value is
dependent upon other aspects of the elements, rather than some unrelated value.
The second set variant of
attr()
allows us to conveniently specify multiple
attributes at a time.
This format is a quick and easy way to set multiple attributes onto all the elements
of a wrapped set. The passed parameter can be any object reference, commonly
an object literal, whose properties specify the names and values of the attributes
to be set. Consider:
$('input').attr(
{ value: '', title: 'Please enter a value' }
);
This statement sets the
value
of all
<input>
elements to the empty string, as well
as sets the
title
to the string
Please enter a value
.
Note that if any property value in the object passed as the
value
parameter is
a function reference, it operates in a manner similar to that described for the
Command syntax: attr
attr(attributes)
Sets the attributes and values specified by the passed object onto all elements of the
matched set
Parameters
attributes (Object) An object whose properties are copied as attributes to all
elements in the wrapped set
Returns
The wrapped set
56 CHAPTER 3
Bringing pages to life with jQuery
previous format of
attr()
; the function is invoked for each individual element in
the matched set.
WARNING Internet Explorer won’t allow the name attribute of <input> elements to
be changed. If you want to change the name of
<input> elements in
Internet Explorer, you must replace the element with a new element pos-
sessing the desired name.
Now we know how to get and set attributes. But what about getting rid of them?
3.1.4 Removing attributes
In order to remove an attribute from DOM elements, jQuery provides the
removeAttr()
command. Its syntax is as follows:
Note that removing an attribute doesn’t remove any corresponding property
from the JavaScript
DOM element, though it may cause its value to change. For
example, removing a
readonly
attribute from an element would cause the value
of the element’s
readOnly
property to flip from
true
to
false
, but the property
itself isn’t removed from the element.
Now let’s look at some examples of how we might use this knowledge on
our pages.
3.1.5 Fun with attributes
Let’s say that we want to make all links on our site that pointed to external
domains open in a new window. This is fairly trivial if we’re in total control of the
entire markup, as shown:
<a href="" target="_blank">Some External Site</a>
Command syntax: removeAttr
removeAttr(name)
Removes the specified attribute from every matched element
Parameters
name (String) The name of the attribute to be removed
Returns
The wrapped set
Manipulating element properties and attributes 57
That’s all well and good, but what if we’re running a Content Management
System or a wiki, where end users will be able to add content, and we can’t rely on
them to add the
target="_blank"
to all external links? First, let’s try and deter-
mine what we want; we want all links whose
href
attribute begins with http:// to
open in a new window (which we have determined can be done by setting the
target
attribute to
_blank
).
We can use the techniques we’ve learned in this section to do this concisely,
as follows:
$("a[href^=http://]").attr("target","_blank");
First, we select all links with an
href
attribute starting with
http://
(which indi-
cates that the reference is external). Then, we set its
target
attribute to
_blank
.
Mission accomplished with a single line of jQuery code!
Another excellent use for jQuery’s attribute functionality is helping to solve a
long-standing issue with web applications (rich and otherwise): the Dreaded Dou-
ble Submit Problem. This is a common problem in web applications when the
latency of form submissions, sometimes several seconds or longer, gives users an
opportunity to press the submit button multiple times, causing all manner of
grief for the server-side code.
For our solution, we’ll hook into the form’s
submit
event and disable the sub-
mit button after its first press. That way, users won’t get the opportunity to click
the submit button more than once and will get a visual indication (assuming that
disabled buttons appear so in their browser) that the form is in the process of
being submitted. Don’t worry about the details of event handling in the following
example (we’ll get more than enough of that coming up in chapter 5), but con-
centrate on the use of the
attr()
command:
$("form").submit(function() {
$(":submit",this).attr("disabled", "disabled");
});
Within the body of the event handler, we grab all submit buttons that are inside
our form with the
:submit
selector and modify the
disabled
attribute to the value
"disabled"
(the official W3C-recommended setting for the attribute). Note that
when building the matched set, we provide a context value (the second parame-
ter) of
this
. As we’ll find out when we dive into event handing in chapter 5, the
this
pointer always refers to the page element to which the event was bound
while operating inside event handlers.
58 CHAPTER 3
Bringing pages to life with jQuery
WARNING Disabling the submit button(s) in this way doesn’t relieve the server-side
code from its responsibility to guard against double submission or any
other types of validation. Adding this type of feature to the client code
makes things nicer for the end user and helps prevent the double-submit
problem under normal circumstances. It doesn’t protect against attacks
or other hacking attempts, and server-side code must continue to be on
its guard.
We mentioned the
className
property earlier in this section as an example of the
case where markup attribute names differ from property names; but, truth be
told, class names are a bit special in other respects and are handled as such by
jQuery. The next section will describe a better way to deal with class names than
by directly accessing the
className
property or using the
attr()
command.
3.2 Changing element styling
If we want to change the styling of an element, we have two options. We can add
or remove a
CSS class, causing the existing stylesheet to restyle the element
based on its new classes. Or we can operate on the
DOM element itself, applying
styles directly.
Let’s look at how jQuery makes it simple to make changes to an element’s
style classes.
3.2.1 Adding and removing class names
The class name attributes and properties of DOM elements are unique in their
format and semantics and are also important to the creation of rich user inter-
faces. The addition of class names to and removal of class names from an ele-
ment is one of the primary means by which their stylistic rendering can be
modified dynamically.
One of the aspects of element class names that make them unique—and a
challenge to deal with—is that each element can be assigned any number of class
names. In
HTML, the
class
attribute is used to supply these names as a space-
delimited string. For example:
<div class="someClass anotherClass yetAnotherClass"></div>
Unfortunately, rather than manifesting themselves as an array of names in the DOM
element’s corresponding
className
property, the class names appear as the
Changing element styling 59
space-delimited string. How disappointing, and how cumbersome! This means
that whenever we want to add class names to or remove class names from an
element that already has class names, we need to parse the string to determine
the individual names when reading it and be sure to restore it to valid space-
delimited format when writing it.
Although it’s not a monumental task to write code to handle all that, it’s always
a good idea to abstract such details behind an API that hides the mechanical
details of such operations. Luckily, jQuery has already done that for us.
Adding class names to all the elements of a matched set is an easy operation
with the following
addClass()
command:
Removing class names is as straightforward with the following
removeClass()
command:
Often, we may want to switch a set of styles back and forth, perhaps to indicate a
change between two states or for any other reasons that make sense with our
interface. jQuery makes it easy with the
toggleClass()
command.
Command syntax: addClass
addClass(names)
Adds the specified class name or class names to all elements in the wrapped set
Parameters
names (String) A string containing the class name to add or, if multiple class names are
to be added, a space-delimited string of class names
Returns
The wrapped set
Command syntax: removeClass
removeClass(names)
Removes the specified class name or class names from each element in the wrapped set
Parameters
names (String) A string containing the class name to remove or, if multiple class names
are to be removed, a space-delimited string of class names
Returns
The wrapped set
60 CHAPTER 3
Bringing pages to life with jQuery
One situation where the
toggleClass()
command is most useful is when we want
to switch visual renditions between elements quickly and easily. Remember the
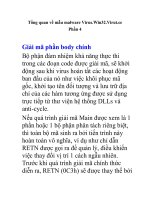
zebra-stripe example of figure 1.1? What if we had some valid reason to swap
the colored background from the odd rows to the even rows (and perhaps back
again) when certain events occurred? The
toggleClass()
command would make
it almost trivial to add a class name to every other row, while removing it from
the remainder.
Let’s give it a whirl. In the file chapter3/zebra.stripes.html, you’ll find a copy
of the same page from chapter 1 with some minor changes. We added the follow-
ing function to the
<script>
element in the page header:
function swap() {
$('tr').toggleClass('striped');
}
This function uses the
toggleClass()
command to toggle the class named
stripe
for all
<tr>
elements. We also added calls to this function as the
onmouseover
and
onmouseout
attributes of the table:
<table onmouseover="swap();" onmouseout="swap();">
The result is that every time the mouse cursor enters or leaves the table, all
<tr>
elements with the class
striped
will have the class removed, and all
<tr>
elements
without the class will have it added. This (rather annoying) activity is shown in the
two parts of figure 3.2.
Manipulating the stylistic rendition of elements via
CSS class names is a pow-
erful tool, but sometimes we want to get down to the nitty-gritty styles themselves
as declared directly on the elements. Let’s see what jQuery offers us for that.
Command syntax: toggleClass
toggleClass(name)
Adds the specified class name if it doesn’t exist on an element, or removes the name from
elements that already possess the class name. Note that each element is tested individu-
ally, so some elements may have the class name added, and others may have it removed.
Parameters
name (String) A string containing the class name to toggle.
Returns
The wrapped set.
Changing element styling 61
3.2.2 Getting and setting styles
Although modifying the class of an element allows us to choose which predeter-
mined set of defined stylesheet styles should be applied, sometimes we want to
override the stylesheet altogether. Applying styles directly on the elements them-
selves will automatically override stylesheets, giving us more fine-grained control
over individual elements and their styles.
The
css()
method works similarly to the
attr()
method, allowing us to set an
individual
CSS property by specifying its name and value, or a series of elements
by passing in an object. First, let’s look at specifying a name and value.
Figure 3.2 The presence or absence of the striped class is toggled whenever the mouse cursor
enters or leaves the table.
Command syntax: css
css(name,value)
Sets the named CSS style property to the specified value for each matched element.
Parameters
name (String) The name of the CSS property to be set.
value (String|Number|Function) A string, number, or function containing the property
value. If a function is passed as this parameter, it will be invoked for each element
of the wrapped set with its return value serving as the value for the CSS property.
The
this
property for each function invocation will be set to the element being
evaluated.
Returns
The wrapped set.
62 CHAPTER 3
Bringing pages to life with jQuery
As described, the value accepts a function in a similar fashion to the
attr()
com-
mands. This means that we can, for instance, expand the width of all elements in
the wrapped set by 20 pixels as follows:
$("div.expandable").css("width",function() {
return $(this).width() + 20 + "px";
});
Don’t worry that we haven’t discussed the
width()
command yet. It does exactly
what you would expect it to (namely, return the width of the element as a num-
ber), and we’ll discuss it in more detail shortly. One interesting side note is that
the normally problematic
opacity
property will work perfectly across browsers by
passing in a value between 0.0 and 1.0; no more messing with
IE alpha filters,
-moz-opacity
, and the like!
Next, let’s look at using the shortcut form of the
css()
command, which works
exactly as the shortcut version of
attr()
worked.
As in the shortcut version of the
attr()
command, we can use functions as val-
ues to any
CSS property in the
properties
parameter object, and they will be
called on each element in the wrapped set to determine the value that should
be applied.
Lastly, we can use
css()
with a name passed in to retrieve the computed style
of the property associated with that name. When we say computed style, we mean
the style after all linked, embedded, and inline
CSS has been applied. Impres-
sively, this works perfectly across all browsers, even for
opacity
, which returns a
string representing a number between 0.0 and 1.0.
Command syntax: css
css(properties)
Sets the CSS properties specified as keys in the passed object to their associated values for
all matched elements
Parameters
properties (Object) Specifies an object whose properties are copied as CSS proper-
ties to all elements in the wrapped set
Returns
The wrapped set
Changing element styling 63
Keep in mind that this variant of the
css()
command always returns a string, so if
you need a number or some other type, you’ll need to parse the returned value.
For a small set of
CSS values that are commonly accessed, jQuery thoughtfully
provides convenience commands that easily access these values and convert them
to the most commonly used types. Specifically, we can get (or set) the width and
height of an element as a number by using the convenient
width()
and
height()
commands. To set the width or height:
Keep in mind that these are shortcuts for the more verbose
css()
function, so
$("div.myElements").width(500)
is identical to
$("div.myElements").css("width","500px")
Command syntax: css
css(name)
Retrieves the computed value of the CSS property specified by
name
for the first element in
the wrapped set
Parameters
name (String) Specifies the name of a CSS property whose computed value is to
be returned
Returns
The wrapped set
Command syntax: width and height
width(value)
height(value)
Sets the width or height of all elements in the matched set
Parameters
value (Number) The value to be set in pixels
Returns
The wrapped set
64 CHAPTER 3
Bringing pages to life with jQuery
To retrieve the width or height:
The fact that the width and height values are returned from these functions as
numbers isn’t the only convenience that these commands bring to the table. If
you’ve ever tried to find the width or height of an element by looking at its
style.width
or
style.height
property, you were confronted with the sad fact that
these properties are only set by the corresponding
style
attribute of that ele-
ment; to find out the dimensions of an element via these properties, you have to
set them in the first place. Not exactly a paragon of usefulness!
The
width()
and
height()
commands, on the other hand, compute and
return the size of the element. Although knowing the precise dimensions of an
element in simple pages that let their elements lay out wherever they end up isn’t
usually necessary, knowing such dimensions in Rich Internet Applications is cru-
cial to be able to correctly place active elements such as context menus, custom
tool tips, extended controls, and other dynamic components.
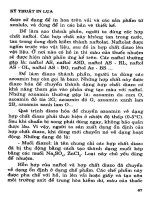
Let’s put them to work. Figure 3.3 shows a sample set up with two primary ele-
ments: a test subject
<div>
that contains a paragraph of text (also with a border
Command syntax: width and height
width()
height()
Retrieves the width or height of the first element of the wrapped set
Parameters
none
Returns
The computed width or height as a number
Figure 3.3 The width and height of the test element aren’t fixed and depend on the width of the
browser window.
Changing element styling 65
and background color for emphasis) and a second
<div>
in which to display
the dimensions.
The dimensions of the test subject aren’t known in advance because no style
rules specifying dimensions are applied. The width of the element is determined
by the width of the browser window, and its height depends on how much room
will be needed to display the contained text. Resizing the browser window would
cause both dimensions to change.
In our page, we define a function that will use the
width()
and
height()
com-
mands to obtain the dimensions of the test subject
<div>
(named
testSubject
)
and display the resulting values in the second
<div>
(named
display
).
function report() {
$('#display').html(
$('#testSubject').width()+'x'+$('#testSubject').height()
);
}
We call this function in the ready handler of the page, resulting in the display of
the values 675 and 48 for that particular size of browser window, as shown in fig-
ure 3.3.
We also add a call to the function in the
onresize
attribute of the
<body>
element:
<body onresize="report();">
Resizing the browser results in the display shown in figure 3.4.
This ability to determine the computed dimensions of an element at any point
is crucial to accurately positioning dynamic elements on our pages.
The full code of this page is shown in listing 3.1 and can be found in the file
chapter3/dimensions.html.
Figure 3.4
Resizing the browser causes
the test subject to change
size; this change is reflected
in the computed values.
66 CHAPTER 3
Bringing pages to life with jQuery
<html>
<head>
<title>width() and height() Test</title>
<link rel="stylesheet" type="text/css" href=" /common.css">
<script type="text/javascript"
src=" /scripts/jquery-1.2.1.js"></script>
<script type="text/javascript">
$(function(){
report();
});
function report() {
$('#display').html(
$('#testSubject').width()+'x'+$('#testSubject').height()
);
}
</script>
<style>
#testSubject {
background-color: plum;
border: 1px solid darkmagenta;
padding: 8px;
font-size: .85em;
}
</style>
</head>
<body onresize="report();">
<div id="testSubject">
Lorem ipsum dolor sit amet, consectetuer adipiscing elit.
Aliquam eget enim id neque aliquet porttitor. Suspendisse
nisl enim, nonummy ac, nonummy ut, dignissim ac, justo.
Aenean imperdiet semper nibh. Vivamus ligula. In in ipsum
sed neque vehicula rhoncus. Nam faucibus pharetra nisi.
Integer at metus. Suspendisse potenti. Vestibulum ante
ipsum primis in faucibus orci luctus et ultrices posuere
cubilia Curae; Proin quis eros at metus pretium elementum.
</div>
<div id="display"></div>
</body>
</html>
You may have picked up on the fact the we embedded behavior in the HTML
markup of this example in violation of the rules of Unobtrusive JavaScript. That’s
OK for now, but in the next chapter we’ll learn a better way to bind event handlers.
Listing 3.1 Dynamically tracking the dimensions of an element
Invokes reporting
function at page ready
Displays width and
height of test subject
Applies styling
to test subject
Reports
dimensions
on window
resize
Declares test subject
with dummy text
Displays dimensions
in this area
Changing element styling 67
Now that we’ve explored manipulating the styles on a wrapped set of elements,
let’s take a look at a couple of related style-oriented activities that you might want
to accomplish, and how to achieve them.
3.2.3 More useful style-related commands
It’s extremely common to need to determine whether an element has a particular
class. With jQuery, we can do that by calling the
hasClass()
function.
$("p:first").hasClass("surpriseMe")
This will return
true
if any element in the matched set has the specified class. The
syntax of this command is as follows:
Recalling the
is()
command from chapter 2, we could achieve the same thing with
$("p:first").is(".surpriseMe")
In fact, jQuery’s inner workings implement the
hasClass()
function exactly that
way! But arguably, the
hasClass()
command makes for more readable code.
Another commonly desired ability is to obtain the list of classes defined for a
particular element as an array instead of the cumbersome space-separated list.
We could try to achieve that by writing
$("p:first").attr("class").split(" ");
Recall that the
attr()
command will return
undefined
if the attribute in question
doesn’t exist, so this statement will throw an error if the
<p>
element doesn’t pos-
sess any class names. We could solve this by first checking for the attribute, and if
we wanted to wrap the entire thing in a repeatable, useful jQuery extension, we
could write
$.fn.getClassNames = function() {
if (name = this.attr("className")) {
Command syntax: hasClass
hasClass(name)
Determines if any element of the matched set possesses the passed class name
Parameters
name (String) The class name to be checked
Returns
Returns
true
if any element in the wrapped set possesses the passed class name;
false
if not
68 CHAPTER 3
Bringing pages to life with jQuery
return name.split(" ");
}
else {
return [];
}
};
But don’t worry about the specifics of the syntax for extending jQuery; we’ll go
into that in more detail in chapter 7. What’s important is that we can use
get-
ClassNames()
anywhere in our script to obtain an array of class names or an
empty array if an element has no classes. Nifty!
Now that we’ve learned how to get and set the styles of elements, let’s discuss
different ways for modifying their contents.
3.3 Setting element content
When it comes to modifying the contents of elements, there’s an ongoing debate
regarding which technique is better: using
DOM API methods or changing their
inner
HTML. In most cases, modifying an element’s HTML is easier and more
effective, so jQuery gives us a number of methods to do so.
3.3.1 Replacing HTML or text content
First is the simple
html()
command, which allows us to retrieve the HTML con-
tents of an element when used without parameters or, as we’ve seen with other
jQuery functions, to set its contents when used with a parameter.
Here’s how to get the
HTML content of an element:
Here’s how to set the
HTML content of all matched elements:
Command syntax: html
html()
Obtains the HTML content of the first element in the matched set.
Parameters
none
Returns
The HTML content of the first matched element. The returned value is identical to accessing
the
innerHTML
property of that element.
Setting element content 69
We can also set or get only the text contents of elements. The
text()
command,
when used without parameters, returns a string that’s the concatenation of all
text. For example, let’s say we have the following
HTML fragment:
<ul id="theList">
<li>One</li>
<li>Two</li>
<li>Three</li>
<li>Four</li>
</ul>
The statement
var text = $('#theList').text();
results in variable
text
being set to
OneTwoThreeFour
.
We can also use the
text
command to set the text content of the wrapped ele-
ments. The syntax for this format is as follows:
Command syntax: html
html(text)
Sets the passed HTML fragment as the content of all matched elements
Parameters
text (String) The HTML fragment to be set as the element content
Returns
The wrapped set
Command syntax: text
text()
Concatenates all text content of the wrapped elements and returns it as the result of
the command
Parameters
none
Returns
The concatenated string
70 CHAPTER 3
Bringing pages to life with jQuery
Note that setting the inner HTML or text of elements using these commands will
replace contents that were previously in the elements, so use these commands
carefully. If you don’t want to bludgeon all of an element’s previous content, a
number of other methods will leave the contents of the elements as they are but
modify their contents or surrounding elements. Let’s look at them.
3.3.2 Moving and copying elements
To add content to the end of existing content, the
append()
command is available.
This function accepts a string containing an
HTML fragment, a reference to an
existing or newly created
DOM element, or a jQuery wrapped set of elements.
Consider the following simple case:
$('p').append('<b>some text<b>');
This statement appends the HTML fragment created from the passed string to
the end of the existing content of all
<p>
elements on the page.
Command syntax: text
text(content)
Sets the text content of all wrapped elements to the passed value. If the passed text con-
tains angle brackets (
<
and
>
), these characters are replaced with their equivalent HTML
entities.
Parameters
content (String) The text content to be set into the wrapped elements. Any angle
bracket characters are escaped as HTML entities.
Returns
The wrapped set.
Command syntax: append
append(content)
Appends the passed HTML fragment or elements to the content in all matched elements.
Parameters
content (String|Element|Object) A string, element, or wrapped set to append to the ele-
ments of the wrapped set. See the following description for details.
Returns
The wrapped set.
Setting element content 71
A more complex use of this command identifies already-existing elements of
the
DOM as the items to be appended. Consider the following:
$("p.appendToMe").append($("a.appendMe"))
This statement appends all links with the class
appendMe
to
<p>
elements with the
class
appendToMe
. The disposition of the original elements depends on the num-
ber of elements serving as the target of the append. If there is a single target, the
element is removed from its original location—performing a move operation of
the original element to a new parent. In the case where there are multiple tar-
gets, the original element remains in place and copies of it are appended to each
of the targets—a copy operation.
In place of a full-blown wrapped set, we can also reference a specific
DOM ele-
ment, as shown:
var toAppend = $("a.appendMe")[0];
$("p.appendToMe").append(toAppend);
Whether the element identified by
toAppend
is moved or copied again depends
on the number of elements identified by
$("p.appendToMe")
: a move if one ele-
ment is matched, a copy if more than one element is matched.
If we want to move or copy an element from one place to another, a simpler
approach uses the
appendTo()
command, which allows us to grab an element and
move it somewhere else in the
DOM.
A common semantic for most functions in this section is that an element will be
moved if the destination identifies only one target. If the destination denotes mul-
tiple target elements, the source element will remain in its original location and
be copied to each destination.
Command syntax: appendTo
appendTo(target)
Moves all elements in the wrapped set to the end of the content of the specified target(s).
Parameters
target (String|Element) A string containing a jQuery selector or a DOM element. Each
element of the wrapped set will be appended to that location. If more than one
element matches a string selector, the element will be copied and appended to
each element matching the selector.
Returns
The wrapped set.
72 CHAPTER 3
Bringing pages to life with jQuery
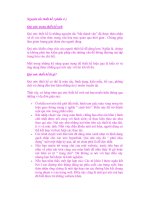
Before we move on to other commands that work in a similar fashion, let’s look at
an example to make sure that this important concept is clear. We’ve set up a lab
page with some elements to serve as the source of an
appendTo()
operation and
some to serve as targets. Upon initial display, this Move and Copy Laboratory
Page looks as shown in figure 3.5.
The
HTML markup for the test candidates in the fieldsets is as follows:
<fieldset id="source">
<legend>Source elements</legend>
<img id="flower" src="flower.png"/>
<img id="car" src="car.png"/>
</fieldset>
Figure 3.5 The Move and Copy Laboratory Page is set up to illustrate the operation of the
appendTo and prependTo commands.
Setting element content 73
<fieldset id="targets">
<legend>Target elements</legend>
<p><img src="dragonfly.png"/></p>
<p><img src="dragonfly.png"/></p>
<p><img src="dragonfly.png"/></p>
</fieldset>
The source fieldset contains two images: one with an
id
of
flower
, and one with an
id
of
car
. These image elements will serve as the source of the commands that we’ll
apply. The target fieldset contains three
<p>
elements, each of which contains an
image. These paragraph elements will serve as the target of our commands.
Display this page, which can be found in the file chapter3/lab.move.and
.copy.html, in your browser. Leaving the appendTo radio button checked, click
the Execute button, which will execute code equivalent to the following:
$('#flower').appendTo('#targets p')
$('#car').appendTo('#targets p:first')
The first statement executes the
appendTo()
command on the flower image, spec-
ifying the three paragraph elements as the target. Because there’s more than one
target element, we would expect the flower image to be copied. The second state-
ment issues the same command for the car image, but specifying only the first of
the paragraph elements as the target. Because there is only one target, we would
expect the car image to be moved.
The display of figure 3.6, taken after the click of the Execute button, shows
that these expectations were correct.
It’s clear from these results that when there are multiple targets, the source ele-
ment is copied, and when there is only a single target the source element is moved.
A number of related commands work in a fashion similar to
append()
and
appendTo()
:
■
prepend()
and
prependTo()
—Work like
append()
and
appendTo()
, but insert
the source element before the destination target’s contents instead of after.
These commands can also be demonstrated in the Move and Copy Labora-
tory by clicking the PrependTo radio button before clicking Execute.
■
before()
and
insertBefore()
—Insert the element before the destination
elements instead of before the destination’s first child.
■
after()
and
insertAfter()
—Insert the element after the destination ele-
ments instead of after the destination’s last child.
Because the syntax of these commands is so similar to that of the append class of
commands, we won’t waste the space to show individual syntax descriptions for
74 CHAPTER 3
Bringing pages to life with jQuery
them. Please refer back to the syntax blocks for
append()
and
appendTo()
for the
format of the syntax for these commands.
One more thing before we move on…
Remember back in the previous chapter when we showed how to create new
HTML fragments with the jQuery
$()
wrapper function? Well, that becomes a
really useful trick when paired with the
appendTo()
,
prependTo()
,
insertBefore()
,
and
insertAfter()
commands. Consider the following:
$('<p>Hi there!</p>').insertAfter('p img');
This statement creates a friendly paragraph and inserts a copy of it after every
image element within a paragraph element.
Figure 3.6 After execution, it’s clear that the car has been moved and the flower has
been copied.
Setting element content 75
Sometimes, rather than inserting elements into other elements, we want to do
the opposite. Let’s see what jQuery offers for that.
3.3.3 Wrapping elements
Another type of DOM manipulation that we’ll often need to perform is to wrap an
element (or series of elements) in some markup. For example, we might want to
wrap all links of a certain class inside a
<div>
. We can accomplish such DOM mod-
ifications by using jQuery’s
wrap()
command. Its syntax is as follows:
To wrap each link with the class
surprise
in a
<div>
with the class
hello
, we write
$("a.surprise").wrap("<div class='hello'></div>")
If we wanted to wrap the link in a clone of the first
<div>
element on the page:
$("a.surprise").wrap($("div:first")[0]);
When multiple elements are collected in a matched set, the
wrap()
method oper-
ates on each one individually. If we’d rather wrap all the elements in the set as a
unit, we can use the
wrapAll()
method instead:
Command syntax: wrap
wrap(wrapper)
Wraps the elements of the matched set with the passed HTML tags or a clone of the
passed element.
Parameters
wrapper (String|Element) The opening and closing tags of the element with which to
wrap each element of the matched set, or an element to be cloned and server
as the wrapper.
Returns
The wrapped set.
Command syntax: wrapAll
wrapAll(wrapper)
Wraps the elements of the matched set, as a unit, with the passed HTML tags or a clone of
the passed element.
Parameters
wrapper (String|Element) The opening and closing tags of the element with which to
wrap each element of the matched set, or an element to be cloned and server
as the wrapper.
Returns
The wrapped set