beginning opengl game programming 2004 phần 9 pps
Bạn đang xem bản rút gọn của tài liệu. Xem và tải ngay bản đầy đủ của tài liệu tại đây (570.18 KB, 26 trang )
setting up the bitmap font for use with Windows through the
wglUseFontBitmaps()
func-
tion, the
CreateBitmapFont()
method returns the base ID for the character display list.
Next is the
RenderFont()
method, which displays a string of text using the selected bitmap
font at a specified raster position:
void CGfxOpenGL::RenderFont(int xPos, int yPos, unsigned int base, char *str)
{
if ((base == 0) || (!str))
return;
glRasterPos2i(xPos, yPos);
glPushAttrib(GL_LIST_BIT);
glListBase(base - 32);
glCallLists((int)strlen(str), GL_UNSIGNED_BYTE, str);
glPopAttrib();
}
The
RenderFont()
method is very simple in that it verifies the base ID and string it receives
before setting the raster position and rendering the text display list. Finally, we have the
ReleaseFont()
method, which simply cleans up the font display list:
void CGfxOpenGL::ReleaseFont(unsigned int base)
{
if (base != 0)
glDeleteLists(base, 96);
}
The rest of the code uses these functions to display the screenshot shown in Figure 11.1.
The example is set up in orthographic projection. We recommend orthographic projec-
tion when rendering with bitmap fonts because it enables you to specify the raster posi-
tion coordinates in window coordinates, and you don’t need to worry about the
perspective projection affecting the raster position.
That’s all for bitmap fonts! Let’s look at another technique for putting text on the screen:
outline fonts.
Outline Fonts
Outline fonts are very similar to the bitmap fonts we just discussed, but they are much
more fun to play around with! Outline fonts define characters in a font as a series of lines
and curves, which means they can be scaled up and down without a loss in quality. With
Outline Fonts 253
11 BOGL_GP CH11 3/1/04 10:06 AM Page 253
TLFeBOOK
OpenGL, you can move outline font text around the screen in 3D, give the font text some
thickness, and essentially turn any font on the current system into a 3D font with all the
functionality of other 3D objects.
To use outline fonts, you first need to declare an array of 256
GLYPHMETRICSFLOAT
variables,
which hold information about the placement and orientation of a glyph in a character
cell. The
GLYPHMETRICSFLOAT
structure is a special structure created specifically for using text
with OpenGL. It is defined as:
typedef struct _GLYPHMETRICSFLOAT { // gmf
FLOAT gmfBlackBoxX;
FLOAT gmfBlackBoxY;
POINTFLOAT gmfptGlyphOrigin;
FLOAT gmfCellIncX;
FLOAT gmfCellIncY;
} GLYPHMETRICSFLOAT;
You’ll pass the
GLYPHMETRICSFLOAT
variable you create to the
wglUseFontOutlines()
function.
This function creates a set of display lists, one for each glyph of the current outline font,
which you can use to render text to the screen. This function is defined as:
BOOL wglUseFontOutlines(
HDC hdc, // device context of the outline font
DWORD first, // first glyph to be turned into a display list
DWORD count, // number of glyphs to be turned into display lists
DWORD listBase, // specifies the starting display list
FLOAT deviation, // specifies the maximum chordal deviation from the
// true outlines
FLOAT extrusion, // extrusion value in the negative-z direction
int format, // specifies line segments or polygons in display lists
LPGLYPHMETRICSFLOAT lpgmf // address of buffer to receive glyph metric data
);
Creation of the outline font is essentially the same as the bitmap font with the addition of
these two items. For instance, compare the
CreateBitmapFont()
function we showed earlier
with this
CreateOutlineFont()
function:
unsigned int CreateOutlineFont(char *fontName, int fontSize, float depth)
{
HFONT hFont; // windows font
unsigned int base;
base = glGenLists(256); // create storage for 256 characters
if (stricmp(fontName, “symbol”) == 0)
Chapter 11
■
Displaying Text254
11 BOGL_GP CH11 3/1/04 10:06 AM Page 254
TLFeBOOK
{
hFont = CreateFont(fontSize, 0, 0, 0, FW_BOLD, FALSE, FALSE, FALSE,
SYMBOL_CHARSET, OUT_TT_PRECIS, CLIP_DEFAULT_PRECIS,
ANTIALIASED_QUALITY, FF_DONTCARE | DEFAULT_PITCH,
fontName);
}
else
{
hFont = CreateFont(fontSize, 0, 0, 0, FW_BOLD, FALSE, FALSE, FALSE,
ANSI_CHARSET, OUT_TT_PRECIS, CLIP_DEFAULT_PRECIS,
ANTIALIASED_QUALITY, FF_DONTCARE | DEFAULT_PITCH,
fontName);
}
if (!hFont)
return 0;
SelectObject(g_HDC, hFont);
wglUseFontOutlines(g_HDC, 0, 255, base, 0.0f, depth, WGL_FONT_POLYGONS, gmf);
return base;
}
As you can see, this function is very similar to the
CreateBitmapFont()
method we showed
earlier, but there are a few differences. The first difference you might notice is the addition
of the
depth
parameter, which is used by the
wglUseFontOutlines()
function to define the
length of the outline font text along the z-axis (or essentially the depth of the font). The
next difference is that you create 256 display lists instead of 96. This is because you
want to provide support for all the 256 available ASCII codes. And lastly, you use the
wglUseFontOutlines()
function to finalize the setup of the outline fonts for OpenGL.
Displaying outline font text is exactly the same as displaying bitmap font text. Because you
used all 256 ASCII codes when initializing the outline font, here is how the display code
would look:
glPushAttrib(GL_LIST_BIT);
glListBase(base);
glCallLists(strlen(str), GL_UNSIGNED_BYTE, str);
glPopAttrib();
On the CD included with this book you will find the OutlineFont example for Chapter 11.
This example renders text as an outline font to the window and rotates it. A screenshot is
shown in Figure 11.2.
Outline Fonts 255
11 BOGL_GP CH11 3/1/04 10:06 AM Page 255
TLFeBOOK
The majority of the code for this example is the same as the BitmapFont example, so we
will focus only on the
RenderFont()
method because it is the most different:
void CGfxOpenGL::RenderFont(float xPos, float yPos, float zPos, unsigned int base,
char *str)
{
float length = 0.0;
if ((base == 0) || (!str))
return;
// center the text
for (int idx = 0; idx < (int)strlen(str); idx++) // find length of text
{
length += gmf[str[idx]].gmfCellIncX; // increase length by character’s width
}
glTranslatef(-length/2.0f, yPos, zPos);
glRotatef(m_angle, 1.0, 0.0, 0.0);
glRotatef(m_angle, 0.0, 1.0, 0.0);
glRotatef(m_angle, 0.0, 0.0, 1.0);
Chapter 11
■
Displaying Text256
Figure 11.2 Screenshot of the OutlineFont example.
11 BOGL_GP CH11 3/1/04 10:06 AM Page 256
TLFeBOOK
glPushAttrib(GL_LIST_BIT);
glListBase(base);
glCallLists((int)strlen(str), GL_UNSIGNED_BYTE, str);
glPopAttrib();
}
The
RenderFont()
method includes some code that centers the text on the point in space to
which the text is being drawn. This is accomplished through a loop that goes through each
character in the text string that you are displaying. During each iteration of the loop, you
add the character’s width, which you obtain from the
GLYPHMETRICSFLOAT
variable, to a vari-
able that stores the sum of all the characters’ widths. You then translate your coordinate
system along the negative x-axis by half the total length of the text string, resulting in the
text being centered on the (
xPos
,
yPos
,
zPos
) point in 3D space.
Also, the
glRotatef()
calls you see in the method are there only for demonstration pur-
poses and should not be in the
RenderFont()
method during normal use.
You can also texture map outline fonts since they are constructed of polygons. Instead of
trying to figure out the texture coordinates on your own, you can use OpenGL’s automatic
texture-coordinate generation functionality to texture map the text. You can find more
information on texture-coordinate generation in Chapter 9, “More on Texture Mapping.”
Using glFont
glFont
is both a program executable and an API with source code that takes any Windows
TrueType font and turns it into an OpenGL texture.
glFont
determines the appropriate
texture coordinates and displays text with correct spacing and size on an OpenGL quadri-
lateral. Its design is not for 3D text, but rather for 2D text for use in games and other
graphics applications where 3D text is overkill.
You can find
glFont
on the CD included with this book, or you can get it from the
glFont
Web site at />The Executable
The program included with
glFont
is
glFont.exe
, which is a simple-to-use program for
creating font textures that the
glFont
API code can read and display. The process for using
glFont.exe
is simple:
1. Choose a font, using the standard Windows font dialog. Choose the size, style, and
so on.
2. Specify the size of the texture to be used. Remember, the bigger the texture, the
higher the font quality.
3. Specify the range of ASCII characters to draw onto the texture.
Using glFont 257
11 BOGL_GP CH11 3/1/04 10:06 AM Page 257
TLFeBOOK
4. Generate the texture.
5. Save the texture to a GLF file.
The Code
Using
glFont
in code is almost as easy as using the
glFont
executable. First you need to cre-
ate a
GLFONT
object:
GLFONT font;
Next, you need to generate an OpenGL texture object with the
glGenTextures()
function
and then use that texture object when calling the
GLFONT::Create()
method:
unsigned int tex;
glEnable(GL_TEXTURE_2D);
glGenTextures(1, &tex);
font.Create(“timesnewroman.glf”, tex);
At this point, using
glFont
is just a matter of calling the
GLFONT::Begin()
method, display-
ing your text with
GLFONT::DrawString()
, and then finishing off the text display with
GLFONT::End()
:
font.Begin();
font.DrawString(“Hello world!”, 5, 5, 0);
font.End();
A nice addition to
glFont
is that you can modify the source code for displaying text as you
need it. For instance, you might want to display the text as a billboard for character dia-
logue. With
glFont
, you just need to create another
DrawString()
method for
GLFONT
that cal-
culates the billboard coordinates. Remember,
glFont
simply uses OpenGL quads for
rendering, so you can rotate fonts, scale fonts, and translate fonts however you want.
Explore and experiment!
Summary
In this chapter you learned how to display and position 2D text with bitmap fonts using
the
wglUseFontBitmaps()
function and display lists. You also learned how to display and
position 3D text with outline fonts using the
wglUseFontOutlines()
function. Finally, we
introduced the
glFont
OpenGL font library, which you can use and modify to suit your
text rendering purposes.
What You Have Learned
■
The
wglUseFontBitmaps()
function generates bitmap fonts from the font files loaded
on the execution system.
Chapter 11
■
Displaying Text258
11 BOGL_GP CH11 3/1/04 10:06 AM Page 258
TLFeBOOK
■
Display lists can be used to render each character of a font.
■
When rendering bitmap fonts, you should use an orthographic perspective projec-
tion to simplify positioning the text.
■
The
wglUseFontOutlines()
function creates a set of display lists, one for each glyph
of the current outline font.
■
The
GLYPHMETRICSFLOAT
struct is used when creating outline fonts. This struct is
included particularly for rendering text with OpenGL.
■
You can texture map outline fonts and specify texture coordinates with the auto-
matic texture coordinate generation functionality provided with OpenGL.
■
glFont
is both a program executable and an API with source code that takes any
Windows TrueType font and turns it into an OpenGL texture.
Review Questions
1. What “wiggle” function is used to create bitmap fonts?
2. What “wiggle” function is used to create outline fonts?
3. How do you texture map outline fonts?
On Your Own
1. Create a program that uses bitmap fonts, outline fonts, and the
glFont
library to
render text.
2. Modify the
glFont
API source code to display text on a billboard polygon.
Summary 259
11 BOGL_GP CH11 3/1/04 10:06 AM Page 259
TLFeBOOK
This page intentionally left blank
TLFeBOOK
261
OpenGL Buffers
chapter 12
W
e’ve been discussing buffers is some form for quite some time now but
haven’t really taken the time to discuss them in detail. For instance, we’ve
used the color and depth buffers in nearly every example thus far for func-
tions such as double-buffering and hidden surface removal. In this chapter, we’ll extend
beyond these basic functionalities while also looking at two more buffers, called the sten-
cil buffer and the accumulation buffer.
In this chapter, you’ll learn:
■
What the framebuffer is
■
What general operations can be performed on buffers
■
How to use the alpha test, color masking, and logic ops
■
How to use the depth buffer
■
How to use the stencil buffer
■
How to use the accumulation buffer
What Is an OpenGL Buffer?
There are several buffers in OpenGL that you can use and manipulate, but just what exactly
is a buffer? Simply put, a buffer is a set of sequential locations in memory. In OpenGL, a
buffer is section of memory that is used to represent some aspect of the display. For exam-
ple, the color buffer stores RGBA data for each pixel on the screen or window.
All the buffers in a system are collectively referred to as the framebuffer. So with OpenGL,
the color buffer, depth buffer, stencil buffer, and accumulation buffer combine to give you
12 BOGL_GP CH12 3/1/04 10:06 AM Page 261
TLFeBOOK
a single framebuffer. When you operate on any OpenGL buffer, you are operating on the
framebuffer.
Before discussing individual buffer types, we’ll first look at a couple of operations that
apply to all of the buffers: clearing and scissoring.
Clearing the Buffers
The most basic operation you can perform on a buffer is to clear out the previous con-
tents. This is done using
glClear()
:
void glClear(GLbitfield mask);
You’ve already seen this in action in all of
the demos presented so far, so it should
look familiar. The
mask
parameter is the
bitwise logical
OR
of a combination of the
values listed in Table 12.1.
Each buffer has a default value, and when
you clear it, each element in the buffer is
set to that value. As with most areas of
OpenGL, you can set the default clear
values to your own custom values. You do so with the following APIs:
void glClearColor(GLclampf red, GLclampf green, GLclampf green, GLclampf alpha);
void glClearDepth(GLclampd depth);
void glClearStencil(GLint i);
void glClearAccum(GLclampf red, GLclampf green, GLclampf green, GLclampf alpha);
The
GLclamp
types are used for parameters that are internally clamped to fall within 0.0 and
1.0. The default values for all buffers are 0, except for the depth buffer, which is 1.0, cor-
responding to the value that represents elements that are farthest away from the camera.
Scissor Boxes
OpenGL allows you to define a scissor box that limits rendering to a sub-region of the
screen. When scissoring is enabled, any pixel writes outside of the box are ignored. This
applies to not only color values, but depth, stencil, and accumulation buffer values as well.
Scissoring is one of the few operations that also affect the operation of
glClear()
; when it
is enabled, only pixels inside of the scissor box will be cleared.
You can enable scissoring by passing
GL_SCISSOR_TEST
to
glEnable()
. The size of the scissor
box is defined using:
void glScissor(GLint x, GLint y, GLsizei width, GLsizei height);
Chapter 12
■
OpenGL Buffers262
Table 12.1 Clear Mask Values
Flag Buffer
GL_COLOR_BUFFER_BIT
RGBA color buffer
GL_DEPTH_BUFFER_BIT
Depth buffer
GL_STENCIL_BUFFER_BIT
Stencil buffer
GL_ACCUM_BUFFER_BIT
Accumulation buffer
12 BOGL_GP CH12 3/1/04 10:06 AM Page 262
TLFeBOOK
The
x
and
y
values correspond to the screen coordinates of the lower left corner of the box
(the lower left corner of the screen is at (0, 0)).
width
and
height
are the dimensions of the
box in pixels. The scissor box is set to the size of the window when a rendering context is
first attached to it.
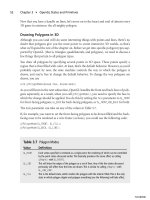
The following code shows an example of setting up a scissor box such as that shown in
Figure 12.1.
glEnable(GL_SCISSOR_TEST);
glScissor(200, 250, 240, 180);
The Color Buffer
The color buffer stores RGBA data for each pixel on the screen. Almost everything discussed
in this book relates to the color buffer in some way. There are a few operations in addition
to those that we’ve already discussed that affect the color buffer on a per-fragment basis,
and those will be described in this section.
Alpha Test
Every incoming fragment has an alpha value associated with it. Even if you don’t specify
it yourself, it gets set to the default value of 1. The alpha test can be used to discard frag-
ments based on their alpha value. Practical applications for this include being able to dis-
card transparent components of images.
The Color Buffer 263
Figure 12.1 An example of a scissor box.
12 BOGL_GP CH12 3/1/04 10:06 AM Page 263
TLFeBOOK
For example, say you are using the image in Figure
12.2 for billboarding, in which you apply the image
as a texture to a screen-oriented quad to cheaply
fake a 3D cactus. When applying the texture map,
you would want to draw only the pixels that make
up the cactus. Drawing the black area around it
would ruin the effect. Alpha testing is the best way
to do this.
The first step is to initialize the texture with appro-
priate values, such as an alpha of 0 in the black
areas and 1 everywhere else. The next step is to
enable the alpha test, which you would do with:
glEnable(GL_ALPHA_TEST);
Then you need to set up the alpha function. The alpha function controls exactly how the
comparison is done. It is specified by using:
void glAlphaFunc(GLenum func, GLclampf reference);
func
is an enumeration specifying the comparison function. Valid values are listed in Table
12.2. The incoming fragment alpha is compared against the
reference
value. Continuing
with the cactus example, setting up the alpha function as follows would reject the black
pixels (with an alpha of 0) and accept everything else.
glAlphaFunc(GL_GREATER, 0.0);
The alpha test is an easy to use tool that has many practical applications in games.
Chapter 12
■
OpenGL Buffers264
Table 12.2 Alpha Test Functions
Function Description
GL_NEVER
Never pass, regardless of the fragment or reference alpha values.
GL_ALWAYS
Always pass, regardless of the fragment or reference alpha values. This is the default.
GL_LESS
Pass if the fragment alpha is less than the reference value.
GL_LEQUAL
Pass if the fragment alpha is less than or equal to the reference value.
GL_EQUAL
Pass if the fragment alpha is equal to the reference value.
GL_GEQUAL
Pass if the fragment alpha is greater than or equal to the reference value.
GL_GREATER
Pass if the fragment alpha is greater than the reference value.
GL_NOTEQUAL
Pass if the fragment alpha not equal to the reference value.
Figure 12.2 An image used as a
billboard texture.
12 BOGL_GP CH12 3/1/04 10:06 AM Page 264
TLFeBOOK
Color Masking
OpenGL allows you to disable writing to specific color channels. This can be used to cre-
ate some interesting effects. For example, some multipass rendering algorithms require
you to modify the depth buffer without actually writing color values. Another use might
be to disable writing to everything but the green channel to create a cheap night vision
effect.
This is known as color masking, and it is controlled through the following API:
void glColorMask(GLboolean red, GLboolean green, GLboolean blue, GLboolean alpha);
Passing
GL_FALSE
as the
red
,
green
,
blue
,or
alpha
parameter will disable writes for that chan-
nel.
GL_TRUE
is used to enable writes. By default, all of the channels are enabled, as you’d
expect.
The color mask affects all operations that may potentially modify the color buffer, includ-
ing clears.
Logical Operations
OpenGL allows you to create some interest-
ing effects by performing logical operations
between the incoming fragment and the
value in the color buffer. These are executed
as bitwise logical operations between each
of the individual red, green, blue, and alpha
components of the two colors. The result-
ing value is then stored in the color buffer.
Logic ops are enabled by passing
GL_COLOR_LOGIC_OP
to
glEnable()
. You can
specify which specific operation to perform
by using:
void glLogicOp(GLenum op);
op
can be any of the enumerants listed in
Table 12.3, where the fragment color is rep-
resented as s, the value in the color buffer is
d, and the resulting color is c. The notation
used corresponds to the C/C++ notation
for bitwise operations.
The Color Buffer 265
Table 12.3 Logical Operations
Function Description
GL_ZERO c = 0
GL_AND c = s & d
GL_AND_REVERSE c = s & (~d)
GL_COPY c = s
GL_AND_INVERTED c = (~s) & d
GL_NOOP c = d
GL_XOR c = s ^ d
GL_OR c = s | d
GL_NOR c = ~(s | d)
GL_EQUIV c = ~(s ^ d)
GL_INVERT c = ~d
GL_OR_REVERSE c = s | (~d)
GL_COPY_INVERTED c = ~s
GL_OR_INVERTED c = (~s) | d
GL_NAND c = ~(s & d)
GL_SET c = 1
(all bits set to 1)
12 BOGL_GP CH12 3/1/04 10:06 AM Page 265
TLFeBOOK
Note
When logic ops are enabled, blending isn’t performed, whether or not it is actually enabled. This is
because the two operations have very similar functionality, so using them together would be
ambiguous.
The Depth Buffer
You typically use the depth buffer (also known as the z-buffer) to perform hidden-surface
removal on the objects in the scene. The values stored by the depth buffer for each pixel
represent the distance between the object and the viewpoint. As you draw primitives, the
depth buffer is checked and updated based on the distance of each object and the current
depth-comparison function.
To take advantage of depth buffering, you must first be sure to request one when creating
your window. You can then enable or disable depth testing by passing
GL_DEPTH_TEST
to
glEnable()
/
glDisable()
. It’s disabled by default.
Depth-Comparison Functions
As mentioned, when you draw your scene with OpenGL, the z coordinate of each pixel on
the screen is compared with the previous z coordinate already stored in the depth value as
a distance. The function to determine what type of comparison you’re going to use is set
with the
glDepthFunc()
function:
void glDepthFunc(GLenum func);
You can use any of the values listed in Table 12.4 for the
func
parameter.
Chapter 12
■
OpenGL Buffers266
Table 12.4 Depth-Comparison Functions
Mode Description
GL_NEVER
Never passes.
GL_LESS
Passes if the incoming z value is less than the stored z value. This is the default.
GL_EQUAL
Passes if the incoming z value is equal to the stored z value.
GL_LEQUAL
Passes if the incoming z value is equal to the stored z value.
GL_GREATER
Passes if the incoming z value is greater than the stored z value.
GL_NOTEQUAL
Passes if the incoming z value is not equal to the stored z value.
GL_GEQUAL
Passes if the incoming z value is greater than or equal to the stored z value.
GL_ALWAYS
Always passes.
12 BOGL_GP CH12 3/1/04 10:06 AM Page 266
TLFeBOOK
OpenGL compares the current pixel’s z value with the z value stored in the depth buffer
at that location. If the depth-comparison function passes, then the pixel is stored in the
color buffer, and the depth buffer is updated with the new pixel’s depth. The default
depth-comparison function is
GL_LESS
, which draws a pixel on if its z value is less than the
z value in the depth buffer.
Tip
There’s a subtle difference between using a depth function of
GL_ALWAYS
and simply disabling the
depth test. Both methods will cause all objects to be updated in the color buffer, regardless of their
depth. The difference is that when using
GL_ALWAYS
, each object will also update the depth buffer.
The depth buffer isn’t updated when the depth test is disabled.
Read-Only Depth Buffer
Being able to have objects tested against the depth buffer without updating it can enable
some useful effects. For example, imagine rendering an explosion as a particle system.
Each particle is transparent, and they are being additively blended, so that multiple parti-
cles in a single location will result in a brighter spot. The particles should be occluded by
solid objects in the scene but not occlude each other. One way to achieve this would be to
depth sort the particles and draw them in order from farthest to nearest. However, with
thousands of particles, the cost of sorting could be high.
By making the depth buffer read-only and rendering the particles last, you can achieve the
same effect much more easily. Read/write access to the depth buffer is controlled with
glDepthMask()
:
void glDepthMask(GLboolean enable);
A value of
GL_TRUE
enables writes to the depth buffer, and
GL_FALSE
makes it read-only.
Pseudocode for the explosion effect would look like this:
// depth testing is on all of the time
glEnable(GL_DEPTH_TEST);
Draw all normal objects in the scene
glDepthMask(GL_FALSE); // disable depth writes
Draw the explosion
glDepthMask(GL_TRUE); // reenable depth writes
The Depth Buffer 267
12 BOGL_GP CH12 3/1/04 10:06 AM Page 267
TLFeBOOK
The Stencil Buffer
Like the depth buffer, you can use the stencil buffer to block out portions of the screen
from view. However, the stencil buffer is a general purpose buffer that allows you to do
things that aren’t possible with the color buffer and depth buffer alone. One popular
application is in creating reflective surfaces, where you restrict rendering to an irregular
section of the screen where the reflected geometry will appear. You’ll see an example of
this at the end of this section. It is essential for many shadow rendering techniques, such
as shadow volumes.
To use the stencil buffer, you must first make sure that your rendering window supports
it. Under Windows, this means setting the
cStencilBits
field of the
PIXELFORMATDESCRIPTOR
when
setting the pixel format, like this:
pfd.cStencilBits = 8;
This will create an 8-bit stencil buffer. Then you need to enable stenciling by passing
GL_STENCIL_TEST
to
glEnable()
. The next step is to set up stencil function and operation.
These define how stenciling actually works, and understanding them will allow you to
understand what stenciling really is.
The stencil function allows you to specify a function (which can be any of the values in
Table 12.5), a reference value, and a mask. When a fragment is processed, the reference
Chapter 12
■
OpenGL Buffers268
Z-Fighting
When drawing overlapping triangles with similar depth values, a visual artifact known as
z-fighting
can manifest itself, causing the triangles to flicker as the camera moves. This is an impre-
cision issue; because depth values are stored in a finite (and relatively small) range, small errors
introduced during their calculation can cause triangles that should be behind other triangles to
show through them instead.
Z-fighting usually happens when using a 16-bit depth buffer, so switching to a 24-bit depth buffer
usually fixes the problem. However, to get a hardware-accelerated 24-bit depth buffer, you usually
have to also request a 32-bit color buffer, which may not be possible on older systems. In addition,
even with a 24-bit depth buffer, you may still experience z-fighting.
The best solution is often to modify the values used for the far and near clip planes. Making the
view frustum shorter allows for greater precision. Furthermore, z values are mapped to the depth
buffer in a nonlinear fashion, so that objects closer to the screen have greater precision than
objects farther away. Therefore, increasing the distance to the near clip plane has a more dramatic
effect than decreasing the distance to the far clip plane. For instance, doubling the near plane dis-
tance from 1 to 2 doubles the precision of the depth buffer.
12 BOGL_GP CH12 3/1/04 10:06 AM Page 268
TLFeBOOK
value and the value in the stencil buffer at the current pixel are logically
AND
ed with the
mask, and the resulting values are tested using the stencil function. What happens next
depends on the stencil operation. The stencil function can be set with the following API:
void glStencilFunc(GLenum func, GLint reference, GLuint mask);
The stencil operation defines three different actions:
1. What to do if the stencil test fails.
2. What to do if the stencil test passes but the depth test fails.
3. What to do if both the stencil and depth tests pass, or if the stencil tests pass and
depth testing is disabled.
Each of these actions can be any of the values listed in Table 12.6. The stencil operation
can be set using the following:
void glStencilOp(GLenum fail, GLenum zfail, GLenum zpass)
fail
,
zfail
, and
zpass
correspond to actions 1, 2, and 3 in the list above.
The Stencil Buffer 269
Table 12.5 Stencil Functions
Function Description
GL_NEVER
Always fails.
GL_LESS
Passes if the reference value is less than the value in the stencil buffer.
GL_LEQUAL
Passes if the reference value is less than or equal to the value in the stencil buffer.
GL_GREATER
Passes if the reference value is greater than the value in the stencil buffer.
GL_GEQUAL
Passes if the reference value is greater than or equal to the value in the stencil buffer.
GL_EQUAL
Passes if the reference value is equal to the value in the stencil buffer.
GL_NOTEQUAL
Passes if the reference value is not equal to the value in the stencil buffer.
GL_ALWAYS
Always passes. This is the default.
Table 12.6 Stencil Operations
Function Description
GL_KEEP
The value in the stencil buffer is not changed.
GL_ZERO
The value in the stencil buffer is set to 0.
GL_REPLACE
The value in the stencil buffer is set to the reference value.
GL_INCR
The value in the stencil buffer is increased by 1.
GL_DECR
The value in the stencil buffer is decreased by 1.
GL_INVERT
Inverts the bits in the stencil buffer value.
12 BOGL_GP CH12 3/1/04 10:06 AM Page 269
TLFeBOOK
An Example of Stencil Testing
You now know how the stencil test works on a low level, but let’s look at an example to
better understand it. The Marbles demo from Chapter 10, “Up Your Performance,” used
the stencil test to create a reflection of the marbles on the floor of the box. This was done
in the following function:
void CGfxOpenGL::DrawReflection()
{
glLightfv(GL_LIGHT0, GL_POSITION, NEG_LIGHT_POSITION);
glDepthMask(GL_FALSE);
glEnable(GL_STENCIL_TEST);
glStencilFunc(GL_ALWAYS, 1, 0xFFFFFFFF);
glStencilOp(GL_REPLACE, GL_REPLACE, GL_REPLACE);
DrawBoxBottom();
glDepthMask(GL_TRUE);
glStencilFunc(GL_EQUAL, 1, 0xFFFFFFFF);
glStencilOp(GL_KEEP, GL_KEEP, GL_KEEP);
DrawMarbles(GL_TRUE);
glDisable(GL_STENCIL_TEST);
glLightfv(GL_LIGHT0, GL_POSITION, LIGHT_POSITION);
}
To set up the stencil test, this code first enables it and sets the stencil function to always
pass with a reference value of 1. The mask used will not modify the reference or stencil
buffer values at all. The stencil operation is set to
GL_REPLACE
for all possibilities, so any-
thing that gets rendered will set the stencil buffer to the reference value.
After setting up the stencil test, the bottom of the box is rendered. When the stencil buffer
was cleared (outside of this code), the entire stencil buffer was set to 0. After the call to
DrawBoxBottom()
, the stencil buffer will be set to 1 (the reference value) at the pixels where
the box bottom was drawn and 0 everywhere else.
Then the stencil function is changed to
GL_EQUAL
, but the reference value is left at 1. Now
fragments will pass the stencil test only when the stencil buffer is 1 at the current pixel
location. So when the call to
DrawMarbles()
is made, it will only be drawn in the region
where the box bottom is located. By setting all stencil operations to
GL_KEEP
, we’re ensur-
ing that the contents of the stencil buffer won’t get modified by anything currently being
drawn.
Chapter 12
■
OpenGL Buffers270
12 BOGL_GP CH12 3/1/04 10:06 AM Page 270
TLFeBOOK
That’s all there is to using the stencil buffer. The stencil test is useful in games for reflec-
tions, decals, and shadow volumes, among other things, so you’ll definitely be using it.
Tip
To ensure that you get a hardware-accelerated stencil buffer, it’s recommended that you use a 32-
bit color buffer along with a 24-bit depth buffer and 8-bit stencil buffer. Color depths other than 32
may cause the stencil buffer to operate in software mode, which is extremely slow. Similarly, the
depth buffer and stencil buffer are typically interleaved in memory, so using 24 bits for the depth
buffer and 8 bits for the stencil buffer allows for optimal performance.
The Accumulation Buffer
The idea of the accumulation buffer is that you draw multiple images into the color buffer,
one at a time, and then accumulate each image into the accumulation buffer. After you’ve
accumulated all the images, you put them back onto the color buffer to be displayed on
the screen. You can create some cool effects with this buffer, including motion blur, depth-
of-field effects, scene antialiasing, and soft shadows.
As with other buffer types, to be able to actually use the accumulation buffer, you have to
request one when you set up the pixel format. This is done by setting the
cAccum
bits field. The accumulation buffer typically requires more storage per pixel than other
buffers, with 64 bits being a common value. This is to help maintain range and precision
when accumulating multiple samples.
OpenGL provides a single function to work on the accumulation buffer:
void glAccum(GLenum op, GLfloat value);
The
op
parameter specifies the operation to be performed, and the
value
parameter specifies
a number that will be used for the operation. Table 12.7 shows the available operations.
The Accumulation Buffer 271
Table 12.7 Accumulation Buffer Operations
Operation Description
GL_ACCUM
Obtains RBGA values from the color buffer, multiplying them by
value
and then
adding them to the existing contents of the accumulation buffer.
GL_LOAD
Obtains RBGA values from the color buffer, multiplying them by
value
and replacing
the existing contents of the accumulation buffer.
GL_ADD
Adds the
value
parameter to each existing value in the accumulation buffer.
GL_MULT
Multiplies the value of each pixel in the accumulation buffer by
value
.
GL_RETURN
Multiplies the value of each pixel in the accumulation buffer by
value
and sends the
result to the color buffer.
12 BOGL_GP CH12 3/1/04 10:06 AM Page 271
TLFeBOOK
To use the accumulation buffer for motion blur, you accumulate several images repre-
senting the trail of the blur by using the
glAccum()
function like this:
glAccum(GL_ACCUM, 1.0f/N);
where
N
is the number of images being accumulated. This acts as a decay factor between
the images. Each time this line is called, the object’s image will be fainter than the previ-
ous image. After you’re finished accumulating your images into the accumulation buffer,
you call the
glAccum()
function again to copy the contents back into the color buffer:
glAccum(GL_RETURN, 1.0);
Until recently, the accumulation buffer was not well supported in consumer-level graph-
ics hardware, so if you use it in a game, it may not run well on older computers. Fortu-
nately, there are alternatives for many specific effects that can be more efficient than using
the accumulation buffer.
Example: Using the Accumulation Buffer
A simple demo showing two uses of the accumulation buffer can be found on the CD in
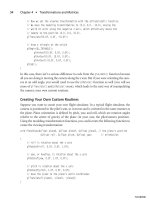
the folder for this chapter in the Accum directory. This demo, shown in Figures 12.3 and
12.4, actually contains two demos, one showing motion blur and the other showing soft
shadows. The demo starts off with the motion blur. You can change to the soft shadows
demo by pressing the S key and then change back to motion blur with the M key. Let’s
look at the relevant portions of this demo.
Chapter 12
■
OpenGL Buffers272
Figure 12.3 Two spheres rendered with motion blur.
12 BOGL_GP CH12 3/1/04 10:06 AM Page 272
TLFeBOOK
The bulk of the work for motion blur is done in the following function:
void CGfxOpenGL::RenderMotionBlur()
{
glClear(GL_COLOR_BUFFER_BIT | GL_DEPTH_BUFFER_BIT);
glLoadIdentity();
gluLookAt(0.0, 0.0, 10.0, 0.0, 0.0, 0.0, 0.0, 1.0, 0.0);
GLfloat angle = m_angle;
for (int i = 0; i < SPHERE_NUM_SAMPLES; ++i)
{
DrawSpheres(angle);
angle -= SPHERE_BLUR_ARC/SPHERE_NUM_SAMPLES;
if (i == 0)
glAccum(GL_LOAD, 1.0f/SPHERE_NUM_SAMPLES);
else
glAccum(GL_ACCUM, 1.0f/SPHERE_NUM_SAMPLES);
}
glAccum(GL_RETURN, 1.0);
}
The Accumulation Buffer 273
Figure 12.4 Soft shadows.
12 BOGL_GP CH12 3/1/04 10:06 AM Page 273
TLFeBOOK
During each iteration through this loop, the spheres are rotated back a bit farther along
their path. Because the color buffer isn’t being cleared between each iteration, the images
gradually build up. At the end, they are accumulated into the depth buffer with a factor
based on the total number of iterations. Spheres drawn during the first several iterations
will be accumulated multiple times, so they will be brighter than the ones accumulated
near the end. Finally, the results are copied back into the frame buffer.
You’ll notice that on the first iteration, the color buffer is accumulated via
GL_LOAD
, which
allows us to skip clearing the accumulation buffer at the beginning of the frame.
The main rendering function for the soft shadow portion of the demo looks like this:
void CGfxOpenGL::RenderSoftShadow()
{
glClear(GL_COLOR_BUFFER_BIT | GL_DEPTH_BUFFER_BIT | GL_ACCUM_BUFFER_BIT);
glLoadIdentity();
gluLookAt(5.0, 8.0, 10.0, 0.0, 2.0, 0.0, 0.0, 1.0, 0.0);
for (int i = 0; i < SHADOW_NUM_SAMPLES; ++i)
{
SetShadowMatrix(m_shadowMatrix, LIGHT_POS[i], FLOOR_PLANE);
// draw the shadow
glPushMatrix();
glClear(GL_COLOR_BUFFER_BIT | GL_DEPTH_BUFFER_BIT);
glEnable(GL_LIGHTING);
glLightfv(GL_LIGHT0, GL_POSITION, LIGHT_POS[0]);
DrawFloor();
glDisable(GL_LIGHTING);
glDisable(GL_DEPTH_TEST);
glColor4f(0.0, 0.0, 0.0, 1.0f);
// project the cone through the shadow matrix
glMultMatrixf(m_shadowMatrix);
DrawCone();
glEnable(GL_DEPTH_TEST);
glPopMatrix();
glAccum(GL_ACCUM, 1.0f/SHADOW_NUM_SAMPLES);
}
glAccum(GL_RETURN, 1.0);
Chapter 12
■
OpenGL Buffers274
12 BOGL_GP CH12 3/1/04 10:06 AM Page 274
TLFeBOOK
glLightfv(GL_LIGHT0, GL_POSITION, LIGHT_POS[0]);
// draw the cone normally
glEnable(GL_LIGHTING);
glColor3f(0.1f, 0.2f, 0.8f);
DrawCone();
glDisable(GL_LIGHTING);
}
This is slightly more complex due to the projective shadow code, but again we’ll focus on
the
for
loop. Each time through the loop, a different light position is used. These positions
vary slightly from each other, allow us to jitter the light position. This allows us to simu-
late a light source that has volume (which is how lights in the real world work, as opposed
to the infinitely small points supported by OpenGL’s lighting model). A shadow projec-
tion matrix is calculated using the new light position, and then the cone is projected onto
the floor plane and drawn as a black shadow. The results are accumulated with a factor
based on the total number of samples.
Both the plane and shadow are drawn every iteration, but the plane remains stationary
while the shadow moves slightly due to the jittered light source. The result of this is that
the plane is drawn normally, but the shadow is dark in the center because the center pix-
els were rendered during every iteration, while the pixels near the edge of the shadow var-
ied with each light position.
Summary
The framebuffer, composed of the color, depth, stencil, and accumulation buffers, plays a
central role in OpenGL rendering. The color buffer is what ultimately gets seen, but the
depth and stencil buffers both play a role in determining which pixels actually get drawn,
and the accumulation buffer can be used in conjunction with the color buffer for a num-
ber of multipass rendering effects. Each buffer has several states associated with it that you
can control to achieve exactly the results you want.
What You Have Learned
■
All the buffers are collectively referred to as the framebuffer.
■
Buffers can be cleared using
glClear()
. Each buffer has a clear value that you can
control.
■
You can define a scissor window using
glScissor()
that limits rendering to a subre-
gion of the display.
■
The alpha test can be used to cause fragments to be rejected based on their alpha
values.
Summary 275
12 BOGL_GP CH12 3/1/04 10:06 AM Page 275
TLFeBOOK
■
glColorMask()
allows you to disable writes to specific color channels.
■
Source and destination pixels can be combined using bitwise logical operations
defined with
glLogicOp()
.
■
glColorMask()
allows you to disable writes to specific color channels.
■
The depth buffer is used to remove hidden surfaces via a depth function you can
change to fit your needs.
glDepthMask()
can be used to make the depth buffer read-
only.
■
The stencil buffer provides you with fine-grained control of what regions of the
screen can be rendered to.
■
The accumulation buffer is useful for several multipass rendering techniques.
Review Questions
1. What are the default clear values for the four buffers described in this chapter?
2. How is alpha testing different from alpha blending?
3. What happens to blending when logic ops are enabled?
4. True or false: Setting the depth function to
GL_ALWAYS
has the same effect as dis-
abling the depth test.
5. How is the
mask
parameter in
glStencilFunc()
used?
6. Which accumulation function can be used to avoid clearing the accumulation
buffer every frame?
On Your Own
1. To better understand the alpha test, create a simple program that uses it. Specify a
smooth shaded quad with an alpha value of 0 in the lower left corner, 0.5 in the
top left and bottom right corners, and 1 in the top right corner. Have your pro-
gram cycle through several alpha reference values. Alternatively, create an image
like that shown in Figure 12.2. Set the alpha value for the black regions to 0 with a
value of 1 everywhere else. Set the alpha test to reject the black pixels, and apply
the texture using
GL_REPLACE
.
Chapter 12
■
OpenGL Buffers276
12 BOGL_GP CH12 3/1/04 10:06 AM Page 276
TLFeBOOK
277
The Endgame
chapter 13
T
he endgame. This is the end, and we have a game for you. We’ve covered quite a
bit of OpenGL in this book, and now it’s time to put OpenGL to work. On the CD
in Chapter 13, you will find a chess game that we have affectionately called Chess,
which follows in the spirit of the computer chess game hit BattleChess. In this chapter we
are going to talk a little bit about the technical design as well as cover how we used
OpenGL in the game. We invite you to modify the game code and make additions if you
would like. Use your imagination!
In this chapter we will cover:
■
Chess game technical design
■
How OpenGL is used in Chess
The Design
We had one rule when designing the chess game: keep things simple. We wanted to sepa-
rate data processing from rendering as much as possible, and we wanted to keep the code
portable in case you decide to copy it to another operating system. The result is a pretty
solid design that we hope is expandable enough for you to modify and make changes as
you see fit.
If you do a search on the Internet for “programming chess games,”you will likely find Web
pages that describe popular chess data structures and algorithms like “bitboards,” move
generations, and evaluation functions. In the spirit of keeping things simple, we didn’t
want to spend pages upon pages describing popular chess programming practices, so we
did things our own way. In addition, we decided to keep the chess game two player, leav-
ing the addition of chess artificial intelligence as an exercise for you.
13 BOGL_GP CH13 3/1/04 10:17 AM Page 277
TLFeBOOK