Apress pro Silverlight 3 in C# phần 6 pps
Bạn đang xem bản rút gọn của tài liệu. Xem và tải ngay bản đầy đủ của tài liệu tại đây (1.35 MB, 56 trang )
325
CHAPTER 10
■ ■ ■
Animation
Animation allows you to create truly dynamic user interfaces. It’s often used to apply effects–
for example, icons that grow when you move over them, logos that spin, text that scrolls into
view, and so on. Sometimes, these effects seem like excessive glitz. But used properly,
animations can enhance an application in a number of ways. They can make an application
seem more responsive, natural, and intuitive. (For example, a button that slides in when you
click it feels like a real, physical button–not just another gray rectangle.) Animations can also
draw attention to important elements and guide the user through transitions to new content.
(For example, an application could advertise new content with a twinkling, blinking, or pulsing
icon.)
Animations are a core part of the Silverlight model. That means you don’t need to use
timers and event-handling code to put them into action. Instead, you can create and configure
them declaratively, using XAML markup. Animations also integrate themselves seamlessly into
ordinary Silverlight pages. For example, if you animate a button so it drifts around the page, the
button still behaves like a button. It can be styled, it can receive focus, and it can be clicked to
fire off the typical event-handling code.
In this chapter, you’ll consider the set of animation classes that Silverlight provides.
You’ll see how to construct them with XAML and (more commonly) how to control them with
code. Along the way, you’ll see a wide range of animation examples, including page transitions
and a simple catch-the-bombs game.
■ What’s New Silverlight 3 adds a feature called animation easing, which uses mathematical formulas to
create more natural animated effects (see the “Animation Easing” section). Although this is the only truly new
animation feature, you can create a wide range of new animated effects by combining Silverlight animation with
two features you learned about in Chapter 9: perspective projections and pixel shaders. (You’ll see an example
of both in this chapter.) Finally, Silverlight 3 adds hardware acceleration that can increase the performance of
some animations, and is described in the “Hardware Acceleration” section at the end of this chapter.
Understanding Silverlight Animation
Often, an animation is thought of as a series of frames. To perform the animation, these frames
are shown one after the other, like a stop-motion video.
CHAPTER 10 ■ ANIMATION
326
Silverlight animations use a dramatically different model. Essentially, a Silverlight animation
is a way to modify the value of a dependency property over an interval of time. For
example, to make a button that grows and shrinks, you can modify its Width property in an
animation. To make it shimmer, you can change the properties of the LinearGradientBrush that
it uses for its background. The secret to creating the right animation is determining what
properties you need to modify.
If you want to make other changes that can’t be made by modifying a property, you’re
out of luck. For example, you can’t add or remove elements as part of an animation. Similarly,
you can’t ask Silverlight to perform a transition between a starting scene and an ending scene
(although some crafty workarounds can simulate this effect). And finally, you can use
animation only with a dependency property, because only dependency properties use the
dynamic value-resolution system (described in Chapter 4) that takes animations into account.
■ Note Silverlight animation is a scaled-down version of the WPF animation system. It keeps the same
conceptual framework, the same model for defining animations with animation classes, and the same storyboard
system. However, WPF developers will find some key differences, particularly in the way animations are created
and started in code. (For example, Silverlight elements lack the built-in BeginAnimation() method that they have
in WPF.)
GOING BEYOND SILVERLIGHT ANIMATION
At first glance, the property-focused nature of Silverlight animations seems terribly limiting. But
as you work with Silverlight, you’ll find that it’s surprisingly capable. You can create a wide range
of animated effects using common properties that every element supports. In this chapter, you’ll
even see how you can use it to build a simple game.
That said, in some cases the property-based animation system won’t suit. As a rule of
thumb, the property-based animation is a great way to add dynamic effects to an otherwise
ordinary application (like buttons that glow, pictures that expand when you move over them, and
so on). However, if you need to use animations as part of the core purpose of your application,
and you want them to continue running over the lifetime of your application, you may need
something more flexible and more powerful. For example, if you’re creating a complex arcade
game or using physics calculations to model collisions, you’ll need greater control over the
animation.
Later in this chapter, you’ll learn how to take a completely different approach with frame-
based animations. In a frame-based animation, your code runs several times a second, and each
time it runs you have a chance to modify the content of your window. For more information, see
the section “Frame-Based Animation.”
CHAPTER 10 ■ ANIMATION
327
The Rules of Animation
In order to understand Silverlight animation, you need to be aware of the following key rules:
• Silverlight animations are time-based. You set the initial state, the final state, and the
duration of your animation. Silverlight calculates the frame rate.
• Animations act on properties. A Silverlight animation can do only one thing: modify the
value of a property over an interval of time. This sounds like a significant limitation (and
it many ways, it is), but you can create a surprisingly large range of effects by modifying
properties.
• Every data type requires a different animation class. For example, the Button.Width
property uses the double data type. To animate it, you use the DoubleAnimation class. If
you want to modify the color that’s used to paint the background of a Canvas, you need
to use the ColorAnimation class.
Silverlight has relatively few animation classes, so you’re limited in the data types you
can use. At present, you can use animations to modify properties with the following data types:
double, object, Color, and Point. However, you can also craft your own animation classes that
work for different data types–all you need to do is derive from
System.Windows.Media.Animation and indicate how the value should change as time passes.
Many data types don’t have a corresponding animation class because it wouldn’t be
practical. A prime example is enumerations. For example, you can control how an element is
placed in a layout panel using the HorizontalAlignment property, which takes a value from the
HorizontalAlignment enumeration. But the HorizontalAlignment enumeration allows you to
choose among only four values (Left, Right, Center, and Stretch), which greatly limits its use in
an animation. Although you can swap between one orientation and another, you can’t
smoothly transition an element from one alignment to another. For that reason, there’s no
animation class for the HorizontalAlignment data type. You can build one yourself, but you’re
still constrained by the four values of the enumeration.
Reference types aren’t usually animated. However, their subproperties are. For
example, all content controls sport a Background property that lets you set a Brush object that’s
used to paint the background. It’s rarely efficient to use animation to switch from one brush to
another, but you can use animation to vary the properties of a brush. For example, you can vary
the Color property of a SolidColorBrush (using the ColorAnimation class) or the Offset property
of a GradientStop in a LinearGradientBrush (using the DoubleAnimation class). Doing so
extends the reach of Silverlight animation, allowing you to animate specific aspects of an
element’s appearance.
■ Tip As you’ll see, DoubleAnimation is by far the most useful of Silverlight’s animation classes. Most of the
properties you’ll want to change are doubles, including the position of an element on a Canvas, its size, its
opacity, and the properties of the transforms it uses.
CHAPTER 10 ■ ANIMATION
328
Creating Simple Animations
Creating an animation is a multistep process. You need to create three separate ingredients: an
animation object to perform your animation, a storyboard to manage your animation, and an
event handler (an event trigger) to start your storyboard. In the following sections, you’ll tackle
each of these steps.
The Animation Class
Silverlight includes two types of animation classes. Each type of animation uses a different
strategy for varying a property value:
• Linear interpolation: The property value varies smoothly and continuously over the
duration of the animation. (You can use animation easing to create more complex
patterns of movement that incorporate acceleration and deceleration, as described later
in this chapter.) Silverlight includes three such classes: DoubleAnimation,
PointAnimation, and ColorAnimation.
• Key-frame animation: Values can jump abruptly from one value to another, or they can
combine jumps and periods of linear interpolation (with or without animation easing).
Silverlight includes four such classes: ColorAnimationUsingKeyFrames,
DoubleAnimationUsingKeyFrames, PointAnimationUsingKeyFrames, and
ObjectAnimationUsingKeyFrames.
In this chapter, you’ll begin by focusing on the indispensable DoubleAnimation class,
which uses linear interpolation to change a double from a starting value to its ending value.
Animations are defined using XAML markup. Although the animation classes aren’t
elements, they can be created with the same XAML syntax. For example, here’s the markup
required to create a DoubleAnimation:
<DoubleAnimation From="160" To="300" Duration="0:0:5"></DoubleAnimation>
This animation lasts 5 seconds (as indicated by the Duration property, which takes a
time value in the format Hours:Minutes:Seconds.FractionalSeconds). While the animation is
running, it changes the target value from 160 to 300. Because the DoubleAnimation uses linear
interpolation, this change takes place smoothly and continuously.
There’s one important detail that’s missing from this markup. The animation indicates
how the property will be changed, but it doesn’t indicate what property to use. This detail is
supplied by another ingredient, which is represented by the Storyboard class.
The Storyboard Class
The storyboard manages the timeline of your animation. You can use a storyboard to group
multiple animations, and it also has the ability to control the playback of animation–pausing
it, stopping it, and changing its position. But the most basic feature provided by the Storyboard
class is its ability to point to a specific property and specific element using the TargetProperty
and TargetName properties. In other words, the storyboard bridges the gap between your
animation and the property you want to animate.
CHAPTER 10 ■ ANIMATION
329
Here’s how you can define a storyboard that applies a DoubleAnimation to the Width
property of a button named cmdGrow:
<Storyboard x:Name="storyboard"
Storyboard.TargetName="cmdGrow" Storyboard.TargetProperty="Width">
<DoubleAnimation From="160" To="300" Duration="0:0:5"></DoubleAnimation>
</Storyboard>
The Storyboard.TargetProperty property identifies the property you want to change.
(In this example, it’s Width.) If you don’t supply a class name, the storyboard uses the parent
element. If you want to set an attached property (for example, Canvas.Left or Canvas.Top), you
need to wrap the entire property in brackets, like this:
<Storyboard x:Name="storyboard"
Storyboard.TargetName="cmdGrow" Storyboard.TargetProperty="(Canvas.Left)">
</Storyboard>
Both TargetName and TargetProperty are attached properties. That means you can
apply them directly to the animation, as shown here:
<Storyboard x:Name="storyboard">
<DoubleAnimation
Storyboard.TargetName="cmdGrow" Storyboard.TargetProperty="Width"
From="160" To="300" Duration="0:0:5"></DoubleAnimation>
</Storyboard>
This syntax is more common, because it allows you to put several animations in the
same storyboard but set each animation to act on a different element and property. Although
you can’t animate the same property at the same time with multiple animations, you can (and
often will) animate different properties of the same element at once.
Starting an Animation with an Event Trigger
Defining a storyboard and an animation are the first steps to creating an animation. To actually
put this storyboard into action, you need an event trigger. An event trigger responds to an event
by performing a storyboard action. The only storyboard action that Silverlight currently
supports is BeginStoryboard, which starts a storyboard (and hence all the animations it
contains).
The following example uses the Triggers collection of a page to attach an animation to
the Loaded event. When the Silverlight content is first rendered in the browser, and the page
element is loaded, the button begins to grow. Five seconds later, its width has stretched from
160 pixels to 300.
<UserControl >
<UserControl.Triggers>
<EventTrigger>
<EventTrigger.Actions>
<BeginStoryboard>
<Storyboard>
<DoubleAnimation Storyboard.TargetName="cmdGrow"
Storyboard.TargetProperty="Width"
CHAPTER 10 ■ ANIMATION
330
From="160" To="300" Duration="0:0:5"></DoubleAnimation>
</Storyboard>
</BeginStoryboard>
</EventTrigger.Actions>
</EventTrigger>
</UserControl.Triggers>
<Grid x:Name="LayoutRoot" Background="White">
<Button x:Name="cmdGrow" Width="160" Height="30"
Content="This button grows"></Button>
</Grid>
</UserControl>
Unfortunately, Silverlight event triggers are dramatically limited–much more so than
their WPF counterparts. Currently, Silverlight only allows event triggers to respond to the
Loaded event when your page is first created. They can’t react to other events, like clicks,
keypresses, and mouse movements. For those, you need the code described in the next section.
Starting an Animation with Code
You can start a Silverlight animation in response to any event using code that interacts with the
storyboard. The first step is to move your storyboard out of the Triggers collection and place it
in another collection of the same element: the Resources collection.
As you learned in Chapter 1, Silverlight elements provide a Resources property, which
holds a collection where you can store miscellaneous objects. The primary purpose of the
Resources collection is to let you define objects in XAML that aren’t elements and so can’t be
placed into the visual layout of your content region. For example, you may want to declare a
Brush object as a resource so it can be used by more than one element. You can retrieve
resources in your code or use them elsewhere in your markup.
Here’s an example that defines the button-growing animation as a resource:
<UserControl >
<UserControl.Resources>
<Storyboard x:Name="storyboard">
<DoubleAnimation
Storyboard.TargetName="cmdGrow" Storyboard.TargetProperty="Width"
From="160" To="300" Duration="0:0:5"></DoubleAnimation>
</Storyboard>
</UserControl.Resources>
<Grid x:Name="LayoutRoot" Background="White">
<Button x:Name="cmdGrow" Width="160" Height="30" Click="cmdGrow_Click"
Content="This button grows"></Button>
</Grid>
</UserControl>
Notice that the storyboard is now given a name, so you can manipulate it in your code.
(You can also add a name to the DoubleAnimation if you want to tweak its properties
programmatically before launching the animation.)
CHAPTER 10 ■ ANIMATION
331
Now, you need to call the methods of the Storyboard object in an event handler in your
Silverlight code-behind file. The methods you can use include Begin(), Stop(), Pause(),
Resume(), and Seek(), all of which are fairly self-explanatory.
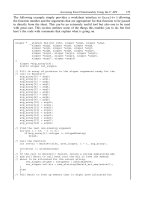
private void cmdGrow_Click(object sender, RoutedEventArgs e)
{
storyboard.Begin();
}
Clicking the button launches the animation, and the button stretches from 160 to 300
pixels, as shown in Figure 10-1.
Figure 10-1. Animating a button’s width
Configuring Animation Properties
To get the most out of your animations, you need to take a closer look at the seemingly simple
animation class properties that were set in the previous example, including From, To, and
Duration. As you’ll see, there’s a bit more subtlety–and a few more possibilities–than you may
initially expect.
From
The From value is the starting value. In the previous example, the animation starts at 160 pixels.
Thus, each time you click the button and start the animation, the Width property is reset to 160,
and the animation runs again. This is true even if you click the button while an animation is
under way.
■ Note This example exposes another detail about Silverlight animations: every dependency property can be
acted on by only one animation at a time. If you start a second animation, the first one is discarded.
In many situations, you don’t want an animation to begin at the original From value.
There are two common reasons:
CHAPTER 10 ■ ANIMATION
332
• You have an animation that can be triggered multiple times in a row for a cumulative
effect. For example, you may want to create a button that grows a bit more each time it’s
clicked.
• You have animations that can overlap. For example, you may use the MouseEnter event
to trigger an animation that expands a button and the MouseLeave event to trigger a
complementary animation that shrinks it back. (This is often known as a fish-eye effect.)
If you move the mouse over and off this sort of button several times in quick succession,
each new animation interrupts the previous one, causing the button to jump back to the
size that’s set by the From property.
If you leave out the From value in the button-growing example, you can click the
button multiple times without resetting its progress. Each time, a new animation starts, but it
continues from the current width. When the button reaches its maximum width, further clicks
have no effect, unless you add another animation to shrink it back.
<DoubleAnimation Storyboard.TargetName="cmdGrow"
Storyboard.TargetProperty="Width" To="300" Duration="0:0:5"></DoubleAnimation>
There’s one catch. For this technique to work, the property you’re animating must
have a previously set value. In this example, that means the button must have a hard-coded
width (whether it’s defined directly in the button tag or applied through a style setter). The
problem is that in many layout containers, it’s common not to specify a width and to allow the
container to control the width based on the element’s alignment properties. In this case, the
default width applies, which is the special value Double.NaN (where NaN stands for “not a
number”). You can’t use linear interpolation to animate a property that has this value.
What’s the solution? In many cases, the answer is to hard-code the button’s width. As
you’ll see, animations often require more fine-grained control of element sizing and positioning
than you’d otherwise use. The most common layout container for animatable content is the
Canvas, because it makes it easy to move content around (with possible overlap) and resize it.
The Canvas is also the most lightweight layout container, because no extra layout work is
needed when you change a property like Width.
In the current example, you have another option. You can retrieve the current value of
the button using its ActualWidth property, which indicates the current rendered width. You
can’t animate ActualWidth (it’s read-only), but you can use it to set the From property of your
animation programmatically, before you start the animation.
You need to be aware of another issue when you use the current value as a starting
point for an animation: doing so may change the speed of your animation. That’s because the
duration isn’t adjusted to take into account the smaller spread between the initial value and the
final value. For example, imagine you create a button that doesn’t use the From value and
instead animates from its current position. If you click the button when it has almost reached
its maximum width, a new animation begins. This animation is configured to take 5 seconds
(through the Duration property), even though there are only a few more pixels to go. As a result,
the growth of the button seems to slow down.
This effect appears only when you restart an animation that’s almost complete.
Although it’s a bit odd, most developers don’t bother trying to code around it. Instead, it’s
considered an acceptable quirk.
CHAPTER 10 ■ ANIMATION
333
To
Just as you can omit the From property, you can omit the To property. You can leave out both
the From and To properties to create an animation like this:
<DoubleAnimation Storyboard.TargetName="cmdGrow"
Storyboard.TargetProperty="Width" Duration="0:0:5"></DoubleAnimation>
At first glance, this animation seems like a long-winded way to do nothing at all. It’s
logical to assume that because both the To and From properties are omitted, they both use the
same value. But there’s a subtle and important difference.
When you leave out From, the animation uses the current value and takes animation
into account. For example, if the button is midway through a grow operation, the From value
uses the expanded width. However, when you omit To, the animation uses the current value
without taking animation into account. Essentially, that means the To value becomes the
original value–whatever you last set in code, on the element tag, or through a style. (This works
thanks to Silverlight’s property-resolution system, which is able to calculate a value for a
property based on several overlapping property providers without discarding any information.
Chapter 4 describes this system in more detail.)
In the button example, if you start a grow animation and then interrupt it with the
animation shown previously (perhaps by clicking another button), the button shrinks from its
partially expanded size until it reaches the original width set in the XAML markup. On the other
hand, if you run this code while no other animation is under way, nothing happens. That’s
because the From value (the animated width) and the To value (the original width) are the
same.
By
Instead of using To, you can use the By property. The By property is used to create an
animation that changes a value by a set amount, rather than to a specific target. For example,
you can create an animation that enlarges a button by 10 pixels more than its current size, as
shown here:
<DoubleAnimation Storyboard.TargetName="cmdGrow" By="10"
Storyboard.TargetProperty="Width" Duration="0:0:5"></DoubleAnimation>
Clicking this button always enlarges the button, no matter how many times you’ve run
the animation and how large the button has already grown.
The By property isn’t offered with all animation classes. For example, it doesn’t make
sense with non-numeric data types, such as a Color structure (as used by ColorAnimation).
Duration
The Duration property is straightforward–it takes the time interval (in milliseconds, minutes,
hours, or whatever else you’d like to use) between the time the animation starts and the time it
ends. Although the duration of the animations in the previous examples are set using
TimeSpan, the Duration property requires a Duration object. Fortunately, Duration and
TimeSpan are similar, and the Duration structure defines an implicit cast that can convert
CHAPTER 10 ■ ANIMATION
334
System.TimeSpan to System.Windows.Duration as needed. That’s why code like this is
reasonable:
widthAnimation.Duration = TimeSpan.FromSeconds(5);
Why bother introducing a whole new type? Duration also includes two special values
that can’t be represented by a TimeSpan object: Duration.Automatic and Duration.Forever.
Neither of these values is useful in the current example. Automatic sets the animation to a 1-
second duration; and Forever makes the animation infinite in length, which prevents it from
having any effect.
But Duration.Forever becomes useful if you’re creating a reversible animation. To do
so, set the AutoReverse property to true. Now, the animation will play out in reverse once it’s
complete, reverting to the original value (and doubling the time the animation takes). Because a
reversible animation returns to its initial state, Duration.Forever makes sense–it forces the
animation to repeat endlessly.
Animation Lifetime
Technically, Silverlight animations are temporary, which means they don’t change the value of
the underlying property. While an animation is active, it overrides the property value. This is
because of the way that dependency properties work (as described in Chapter 4), and it’s an
often-overlooked detail that can cause significant confusion.
A one-way animation (like the button-growing animation) remains active after it
finishes running. That’s because the animation needs to hold the button’s width at the new
size. This can lead to an unusual problem: if you try to modify the value of the property using
code after the animation has completed, your code will appear to have no effect. Your code
assigns a new local value to the property, but the animated value still takes precedence.
You can solve this problem in several ways, depending on what you’re trying to
accomplish:
• Create an animation that resets your element to its original state. You do this by not
setting the To property. For example, the button-shrinking animation reduces the width
of the button to its last set size, after which you can change it in your code.
• Create a reversible animation. You do this by setting the AutoReverse property to true.
For example, when the button-growing animation finishes widening the button, it will
play out the animation in reverse, returning it to its original width. The total duration of
your animation is doubled.
• Change the FillBehavior property. Ordinarily, FillBehavior is set to HoldEnd, which
means that when an animation ends, it continues to apply its final value to the target
property. If you change FillBehavior to Stop, then as soon as the animation ends, the
property reverts to its original value.
• Remove the animation object when the animation ends. To do so, handle the Completed
event of the animation object or the containing storyboard.
The first three options change the behavior of your animation. One way or another,
they return the animated property to its original value. If this isn’t what you want, you need to
use the last option.
First, before you launch the animation, attach an event handler that reacts when the
animation finishes. You can do this when the page first loads:
CHAPTER 10 ■ ANIMATION
335
storyboard.Completed += storyboard_Completed;
When the Completed event fires, you can retrieve the storyboard that controls the
animation and stop it:
private void storyboard_Completed(object sender, EventArgs e)
{
Storyboard storyboard = (Storyboard)sender;
storyboard.Stop();
}
When you call Storyboard.Stop(), the property returns to the value it had before the
animation started. If this isn’t what you want, you can take note of the current value that’s
being applied by the animation, remove the animation, and then manually set the new
property:
double currentWidth = cmdGrow.Width;
storyboard.Stop();
cmdGrow.Width = currentWidth;
Keep in mind that this changes the local value of the property. That may affect how
other animations work. For example, if you animate this button with an animation that doesn’t
specify the From property, it uses this newly applied value as a starting point. In most cases,
this is the behavior you want.
RepeatBehavior
The RepeatBehavior property allows you to control how an animation is repeated. If you want
to repeat it a fixed number of times, indicate the number of times to repeat, followed by an x.
For example, this animation repeats twice:
<DoubleAnimation Storyboard.TargetName="cmdGrow" RepeatBehavior="2x"
Storyboard.TargetProperty="Width" To="300" Duration="0:0:5"></DoubleAnimation>
Or in code, pass the number of times to the RepeatBehavior constructor:
widthAnimation.RepeatBehavior = new RepeatBehavior(2);
When you run this animation, the button increases in size (over 5 seconds), jumps
back to its original value, and then increases in size again (over 5 seconds), ending at the full
width of the page. If you’ve set AutoReverse to true, the behavior is slightly different: the entire
animation is completed forward and backward (meaning the button expands and then shrinks),
and then it’s repeated again.
Rather than using RepeatBehavior to set a repeat count, you can use it to set a repeat
interval. To do so, set the RepeatBehavior property with a time value instead of a single
number. For example, the following animation repeats itself for 13 seconds:
<DoubleAnimation Storyboard.TargetName="cmdGrow" RepeatBehavior="0:0:13"
Storyboard.TargetProperty="Width" To="300" Duration="0:0:5"></DoubleAnimation>
And here’s the same change made in code:
widthAnimation.RepeatBehavior = new RepeatBehavior(TimeSpan.FromSeconds(13));
CHAPTER 10 ■ ANIMATION
336
In this example, the Duration property specifies that the entire animation takes 5
seconds. As a result, the RepeatBehavior of 13 seconds triggers two repeats and then leaves the
button halfway through a third repeat (at the 3-second mark).
■ Tip You can use RepeatBehavior to perform just part of an animation. To do so, use a fractional number
of repetitions, or use a TimeSpan that’s less than the duration.
Finally, you can cause an animation to repeat itself endlessly with the
RepeatBehavior.Forever value:
<DoubleAnimation Storyboard.TargetName="cmdGrow" RepeatBehavior="Forever"
Storyboard.TargetProperty="Width" To="300" Duration="0:0:5"></DoubleAnimation>
Simultaneous Animations
The Storyboard class has the ability to hold more than one animation. Best of all, these
animations are managed as one group–meaning they’re started at the same time.
To see an example, consider the following storyboard. It wraps two animations, one
that acts on a button’s Width property and another that acts on the Height property. Because
the animations are grouped into one storyboard, they increment the button’s dimensions in
unison:
<Storyboard x:Name="storyboard" Storyboard.TargetName="cmdGrow">
<DoubleAnimation Storyboard.TargetProperty="Width"
To="300" Duration="0:0:5"></DoubleAnimation>
<DoubleAnimation Storyboard.TargetProperty="Height"
To="300" Duration="0:0:5"></DoubleAnimation>
</Storyboard>
This example moves Storyboard.TargetName property from the DoubleAnimation to
the Storyboard. This is an optional change, but it saves you from setting the property twice,
once on each animation object. (Obviously, if your animation objects need to act on different
elements, you couldn’t use this shortcut.)
In this example, both animations have the same duration, but this isn’t a requirement.
The only consideration with animations that end at different times is their FillBehavior. If an
animation’s FillBehavior property is set to HoldEnd (the default), it holds the value until all the
animations in the storyboard are completed. At this point, the storyboard’s FillBehavior comes
into effect, either continuing to hold the values from both animations (HoldEnd) or reverting
them to their initial values (Stop). On the other hand, if you have multiple animations and one
of them has a FillBehavior of Stop, this animated property will revert to its initial value when the
animation is complete, even if other animations in the storyboard are still running.
When you’re dealing with more than one simultaneous animation, two more
animation class properties become useful: BeginTime and SpeedRatio. BeginTime sets a delay
that is added before the animation starts (as a TimeSpan). This delay is added to the total time,
so a 5-second animation with a 5-second delay takes 10 seconds. BeginTime is useful when
you’re synchronizing different animations that start at the same time but should apply their
effects in sequence. SpeedRatio increases or decreases the speed of the animation. Ordinarily,
CHAPTER 10 ■ ANIMATION
337
SpeedRatio is 1. If you increase it, the animation completes more quickly (for example, a
SpeedRatio of 5 completes five times faster). If you decrease it, the animation is slowed down
(for example, a SpeedRatio of 0.5 takes twice as long). Although the overall effect is the same as
changing the Duration property of your animation, setting the SpeedRatio makes it easier to
control how simultaneous animations overlap.
Controlling Playback
You’ve already seen how to start an animation using the Storyboard.Begin() method. The
Storyboard class also provides a few more methods that allow you to stop or pause an
animation. You’ll see them in action in the following example, shown in Figure 10-2. This page
superimposes two Image elements in exactly the same position, using a grid. Initially, only the
topmost image–which shows a day scene of a Toronto city landmark–is visible. But as the
animation runs, it reduces the opacity from 1 to 0, eventually allowing the night scene to show
through completely. The effect makes it seem that the image is changing from day to night, like
a sequence of time-lapse photography.
Figure 10-2. A controllable animation
Here’s the markup that defines the Grid with its two images:
<Grid>
<Image Source="night.jpg"></Image>
<Image Source="day.jpg" x:Name="imgDay"></Image>
</Grid>
And here’s the storyboard that fades from one to the other, which is placed in the
page’s Resources collection:
CHAPTER 10 ■ ANIMATION
338
<Storyboard x:Name="fadeStoryboard">
<DoubleAnimation x:Name="fadeAnimation"
Storyboard.TargetName="imgDay" Storyboard.TargetProperty="Opacity"
From="1" To="0" Duration="0:0:10">
</DoubleAnimation>
</Storyboard>
To make this example more interesting, it includes several buttons at the bottom that
let you control the playback of this animation. Using these buttons, you can perform the typical
media player actions, such as starting, pausing, resuming, and stopping, and seeking. The
event-handling code uses the appropriate methods of the Storyboard object, as shown here:
private void cmdStart_Click(object sender, RoutedEventArgs e)
{
fadeStoryboard.Begin();
}
private void cmdPause_Click(object sender, RoutedEventArgs e)
{
fadeStoryboard.Pause();
}
private void cmdResume_Click(object sender, RoutedEventArgs e)
{
fadeStoryboard.Resume();
}
private void cmdStop_Click(object sender, RoutedEventArgs e)
{
fadeStoryboard.Stop();
}
private void cmdMiddle_Click(object sender, RoutedEventArgs e)
{
// Start the animation, in case it's not currently underway.
fadeStoryboard.Begin();
// Move to the time position that represents the middle of the animation.
fadeStoryboard.Seek(
TimeSpan.FromSeconds(fadeAnimation.Duration.TimeSpan.TotalSeconds/2));
}
■ Note Remember, stopping an animation isn’t equivalent to completing the animation (unless FillBehavior is
set to Stop). That’s because even when an animation reaches the end of its timeline, it continues to apply its
final value. Similarly, when an animation is paused, it continues to apply the most recent intermediary value.
However, when an animation is stopped, it no longer applies any value, and the property reverts to its
preanimation value.
CHAPTER 10 ■ ANIMATION
339
If you drag the thumb on the slider, the Slider.ValueChanged event fires and triggers
another event handler. This event handler then takes the current value of the slider (which
ranges from 0 to 3) and uses it to apply a new speed ratio:
private void sldSpeed_ValueChanged(object sender, RoutedEventArgs e)
{
// To nothing if the page is still being initialized.
if (sldSpeed == null) return;
// This also restarts the animation if it's currently underway.
fadeStoryboard.SpeedRatio = sldSpeed.Value;
lblSpeed.Text = sldSpeed.Value.ToString("0.0");
}
Unlike in WPF, the Storyboard class in Silverlight doesn’t provide events that allow you
to monitor the progress of an event. For example, there’s no CurrentTimeInvalidated event to
tell you the animation is ticking forward.
Animation Easing
One of the shortcomings of linear animation is that it often feels mechanical and unnatural. By
comparison, sophisticated user interfaces have animated effects that model real-world systems.
For example, they may use tactile push-buttons that jump back quickly when clicked but slow
down as they come to rest, creating the illusion of true movement. Or, they may use maximize
and minimize effects like Windows Vista, where the speed at which the window grows or
shrinks accelerates as the window nears its final size. These details are subtle, and you’re not
likely to notice them when they’re implemented well. However, you’ll almost certainly notice
the clumsy feeling of less refined animations that lack these finer points.
The secret to improving your animations and creating more natural animations is to
vary the rate of change. Instead of creating animations that change properties at a fixed,
unchanging rate, you need to design animations that speed up or slow down along the way.
Silverlight gives you several good options.
For the most control, you can create a frame-based animation (as discussed later in
the “Frame-Based Animation” section). This approach is useful if you must have absolute
control over every detail, which is the case if your animation needs to run in a specific way (for
example, an action game or a simulation that follows the rules of physics). The drawback is that
frame-based animations take a lot of work, because the Silverlight animation model does very
little to help you.
If your animations aren’t quite as serious, and you just want a way to make them look
more professional, you can use a simpler approach. One option is a key-frame animation,
which divides the animation into multiple segments and (optionally) uses key splines to add
acceleration or deceleration to different segments. This approach works well (and you’ll learn
about it later in the “Key-Frame Animation” section). But it’s tedious to implement and often
requires a significant amount of XAML markup. It makes the most sense when you’re using
some sort of design tool that helps you create the key frames and key splines–for example, by
drawing on a graph, as you can in Expression Blend.
If you don’t have a design tool like Expression Blend, or you don’t want to go the
trouble of clicking your way to a complex key-frame animation, you have one more choice: you
can use a prebuilt animation-easing function. In this case, you can still define your animation
normally by specifying the starting and ending property values. But in addition to these details,
you add a ready-made mathematical function that alters the progression of your animation,
CHAPTER 10 ■ ANIMATION
340
causing it to accelerate or decelerate at different points. This is the technique you’ll study in the
following sections.
Using an Easing Function
The best part about animation easing is that it requires much less work than other approaches
like frame-based animation and key frames. To use animation easing, you set the
EasingFunction property of an animation object with an instance of an easing function class (a
class that derives from EasingFunctionBase). You’ll usually need to set a few properties on the
easing function, and you may be forced to play around with different settings to get the effect
you want, but you’ll need no code and very little additional XAML.
For example, consider the two animations shown here, which act on a button. When
the user moves the mouse over the button, a small snippet of code calls the growStoryboard
animation into action, stretching the button to 400 pixels. When the user moves the mouse off
the button, the buttons shrinks back to its normal size.
<Storyboard x:Name="growStoryboard">
<DoubleAnimation
Storyboard.TargetName="cmdGrow" Storyboard.TargetProperty="Width"
To="400" Duration="0:0:1.5"></DoubleAnimation>
</Storyboard>
<Storyboard x:Name="revertStoryboard">
<DoubleAnimation
Storyboard.TargetName="cmdGrow" Storyboard.TargetProperty="Width"
Duration="0:0:3"></DoubleAnimation>
</Storyboard>
Right now, the animations use linear interpolation, which means the growing and
shrinking happen in a steady, mechanical way. For a more natural effect, you can add an easing
function. The following example adds an easing function named ElasticEase. The end result is
that the button springs beyond its full size, snaps back to a value that’s somewhat less, swings
back over its full size again (but a little less than before), snaps back a bit less, and so on,
repeating its bouncing pattern as the movement diminishes. It gradually comes to rest ten
oscillations later. The Oscillations property controls the number of bounces at the end. The
ElasticEase class provides one other property that’s not used in this example: Springiness. This
higher this value, the more each subsequent oscillation dies down (the default value is 3).
<Storyboard x:Name="growStoryboard">
<DoubleAnimation
Storyboard.TargetName="cmdGrow" Storyboard.TargetProperty
="Width"
To="400" Duration="0:0:1.5">
<DoubleAnimation.EasingFunction>
<ElasticEase EasingMode="EaseOut" Oscillations="10"></ElasticEase>
</DoubleAnimation.EasingFunction>
</DoubleAnimation>
</Storyboard>
To really appreciate the difference between this markup and the earlier example that
didn’t use an easing function, you need to try this animation (or run the companion examples
CHAPTER 10 ■ ANIMATION
341
for this chapter). It’s a remarkable change. With one line of XAML, a simple animation changes
from amateurish to a slick effect that would feel at home in a professional application.
■ Note Because the EasingFunction property accepts a single easing function object, you can’t combine
different easing functions for the same animation.
Easing In and Easing Out
Before you consider the different easing functions, it’s important to understand when an easing
function is applied. Every easing function class derives from EasingFunctionBase and inherits a
single property named EasingMode. This property has three possible values: EaseIn (which
means the effect is applied to the beginning of the animation), EaseOut (which means it’s
applied to the end), and EaseInOut (which means it’s applied at both the beginning and end–
the easing in takes place in the first half of the animation, and the easing out takes place in the
second half).
In the previous example, the animation in the growStoryboard animation uses
EaseOut mode. Thus, the sequence of gradually diminishing bounces takes place at the end of
the animation. If you were to graph the changing button width as the animation progresses,
you’d see something like the graph shown in Figure 10-3.
Figure 10-3. Oscillating to a stop using EaseOut with ElasticEase
■ Note The duration of an animation doesn’t change when you apply an easing function. In the case of the
growStoryboard animation, the ElasticEase function doesn’t just change the way the animation ends—it also
makes the initial portion of the animation (when the button expands normally) run more quickly so that there’s
more time left for the oscillations at the end.
If you switch the ElasticEase function to use EaseIn mode, the bounces happen at the
beginning of the animation. The button shrinks below its starting value a bit, expands a bit over,
shrinks back a little more, and continues this pattern of gradually increasing oscillations until it
finally breaks free and expands the rest of the way. (You use the ElasticEase.Oscillations
CHAPTER 10 ■ ANIMATION
342
property to control the number of bounces.) Figure 10-4 shows this very different pattern of
movement
Figure 10-4. Oscillating to a start using EaseIn with ElasticEase
Finally, EaseInOut creates a stranger effect, with oscillations that start the animation in
its first half followed by oscillations that stop it in the second half. Figure 10-5 illustrates.
Figure 10-5. Oscillating to a start and to a stop using EaseInOut with ElasticEase
Easing Function Classes
Silverlight has 11 easing functions, all of which are found in the familiar
System.Windows.Media.Animation namespace. Table 10-1 describes them all and lists their
important properties. Remember, every animation also provides the EasingMode property,
which allows you to control whether it affects that animation as it starts (EaseIn), ends
(EaseOut), or both (EaseInOut).
Table 10-1. Easing Functions
Name Description Properties
BackEase When applied with EaseIn, pulls
the animation back before
starting it. When applied with
EaseOut, this function allows the
animation to overshoot slightly
and then pulls it back.
Amplitude determines the amount of
pullback or overshoot. The default
value is 1, and you can decrease it (to
any value greater than 0) to reduce the
effect or increase it to amplify the
effect.
CHAPTER 10 ■ ANIMATION
343
Name Description Properties
ElasticEase When applied with EaseOut,
makes the animation overshoot
its maximum and swing back and
forth, gradually slowing. When
applied with EaseIn, the
animation swings back and forth
around its starting value,
gradually increasing.
Oscillations controls the number of
times the animation swings back and
forth (the default is 3), and
Springiness controls how quickly
which the oscillations increase or
diminish (the default is 3).
BounceEase Performs an effect similar to
ElasticEase, except the bounces
never overshoot the initial or final
values.
Bounces controls the number of times
the animation bounces back (the
default is 2), and Bounciness
determines how quickly the bounces
increase or diminish (the default is 2).
CircleEase Accelerates (with EaseIn) or
decelerates (with EaseOut) the
animation using a circular
function.
None
CubicEase Accelerates (with EaseIn) or
decelerates (with EaseOut) the
animation using a function based
on the cube of time. The effect is
similar to CircleEase, but the
acceleration is more gradual.
None
QuadraticEase Accelerates (with EaseIn) or
decelerates (with EaseOut) the
animation using a function based
on the square of time. The effect
is similar to CubicEase, but even
more gradual.
None
QuarticEase Accelerates (with EaseIn) or
decelerates (with EaseOut) the
animation using a function based
on time to the power of 4. The
effect is similar to CubicEase and
QuadraticEase, but the
acceleration is more pronounced.
None
CHAPTER 10 ■ ANIMATION
344
Name Description Properties
QuinticEase Accelerates (with EaseIn) or
decelerates (with EaseOut) the
animation using a function based
on time to the power of 5. The
effect is similar to CubicEase,
QuadraticEase, and QuinticEase,
but the acceleration is more
pronounced.
None
SineEase Accelerates (with EaseIn) or
decelerates (with EaseOut) the
animation using a function that
includes a sine calculation. The
acceleration is very gradual and
closer to linear interpolation than
any of the other easing functions.
None
PowerEase Accelerates (with EaseIn) or
decelerates (with EaseOut) the
animation using the power
function f(t) = t
p
. Depending on
the value you use for the
exponent p, you can duplicate the
effect of the Cubic,
QuadraticEase, QuarticEase, and
QuinticEase functions.
Power, which sets the value of the
exponent in the formula. Use 2 to
duplicate QuadraticEase (f(t) = t
2
), 3
for CubicEase (f(t) = t
3
), 4 for
QuarticEase (f(t) = t
4
), and 5 for
QuinticEase (f(t) = t
5
), or choose
something different. The default is 2.
ExponentialEase Accelerates (with EaseIn) or
decelerates (with EaseOut) the
animation using the exponential
function f(t)=(e(at) – 1)/(e(a) – 1).
Exponent allows you to set the value
of the exponent (2 is the default).
Many of the easing functions provide similar but subtly different results. To use
animation easing successfully, you need to decide which easing function to use and how to
configure it. Often, this process requires a bit of trial-and-error experimentation. Two good
resources can help you out.
First, the Silverlight documentation charts example behavior for each easing function,
showing how the animated value changes as time progresses. Reviewing these charts is a good
way to develop a sense of what the easing function does. Figure 10-6 shows the charts for the
most popular easing functions.
CHAPTER 10 ■ ANIMATION
345
Figure 10-6. The effect of different easing functions
Second, Microsoft provides several sample applications that you can use to play with
the different easing functions and try different property values. The most useful of these lets
you observe the effect of any easing function on a falling square, complete with the
automatically generated XAML markup needed to duplicate the effect. You can try it online at
CHAPTER 10 ■ ANIMATION
346
Animation Types Revisited
You now know the fundamentals of Silverlight’s property animation system–how animations
are defined, how they’re connected to elements, how you can control playback with a
storyboard, and how you can incorporate animation easing to create more realistic effects. Now
is a good time to take a step back and take a closer look at the animation classes for different
data types, and consider how you can use them to achieve the effect you want.
The first challenge in creating any animation is choosing the right property to animate.
Making the leap between the result you want (for example, an element moving across the page)
and the property you need to use (in this case, Canvas.Left and Canvas.Top) isn’t always
intuitive. Here are a few guidelines:
• If you want to use an animation to make an element appear or disappear, don’t use the
Visibility property (which allows you to switch only between completely visible or
completely invisible). Instead, use the Opacity property to fade it in or out.
• If you want to animate the position of an element, consider using a Canvas. It provides
the most direct properties (Canvas.Left and Canvas.Top) and requires the least
overhead.
• The most common properties to animate are transforms, which you first explored in
Chapter 9. You can use them to move or flip an element (TranslateTransform), rotate it
(RotateTransform), resize or stretch it (ScaleTransform), and more. Used carefully,
transforms can sometimes allow you to avoid hard-coding sizes and positions in your
animation. TranslateTransform also lets you move elements in layout containers like the
Grid in much the same way you can position them in the Canvas.
• One good way to change the surface of an element through an animation is to modify
the properties of the brush. You can use a ColorAnimation to change the color or
another animation object to transform a property of a more complex brush, like the
offset in a gradient.
The following examples demonstrate how to animate transforms and brushes and how
to use a few more animation types. You’ll also learn how to create multi-segmented animations
with key frames.
Animating Transforms
Transforms offer one of the most powerful ways to customize an element. When you use
transforms, you don’t simply change the bounds of an element. Instead, the element’s entire
visual appearance is moved, flipped, skewed, stretched, enlarged, shrunk, or rotated. For
example, if you animate the size of a button using a ScaleTransform, the entire button is
resized, including its border and its inner content. The effect is much more impressive than if
you animate its Width and Height or the FontSize property that affects its text.
To use a transform in animation, the first step is to define the transform. (An
animation can change an existing transform but not create a new one.) For example, imagine
you want to allow a button to rotate. This requires the RotateTransform:
CHAPTER 10 ■ ANIMATION
347
<Button Content="A Button">
<Button.RenderTransform>
<RotateTransform x:Name="rotateTransform"></RotateTransform>
</Button.RenderTransform>
</Button>
■ Tip You can use transforms in combination. It’s easy—use a TransformGroup object to set the
RenderTransform property. You can nest as many transforms as you need inside the transform group. You’ll see
an example in the bomb game that’s shown later in this chapter.
Here’s an animation that makes a button rotate when the mouse moves over it. It acts
on the Button.RotateTransform object and uses the target property Angle. The fact that the
RenderTransform property can hold a variety of different transform objects, each with different
properties, doesn’t cause a problem. As long as you’re using a transform that has an Angle
property, this animation will work.
<Storyboard x:Name="rotateStoryboard">
<DoubleAnimation Storyboard.TargetName="rotateTransform"
Storyboard.TargetProperty="Angle"
To="360" Duration="0:0:0.8" RepeatBehavior="Forever"></DoubleAnimation>
</Storyboard>
If you place this animation in the page’s Resources collection, you can trigger it when
the user moves the mouse over the button:
private void cmd_MouseEnter(object sender, MouseEventArgs e)
{
rotateStoryboard.Begin();
}
The button rotates one revolution every 0.8 seconds and continues rotating
perpetually. While the button rotates, it’s completely usable–for example, you can click it and
handle the Click event.
To make sure the button rotates around its center point (not the upper-left corner),
you need to set the RenderTransformOrigin property as shown here:
<Button Content="One" Margin="5" RenderTransformOrigin="0.5,0.5"
MouseEnter="cmd_MouseEnter">
<Button.RenderTransform>
<RotateTransform x:Name="rotateTransform"></RotateTransform>
</Button.RenderTransform>
</Button>
Remember, the RenderTransformOrigin property uses relative units from 0 to 1, so 0.5
represents a midpoint.
To stop the rotation, you can react to the MouseLeave event. You could stop the
storyboard that performs the rotation, but doing so would cause the button to jump back to its
original orientation in one step. A better approach is to start a second animation that replaces
CHAPTER 10 ■ ANIMATION
348
the first. This animation leaves out the From property, which allows it to seamlessly rotate the
button from its current angle to its original orientation in a snappy 0.2 seconds:
<Storyboard x:Name="unrotateStoryboard">
<DoubleAnimation Storyboard.TargetName="rotateTransform"
Storyboard.TargetProperty="Angle" To="0" Duration="0:0:0.2"></DoubleAnimation>
</Storyboard>
Here’s the event handler:
private void cmd_MouseLeave(object sender, MouseEventArgs e)
{
unrotateStoryboard.Begin();
}
With a little more work, you can make these two animations and the two event
handlers work for a whole stack of rotatable buttons, as shown in Figure 10-7. The trick is to
handle the events of all the buttons with the same code, and dynamically assign the target of
the storyboard to the current button using the Storyboard.SetTarget() method:
private void cmd_MouseEnter(object sender, MouseEventArgs e)
{
rotateStoryboard.Stop();
Storyboard.SetTarget(rotateStoryboard, ((Button)sender).RenderTransform);
rotateStoryboard.Begin();
}
private void cmd_MouseLeave(object sender, MouseEventArgs e)
{
unrotateStoryboard.Stop();
Storyboard.SetTarget(unrotateStoryboard, ((Button)sender).RenderTransform);
unrotateStoryboard.Begin();
}
This approach has two limitations. First, because the code reuses the same
storyboards for all the buttons, there’s no way to have two buttons rotating at once. For
example, if you quickly slide the mouse over several buttons, the buttons you leave first may not
rotate all the way back to their initial position, because the storyboard is commandeered by
another button. If this behavior is a problem, you can code around it by creating the
storyboards you need dynamically in code. You’ll see how to implement this technique later in
this chapter, when you consider the bomb game.
CHAPTER 10 ■ ANIMATION
349
Figure 10-7. Using a render transform
The other shortcoming in this example is the fact that you need a fair bit of markup to
define the margins, event handlers, and transforms for all the buttons. You can streamline this
markup by using styles to apply the same settings to various buttons (see Chapter 12) or by
configuring the buttons programmatically.
Animation Perspective Projections
Just as you can animate transforms, you can also animate perspective projections–namely, the
PlaneProjection class you studied in Chapter 9, which allows you to simulate a flat, tilted 3-D
surface. For example, imagine you have a group of elements wrapped in a Border control, and
that border uses a PlaneProjection, as shown here:
<Border CornerRadius="2" Padding="10" Height="140" Width="170"
BorderBrush="SlateGray" BorderThickness="4">
<Border.Projection>
<PlaneProjection x:Name="projection"></PlaneProjection>
</Border.Projection>
</Border>
Currently, the PlaneProjection in this example doesn’t do anything. To change the way
the elements are rendered, you need to modify the RotateX, RotateY, and RotateZ properties of
the PlaneProjection object, which turns the 2-D surface of the border around the appropriate
axis. You saw how to pull this off in Chapter 9, but now you’ll use an animation to change these
properties gradually and continuously.