Apress pro Silverlight 3 in C# phần 9 pps
Bạn đang xem bản rút gọn của tài liệu. Xem và tải ngay bản đầy đủ của tài liệu tại đây (2.66 MB, 95 trang )
CHAPTER 16 ■ DATA BINDING
561
while (reader.Read())
{
// Create a Product object that wraps the
// current record.
Product product = new Product((string)reader["ModelNumber"],
(string)reader["ModelName"], Convert.ToDouble(reader["UnitCost"]),
(string)reader["Description"], (string)reader["CategoryName"]);
// Add to collection
products.Add(product);
}
}
finally
{
con.Close();
}
return products;
}
When the user clicks the Get Products button, the event-handling code calls the
GetProducts() method asynchronously:
private void cmdGetProducts_Click(object sender, RoutedEventArgs e)
{
StoreDbClient client = new StoreDbClient();
client.GetProductsCompleted += client_GetProductsCompleted;
client.GetProductsAsync();
}
When the product list is received from the web service, the code stores the collection
as a member variable in the page class for easier access elsewhere in your code. The code then
sets that collection as the ItemsSource for the list:
private ObservableCollection[] products;
private void client_GetProductsCompleted(object sender,
GetProductsCompletedEventArgs e)
{
try
{
products = e.Result;
lstProducts.ItemsSource = products;
}
catch (Exception err)
{
lblError.Text = "Failed to contact service.";
}
}
CHAPTER 16 ■ DATA BINDING
562
■ Note Keen eyes will notice one unusual detail in this example. Although the web service returned an array
of Product objects, the client applications receives them in a different sort of package: the ObservableCollection.
You’ll learn why Silverlight performs this sleight of hand in the next section.
This code successfully fills the list with Product objects. However, the list doesn’t know
how to display a Product object, so it calls the ToString() method. Because this method hasn’t
been overridden in the Product class, this has the unimpressive result of showing the fully
qualified class name for every item (see Figure 16-6).
Figure 16-6. An unhelpful bound list
You have three options to solve this problem:
• Set the list’s DisplayMemberPath property. For example, set it to ModelName to get the
result shown in Figure 16-5.
• Override the Product.ToString() method to return more useful information. For example,
you can return a string with the model number and model name of each item. This
approach gives you a way to show more than one property in the list (for example, it’s
great for combining the FirstName and LastName properties in a Customer class).
CHAPTER 16 ■ DATA BINDING
563
• Supply a data template. This way, you can show any arrangement of property values
(and along with fixed text). You’ll learn how to use this trick later in this chapter.
When you’ve decided how to display information in the list, you’re ready to move on to
the second challenge: displaying the details for the currently selected item in the grid that
appears below the list. To make this work, you need to respond to the SelectionChanged event
and change the DataContext of the Grid that contains the product details. Here’s the code that
does it:
private void lstProducts_SelectionChanged(object sender,
SelectionChangedEventArgs e)
{
gridProductDetails.DataContext = lstProducts.SelectedItem;
}
■ Tip To prevent a field from being edited, set the TextBox.IsReadOnly property to true or, better yet, use a
read-only control like a TextBlock.
If you try this example, you’ll be surprised to see that it’s already fully functional. You
can edit product items, navigate away (using the list), and then return to see that your edits
were successfully committed to the in-memory data objects. You can even change a value that
affects the display text in the list. If you modify the model name and tab to another control, the
corresponding entry in the list is refreshed automatically.
But there’s one quirk. Changes are committed only when a control loses focus. If you
change a value in a text box and then move to another text box, the data object is updated just
as you’d expect. However, if you change a value and then click a new item in the list, the edited
value is discarded, and the information from the selected data object is loaded. If this behavior
isn’t what you want, you can add code that explicitly forces a change to be committed. Unlike
WPF, Silverlight has no direct way to accomplish this. Your only option is to programmatically
send the focus to another control (if necessary, an invisible one) by calling its Focus() method.
This commits the change to the data object. You can then bring the focus back to the original
text box by calling its Focus() method. You can use this code when reacting to TextChanged, or
you can add a Save or Update button. If you use the button approach, no code is required,
because clicking the button changes the focus and triggers the update automatically.
Inserting and Removing Collection Items
As you saw in the previous section, Silverlight performs a change when it generates the client-
side code for communicating with a web service. Your web service may return an array or List
collection, but the client-side code places the objects into an ObservableCollection. The same
translation step happens if you return an object with a collection property.
This shift takes place because the client doesn’t really know what type of collection the
web server is returning. Silverlight assumes that it should use an ObservableCollection to be
safe, because an ObservableCollection is more fully featured than an array or an ordinary List
collection.
CHAPTER 16 ■ DATA BINDING
564
So what does the ObservableCollection add that arrays and List objects lack? First, like
the List, the ObservableCollection has support for adding and removing items. For example,
you try deleting an item with a Delete button that executes this code:
private void cmdDeleteProduct_Click(object sender, RoutedEventArgs e)
{
products.Remove((Product)lstProducts.SelectedItem);
}
This obviously doesn’t work with an array. It does work with a List collection, but
there’s a problem: although the deleted item is removed from the collection, it remains
stubbornly visible in the bound list.
To enable collection change tracking, you need to use a collection that implements the
INotifyCollectionChanged interface. In Silverlight, the only collection that meets this bar is the
ObservableCollection class. When you execute the above code with an ObservableCollection
like the collection of products returned from the web service, you’ll see the bound list is
refreshed immediately. Of course, it’s still up to you to create the data-access code that can
commit changes like these permanently–for example, the web service methods that insert and
remove products from the back-end database.
Binding to a LINQ Expression
One of Silverlight’s many surprises is its support for Language Integrated Query, which is an all-
purpose query syntax that was introduced in .NET 3.5.
LINQ works with any data source that has a LINQ provider. Using the support that’s
included with Silverlight, you can use similarly structured LINQ queries to retrieve data from an
in-memory collection or an XML file. And as with other query languages, LINQ lets you apply
filtering, sorting, grouping, and transformations to the data you retrieve.
Although LINQ is somewhat outside the scope of this chapter, you can learn a lot from
a simple example. For example, imagine you have a collection of Product objects named
products, and you want to create a second collection that contains only those products that
exceed $100 in cost. Using procedural code, you can write something like this:
// Get the full list of products.
List<Product> products = App.StoreDb.GetProducts();
// Create a second collection with matching products.
List<Product> matches = new List<Product>();
foreach (Product product in products)
{
if (product.UnitCost >= 100)
{
matches.Add(product);
}
}
Using LINQ, you can use the following expression, which is far more concise:
// Get the full list of products.
List<Product> products = App.StoreDb.GetProducts();
// Create a second collection with matching products.
CHAPTER 16 ■ DATA BINDING
565
IEnumerable<Product> matches = from product in products
where product.UnitCost >= 100
select product;
This example uses LINQ to Objects, which means it uses a LINQ expression to query
the data in an in-memory collection. LINQ expressions use a set of new language keywords,
including from, in, where, and select. These LINQ keywords are a genuine part of the C#
language.
■ Note A full discussion of LINQ is beyond the scope of this book. For a detailed treatment, you can refer to
the book Pro LINQ: Language Integrated Query in C# 2008, the LINQ developer center at
or the huge catalog of LINQ
examples at
LINQ revolves around the IEnumerable<T> interface. No matter what data source you
use, every LINQ expression returns some object that implements IEnumerable<T>. Because
IEnumerable<T> extends IEnumerable, you can bind it in a Silverlight page just as you bind an
ordinary collection (see Figure 16-7):
lstProducts.ItemsSource = matches;
CHAPTER 16 ■ DATA BINDING
566
Figure 16-7. Filtering a collection with LINQ
Unlike the List and ObservableCollection classes, the IEnumerable<T> interface
doesn’t provide a way to add or remove items. If you need this capability, you must first convert
your IEnumerable<T> object into an array or List collection using the ToArray() or ToList()
method.
Here’s an example that uses ToList() to convert the result of a LINQ query (shown
previously) into a strongly typed List collection of Product objects:
List<Product> productMatches = matches.ToList();
CHAPTER 16 ■ DATA BINDING
567
■ Note ToList() is an extension method, which means it’s defined in a different class from the one in which it’s
used. Technically, ToList() is defined in the System.Linq.Enumerable helper class, and it’s available to all
IEnumerable<T> objects. However, it isn’t available if the Enumerable class isn’t in scope, which means the
code shown here won’t work if you haven’t imported the System.Linq namespace.
The ToList() method causes the LINQ expression to be evaluated immediately. The
end result is an ordinary List collection, which you can deal with in all the usual ways. If you
want to make the collection editable, so that changes show up in bound controls immediately,
you’ll need to copy the contents of the List to a new ObservableCollection.
Master-Details Display
As you’ve seen, you can bind other elements to the SelectedItem property of your list to show
more details about the currently selected item. Interestingly, you can use a similar technique to
build a master-details display of your data. For example, you can create a page that shows a list
of categories and a list of products. When the user chooses a category in the first list, you can
show just the products that belong to that category in the second list. Figure 16-8 shows this
example.
Figure 16-8. A master-details list
CHAPTER 16 ■ DATA BINDING
568
To pull this off, you need a parent data object that provides a collection of related child
data objects through a property. For example, you can build a Category class that provides a
property named Category.Products with the products that belong to that category. Like the
Product class, the Category class can implement the INotifyPropertyChanged to provide change
notifications. Here’s the complete code:
public class Category : INotifyPropertyChanged
{
private string categoryName;
public string CategoryName
{
get { return categoryName; }
set { categoryName = value;
OnPropertyChanged(new PropertyChangedEventArgs("CategoryName"));
}
}
private List<Product> products;
public List<Product> Products
{
get { return products; }
set { products = value;
OnPropertyChanged(new PropertyChangedEventArgs("Products"));
}
}
public event PropertyChangedEventHandler PropertyChanged;
public void OnPropertyChanged(PropertyChangedEventArgs e)
{
if (PropertyChanged != null)
PropertyChanged(this, e);
}
public Category(string categoryName, List<Product> products)
{
CategoryName = categoryName;
Products = products;
}
public Category(){}
}
To use the Category class, you also need to modify the data-access code that you saw
earlier. Now, you query the information about products and categories from the database. The
example in Figure 16-8 uses a web service method named GetCategoriesWithProducts(), which
returns a collection of Category objects, each of which has a nested collection of Product
objects:
[OperationContract()]
public List<Category> GetCategoriesWithProducts()
{
// Perform the query for products using the GetProducts stored procedure.
SqlConnection con = new SqlConnection(connectionString);
CHAPTER 16 ■ DATA BINDING
569
SqlCommand cmd = new SqlCommand("GetProducts", con);
cmd.CommandType = CommandType.StoredProcedure;
// Store the results (temporarily) in a DataSet.
SqlDataAdapter adapter = new SqlDataAdapter(cmd);
DataSet ds = new DataSet();
adapter.Fill(ds, "Products");
// Perform the query for categories using the GetCategories stored procedure.
cmd.CommandText = "GetCategories";
adapter.Fill(ds, "Categories");
// Set up a relation between these tables.
// This makes it easier to discover the products in each category.
DataRelation relCategoryProduct = new DataRelation("CategoryProduct",
ds.Tables["Categories"].Columns["CategoryID"],
ds.Tables["Products"].Columns["CategoryID"]);
ds.Relations.Add(relCategoryProduct);
// Build the collection of Category objects.
List<Category> categories = new List<Category>();
foreach (DataRow categoryRow in ds.Tables["Categories"].Rows)
{
// Add the nested collection of Product objects for this category.
List<Product> products = new List<Product>();
foreach (DataRow productRow in categoryRow.GetChildRows(relCategoryProduct))
{
products.Add(new Product(productRow["ModelNumber"].ToString(),
productRow["ModelName"].ToString(),
Convert
.ToDouble(productRow["UnitCost"]),
productRow["Description"].ToString()));
}
categories.Add(new Category(categoryRow["CategoryName"].ToString(),
products));
}
return categories;
}
To display this data, you need the two lists shown here:
<ListBox x:Name="lstCategories" DisplayMemberPath="CategoryName"
SelectionChanged="lstCategories_SelectionChanged"></ListBox>
<ListBox x:Name="lstProducts" Grid.Row="1" DisplayMemberPath="ModelName">
</ListBox>
After you receive the collection from the GetCategoriesWithProducts() method, you
can set the ItemsSource of the topmost list to show the categories:
lstCategories.ItemsSource = e.Result;
To show the related products, you must react when an item is clicked in the first list,
and then set the ItemsSource property of the second list to the Category.Products property of
the selected Category object:
CHAPTER 16 ■ DATA BINDING
570
lstProducts.ItemsSource = ((Category)lstCategories.SelectedItem).Products;
Data Conversion
In an ordinary binding, the information travels from the source to the target without any
change. This seems logical, but it’s not always the behavior you want. Your data source may use
a low-level representation that you don’t want to display directly in your user interface. For
example, you may have numeric codes you want to replace with human-readable strings,
numbers that need to be cut down to size, dates that need to be displayed in a long format, and
so on. If so, you need a way to convert these values into the correct display form. And if you’re
using a two-way binding, you also need to do the converse–take user-supplied data and
convert it to a representation suitable for storage in the appropriate data object.
Fortunately, Silverlight allows you to do both by creating (and using) a value-converter
class. The value converter is responsible for converting the source data just before it’s displayed
in the target and (in the case of a two-way binding) converting the new target value just before
it’s applied back to the source.
Value converters are an extremely useful piece of the Silverlight data-binding puzzle.
You can use them several ways:
• To format data to a string representation. For example, you can convert a number to a
currency string. This is the most obvious use of value converters, but it’s certainly not
the only one.
• To create a specific type of Silverlight object. For example, you can read a block of binary
data and create a BitmapImage object that can be bound to an Image element.
• To conditionally alter a property in an element based on the bound data. For example,
you may create a value converter that changes the background color of an element to
highlight values in a specific range.
In the following sections, you’ll consider an example of each of these approaches.
Formatting Strings with a Value Converter
Value converters are the perfect tool for formatting numbers that need to be displayed as text.
For example, consider the Product.UnitCost property in the previous example. It’s stored as a
decimal; and, as a result, when it’s displayed in a text box, you see values like 3.9900. Not only
does this display format show more decimal places than you’d probably like, but it also leaves
out the currency symbol. A more intuitive representation is the currency-formatted value
$49.99, as shown in Figure 16-9.
CHAPTER 16 ■ DATA BINDING
571
Figure 16-9. Displaying formatted currency values
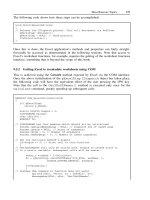
To create a value converter, you need to take three steps:
1. Create a class that implements IValueConverter (from the System.Windows.Data
namespace). You place this class in your Silverlight project, which is where the
conversion takes place–not in the web service.
2. Implement a Convert() method that changes data from its original format to its display
format.
3. Implement a ConvertBack() method that does the reverse and changes a value from
display format to its native format.
Figure 16-10 shows how it works.
CHAPTER 16 ■ DATA BINDING
572
Figure 16-10. Converting bound data
In the case of the decimal-to-currency conversion, you can use the Decimal.ToString()
method to get the formatted string representation you want. You need to specify the currency
format string “C”, as shown here:
string currencyText = decimalPrice.ToString("C");
This code uses the culture settings that apply to the current thread. A computer that’s
configured for the English (United States) region runs with a locale of en-US and displays
currencies with the dollar sign ($). A computer that’s configured for another locale may display
a different currency symbol. If this isn’t the result you want (for example, you always want the
dollar sign to appear), you can specify a culture using the overload of the ToString() method
shown here:
CultureInfo culture = new CultureInfo("en-US");
string currencyText = decimalPrice.ToString("C", culture);
You can learn about all the format strings that are available in the Visual Studio help.
Table 16-3 and Table 16-4 show some of the most common options you’ll use for numeric and
date values, respectively.
Table 16-3. Format Strings for Numeric Data
Type Format String Example
Currency C $1,234.50.
Parentheses indicate negative values: ($1,234.50).
The currency sign is locale-specific.
Scientific
(Exponential)
E 1.234.50E+004.
Percentage P 45.6%.
Fixed Decimal F? Depends on the number of decimal places you set.
F3 formats values like 123.400. F0 formats values like
123.
CHAPTER 16 ■ DATA BINDING
573
Table 16-4. Format Strings for Times and Dates
Type Format String Format
Short Date d M/d/yyyy
For example: 10/30/2005
Long Date D dddd, MMMM dd, yyyy
For example: Monday, January 30, 2005
Long Date and
Short Time
f dddd, MMMM dd, yyyy HH:mm aa
For example: Monday, January 30, 2005 10:00 AM
Long Date and
Long Time
F dddd, MMMM dd, yyyy HH:mm:ss aa
For example: Monday, January 30, 2005 10:00:23 AM
ISO Sortable
Standard
s yyyy-MM-dd HH:mm:ss
For example: 2005-01-30 10:00:23
Month and Day M MMMM dd
For example: January 30
General G M/d/yyyy HH:mm:ss aa (depends on locale-specific
settings)
For example: 10/30/2002 10:00:23 AM
Converting from the display format back to the number you want is a little trickier. The
Parse() and TryParse() methods of the double type are logical choices to do the work, but
ordinarily they can’t handle strings that include currency symbols. The solution is to use an
overloaded version of the Parse() or TryParse() method that accepts a
System.Globalization.NumberStyles value. If you supply NumberStyles.Any, you can
successfully strip out the currency symbol, if it exists.
Here’s the complete code for the value converter that deals with price values like the
Product.UnitCost property:
public class PriceConverter : IValueConverter
{
public object Convert(object value, Type targetType, object parameter,
CultureInfo culture)
{
double price = (double)value;
return price.ToString("C", culture);
}
public object ConvertBack(object value, Type targetType, object parameter,
CultureInfo culture)
{
string price = value.ToString();
double result;
CHAPTER 16 ■ DATA BINDING
574
if (Double.TryParse(price, NumberStyles.Any, culture, out result))
{
return result;
}
return value;
}
}
To put this converter into action, you need to begin by mapping your project
namespace to an XML namespace prefix you can use in your markup. Here’s an example that
uses the namespace prefix local and assumes your value converter is in the namespace
DataBinding:
xmlns:local="clr-namespace:DataBinding"
Typically, you’ll add this attribute to the <UserControl> start tag at the top of your
markup.
Now, you need to create an instance of the PriceConverter class in your page’s
Resources collection, as shown here:
<UserControl.Resources>
<local:PriceConverter x:Key="PriceConverter"></local:PriceConverter>
</UserControl.Resources>
Then, you can point to it in your binding using a StaticResource reference:
<TextBox Margin="5" Grid.Row="2" Grid.Column="1"
Text="{Binding UnitCost, Mode=TwoWay, Converter={StaticResource PriceConverter}}">
</TextBox>
■ Note Unlike WPF, Silverlight lacks the IMultiValueConverter interface. As a result, you’re limited to
converting individual values, and you can’t combine values (for example, join together a FirstName and a
LastName field) or perform calculations (for example, multiply UnitPrice by UnitsInStock).
Creating Objects with a Value Converter
Value converters are indispensable when you need to bridge the gap between the way data is
stored in your classes and the way it’s displayed in a page. For example, imagine you have
picture data stored as a byte array in a field in a database. You can convert the binary data into a
System.Windows.Media.Imaging.BitmapImage object and store that as part of your data object.
However, this design may not be appropriate.
For example, you may need the flexibility to create more than one object
representation of your image, possibly because your data library is used in both Silverlight
applications and Windows Forms applications (which use the System.Drawing.Bitmap class
instead). In this case, it makes sense to store the raw binary data in your data object and convert
it to a BitmapImage object using a value converter.
CHAPTER 16 ■ DATA BINDING
575
■ Tip To convert a block of binary data into an image, you must first create a BitmapImage object and read
the image data into a MemoryStream. Then, you can call the BitmapImage.SetSource() method to pass the
image data in the stream to the BitmapImage.
The Products table from the Store database doesn’t include binary picture data, but it
does include a ProductImage field that stores the file name of an associated product image. In
this case, you have even more reason to delay creating the image object. First, the image may
not be available, depending on where the application is running. Second, there’s no point in
incurring the extra memory overhead from storing the image unless it’s going to be displayed.
The ProductImage field includes the file name but not the full URI of an image file.
This gives you the flexibility to pull the image files from any location. The value converter has
the task of creating a URI that points to the image file based on the ProductImage field and the
website you want to use. The root URI is stored using a custom property named RootUri, which
defaults to the same URI where the current web page is located.
Here’s the complete code for the ImagePathConverter that performs the conversion:
public class ImagePathConverter : IValueConverter
{
private string rootUri;
public string RootUri
{
get { return rootUri; }
set { rootUri = value; }
}
public ImagePathConverter()
{
string uri = HtmlPage.Document.DocumentUri.ToString();
// Remove the web page from the current URI to get the root URI.
rootUri = uri.Remove(uri.LastIndexOf('/'),
uri.Length - uri.LastIndexOf('/'));
}
public object Convert(object value, Type targetType, object parameter,
System.Globalization.CultureInfo culture)
{
string imagePath = RootUri + "/" + (string)value;
return new BitmapImage(new Uri(imagePath));
}
public object ConvertBack(object value, Type targetType, object parameter,
System.Globalization.CultureInfo culture)
{
// Images aren't editable, so there's no need to support ConvertBack.
throw new NotSupportedException();
}
}
CHAPTER 16 ■ DATA BINDING
576
To use this converter, begin by adding it to Resources. Although you can set the
RootUri property on the ImagePathConverter element, this example doesn’t. As a result, the
ImagePathConverter uses the default value that points to the current application website.
<UserControl.Resources>
<local:ImagePathConverter x:Key="ImagePathConverter"></local:ImagePathConverter>
</UserControl.Resources>
Now it’s easy to create a binding expression that uses this value converter:
<Image Margin="5" Grid.Row="2" Grid.Column="1" Stretch="None"
HorizontalAlignment="Left" Source=
"{Binding ProductImagePath, Converter={StaticResource ImagePathConverter}}">
</Image>
This works because the Image.Source property expects an ImageSource object, and
the BitmapImage class derives from ImageSource.
Figure 16-11 shows the result.
Figure 16-11. Displaying bound images
CHAPTER 16 ■ DATA BINDING
577
You can improve this example in a couple of ways. First, attempting to create a
BitmapImage that points to a nonexistent file causes an exception, which you’ll receive when
setting the DataContext, ItemsSource, or Source property. Alternatively, you can add properties
to the ImagePathConverter class that let you configure this behavior. For example, you may
introduce a Boolean SuppressExceptions property. If it’s set to true, you can catch exceptions in
the Convert() method and return an empty string. Or, you can add a DefaultImage property that
takes a placeholder BitmapImage. ImagePathConverter can then return the default image if an
exception occurs.
Applying Conditional Formatting
Some of the most interesting value converters aren’t designed to format data for presentation.
Instead, they’re intended to format some other appearance-related aspect of an element based
on a data rule.
For example, imagine that you want to flag high-priced items by giving them a
different background color. You can easily encapsulate this logic with the following value
converter:
public class PriceToBackgroundConverter : IValueConverter
{
public double MinimumPriceToHighlight
{
get; set;
}
public Brush HighlightBrush
{
get; set;
}
public Brush DefaultBrush
{
get; set;
}
public object Convert(object value, Type targetType, object parameter,
System.Globalization.CultureInfo culture)
{
double price = (double)value;
if (price >= MinimumPriceToHighlight)
return HighlightBrush;
else
return DefaultBrush;
}
public object ConvertBack(object value, Type targetType, object parameter,
System.Globalization.CultureInfo culture)
{
throw new NotSupportedException();
}
}
CHAPTER 16 ■ DATA BINDING
578
■ Tip If you decide you can’t perform the conversion, you can return the value Binding.UnsetValue to tell
Silverlight to ignore your binding. The bound property (in this case, Background) will keep its default value.
Once again, the value converter is carefully designed with reusability in mind. Rather
than hard-coding the color highlights in the converter, they’re specified in the XAML by the
code that uses the converter:
<local:PriceToBackgroundConverter x:Key="PriceToBackgroundConverter"
DefaultBrush="{x:Null}" HighlightBrush="Orange" MinimumPriceToHighlight="50">
</local:PriceToBackgroundConverter>
Brushes are used instead of colors so that you can create more advanced highlight
effects using gradients and background images. And if you want to keep the standard,
transparent background (so the background of the parent elements is used), set the
DefaultBrush or HighlightBrush property to null, as shown here.
All that’s left is to use this converter to set the background of an element, such as the
border that contains all the other elements:
<Border Background=
"{Binding UnitCost, Converter={StaticResource PriceToBackgroundConverter}}"
>
In many cases, you’ll need to pass information to a converter beyond the data you
want to convert. In this example, PriceToBackgroundConverter needs to know the highlight
color and minimum price details, and this information is passed along through properties.
However, you have one other alternative. You can pass a single object (of any type) to a
converter through the binding expression, by setting the ConverterParameter property. Here’s
an example that uses this approach to supply the minimum price:
<Border Background=
"{Binding UnitCost, Converter={StaticResource PriceToBackgroundConverter},
ConverterParameter=50}"
>
The parameter is passed as an argument to the Convert() method. Here’s how you can
rewrite the earlier example to use it:
public object Convert(
object value, Type targetType, object parameter,
System.Globalization.CultureInfo culture)
{
double price = (double)value;
if (price >= Double.Parse(parameter))
return HighlightBrush;
else
return DefaultBrush;
}
In general, the property-based approach is preferred. It’s clearer, more flexible, and
strongly typed. (When set in the markup extension, ConverterParameter is always treated as a
string.) But in some situations, you may want to reuse a single value converter for multiple
CHAPTER 16 ■ DATA BINDING
579
elements, and you may need to vary a single detail for each element. In this situation, it’s more
efficient to use ConverterParameter than to create multiple copies of the value converter.
Data Templates
A data template is a chunk of XAML markup that defines how a bound data object should be
displayed. Two types of controls support data templates:
• Content controls support data templates through the ContentTemplate property. The
content template is used to display whatever you’ve placed in the Content property.
• List controls (controls that derive from ItemsControl) support data templates through
the ItemTemplate property. This template is used to display each item from the
collection (or each row from a DataTable) that you’ve supplied as the ItemsSource.
The list-based template feature is based on content control templates: each item in a
list is wrapped by a content control, such as ListBoxItem for the ListBox, ComboBoxItem for the
ComboBox, and so on. Whatever template you specify for the ItemTemplate property of the list
is used as the ContentTemplate of each item in the list.
What can you put inside a data template? It’s simple. A data template is an ordinary
block of XAML markup. Like any other block of XAML markup, the template can include any
combination of elements. It should also include one or more data-binding expressions that pull
out the information that you want to display. (After all, if you don’t include any data-binding
expressions, each item in the list will appear the same, which isn’t very helpful.)
The best way to see how a data template works is to start with a basic list that doesn’t
use a template. For example, consider this list box, which was shown previously:
<ListBox Name="lstProducts" DisplayMemberPath="ModelName"></ListBox>
You can get the same effect with this list box that uses a data template:
<ListBox Name="lstProducts">
<ListBox.ItemTemplate>
<DataTemplate>
<TextBlock Text="{Binding ModelName}"></TextBlock>
</DataTemplate>
</ListBox.ItemTemplate>
</ListBox>
When you bind the list to the collection of products (by setting the ItemsSource
property), a single ListBoxItem is created for each Product object. The ListBoxItem.Content
property is set to the appropriate Product object, and the ListBoxItem.ContentTemplate is set
to the data template shown earlier, which extracts the value from the Product.ModelName
property and displays it in a TextBlock.
So far, the results are underwhelming. But now that you’ve switched to a data
template, there’s no limit to how you can creatively present your data. Here’s an example that
wraps each item in a rounded border, shows two pieces of information, and uses bold
formatting to highlight the model number:
CHAPTER 16 ■ DATA BINDING
580
<ListBox Name="lstProducts" HorizontalContentAlignment="Stretch"
SelectionChanged="lstProducts_SelectionChanged">
<ListBox.ItemTemplate>
<DataTemplate>
<Border Margin="5" BorderThickness="1" BorderBrush="SteelBlue"
CornerRadius="4">
<Grid Margin="3">
<Grid.RowDefinitions>
<RowDefinition></RowDefinition>
<RowDefinition></RowDefinition>
</Grid.RowDefinitions>
<TextBlock FontWeight="Bold"
Text="{Binding ModelNumber}"></TextBlock>
<TextBlock Grid.Row="1"
Text="{Binding ModelName
}"></TextBlock>
</Grid>
</Border>
</DataTemplate>
</ListBox.ItemTemplate>
</ListBox>
When this list is bound, a separate Border object is created for each product. Inside the
Border element is a Grid with two pieces of information, as shown in Figure 16-12.
Figure 16-12. A list that uses a data template
CHAPTER 16 ■ DATA BINDING
581
Separating and Reusing Templates
Like styles, templates are often declared as a page or application resource rather than defined in
the list where you use them. This separation is often clearer, especially if you use long, complex
templates or multiple templates in the same control (as described in the next section). It also
gives you the ability to reuse your templates in more than one list or content control if you want
to present your data the same way in different places in your user interface.
To make this work, all you need to do is to define your data template in a resources
collection and give it a key name. Here’s an example that extracts the template shown in the
previous example:
<UserControl.Resources>
<DataTemplate x:Key="ProductDataTemplate">
<Border Margin="5" BorderThickness="1" BorderBrush="SteelBlue"
CornerRadius="4">
<Grid Margin="3">
<Grid.RowDefinitions>
<RowDefinition></RowDefinition>
<RowDefinition></RowDefinition>
</Grid.RowDefinitions>
<TextBlock FontWeight="Bold"
Text="{Binding ModelNumber}"></TextBlock>
<TextBlock Grid.Row="1"
Text="{Binding ModelName}"></TextBlock>
</Grid>
</Border>
</DataTemplate>
</UserControl.Resources>
Now you can use your data template using a StaticResource reference:
<ListBox Name="lstProducts" HorizontalContentAlignment="Stretch"
ItemTemplate="{StaticResource ProductDataTemplate}"
SelectionChanged="lstProducts_SelectionChanged"></ListBox>
■ Note Data templates don’t require data binding. In other words, you don’t need to use the ItemsSource
property to fill a template list. In the previous examples, you’re free to add Product objects declaratively (in your
XAML markup) or programmatically (by calling the ListBox.Items.Add() method). In both cases, the data
template works the same way.
More Advanced Templates
Data templates can be remarkably self-sufficient. Along with basic elements such as TextBlock
and data-binding expressions, they can also use more sophisticated controls, attach event
handlers, convert data to different representations, use animations, and so on.
CHAPTER 16 ■ DATA BINDING
582
You can use a value converter in your binding expressions to convert your data to a
more useful representation. Consider, for example, the ImagePathConverter demonstrated
earlier. It accepts a picture file name and uses it to create a BitmapImage object with the
corresponding image content. This BitmapImage object can then be bound directly to the
Image element.
You can use the ImagePathConverter to build the following data template that displays
the image for each product:
<UserControl.Resources>
<local:ImagePathConverter x:Key="ImagePathConverter"></local:ImagePathConverter>
<DataTemplate x:Key="ProductDataTemplate">
<Border Margin="5" BorderThickness="1" BorderBrush="SteelBlue"
CornerRadius="4">
<Grid Margin="3">
<Grid.RowDefinitions>
<RowDefinition></RowDefinition>
<RowDefinition></RowDefinition>
<RowDefinition></RowDefinition>
</Grid.RowDefinitions>
<TextBlock FontWeight="Bold" Text="{
Binding Path=ModelNumber}"></TextBlock>
<TextBlock Grid.Row="1" Text="{Binding Path=ModelName}"></TextBlock>
<Image Grid.Row="2" Grid.RowSpan="2" Source=
"{Binding Path=ProductImagePath, Converter={StaticResource ImagePathConverter}}">
</Image>
</Grid>
</Border>
</DataTemplate>
</UserControl.Resources>
Although this markup doesn’t involve anything exotic, the result is a much more
interesting list (see Figure 16-13).
CHAPTER 16 ■ DATA BINDING
583
Figure 16-13. A list with image content
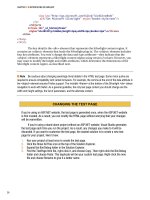
■ Note If there is an error in your template, you don’t receive an exception. Instead, the control is unable to
display your data and remains blank.
Changing Item Layout
Data templates give you remarkable control over every aspect of item presentation. However,
they don’t allow you to change how the items are organized with respect to each other. No
matter what templates and styles you use, the list box puts each item into a separate horizontal
row and stacks each row to create the list.
You can change this layout by replacing the container that the list uses to lay out its
children. To do so, you set the ItemsPanel property with a block of XAML that defines the panel
you want to use. This panel can be any class that derives from System.Windows.Controls.Panel,
including a custom layout container that implements your own specialized layout logic.
The following uses the WrapPanel from the Silverlight Toolkit
( which was described in Chapter 3. It arranges items
from left to right over multiple rows:
CHAPTER 16 ■ DATA BINDING
584
<ListBox Margin="7,3,7,10" Name="lstProducts"
ItemTemplate="{StaticResource ProductDataTemplate}">
<ListBox.ItemsPanel>
<ItemsPanelTemplate>
<controlsToolkit:WrapPanel></controlsToolkit:WrapPanel>
</ItemsPanelTemplate>
</ListBox.ItemsPanel>
</ListBox>
Figure 16-14 shows the result.
Figure 16-14. Tiling a list
The Last Word
This chapter took a thorough look at data binding. You learned how to create data-binding
expressions that draw information from custom objects, use change notification and validation,
bind entire collections of data, and get your records from a web service. You also explored a
range of techniques you can use to customize the display of your data, from data conversion
and conditional formatting with IValueConverter to data templates and custom layout.
In the next chapter, you’ll build on these concepts as you take a deeper look into
validation and consider rich data controls like the DataGrid, DataForm, and TreeView.
585
CHAPTER 17
■ ■ ■
Data Controls
So far, you’ve learned how to use data binding to pull information out of data objects, format it,
and make it available for editing. However, although data binding is a flexible and powerful
system, getting the result you want can still take a lot of work. For example, a typical data form
needs to bind a number of different properties to different controls, arrange them in a
meaningful way, and use the appropriate converters, templates, and validation logic. Creating
these ingredients is as time-consuming as any other type of UI design.
Silverlight offers several features that can help offload some of the work:
• The Label and DescriptionViewer controls: They pull metadata out of your data objects
and display it in your pages–automatically.
• Data annotations: Originally introduced with ASP.NET Dynamic Data, they let you
embed validation rules in your data classes. Pair data annotations with the
ValidationSummary control for an easy way to list all the validation errors in a page.
• The DataGrid control: It’s the centerpiece of Silverlight’s rich data support–a highly
customizable table of rows and columns with support for sorting, editing, grouping, and
(with the help of the DataPager) paging.
• The TreeView control: Silverlight’s hierarchical tree isn’t limited to data binding and
doesn’t support editing. However, it’s a true timesaver when dealing with hierarchical
data–for example, a list of categories with nested lists of products.
In this chapter, you’ll learn how to extend the data-binding basics you picked up in the
last chapter. You’ll also learn how to pass your smart data objects across the great web service
divide, so that the same metadata and validation logic is available to your server-side ASP.NET
code and your client-side Silverlight applications.
■ What’s New Virtually all the features and controls in this chapter are new to Silverlight 3. The exception
is the DataGrid control, which still boasts several improvements, including cancellable editing events, support for
data annotations, grouping, and paging.