Pro WPF in C# 2010 phần 7 pptx
Bạn đang xem bản rút gọn của tài liệu. Xem và tải ngay bản đầy đủ của tài liệu tại đây (1.73 MB, 107 trang )
CHAPTER 19 ■ DATA BINDING
600
■ Note The downloadable code for this chapter includes the custom data access component and a database
script that installs the sample data, so you can test all the examples. But if you don’t have a test database server
or you don’t want to go to the trouble of creating a new database, you can use an alternate version of the data
access component that’s also included with the code. This version simply loads the data from a file, while still
exposing the same set of classes and methods. It’s perfect for testing but obviously impractical for a real
application.
Building a Data Access Component
In professional applications, database code is not embedded in the code-behind class for a window but
encapsulated in a dedicated class. For even better componentization, these data access classes can be
pulled out of your application altogether and compiled in a separate DLL component. This is
particularly true when writing code that accesses a database (because this code tends to be extremely
performance-sensitive), but it’s a good design no matter where your data lives.
Designing Data Access Components
No matter how you plan to use data binding (or even if you don’t), your data access code should always be
coded in a separate class. This approach is the only way you have the slightest chance to make sure you
can efficiently maintain, optimize, troubleshoot, and (optionally) reuse your data access code.
When creating a data class, you should follow a few basic guidelines in this section:
x Open and close connections quickly. Open the database connection in every method call, and close
it before the method ends. This way, a connection can’t be inadvertently left open. One way to
ensure the connection is closed at the appropriate time is with a using block.
x Implement error handling. Use error handling to make sure that connections are closed even if an
exception occurs.
x Follow stateless design practices. Accept all the information needed for a method in its parameters,
and return all the retrieved data through the return value. This avoids complications in a number of
scenarios (for example, if you need to create a multithreaded application or host your database
component on a server).
x Store the connection string in one place. Ideally, this is the configuration file for your application.
The database component that’s shown in the following example retrieves a table of product
information from the Store database, which is a sample database for the fictional IBuySpy store included
with some Microsoft case studies. Figure 19-1 shows two tables in the Store database and their schemas.
CHAPTER 19 ■ DATA BINDING
601
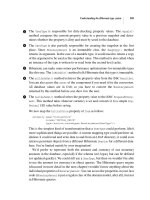
Figure 19-1.
A portion of the Store database
The data access class is exceedingly simple—it provides just a single method that allows the caller to
retrieve one product record. Here’s the basic outline:
public class StoreDB
{
// Get the connection string from the current configuration file.
private string connectionString = Properties.Settings.Default.StoreDatabase;
public Product GetProduct(int ID)
{
}
}
The query is performed through a stored procedure in the database named GetProduct. The
connection string isn’t hard-coded—instead, it’s retrieved through an application setting in the .config
file for this application. (To view or set application settings, double-click the Properties node in the
Solution Explorer, and then click the Settings tab.)
When other windows need data, they call the StoreDB.GetProduct() method to retrieve a Product
object. The Product object is a custom object that has a sole purpose in life—to represent the
information for a single row in the Products table. You’ll consider it in the next section.
You have several options for making the StoreDB class available to the windows in your application:
x The window could create an instance of StoreDB whenever it needs to access the
database.
x You could change the methods in the StoreDB class to be static.
x You could create a single instance of StoreDB and make it available through a
static property in another class (following the “factory” pattern).
The first two options are reasonable, but both of them limit your flexibility. The first choice prevents
you from caching data objects for use in multiple windows. Even if you don’t want to use that caching
right away, it’s worth designing your application in such a way that it’s easy to implement later.
Similarly, the second approach assumes you won’t have any instance-specific state that you need to
retain in the StoreDB class. Although this is a good design principle, you might want to retain some
details (such as the connection string) in memory. If you convert the StoreDB class to use static
CHAPTER 19 ■ DATA BINDING
602
methods, it becomes much more difficult to access different instances of the Store database in different
back-end data stores.
Ultimately, the third option is the most flexible. It preserves the switchboard design by forcing all
the windows to work through a single property. Here’s an example that makes an instance of StoreDB
available through the Application class:
public partial class App : System.Windows.Application
{
private static StoreDB storeDB = new StoreDB();
public static StoreDB StoreDB
{
get { return storeDB; }
}
}
In this book, we’re primarily interested with how data objects can be bound to WPF elements. The
actual process that deals with creating and filling these data objects (as well as other implementation
details, such as whether StoreDB caches the data over several method calls, whether it uses stored
procedures instead of inline queries, whether it fetches the data from a local XML file when offline,
and so on) isn’t our focus. However, just to get an understanding of what’s taking place, here’s the
complete code:
public class StoreDB
{
private string connectionString = Properties.Settings.Default.StoreDatabase;
public Product GetProduct(int ID)
{
SqlConnection con = new SqlConnection(connectionString);
SqlCommand cmd = new SqlCommand("GetProductByID", con);
cmd.CommandType = CommandType.StoredProcedure;
cmd.Parameters.AddWithValue("@ProductID", ID);
try
{
con.Open();
SqlDataReader reader = cmd.ExecuteReader(CommandBehavior.SingleRow);
if (reader.Read())
{
// Create a Product object that wraps the
// current record.
Product product = new Product((string)reader["ModelNumber"],
(string)reader["ModelName"], (decimal)reader["UnitCost"],
(string)reader["Description"] ,
(string)reader["ProductImage"]);
return(product);
}
else
{
return null;
}
}
CHAPTER 19 ■ DATA BINDING
603
finally
{
con.Close();
}
}
}
■ Note Currently, the GetProduct() method doesn’t include any exception handling code, so all exceptions will
bubble up the calling code. This is a reasonable design choice, but you might want to catch the exception in
GetProduct(), perform cleanup or logging as required, and then rethrow the exception to notify the calling code of
the problem. This design pattern is called caller inform.
Building a Data Object
The data object is the information package that you plan to display in your user interface. Any class
works, provided it consists of public properties (fields and private properties aren’t supported). In
addition, if you want to use this object to make changes (via two-way binding), the properties cannot be
read-only.
Here’s the Product object that’s used by StoreDB:
public class Product
{
private string modelNumber;
public string ModelNumber
{
get { return modelNumber; }
set { modelNumber = value; }
}
private string modelName;
public string ModelName
{
get { return modelName; }
set { modelName = value; }
}
private decimal unitCost;
public decimal UnitCost
{
get { return unitCost; }
set { unitCost = value; }
}
private string description;
public string Description
{
get { return description; }
CHAPTER 19 ■ DATA BINDING
604
set { description = value; }
}
public Product(string modelNumber, string modelName,
decimal unitCost, string description)
{
ModelNumber = modelNumber;
ModelName = modelName;
UnitCost = unitCost;
Description = description;
}
}
Displaying the Bound Object
The final step is to create an instance of the Product object and then bind it to your controls. Although
you could create a Product object and store it as a resource or a static property, neither approach makes
much sense. Instead, you need to use StoreDB to create the appropriate object at runtime and then bind
that to your window.
■ Note Although the declarative no-code approach sounds more elegant, there are plenty of good reasons to mix a
little code into your data-bound windows. For example, if you’re querying a database, you probably want to handle the
connection in your code so that you can decide how to handle exceptions and inform the user of problems.
Consider the simple window shown in Figure 19-2. It allows the user to supply a product code, and
it then shows the corresponding product in the Grid in the lower portion of the window.
Figure 19-2.
Querying a product
CHAPTER 19 ■ DATA BINDING
605
When you design this window, you don’t have access to the Product object that will supply the data
at runtime. However, you can still create your bindings without indicating the data source. You simply
need to indicate the property that each element uses from the Product class.
Here’s the full markup for displaying a Product object:
<Grid Name="gridProductDetails">
<Grid.ColumnDefinitions>
<ColumnDefinition Width="Auto"></ColumnDefinition>
<ColumnDefinition></ColumnDefinition>
</Grid.ColumnDefinitions>
<Grid.RowDefinitions>
<RowDefinition Height="Auto"></RowDefinition>
<RowDefinition Height="Auto"></RowDefinition>
<RowDefinition Height="Auto"></RowDefinition>
<RowDefinition Height="Auto"></RowDefinition>
<RowDefinition Height="*"></RowDefinition>
</Grid.RowDefinitions>
<TextBlock Margin="7">Model Number:</TextBlock>
<TextBox Margin="5" Grid.Column="1"
T
Text="{Binding Path=ModelNumber}"
></TextBox>
<TextBlock Margin="7" Grid.Row="1">Model Name:</TextBlock>
<TextBox Margin="5" Grid.Row="1" Grid.Column="1"
T
Text="{Binding Path=ModelName}"
></TextBox>
<TextBlock Margin="7" Grid.Row="2">Unit Cost:</TextBlock>
<TextBox Margin="5" Grid.Row="2" Grid.Column="1"
T
Text="{Binding Path=UnitCost}"
></TextBox>
<TextBlock Margin="7,7,7,0" Grid.Row="3">Description:</TextBlock>
<TextBox Margin="7" Grid.Row="4" Grid.Column="0" Grid.ColumnSpan="2"
TextWrapping="Wrap" T
Text="{Binding Path=Description}"
></TextBox>
</Grid>
Notice that the Grid wrapping all these details is given a name so that you can manipulate it in code
and complete your data bindings.
When you first run this application, no information will appear. Even though you’ve defined your
bindings, no source object is available.
When the user clicks the button at runtime, you use the StoreDB class to get the appropriate
product data. Although you could create each binding programmatically, this wouldn’t make much
sense (and it wouldn’t save much code over just populating the controls by hand). However, the
DataContext property provides a perfect shortcut. If you set it for the Grid that contains all your data
binding expressions, all your binding expressions will use it to fill themselves with data.
Here’s the event handling code that reacts when the user clicks the button:
private void cmdGetProduct_Click(object sender, RoutedEventArgs e)
{
int ID;
if (Int32.TryParse(txtID.Text, out ID))
{
try
{
gridProductDetails.DataContext = App.StoreDB.GetProduct(ID);
}
CHAPTER 19 ■ DATA BINDING
606
catch
{
MessageBox.Show("Error contacting database.");
}
}
else
{
MessageBox.Show("Invalid ID.");
}
}
Binding With Null Values
The current Product class assumes that it will get a full complement of product data. However,
database tables frequently include nullable fields, where a null value represents missing or
inapplicable information. You can reflect this reality in your data classes by using nullable data types
for simple value types like numbers and dates. For example, in the Product class, you can use
decimal? instead of decimal. Of course, reference types, such as strings and full-fledged objects,
always support null values.
The results of binding a null value are predictable: the target element shows nothing at all. For numeric
fields, this behavior is useful because it distinguishes between a missing value (in which case the element
shows nothing) and a zero value (in which case it shows the text “0”). However, it’s worth noting that you
can change how WPF handles null values by setting the TargetNullValue property in your binding
expression. If you do, the value you supply will be displayed whenever the data source has a null value.
Here’s an example that shows the text “[No Description Provided]” when the Product.Description property
is null:
Text="{Binding Path=Description, TargetNullValue=[No Description Provided]}"
The square brackets around the TargetNullValue text are optional. In this example, they’re intended to help
the user recognize that the displayed text isn’t drawn from the database.
Updating the Database
You don’t need to do anything extra to enable data object updates with this example. The
TextBox.Text property uses two-way binding by default, which means that the bound Product
object is modified as you edit the text in the text boxes. (Technically, each property is updated
when you tab to a new field, because the default source update mode for the TextBox.Text
property is LostFocus. To review the different update modes that binding expressions support,
refer to Chapter 8.)
CHAPTER 19 ■ DATA BINDING
607
You can commit changes to the database at any time. All you need is to add an UpdateProduct()
method to the StoreDB class and an Update button to the window. When clicked, your code can grab the
current Product object from the data context and use it to commit the update:
private void cmdUpdateProduct_Click(object sender, RoutedEventArgs e)
{
Product product = (Product)gridProductDetails.DataContext;
try
{
App.StoreDB.UpdateProduct(product);
}
catch
{
MessageBox.Show("Error contacting database.");
}
}
This example has one potential stumbling block. When you click the Update button, the focus
changes to that button, and any uncommitted edit is applied to the Product object. However, if you set
the Update button to be a default button (by setting IsDefault to true), there’s another possibility. A user
could make a change in one of the fields and hit Enter to trigger the update process without committing
the last change. To avoid this possibility, you can explicitly force the focus to change before you execute
any database code, like this:
FocusManager.SetFocusedElement(this, (Button)sender);
Change Notification
The Product binding example works so well because each Product object is essentially fixed—it never
changes (except if the user edits the text in one of the linked text boxes).
For simple scenarios, where you’re primarily interested in displaying content and letting the user
edit it, this behavior is perfectly acceptable. However, it’s not difficult to imagine a different situation,
where the bound Product object might be modified elsewhere in your code. For example, imagine an
Increase Price button that executes this line of code:
product.UnitCost *= 1.1M;
■ Note Although you could retrieve the Product object from the data context, this example assumes you’re also
storing it as a member variable in your window class, which simplifies your code and requires less type casting.
When you run this code, you’ll find that even though the Product object has been changed, the old
value remains in the text box. That’s because the text box has no way of knowing that you’ve changed a
value.
CHAPTER 19 ■ DATA BINDING
608
You can use three approaches to solve this problem:
x You can make each property in the Product class a dependency property using the
syntax you learned about in Chapter 4. (In this case, your class must derive from
DependencyObject.) Although this approach gets WPF to do the work for you
(which is nice), it makes the most sense in elements—classes that have a visual
appearance in a window. It’s not the most natural approach for data classes like
Product.
x You can raise an event for each property. In this case, the event must have the
name PropertyNameChanged (for example, UnitCostChanged). It’s up to you to
fire the event when the property is changed.
x You can implement the System.ComponentModel.INotifyPropertyChanged
interface, which requires a single event named PropertyChanged. You must then
raise the PropertyChanged event whenever a property changes and indicate which
property has changed by supplying the property name as a string. It’s still up to
you to raise this event when a property changes, but you don’t need to define a
separate event for each property.
The first approach relies on the WPF dependency property infrastructure, while both the second
and the third rely on events. Usually, when creating a data object, you’ll use the third approach. It’s the
simplest choice for non-element classes.
■ Note You can actually use one other approach. If you suspect a change has been made to a bound object
and that bound object doesn’t support change notifications in any of the proper ways, you can retrieve
the BindingExpression object (using the FrameworkElement.GetBindingExpression() method) and call
BindingExpression.UpdateTarget() to trigger a refresh. Obviously, this is the most awkward solution—you
can almost see the duct tape that’s holding it together.
Here’s the definition for a revamped Product class that uses the INotifyPropertyChanged interface,
with the code for the implementation of the PropertyChanged event:
public class Product : INotifyPropertyChanged
{
public event PropertyChangedEventHandler PropertyChanged;
public void OnPropertyChanged(PropertyChangedEventArgs e)
{
if (PropertyChanged != null)
PropertyChanged(this, e);
}
}
CHAPTER 19 ■ DATA BINDING
609
Now you simply need to fire the PropertyChanged event in all your property setters:
private decimal unitCost;
public decimal UnitCost
{
get { return unitCost; }
set {
unitCost = value;
OnPropertyChanged(new PropertyChangedEventArgs("UnitCost"));
}
}
If you use this version of the Product class in the previous example, you’ll get the behavior you
expect. When you change the current Product object, the new information will appear in the text box
immediately.
■ Tip If several values have changed, you can call OnPropertyChanged() and pass in an empty string. This tells
WPF to reevaluate the binding expressions that are bound to any property in your class.
Binding to a Collection of Objects
Binding to a single object is quite straightforward. But life gets more interesting when you need to bind
to some collection of objects—for example, all the products in a table.
Although every dependency property supports the single-value binding you’ve seen so far,
collection binding requires an element with a bit more intelligence. In WPF, all the classes that
derive from ItemsControl have the ability to show an entire list of items. Data binding possibilities
include the ListBox, ComboBox, ListView, and DataGrid (and the Menu and TreeView for
hierarchical data).
■ Tip Although it seems like WPF offers a relatively small set of list controls, these controls allow you to
show your data in a virtually unlimited number of ways. That’s because the list controls support data
templates, which allow you to control exactly how items are displayed. You’ll learn more about data
templates in Chapter 20.
To support collection binding, the ItemsControl class defines the three key properties listed in Table 19-1.
CHAPTER 19 ■ DATA BINDING
610
Table 19-1.
Properties in the ItemsControl Class for Data Binding
Name Description
ItemsSource Points to the collection that has all the objects that will be shown in the list.
DisplayMemberPath Identifies the property that will be used to create the display text for each item.
ItemTemplate Accepts a data template that will be used to create the visual appearance of
each item. This property is far more powerful than DisplayMemberPath, and
you’ll learn how to use it in Chapter 20.
At this point, you’re probably wondering exactly what type of collections you can stuff in the
ItemSource property. Happily, you can use just about anything. All you need is support for the
IEnumerable interface, which is provided by arrays, all types of collections, and many more specialized
objects that wrap groups of items. However, the support you get from a basic IEnumerable interface is
limited to read-only binding. If you want to edit the collection (for example, you want to allow inserts
and deletions), you need a bit more infrastructure, as you’ll see shortly.
Displaying and Editing Collection Items
Consider the window shown in Figure 19-3, which shows a list of products. When you choose a product, the
information for that product appears in the bottom section of the window, where you can edit it. (In this
example, a GridSplitter lets you adjust the space given to the top and bottom portions of the window.)
Figure 19-3.
A list of products
CHAPTER 19 ■ DATA BINDING
611
To create this example, you need to begin by building your data access logic. In this case, the
StoreDB.GetProducts() method retrieves the list of all the products in the database using the
GetProducts stored procedure. A Product object is created for each record and added to a generic List
collection. (You could use any collection here—for example, an array or a weakly typed ArrayList would
work equivalently.)
Here’s the GetProducts() code:
public List<Product> GetProducts()
{
SqlConnection con = new SqlConnection(connectionString);
SqlCommand cmd = new SqlCommand("GetProducts", con);
cmd.CommandType = CommandType.StoredProcedure;
List<Product> products = new List<Product>();
try
{
con.Open();
SqlDataReader reader = cmd.ExecuteReader();
while (reader.Read())
{
// Create a Product object that wraps the
// current record.
Product product = new Product((string)reader["ModelNumber"],
(string)reader["ModelName"], (decimal)reader["UnitCost"],
(string)reader["Description"], (string)reader["CategoryName"],
(string)reader["ProductImage"]);
// Add to collection
products.Add(product);
}
}
finally
{
con.Close();
}
return products;
}
When the Get Products button is clicked, the event handling code calls the GetProducts() method
and supplies it as the ItemsSource for list. The collection is also stored as a member variable in the
window class for easier access elsewhere in your code.
private List<Product> products;
private void cmdGetProducts_Click(object sender, RoutedEventArgs e)
{
products = App.StoreDB.GetProducts();
lstProducts.ItemsSource = products;
}
This successfully fills the list with Product objects. However, the list doesn’t know how to display a
product object, so it will simply call the ToString() method. Because this method hasn’t been overridden
CHAPTER 19 ■ DATA BINDING
612
in the Product class, this has the unimpressive result of showing the fully qualified class name for every
item (see Figure 19-4).
Figure 19-4.
An unhelpful bound list
You have three options to solve this problem:
x Set the DisplayMemberPath property of the list. For example, set this to
ModelName to get the result shown in Figure 19-4.
x Override the ToString() method to return more useful information. For example,
you could return a string with the model number and model name of each item.
This approach gives you a way to show more than one property in the list (for
example, it’s great for combining the FirstName and LastName properties in a
Customer class). However, you still don’t have much control over how the data is
presented.
x Supply a data template. This way, you can show any arrangement of property
values (along with fixed text). You’ll learn how to use this trick in Chapter 20.
Once you’ve decided how to display information in the list, you’re ready to move on to the second
challenge: displaying the details for the currently selected item in the grid that appears below the list.
CHAPTER 19 ■ DATA BINDING
613
You could handle this challenge by responding to the SelectionChanged event and manually changing
the data context of the grid, but there’s a quicker approach that doesn’t require any code. You simply
need to set a binding expression for the Grid.DataContent property that pulls the selected Product object
out of the list, as shown here:
<Grid DataContext="{Binding ElementName=lstProducts, Path=SelectedItem}">
</Grid>
When the window first appears, nothing is selected in the list. The ListBox.SelectedItem property is
null, and therefore the Grid.DataContext is too, and no information appears. As soon as you select an
item, the data context is set to the corresponding object, and all the information appears.
If you try this example, you’ll be surprised to see that it’s already fully functional. You can edit
product items, navigate away (using the list), and then return to see that your edits were successfully
committed. In fact, you can even change a value that affects the display text in the list. If you modify the
model name and tab to another control, the corresponding entry in the list is refreshed automatically.
(Experienced developers will recognize this as a frill that Windows Forms applications lacked.)
■ Tip To prevent a field from being edited, set the IsLocked property of the text box to true, or, better yet, use a
read-only control like a TextBlock.
Master-Details Display
As you’ve seen, you can bind other elements to the SelectedItem property of your list to show more details
about the currently selected item. Interestingly, you can use a similar technique to build a master-details
display of your data. For example, you can create a window that shows a list of categories and a list of
products. When the user chooses a category in the first list, you can show just the products that belong to
that category in the second list.
To pull this off, you need to have a parent data object that provides a collection of related child data
objects through a property. For example, you could build a Category product that provides a property
named Category.Products with the products that belong to that category. (In fact, you can find an
example of a Category class that’s designed like this in Chapter 21.) You can then build a master-
details display with two lists. Fill your first list with Category objects. To show the related products,
bind your second list—the list that displays products—to the SelectedItem.Products property of the
first list. This tells the second list to grab the current Category object, extract its collection of linked
Product objects, and display them.
You can find an example that uses related data in Chapter 21, with a TreeView that shows a categorized
list of products.
CHAPTER 19 ■ DATA BINDING
614
Of course, to complete this example, from an application perspective you’ll need to supply some
code. For example, you might need an UpdateProducts() method that accepts your collection or
products and executes the appropriate statements. Because an ordinary .NET object doesn’t provide any
change tracking, this is a situation where you might want to consider using the ADO.NET DataSet (as
described a little later in this chapter). Alternatively, you might want to force users to update records one
at a time. (One option is to disable the list when text is modified in a text box and force the user to then
cancel the change by clicking Cancel or apply it immediately by clicking Update.)
Inserting and Removing Collection Items
One limitation of the previous example is that it won’t pick up changes you make to the collection. It
notices changed Product objects, but it won’t update the list if you add a new item or remove one
through code.
For example, imagine you add a Delete button that executes this code:
private void cmdDeleteProduct_Click(object sender, RoutedEventArgs e)
{
products.Remove((Product)lstProducts.SelectedItem);
}
The deleted item is removed from the collection, but it remains stubbornly visible in the bound list.
To enable collection change tracking, you need to use a collection that implements the
INotifyCollectionChanged interface. Most generic collections don’t, including the List collection used in
the current example. In fact, WPF includes a single collection that uses INotifyCollectionChanged: the
ObservableCollection class.
■ Note If you have an object model that you’re porting over from the Windows Forms world, you can use the
Windows Forms equivalent of ObservableCollection, which is BindingList. The BindingList collection implements
IBindingList instead of INotifyCollectionChanged, which includes a ListChanged event that plays the same role as
the INotifyCollectionChanged.CollectionChanged event.
You can derive a custom collection from ObservableCollection to customize the way it works, but
that’s not necessary. In the current example, it’s enough to replace the List<Product> object with an
ObservableCollection<Product>, as shown here:
public List<Product> GetProducts()
{
SqlConnection con = new SqlConnection(connectionString);
SqlCommand cmd = new SqlCommand("GetProducts", con);
cmd.CommandType = CommandType.StoredProcedure;
ObservableCollection<Product> products = new ObservableCollection<Product>();
CHAPTER 19 ■ DATA BINDING
615
The return type can be left as List<Product>, because the ObservableCollection class derives from
the List class. To make this example just a bit more generic, you could use ICollection<Product> for the
return type, because the ICollection interface has all the members you need to use.
Now, if you remove or add an item programmatically, the list is refreshed accordingly. Of course, it’s
still up to you to create the data access code that takes place before the collection is modified—for
example, the code that removes the product record from the back-end database.
Binding to the ADO.NET Objects
All the features you’ve learned about with custom objects also work with the ADO.NET disconnected
data objects.
For example, you could create the same user interface you see in Figure 19-4 but use the
DataSet, DataTable, and DataRow on the back end, rather than the custom Product class and the
ObservableCollection.
To try it, start by considering a version of the GetProducts() method that extracts the same data but
packages it into a DataTable:
public DataTable GetProducts()
{
SqlConnection con = new SqlConnection(connectionString);
SqlCommand cmd = new SqlCommand("GetProducts", con);
cmd.CommandType = CommandType.StoredProcedure;
SqlDataAdapter adapter = new SqlDataAdapter(cmd);
DataSet ds = new DataSet();
adapter.Fill(ds, "Products");
return ds.Tables[0];
}
You can retrieve this DataTable and bind it to the list in almost the same way you did with the
ObservableCollection. The only difference is that you can’t bind directly to the DataTable itself. Instead,
you need to go through an intermediary known as the DataView. Although you can create a DataView by
hand, every DataTable has a ready-made DataView object available through the DataTable.DefaultView
property.
■ Note This limitation is nothing new. Even in a Windows Forms application, all DataTable data binding goes
through a DataView. The difference is that the Windows Forms universe can conceal this fact. It allows you to write
code that appears to bind directly to a DataTable, when in reality it uses the DataView that’s provided by the
DataTable.DefaultView property.
CHAPTER 19 ■ DATA BINDING
616
Here’s the code you need:
private DataTable products;
private void cmdGetProducts_Click(object sender, RoutedEventArgs e)
{
products = App.StoreDB.GetProducts();
lstProducts.ItemsSource = products.DefaultView;
}
Now the list will create a separate entry for each DataRow object in the DataTable.Rows collection.
To determine what content is shown in the list, you need to set DisplayMemberPath property with the
name of the field you want to show or use a data template (as described in Chapter 20).
The nice aspect of this example is that once you’ve changed the code that fetches your data, you
don’t need to make any more modifications. When an item is selected in the list, the Grid underneath
grabs the selected item for its data context. The markup you used with the ProductList collection still
works, because the property names of the Product class match the field names of the DataRow.
Another nice feature in this example is that you don’t need to take any extra steps to implement
change notifications. That’s because the DataView class implements the IBindingList interface, which
allows it to notify the WPF infrastructure if a new DataRow is added or an existing one is removed.
However, you do need to be a little careful when removing a DataRow object. It might occur to you
to use code like this to delete the currently selected record:
products.Rows.Remove((DataRow)lstProducts.SelectedItem);
This code is wrong on two counts. First, the selected item in the list isn’t a DataRow object—it’s a
thin DataRowView wrapper that’s provided by the DataView. Second, you probably don’t want to
remove your DataRow from the collection of rows in the table. Instead, you probably want to mark it as
deleted so that when you commit the changes to the database, the corresponding record is removed.
Here’s the correct code, which gets the selected DataRowView, uses its Row property to find the
corresponding DataRow object, and calls its Delete() method to mark the row for upcoming deletion:
((DataRowView)lstProducts.SelectedItem).Row.Delete();
At this point, the scheduled-to-be-deleted DataRow disappears from the list, even though it’s
technically still in the DataTable.Rows collection. That’s because the default filtering settings in the
DataView hide all deleted records. You’ll learn more about filtering in Chapter 21.
Binding to a LINQ Expression
WPF supports Language Integrated Query (LINQ), which is an all-purpose query syntax that works
across a variety of data sources and is closely integrated with the C# language. LINQ works with any data
source that has a LINQ provider. Using the support that’s included with .NET, you can use similarly
structured LINQ queries to retrieve data from an in-memory collection, an XML file, or a SQL Server
database. And as with other query languages, LINQ allows you to apply filtering, sorting, grouping, and
transformations to the data you retrieve.
CHAPTER 19 ■ DATA BINDING
617
Although LINQ is somewhat outside the scope of this chapter, you can learn a lot from a simple
example. For example, imagine you have a collection of Product objects, named products, and you
want to create a second collection that contains only those products that exceed $100 in cost. Using
procedural code, you can write something like this:
// Get the full list of products.
List<Product> products = App.StoreDB.GetProducts();
// Create a second collection with matching products.
List<Product> matches = new List<Product>();
foreach (Product product in products)
{
if (product.UnitCost >= 100)
{
matches.Add(product);
}
}
Using LINQ, you can use the following expression, which is far more concise:
// Get the full list of products.
List<Product> products = App.StoreDB.GetProducts();
// Create a second collection with matching products.
IEnumerable<Product> matches = from product in products
where product.UnitCost >= 100
select product;
This example uses LINQ to Collections, which means it uses a LINQ expression to query the data in
an in-memory collection. LINQ expressions use a set of new language keywords, including from, in,
where, and select. These LINQ keywords are a genuine part of the C# language.
■ Note A full discussion of LINQ is beyond the scope of this book. For a detailed treatment, refer to the huge
catalog of LINQ examples at
LINQ revolves around the IEnumerable<T> interface. No matter what data source you use, every
LINQ expression returns some object that implements IEnumerable<T>. Because IEnumerable<T>
extends IEnumerable, you can bind it in a WPF window just as you bind an ordinary collection:
lstProducts.ItemsSource = matches;
Unlike ObservableCollection and the DataTable classes, the IEnumerable<T> interface does not
provide a way to add or remove items. If you need this capability, you need to first convert your
IEnumerable<T> object into an array or List collection using the ToArray() or ToList() method.
Here’s an example that uses ToList() to convert the result of a LINQ query (shown previously)
into a strongly typed List collection of Product objects:
List<Product> productMatches = matches.ToList();
CHAPTER 19 ■ DATA BINDING
618
■ Note ToList() is an extension method, which means it’s defined in a different class from the one in which
is used. Technically, ToList() is defined in the System.Linq.Enumerable helper class, and it’s available to all
IEnumerable<T> objects. However, it won’t be available if the Enumerable class isn’t in scope, which means the
code shown here will not work if you haven’t imported the System.Linq namespace.
The ToList() method causes the LINQ expression to be evaluated immediately. The end result is an
ordinary collection, which you can deal with in all the usual ways. For example, you can wrap it in an
ObservableCollection to get notification events, so any changes you make are reflected in bound
controls immediately:
ObservableCollection<Product> productMatchesTracked =
new ObservableCollection<Product>(productMatches);
You can then bind the productMatchesTracked collection to a control in your window.
Designing Data Forms in Visual Studio
Writing data access code and filling in dozens of binding expressions can take a bit of time. And if you
create several WPF applications that work with databases, you’re likely to find that you’re writing similar
code and markup in all of them. That’s why Visual Studio includes the ability to generate data access code
and insert data-bound controls automatically.
To use these features, you need to first create a Visual Studio data source. (A data source is a definition
that allows Visual Studio to recognize your back-end data provider and provide code generation services
that use it.) You can create a data source that wraps a database, a web service, an existing data access
class, or a SharePoint server. The most common choice is to create an entity data model, which is a set of
generated classes that models the tables in a database and allows you to query them, somewhat like the
data access component used in this chapter. The benefit is obvious—the entity data model allows you to
avoid writing the often tedious data code. The disadvantages are just as clear—if you want the data logic
to work exactly the way you want, you’ll need to spend some time tweaking options, finding the
appropriate extensibility points, and wading through the lengthy code. Examples where you might want
fine-grained control over data access logic include if you need to call specific stored procedures, cache the
results of a query, use a specific concurrency strategy, or log your data access operations. These feats are
usually possible with an entity data model, but they take more work and may mitigate the benefit of
automatically generated code.
To create a data source, choose Data ➤ Add New Data Source to start the Data Source Configuration
Wizard, which will ask you to choose your data source (in this case, a database) and then prompt you for
additional information (such as the tables and fields you want to query). Once you’ve added your data
source, you can use the Data Sources window to create bound controls. The basic approach is pure
simplicity. First choose Data ➤ Show Data Sources to see the Data Source window, which outlines the
tables and fields you’ve chosen to work with. Then you can drag an individual field from the Data Sources
CHAPTER 19 ■ DATA BINDING
619
window onto the design surface of a window (to create a bound TextBlock, TextBox, ListBox, or other
control) or drag entire tables (to create a bound DataGrid or ListView).
WPF’s data form features give you a quick and nifty way to build data-driven applications, but they don’t
beat knowing what’s actually going on. They may be a good choice if you need straightforward data
viewing or data editing and you don’t want to spend a lot of time fiddling with features and fine-tuning your
user interface. They’re often a good fit for conventional line-of-business applications. If you’d like to learn
more, you can find the official documentation at
Improving Performance in Large Lists
If you deal with huge amounts of data—for example, tens of thousands of records rather than just a few
hundred—you know that a good data binding system needs more than sheer features. It also needs to be
able to handle a huge amount of data without slowing to a crawl or swallowing an inordinate amount of
memory. Fortunately, WPF’s list controls are optimized to help you.
In the following sections, you’ll learn about several performance enhancements for large lists that
are supported by all of WPF’s list controls (that is, all controls that derive from ItemsControl), including
the lowly ListBox and ComboBox and the more specialized ListView, TreeView, and DataGrid that you’ll
meet in Chapter 22.
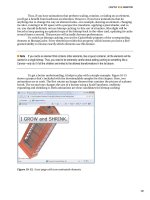
Virtualization
The most important feature that WPF’s list controls provide is UI virtualization, a technique where the
list creates container objects for the currently displayed items only. For example, if you have a ListBox
control with 50,000 records but the visible area holds only 30 records, the ListBox will create just 30
ListBoxItem objects (plus a few more to ensure good scrolling performance). If the ListBox didn’t
support UI virtualization, it would need to generate a full set of 50,000 ListBoxItem objects, which would
clearly take more memory. More significantly, allocating these objects would take a noticeable amount
of time, briefly locking up the application when your code sets the ListBox.ItemsSource property.
The support for UI virtualization isn’t actually built into the ListBox or the ItemsControl class.
Instead, it’s hardwired into the VirtualizingStackPanel container, which functions like a StackPanel
except for the added benefit of virtualization support. The ListBox, ListView, and DataGrid automatically
use a VirtualizingStackPanel to lay out their children. As a result, you don’t need to take any additional
steps to get virtualization support. However, the ComboBox class uses the standard nonvirtualized
StackPanel. If you need virtualization support, you must explicitly add it by supplying a new
ItemsPanelTemplate, as shown here:
<ComboBox>
<ComboBox.ItemsPanel>
<ItemsPanelTemplate>
<VirtualizingStackPanel></VirtualizingStackPanel>
</ItemsPanelTemplate>
</ComboBox.ItemsPanel>
</ComboBox>
The TreeView (Chapter 22) is another control that supports virtualization but, by default, has it
switched off. The issue is that the VirtualizingStackPanel didn’t support hierarchical data in early
releases of WPF. Now it does, but the TreeView disables the feature to guarantee ironclad backward
CHAPTER 19 ■ DATA BINDING
620
compatibility. Fortunately, you can turn it on with just a single property setting, which is always
recommended in trees that contain large amounts of data:
<TreeView VirtualizingStackPanel.IsVirtualizing="True" >
A number of factors can break UI virtualization, sometimes when you don’t expect it:
x
Putting your list control in a ScrollViewer.
The ScrollViewer provides a window
onto its child content. The problem is that the child content is given unlimited
“virtual” space. In this virtual space, the ListBox renders itself at full size, with all
of its child items on display. As a side effect, each item gets its own memory-
hogging ListBoxItem object. This problem occurs any time you place a ListBox in a
container that doesn’t attempt to constrain its size; for example, the same
problem crops up if you pop it into a StackPanel instead of a Grid.
x
Changing the list’s control template and failing to use the ItemsPresenter.
The ItemsPresenter uses the ItemsPanelTemplate, which specifies the
VirtualizingStackPanel. If you break this relationship or if you change the
ItemsPanelTemplate yourself so it doesn’t use a VirtualizingStackPanel, you’ll lose
the virtualization feature.
x
Using grouping.
Grouping automatically configures the list to use pixel-based
scrolling rather than item-based scrolling. (Chapter 6 explains the difference when
it describes the ScrollViewer control.) When pixel-based scrolling is switched on,
virtualization isn’t possible—at least not in this release of WPF.
x
Not using data binding.
It should be obvious, but if you fill a list
programmatically—for example, by dynamically creating the ListBoxItem objects
you need—no virtualization will occur. Of course, you can consider using your
own optimization strategy, such as creating just those objects that you need and
only creating them at the time they’re needed. You’ll see this technique in action
with a TreeView that uses just-in-time node creation to fill a directory tree in
Chapter 22.
If you have a large list, you need to avoid these triggers to ensure good performance.
Even when you’re using UI virtualization, you still have to pay the price of instantiating your
in-memory data objects. For example, in the 50,000-item ListBox example, you’ll have 50,000 data
objects floating around, each with distinct data about one product, customer, order record, or
something else. If you want to optimize this portion of your application, you can consider using data
virtualization—a technique where you fetch only a batch of records at a time. Data virtualization is a
more complex technique, because it assumes the cost of retrieving the data is lower than the cost of
maintaining it. This might not be true, depending on the sheer size of the data and the time required to
retrieve it. For example, if your application is continually connecting to a network database to fetch
more product information as the user scrolls through a list, the end result may be slow scrolling
performance and an increased load on the database server.
Currently, WPF does not have any controls or classes that support data virtualization. However, that
hasn’t stopped enterprising developers from creating the missing piece: a “fake” collection that pretends
to have all the items but doesn’t query the back-end data source until the control requires that data. You
can find solid examples of this work at and
CHAPTER 19 ■ DATA BINDING
621
Item Container Recycling
WPF 3.5 SP1 improved the virtualization story with item container recycling. Ordinarily, as you scroll through a
virtualized list, the control continually creates new item container objects to hold the newly visible items. For
example, as you scroll through the 50,000-item ListBox, the ListBox will generate new ListBoxItem objects. But
if you enable item container recycling, the ListBox will keep a small set of ListBoxItem objects alive and simply
reuse them for different rows by loading them with new data as you scroll.
<ListBox VirtualizingStackPanel.VirtualizationMode="Recycling" >
Item container recycling improves scrolling performance and reduces memory consumption,
because there’s no need for the garbage collector to find old item objects and release them. Once again,
this feature is disabled by default for all controls except the DataGrid to ensure backward compatibility.
If you have a large list, you should always turn it on.
Deferred Scrolling
To further improve scrolling performance, you can switch on deferred scrolling. With deferred scrolling,
the list display isn’t updated when the user drags the thumb along the scroll bar. It’s refreshed only once
the user releases the thumb. By comparison, when you use ordinary scrolling, the list is refreshed as you
drag so that it shows your changing position.
As with item container recycling, you need to explicitly enable deferred scrolling:
<ListBox ScrollViewer.IsDeferredScrollingEnabled="True" />
Clearly, there’s a trade-off here between responsiveness and ease of use. If you have complex
templates and lots of data, deferred scrolling may be preferred for its blistering speed. But otherwise,
your users may prefer the ability to see where they’re going as they scroll.
Validation
Another key ingredient in any data binding scenario is validation—in other words, logic that catches
incorrect values and refuses them. You can build validation directly into your controls (for example, by
responding to input in the text box and refusing invalid characters), but this low-level approach limits
your flexibility.
Fortunately, WPF provides a validation feature that works closely with the data binding system
you’ve explored. Validation gives you two more options to catch invalid values:
x
You can raise errors in your data object.
To notify WPF of an error, simply throw
an exception from a property set procedure. Ordinarily, WPF ignores any
exceptions that are thrown when setting a property, but you can configure it to
show a more helpful visual indication. Another option is to implement the
IDataErrorInfo interface in your data class, which gives you the ability to indicate
errors without throwing exceptions.
x
You can define validation at the binding level.
This gives you the flexibility to
use the same validation regardless of the input control. Even better, because you
define your validation in a distinct class, you can easily reuse it with multiple
bindings that store similar types of data.
CHAPTER 19 ■ DATA BINDING
622
In general, you’ll use the first approach if your data objects already have hardwired validation logic
in their property set procedures and you want to take advantage of that logic. You’ll use the second
approach when you’re defining validation logic for the first time and you want to reuse it in different
contexts and with different controls. However, some developers choose to use both techniques. They
use validation in the data object to defend against a small set of fundamental errors and use validation in
the binding to catch a wider set of user-entry errors.
■ Note Validation applies only when a value from the target is being used to update the source—in other words,
when you’re using a TwoWay or OneWayToSource binding.
Validation in the Data Object
Some developers build error checking directly into their data objects. For example, here’s a modified
version of the Product.UnitPrice property that disallows negative numbers:
public decimal UnitCost
{
get { return unitCost; }
set
{
if (value < 0)
throw new ArgumentException("UnitCost cannot be negative.");
else
{
unitCost = value;
OnPropertyChanged(new PropertyChangedEventArgs("UnitCost"));
}
}
}
The validation logic shown in this example prevents negative price values, but it doesn’t give the
user any feedback about the problem. As you learned earlier, WPF quietly ignores data binding errors
that occur when setting or getting properties. In this case, the user won’t have any way of knowing that
the update has been rejected. In fact, the incorrect value will remain in the text box—it just won’t be
applied to the bound data object. To improve this situation, you need the help of the
ExceptionValidationRule, which is described next.
Data Objects and Validation
Whether or not it’s a good approach to place validation logic in a data object is a matter of never-ending
debate.
This approach has some advantages; for example, it catches all errors all the time, whether they occur
because of an invalid user edit, a programming mistake, or a calculation that’s based on other invalid data.
CHAPTER 19 ■ DATA BINDING
623
However, this has the disadvantage of making the data objects more complex and moving validation code
that’s intended for an application’s front end deeper into the back-end data model.
If applied carelessly, property validation can inadvertently rule out perfectly reasonable uses of the data
object. They can also lead to inconsistencies and actually compound data errors. (For example, it might
not make sense for the UnitsInStock to hold a value of –10, but if the underlying database stores this
value, you might still want to create the corresponding Product object so you can edit it in your user
interface.) Sometimes, problems like these are solved by creating yet another layer of objects—for
example, in a complex system, developers might build a rich business object model overtop the bare-
bones data object layer.
In the current example, the StoreDB and Product classes are designed to be part of a back-end data
access component. In this context, the Product class is simply a glorified package that lets you pass
information from one layer of code to another. For that reason, validation code really doesn’t belong in the
Product class.
The ExceptionValidationRule
The ExceptionValidationRule is a prebuilt validation rule that tells WPF to report all exceptions. To use
the ExceptionValidationRule, you must add it to the Binding.ValidationRules collection, as shown here:
<TextBox Margin="5" Grid.Row="2" Grid.Column="1">
<TextBox.Text>
<Binding Path="UnitCost">
<Binding.ValidationRules>
<ExceptionValidationRule></ExceptionValidationRule>
</Binding.ValidationRules>
</Binding>
</TextBox.Text>
</TextBox>
This example uses both a value converter and a validation rule. Usually, validation is performed
before the value is converted, but the ExceptionValidationRule is a special case. It catches exceptions
that occur at any point, including exceptions that occur if the edited value can’t be cast to the correct
data type, exceptions that are thrown by the property setter, and exceptions that are thrown by the value
converter.
So, what happens when validation fails? Validation errors are recorded using the attached properties
of the System.Windows.Controls.Validation class. For each failed validation rule, WPF takes three steps:
x It sets the attached Validation.HasError property to true on the bound element (in
this case, the TextBox control).
x It creates a ValidationError object with the error details (as returned from the
ValidationRule.Validate() method) and adds that to the attached Validation.Errors
collection.
x If the Binding.NotifyOnValidationError property is set to true, WPF raises the
Validation.Error attached event on the element.
CHAPTER 19 ■ DATA BINDING
624
The visual appearance of your bound control also changes when an error occurs. WPF automatically
switches the template that a control uses when its Validation.HasError property is true to the template
that’s defined by the attached Validation.ErrorTemplate property. In a text box, the new template
changes the outline of the box to a thin red border.
In most cases, you’ll want to augment the error indication in some way and give specific
information about the error that caused the problem. You can use code that handles the Error event, or
you can supply a custom control template that provides a different visual indication. But before you
tackle either of these tasks, it’s worth considering two other ways WPF allows you to catch errors—by
using IDataErrorInfo in your data objects and by writing custom validation rules.
The DataErrorValidationRule
Many object-orientation purists prefer not to raise exceptions to indicate user input errors. There are
several possible reasons, including the following: a user input error isn’t an exceptional condition, error
conditions may depend on the interaction between multiple property values, and it’s sometimes
worthwhile to hold on to incorrect values for further processing rather than reject them outright.
In the Windows Forms world, developers could use the IDataErrorInfo interface (from the
System.ComponentModel namespace) to avoid exceptions but still place the validation code in the data
class. The IDataErrorInfo interface was originally designed to support grid-based display controls such
as the DataGridView, but it also works as an all-purpose solution for reporting errors. Although
IDataErrorInfo wasn’t supported in the first release of WPF, it is supported in WPF 3.5.
The IDataErrorInfo interface requires two members: a string property named Error and a string
indexer. The Error property provides an overall error string that describes the entire object (which could
be something as simple as “Invalid Data”). The string indexer accepts a property name and returns the
corresponding detailed error information. For example, if you pass “UnitCost” to the string indexer, you
might receive a response such as “The UnitCost cannot be negative.” The key idea here is that properties
are set normally, without any fuss, and the indexer allows the user interface to check for invalid data.
The error logic for the entire class is centralized in one place.
Here’s a revised version of the Product class that implements IDataErrorInfo. Although you could
use IDataErrorInfo to provide validation messages for a range of validation problems, this validation
logic checks just one property—ModelNumber—for errors:
public class Product : INotifyPropertyChanged, IDataErrorInfo
{
private string modelNumber;
public string ModelNumber
{
get { return modelNumber; }
set {
modelNumber = value;
OnPropertyChanged(new PropertyChangedEventArgs("ModelNumber"));
}
}
// Error handling takes place here.
public string this[string propertyName]
{
get