Professional DotNetNuke ASP.NET Portals wrox phần 7 pps
Bạn đang xem bản rút gọn của tài liệu. Xem và tải ngay bản đầy đủ của tài liệu tại đây (1.24 MB, 45 trang )
and determines whether the user is anonymous or authenticated, then proceeds to store the request in
cache. Anonymous users are also given a temporary cookie so they are not counted twice in the future.
A scheduled job from the Scheduler executes every minute on a background thread pulling the relevant
details out of cache and updating them in the database; it will also clear up any old records. The records
are stored within two tables, AnonymousUsers and UsersOnline.
This HTTP module is a good module to disable (comment out of config) if you do not need this informa-
tion within your portal. Alternatively you can just disable it in Host Settings.
DNNMembership
The DNNMembership HTTP module performs tasks around the security of a user. It stores role informa-
tion about a user in an HTTP cookie to save requesting the same information again and performs security
checks for users switching portals.
There is no real need to extend this module because it is critical to DotNetNuke’s operation.
Personalization
The personalization HTTP module is very similar to the Microsoft-provided Profile HTTP module, and
in fact, was based on the same concept, just integrated much earlier. It loads a user’s personalized infor-
mation into a serialized XML object at the beginning of the request, and saves it at the end of the request.
If you are interested in storing personalized information about a user, see the personalization classes
under /Components/Personalization/.
Module Interfaces
Modules represent a discrete set of functionality that can extend the portal framework. In past versions
of DotNetNuke, module interactions with the portal were primarily limited to making method calls into
the core portal APIs. While this one-way interaction provides some ability to utilize portal services and
methods within the module, it limits the ability of the portal to provide more advanced services.
In order to provide two-way interactions with modules, the portal needs to have a mechanism to make
method calls into the module. There are several distinct mechanisms for allowing a program to call
methods on an arbitrary set of code, where the module code is unknown at the time the portal is being
developed. Three of these “calling” mechanisms are used within DotNetNuke:
❑ Inheritance
❑ Delegates
❑ Interfaces
As discussed previously, every module inherits from the PortalModuleBase class (located in the compo-
nents/module directory). This base class provides a common set of methods and properties that can be
used by the module as well as the portal to control the behavior of each module instance. Because the
module must inherit from this class, the portal has a set of known methods that it can use to control the
module. The portal could extend the base class to add additional methods to handle new services. One
downside to this approach is that there is not an easy mechanism for determining whether a subclass
240
Chapter 8
12_595636 ch08.qxd 5/10/05 9:56 PM Page 240
implements custom logic for a specific method or property. Because of this restriction, inheritance is gen-
erally limited to providing services that are needed or required for every subclass.
A second method for interacting with the modules involves the use of delegates. A delegate is essentially
a pointer to a method that has a specific set of parameters and return type. Delegates are useful when
a service can be implemented with a single method call and are the underlying mechanism behind
VB.NET’s event handling. DotNetNuke uses delegates to implement callback methods for the Module
Action menu action event. Although delegates are very useful in some situations, they are more difficult
to implement and understand than alternative methods.
The third calling mechanism used by DotNetNuke is the use of interfaces. An interface defines a set of
methods, events, and properties without providing any implementation details for these elements. Any
class that implements an interface is then responsible for providing the specific logic for each method,
event, and property defined in the interface. Interfaces are especially useful for defining optional ser-
vices that a module may implement. The portal is able to detect if a class implements a specific interface
and is then able to call any of the methods, events, or properties defined in the interface.
DotNetNuke 3.0 significantly extends its use of module interfaces. This section examines the six main
interfaces that are intended for use by modules:
❑ IActionable
❑ IPortable
❑ IUpgradable
❑ IModuleCommunicator
❑ IModuleListener
❑ ISearchable
IActionable
Every module has a menu that contains several possible action items for activities like editing module
settings, module movement, and viewing help. These menu items are called Module Actions. The mod-
ule menu can be extended with your own custom actions. When your module inherits from the
PortalModuleBase class, it receives a default set of actions. These actions are defined by the portal to
handle common editing functions. Your module can extend these actions by implementing the
IActionable interface.
Interface
As shown in Listing 8-17, the IActionable interface consists of a single method that returns a collection of
module actions. The ModuleActions property is used when DotNetNuke renders the module.
Listing 8-17: IActionable Interface Definition
Namespace DotNetNuke.Entities.Modules
Public Interface IActionable
ReadOnly Property ModuleActions() As Actions.ModuleActionCollection
End Interface
End Namespace
241
Core DotNetNuke APIs
12_595636 ch08.qxd 5/10/05 9:56 PM Page 241
Listing 8-18 shows an example usage as implemented in the Announcements module. Let’s break this
down. The first two lines tell the compiler that this method implements the ModuleAction method of the
IActionable interface. This is a read-only method and therefore we only need to provide a getter func-
tion. The first step is to create a new collection to hold our custom actions. Then we use the collection’s
Add method to create a new action item in our collection. Finally we return our new collection.
Listing 8-18: IActionable.ModuleActions Example
Public ReadOnly Property ModuleActions() As ModuleActionCollection _
Implements IActionable.ModuleActions
Get
Dim Actions As New ModuleActionCollection
Actions.Add(GetNextActionID, _
Localization.GetString(ModuleActionType.AddContent, _
LocalResourceFile), _
ModuleActionType.AddContent, _
“”, _
“”, _
EditUrl(), _
False, _
Security.SecurityAccessLevel.Edit, _
True, _
False)
Return Actions
End Get
End Property
This is a simple example that demonstrates the basic steps to follow for your own custom module
menus. DotNetNuke provides extensive control over each module action.
ModuleAction API
To take full advantage of the power provided by module actions and the IActionable interface, we need
to examine the classes, properties, and methods that make up the ModuleAction API.
Table 8-7 lists the classes that comprise the ModuleAction API.
Table 8-7: Module Action Classes
Class Description
ModuleAction A module action is used to define a specific function for a given mod-
ule. Each module can define one or more actions that the portal will
present to the user. Each module container can define the skin object
used to render the module actions.
ModuleActionType The ModuleActionType class defines a set of constants used for distin-
guishing common action types.
ModuleActionCollection This is a collection of Module Actions.
242
Chapter 8
12_595636 ch08.qxd 5/10/05 9:56 PM Page 242
ModuleActionEvent This class is used for holding callback information when a module
Listener registers for Action events.
ActionEventArgs The ActionEventArgs class is used for passing data during the click
event that is fired when a module action is selected by the user.
ActionEventHandler The ActionEventHandler is a delegate that defines the method signa-
ture required for responding to the Action event.
ActionBase The ActionBase class is used for creating ModuleAction skin objects.
The core framework includes three different implementations: SolPart
Actions.ascx, DropDownActions.ascx, and LinkActions.ascx.
The ModuleAction class is the heart of the API. Tables 8-8 and 8-9 show the properties and methods
available in the ModuleAction class. Each menu item in the Module Action menu is represented by a sin-
gle ModuleAction instance.
Table 8-8: ModuleAction Properties
Property Name Property Type Description
Actions ModuleAction The Module Action API supports hierarchical
Collection menu structures. Every skin object that inherits from
ActionBase may choose how to render the menu based
on the ability to support hierarchical items. For example
the default SolpartActions skin object supports sub-
menus, while the DropDownActions skin object only
supports a flat menu structure.
Id Integer Every module action for a given module instance must
contain a unique Id. The PortalModuleBase class defines
the GetNextActionId method, which can be used to gen-
erate unique module action IDs.
CommandName String The CommandName property is used to distinguish
which Module Action triggered an action event. DotNet-
Nuke includes 19 standard ModuleActionTypes that
provide access to standard functionality. Custom mod-
ule actions can use their own string to identify com-
mands recognized by the module.
Command String CommandArguments are used to provide additional
Argument information during action event processing. For example,
the DotNetNuke core uses the CommandArgument to
pass the ModuleID for common commands like Delete-
Module.Action.
Title String The Title property sets the text that is displayed in the
Module Action menu.
Table continued on following page
243
Core DotNetNuke APIs
12_595636 ch08.qxd 5/10/05 9:56 PM Page 243
Property Name Property Type Description
Icon String This is the name of the Icon file to use for the Module
Action item.
Url String When set, the URL property allows a menu item to redi-
rect the user to another web page.
ClientScript String The Javascript that will be run during the menuClick
event in the browser. If the ClientScript property is pre-
sent then it is called prior to the postback occurring. If the
ClientScript returns false, then the postback is canceled.
UseAction Boolean The UseActionEvent causes the portal to raise an
Event ActionEvent on the server and notify any registered
event listeners. If UseActionEvent is false, then the por-
tal will handle the event, but will not raise the event
back to any event listeners. The following Command-
Names will prevent the ActionEvent from firing:
ModuleHelp, OnlineHelp, ModuleSettings, DeleteModule,
PrintModule, ClearCache, MovePane, MoveTop, MoveUp,
MoveDown and MoveBottom.
Secure SecurityAccess The Secure property determines the required
Level security level of the user. If the current user does not
have the necessary permissions, then the Module Action
will not be displayed.
Visible Boolean If the visible property is set to false, then the Module
Action will not be displayed. This property allows you
to control the visibility of a Module Action based on cus-
tom business logic.
Newwindow Boolean The Newwindow property will force an action to open
the associated URL in a new window. This property is
not used if UseActionEvent is True or if the following
CommandNames are used: ModuleHelp, OnlineHelp,
ModuleSettings, PrintModule.
Table 8-9: ModuleAction Methods
Method Name Return Type Description
HasChildren Boolean HasChildren returns true if the ModuleAction.Actions
property has any items (Actions.Count > 0).
DotNetNuke includes several standard module actions that are provided by the PortalModuleBase class
or that are used by several of the core modules. These ModuleActionTypes are shown in Listing 8-19.
ModuleActionTypes can also be used to access localized strings for the ModuleAction.Title property.
This helps promote a consistent user interface for both core and third-party modules.
244
Chapter 8
12_595636 ch08.qxd 5/10/05 9:56 PM Page 244
Listing 8-19: ModuleActionTypes
Public Class ModuleActionType
Public Const AddContent As String = “AddContent.Action”
Public Const EditContent As String = “EditContent.Action”
Public Const ContentOptions As String = “ContentOptions.Action”
Public Const SyndicateModule As String = “SyndicateModule.Action”
Public Const ImportModule As String = “ImportModule.Action”
Public Const ExportModule As String = “ExportModule.Action”
Public Const OnlineHelp As String = “OnlineHelp.Action”
Public Const ModuleHelp As String = “ModuleHelp.Action”
Public Const PrintModule As String = “PrintModule.Action”
Public Const ModuleSettings As String = “ModuleSettings.Action”
Public Const DeleteModule As String = “DeleteModule.Action”
Public Const ClearCache As String = “ClearCache.Action”
Public Const MoveTop As String = “MoveTop.Action”
Public Const MoveUp As String = “MoveUp.Action”
Public Const MoveDown As String = “MoveDown.Action”
Public Const MoveBottom As String = “MoveBottom.Action”
Public Const MovePane As String = “MovePane.Action”
Public Const MoveRoot As String = “MoveRoot.Action”
End Class
DotNetNuke provides standard behavior for the following ModuleActionTypes: ModuleHelp,
OnlineHelp, ModuleSettings, DeleteModule, PrintModule, ClearCache, MovePane, MoveTop, MoveUp,
MoveDown, and MoveBottom. All ModuleActionTypes in this subset will ignore the UseActionEvent
and Newwindow properties. The ModuleActionTypes can be further subdivided into three groups:
❑ Basic Redirection: The following ModuleActionTypes will perform a simple redirection and
cause the user to navigate to the URL identified in the URL property: ModuleHelp, OnlineHelp,
ModuleSettings, and PrintModule.
❑ Module Movement: The following ModuleActionTypes will change the order or location of
modules on the current page: MovePane, MoveTop, MoveUp, MoveDown, and MoveBottom.
❑ Custom Logic: The following ModuleActionTypes have custom business logic that will use core
portal APIs to perform standard module-related actions: DeleteModule and ClearCache.
DotNetNuke uses a custom collection class when working with Module Actions. The ModuleAction
Collection inherits from the .Net System.Collections.CollectionBase class and provides a strongly typed
collection class. Using a strongly typed collection minimizes the possibility of typecasting errors that can
occur when using generic collection classes like the ArrayList.
Most module developers will only need to worry about creating the ModuleActionCollection in order to
implement the IActionable interface. Listing 8-20 shows the two primary methods used for adding
ModuleActions to the collection. These methods simplify adding ModuleActions by wrapping the
ModuleAction constructor method calls.
245
Core DotNetNuke APIs
12_595636 ch08.qxd 5/10/05 9:56 PM Page 245
Listing 8-20: Key ModuleActionCollection Methods
Public Function Add(ByVal ID As Integer, _
ByVal Title As String, _
ByVal CmdName As String, _
Optional ByVal CmdArg As String = “”, _
Optional ByVal Icon As String = “”, _
Optional ByVal Url As String = “”, _
Optional ByVal UseActionEvent As Boolean = False, _
Optional ByVal Secure As SecurityAccessLevel = SecurityAccessLevel.Anonymous, _
Optional ByVal Visible As Boolean = True, _
Optional ByVal NewWindow As Boolean = False) _
As ModuleAction
Public Function Add(ByVal ID As Integer, _
ByVal Title As String, _
ByVal CmdName As String, _
ByVal CmdArg As String, _
ByVal Icon As String, _
ByVal Url As String, _
ByVal ClientScript As String, _
ByVal UseActionEvent As Boolean, _
ByVal Secure As SecurityAccessLevel, _
ByVal Visible As Boolean, _
ByVal NewWindow As Boolean) _
As ModuleAction
The first method in Listing 8-20 uses optional parameters that are not supported by C#. This method is
likely to be deprecated in future versions in order to simplify support for C# modules and its use is not
recommended.
The ModuleAction framework makes it easy to handle simple URL redirection from a module action. Just
like the Delete and ClearCache actions provided by the DotNetNuke framework, your module may
require the use of custom logic to determine the appropriate action to take when the menu item is clicked.
To implement custom logic, the module developer needs to be able to respond to a Menu click event.
In the DotNetNuke architecture, the ModuleAction menu is a child of the module container. The module
is also a child of the container. This architecture allows the framework to easily change out the menu
implementation; however, it complicates communication between the menu and module. The menu never
has a direct reference to the module and the module does not have a direct reference to the menu. This is a
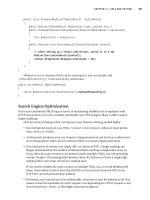
classic example of the Mediator design pattern. This pattern is designed to allow two classes without
direct references to communicate. Figure 8-3 shows the steps involved to implement this pattern.
Let’s examine the steps involved in making this work. During this discussion you will also discover
ways you can to extend the framework.
246
Chapter 8
12_595636 ch08.qxd 5/10/05 9:56 PM Page 246
Figure 8-3
Step 1: Register the Event Handler
The first step to implementing the Mediator pattern is to provide a mechanism for the module to register
with the portal. The portal will use this information later when it needs to notify the module that a menu
item was selected. Handling the click event is strictly optional. Your module may choose to use standard
MenuActions, in which case you can skip this step. Because the module does not contain a direct refer-
ence to the page on which it is instantiated, you need to provide a registration mechanism.
The Skin class, which acts as our mediator, contains the RegisterModuleActionEvent method, which
allows a module to notify the framework of the event handler for the action event (see Listing 8-21).
This registration should occur in the module’s Page_Load event to ensure that registration occurs before
the event could be fired in the Skin class. The code in Listing 8-21 is taken from the HTML module and
provides a working example of module-based event registration for the ModuleAction event. While we
could have used another interface to define a known method to handle the event, the registration mech-
anism turns out to be a much more flexible design when implementing a single method.
Listing 8-21: Registering an Event Handler
‘
‘- Menu Action Handler Registration -
‘
‘This finds a reference to the containing skin
Dim ParentSkin As UI.Skins.Skin = UI.Skins.Skin.GetParentSkin(Me)
‘We should always have a ParentSkin, but need to make sure
If Not ParentSkin Is Nothing Then
‘Register our EventHandler as a listener on the ParentSkin so that it may
‘tell us when a menu has been clicked.
ParentSkin.RegisterModuleActionEvent(Me.ModuleId, AddressOf ModuleAction_Click)
End If
‘
Skin
4
ModuleAction
Skin Object
Module
3
21
247
Core DotNetNuke APIs
12_595636 ch08.qxd 5/10/05 9:56 PM Page 247
Listing 8-22 shows the ModuleAction_Click event handler code from the HTML module.
Listing 8-22: Handling the Event
Public Sub ModuleAction_Click(ByVal sender As Object, _
ByVal e As Entities.Modules.Actions.ActionEventArgs)
‘We could get much fancier here by declaring each ModuleAction with a
‘Command and then using a Select Case statement to handle the various
‘commands.
If e.Action.Url.Length > 0 Then
Response.Redirect(e.Action.Url, True)
End If
End Sub
The DotNetNuke framework uses a delegate (see Listing 8-23) to define the method signature for the
event handler. The RegisterModuleActionEvent requires the address of a method with the same signa-
ture as the ActionEventHandler delegate.
Listing 8-23: ActionEventHandler Delegate
Public Delegate Sub ActionEventHandler(ByVal sender As Object, _
ByVal e As ActionEventArgs)
Step 2: Display the Menu
Now that we have a way for the skin (the mediator class) to communicate with the module, we need a
mechanism to allow the menu to communicate with the skin as well. This portion of the communication
chain is much easier to code. Handling the actual click event and passing it to the skinning class is the
responsibility of the ModuleAction rendering code.
Like much of DotNetNuke, the ModuleAction framework supports the use of custom extensions. In this
case, we rely on skin objects to handle rendering the module actions. Each ModuleAction skin object
inherits from the DotNetNuke.UI.Containers.ActionBase class. The skin class retrieves the module
action collection from the module by calling the IActionable.ModuleActions property and passes this
collection to the ModuleAction skin object for rendering. The ActionBase class includes the code neces-
sary to merge the standard module actions with the collection provided by the Skin class.
Each skin object includes code in the pre-render event to convert the collection of ModuleActions into an
appropriate format for display using an associated server control. In the case of SolPartActions.ascx, the
server control is a menu control that is able to fully support all of the features of ModuleActions includ-
ing submenus and icons. Other skin objects like the DropDownActions.ascx may only support a subset
of the module action features (see Table 8-10).
248
Chapter 8
12_595636 ch08.qxd 5/10/05 9:56 PM Page 248
Table 8-10: ModuleAction Skin Objects
Action Skin Object Menu Separator Icons Submenus Client-Side JavaScript
Actions or SolPartActions Yes Yes Yes Yes
DropDownActions Yes No No Yes
LinkActions No No No No
Step 3: Notify the Portal of a Menu Item Selection
Each skin object handles the click event of the associated server control. This event, as shown in Listing
8-24, calls the ProcessAction method, which is inherited from the ActionBase class. The ProcessAction
method is then responsible for handling the event as indicated by the ModuleAction properties. If you
create your own ModuleAction skin object, you should follow this same pattern.
Listing 8-24: Click Event Handler
Private Sub ctlActions_MenuClick(ByVal ID As String) Handles ctlActions.MenuClick
Try
ProcessAction(ID)
Catch exc As Exception ‘Module failed to load
ProcessModuleLoadException(Me, exc)
End Try
End Sub
Step 4: Notify the Module That a Custom ModuleAction Was Clicked
If the UseActionEvent is set to True, then the ProcessAction method (see Listing 8-25) will call the
OnAction method to handle actually raising the event (see Listing 8-26). This might seem like an extra
method call when ProcessAction could just raise the event on its own. The purpose of the OnAction
method is to provide an opportunity for subclasses to override the default event handling behavior.
While not strictly necessary, it is a standard pattern in .NET and is a good example to follow when
developing your own event handling code in your applications.
Listing 8-25: ProcessAction Method
Public Sub ProcessAction(ByVal ActionID As String)
If IsNumeric(ActionID) Then
Dim action As ModuleAction = GetAction(Convert.ToInt32(ActionID))
Select Case action.CommandName
Case ModuleActionType.ModuleHelp
DoAction(action)
Case ModuleActionType.OnlineHelp
DoAction(action)
Case ModuleActionType.ModuleSettings
DoAction(action)
Case ModuleActionType.DeleteModule
Delete(action)
(continued)
249
Core DotNetNuke APIs
12_595636 ch08.qxd 5/10/05 9:56 PM Page 249
Listing 8-25: (continued)
Case ModuleActionType.PrintModule
DoAction(action)
Case ModuleActionType.ClearCache
ClearCache(action)
Case ModuleActionType.MovePane
MoveToPane(action)
Case ModuleActionType.MoveTop, _
ModuleActionType.MoveUp, _
ModuleActionType.MoveDown, _
ModuleActionType.MoveBottom
MoveUpDown(action)
Case Else
‘ custom action
If action.Url.Length > 0 And action.UseActionEvent = False Then
DoAction(action)
Else
ModuleConfiguration))
End If
End Select
End If
End Sub
Listing 8-26: OnAction Method
Protected Overridable Sub OnAction(ByVal e As ActionEventArgs)
RaiseEvent Action(Me, e)
End Sub
Because the skin maintains a reference to the ModuleAction skin object, the Skin class is able to handle
the Action event raised by the skin object. As shown in Listing 8-27, the Skin class will iterate through
the ActionEventListeners to find the associated module event delegate. Once a listener is found, the code
invokes the event, which notifies the module that the event has occurred.
Listing 8-27: Skin Class Handles the ActionEvent
Public Sub ModuleAction_Click(ByVal sender As Object, ByVal e As ActionEventArgs)
‘Search through the listeners
Dim Listener As ModuleActionEventListener
For Each Listener In ActionEventListeners
‘If the associated module has registered a listener
If e.ModuleConfiguration.ModuleID = Listener.ModuleID Then
‘Invoke the listener to handle the ModuleAction_Click event
Listener.ActionEvent.Invoke(sender, e)
End If
Next
End Sub
You are now ready take full advantage of the entire ModuleAction API to create custom menu items for your
own modules, handle the associated Action event when the menu item is clicked, and to create your own
custom ModuleAction skin objects.
250
Chapter 8
12_595636 ch08.qxd 5/10/05 9:56 PM Page 250
IPortable
DotNetNuke 3.0 provides the ability to import and export modules within the portal. Like many fea-
tures in DotNetNuke, this feature is implemented using a combination of core code and module-specific
logic. The IPortable interface defines the methods required to implement this feature on a module-by-
module basis (see Listing 8-28).
Listing 8-28: IPortable Interface Definition
Public Interface IPortable
Function ExportModule(ByVal ModuleID As Integer) As String
Sub ImportModule(ByVal ModuleID As Integer, _
ByVal Content As String, _
ByVal Version As String, _
ByVal UserID As Integer)
End Interface
This interface provides a much needed feature to DotNetNuke and is a pretty straightforward interface
to implement. To fully support importing and exporting content, you need to implement the interface in
two places within your module.
As modules are being loaded by the portal for rendering a specific page, the module is checked to deter-
mine whether it implements the IPortable interface. This check is based on the current module control
that is being loaded (remember each module can consist of many user controls). Typically, you will want
the portal to add the import and export Module Actions to your primary module control. If the control
implements the IPortable interface, DotNetNuke will automatically add the Import Content and Export
Content menu items to your Module Action menu (see Figure 8-4). You do not need to supply any logic
for the interface methods since we are only using it as a marker interface. See Listing 8-29 for a sample
implementation of the ExportModule method. The ImportModule method would contain the same stub
implementation.
Figure 8-4
A marker interface is used to indicate that a class implements or requires a certain service. A true
marker interface does not include any properties or methods. In this case we chose to re-use an existing
interface rather than create a new one.
Listing 8-29: ExportModule Stub
Public Function ExportModule(ByVal ModuleID As Integer) As String _
Implements Entities.Modules.IPortable.ExportModule
‘Included as a stub only so that the core knows this module
‘ Implements Entities.Modules.IPortable
End Function
251
Core DotNetNuke APIs
12_595636 ch08.qxd 5/10/05 9:56 PM Page 251
Each module should include a controller class that is identified in the BusinessControllerClass property
of the portal’s ModuleInfo class. This class is identified in the module manifest file discussed in Chapter
14. The controller class is where we will implement many of the interfaces available to modules.
Implementing the IPortable interface requires implementing logic for the ExportModule and ImportModule
methods shown in Listing 8-30 and Listing 8-31, respectively. The complexity of the data model for your
module will determine the difficulty of implementing these methods. Let’s take a look at a simple case as
implemented by the HTMLText module.
The ExportModule method is used to serialize the content of the module to an xml string. DotNetNuke
will save the serialized string along with the module’s FriendlyName and Version. The xml file is saved
into the portal directory.
Listing 8-30: ExportModule Stub
Public Function ExportModule(ByVal ModuleID As Integer) As String _
Implements Entities.Modules.IPortable.ExportModule
Dim strXML As String = “”
Dim objHtmlText As HtmlTextInfo = GetHtmlText(ModuleID)
If Not objHtmlText Is Nothing Then
strXML += “<htmltext>”
strXML += “<desktophtml>{0}</desktophtml>”
strXML += “<desktopsummary>{1}</desktopsummary>”
strXML += “</htmltext>”
String.Format(strXML, _
XMLEncode(objHtmlText.DeskTopHTML), _
XMLEncode(objHtmlText.DesktopSummary))
End If
Return strXML
End Function
The ImportModule method (see Listing 8-31) reverses the process by deserializing the xml string created
by the ExportModule method and replacing the content of the specified module. The portal will pass the
version information stored during the export process along with the serialized xml string.
Listing 8-31: ImportModule Stub
Public Sub ImportModule(ByVal ModuleID As Integer, _
ByVal Content As String, _
ByVal Version As String, _
ByVal UserId As Integer) _
Implements Entities.Modules.IPortable.ImportModule
Dim xmlHtmlText As XmlNode = GetContent(Content, “htmltext”)
Dim objText As HtmlTextInfo = New HtmlTextInfo
252
Chapter 8
12_595636 ch08.qxd 5/10/05 9:56 PM Page 252
objText.ModuleId = ModuleID
objText.DeskTopHTML = xmlHtmlText.SelectSingleNode(“desktophtml”).InnerText
objText.DesktopSummary = xmlHtmlText.SelectSingleNode(“desktopsummary”).InnerText
objText.CreatedByUser = UserId
AddHtmlText(objText)
End Sub
The IPortable interface is a straightforward interface to implement but provides much needed function-
ality to the DotNetNuke framework. This interface is at the heart of the Templating capability for
DotNetNuke and therefore is definitely an interface that all modules should implement.
IUpgradable
One of DotNetNuke’s greatest features is the ability to easily upgrade from one version to the next. The
heart of this capability is the creation of script files that can be run sequentially to modify the database
schema and migrate any existing data to the new version’s schema. In later versions DotNetNuke added
a mechanism for also running custom logic during the upgrade process. Unfortunately, this mechanism
was not provided for modules. Therefore, third-party modules were forced to create their own mecha-
nism for handling custom upgrade logic.
This is finally fixed in DotNetNuke 3.0. The IUpgradeable interface (see Listing 8-32) provides a standard
upgrade capability for modules, and uses the same logic as used in the core framework. The interface
includes a single method, UpgradeModule, which allows the module to execute custom business logic
depending on the current version of the module being installed.
Listing 8-32: IUpgradeable Interface
Public Interface IUpgradeable
Function UpgradeModule(ByVal Version As String) As String
End Interface
The UpgradeModule method is called once for each script version included with the module. If an ear-
lier version of the module is already installed, then this method is only called for script versions that are
later than the version of the currently installed module.
Inter-Module Communication
DotNetNuke includes the ability for modules to communicate with each other through the Inter-Module
Communication (IMC) framework. Originally the IMC framework allowed a module to pass simple
strings to another module on the same page. This was enhanced in DotNetNuke 2.0 to allow modules to
pass objects rather than simple strings. Additionally, other properties were added that allowed a module
to identify the Sender, the Target, and the Type of message. Let’s take a look at the two main interfaces
that provide this functionality to your module.
IModuleCommunicator
The IModuleCommunicator interface defines a single event, ModuleCommunication, for your module
to implement (see Listing 8-33).
253
Core DotNetNuke APIs
12_595636 ch08.qxd 5/10/05 9:56 PM Page 253
Listing 8-33: IModuleCommunicator Interface
Public Interface IModuleCommunicator
Event ModuleCommunication As ModuleCommunicationEventHandler
End Interface
To communicate with another module, first implement the IModuleCommunicator interface in your
module. You should have an event declaration in your module as shown in Listing 8-34.
Listing 8-34: ModuleCommunication Event Implementation
Public Event ModuleCommunication(ByVal sender As Object, _
ByVal e As ModuleCommunicationEventArgs) _
Implements IModuleCommunicator.ModuleCommunication
IModuleListener
Whereas the IModuleCommunicator is used for sending messages, the IModuleListener interface (see
Listing 8-35) is used for receiving messages.
Listing 8-35: IModuleListener Interface
Public Interface IModuleListener
Sub OnModuleCommunication(ByVal s As Object, _
ByVal e As ModuleCommunicationEventArgs)
End Interface
This interface defines a single method, OnModuleCommunication, which is called when an
IModuleCommunicator on the same page raises the ModuleCommunication event. What you do in
response to this event notification is totally up to you.
DotNetNuke does not filter event messages. Any module that implements the IModuleListener interface
will be notified when the event is raised. It is the responsibility of the module to determine whether or
not it should take any action.
ISearchable
DotNetNuke 3.0 provides a robust search API for indexing and searching content in your portal. The
DotNetNuke search API is broken down into three distinct parts:
1. Core search engine
2. Search data store
3. Search indexer
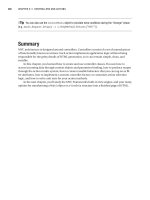
Like the ModuleAction framework, the search framework also implements a Mediator pattern. When
combined with the Provider pattern, this framework provides lots of flexibility. In Figure 8-5 you can see
the relationship between these patterns and the three framework elements listed above.
254
Chapter 8
12_595636 ch08.qxd 5/10/05 9:56 PM Page 254
Figure 8-5
The core search engine provides a simple API for calling the IndexProvider and then storing the results
using a SearchDataStoreProvider. This API is currently intended for use by the core framework. Future
versions of the API will be extended to allow modules greater control over the indexing process.
DotNetNuke includes a default implementation of the SearchDataStoreProvider. The default implemen-
tation is meant to provide basic storage functionality, but could be replaced with a more robust search
engine. Like other providers, it is anticipated that third-party developers will implement providers for
many of the current search engines on the market.
The IndexingProvider provides an interface between the core search engine and each module.
DotNetNuke includes a default provider that indexes module content. This provider could be replaced
to provide document indexing, web indexing, or even indexing legacy application content stored in
another database. If you decide to replace the IndexingProvider, keep in mind that DotNetNuke only
allows for the use of a single provider of a given type. This means that if you want to index content from
multiple sources, you must implement this as a single provider. Future versions of the framework may
be enhanced to overcome this limitation.
When using the ModuleIndexer, you can incorporate a module’s content into the search engine data
store by implementing the ISearchable interface shown in Listing 8-36.
Listing 8-36: ISearchable Interface
Public Interface ISearchable
Function GetSearchItems(ByVal ModInfo As ModuleInfo) As SearchItemInfoCollection
End Interface
SearchEngine.vb
Core Search Engine
DataProvider
Search Data Store
SearchDataStoreProvider
[SearchDataStore]
Search Indexer
IndexingProvider
[ModuleIndexer]
Your Module
Implements ISearchable
255
Core DotNetNuke APIs
12_595636 ch08.qxd 5/10/05 9:56 PM Page 255
This interface is designed to allow almost any content to be indexed. By passing in a reference to the
module and returning a collection of SearchItems, the modules are free to map their content to each
SearchItem as they see fit. Listing 8-37 shows a sample implementation from the Announcements mod-
ule included with DotNetNuke.
Listing 8-37: Implementing the Interface
Public Function GetSearchItems(ByVal ModInfo As Entities.Modules.ModuleInfo) _
As Services.Search.SearchItemInfoCollection _
Implements Services.Search.ISearchable.GetSearchItems
Dim SearchItemCollection As New SearchItemInfoCollection
Dim Announcements As ArrayList = GetAnnouncements(ModInfo.ModuleID)
Dim objAnnouncement As Object
For Each objAnnouncement In Announcements
Dim SearchItem As SearchItemInfo
With CType(objAnnouncement, AnnouncementInfo)
Dim UserId As Integer
If IsNumeric(.CreatedByUser) Then
UserId = Integer.Parse(.CreatedByUser)
Else
UserId = 2
End If
SearchItem = New SearchItemInfo(ModInfo.ModuleTitle & “ - “ & .Title, _
ApplicationURL(ModInfo.TabID), _
.Description, _
UserId, _
.CreatedDate, _
ModInfo.ModuleID, _
“Anncmnt” & ModInfo.ModuleID.ToString & “-” & .ItemId, _
.Description)
SearchItemCollection.Add(SearchItem)
End With
Next
Return SearchItemCollection
End Function
You can see from the preceding code block we made a call to our Info class for our module, just as we
would when we bind to a control within our ascx file, but in this case the results are going to populate
the SearchItemInfo, which will populate the DNN index with data from our module.
The key to implementing the interface is figuring out how to map your content to a collection of
SearchItemInfo objects. Table 8-11 lists the properties of the SearchItemInfo class.
256
Chapter 8
12_595636 ch08.qxd 5/10/05 9:56 PM Page 256
Table 8-11: SearchItemInfo Properties
Property Description
SearchItemId This is an ID that is assigned by the search engine and is used when deleting
items from the data store.
Title The Title is a string that is used when displaying search results.
Description The Description is a summary of the content and is used when displaying
search results.
Author The content author.
PubDate This is a date that allows the search engine to determine the age of the content.
ModuleId The ID of the module whose content is being indexed.
SearchKey This is a unique key that can be used to identify each specific search item for
this module.
Content This is the specific content that will be searched. The default search data store
does not search on any words that are not in the content property.
GUID The GUID is another unique identifier that is used when syndicating content in
the portal.
ImageFileId The ImageFileID is an optional property that is used for identifying image files
that accompany a search item.
HitCount The HitCount is maintained by the search engine, and is used for identifying
the number of times that a search item is returned in a search.
Now that the index is populated with data, users of your portal will be able to search your module’s
information from a unified interface within DNN.
Summary
This chapter examined many of the core APIs that provide the true power behind DotNetNuke. By
leveraging common APIs, you can extend the portal in almost any direction. Replace core functions or
just add a custom module; the core APIs are what makes it all possible. Now that you know how to use
most of the core functions, the next several chapters examine how to create your own custom modules
to really take advantage of this power.
257
Core DotNetNuke APIs
12_595636 ch08.qxd 5/10/05 9:56 PM Page 257
12_595636 ch08.qxd 5/10/05 9:56 PM Page 258
Beginning Module
Development
This chapter begins the tour of module development in DotNetNuke. As you have read,
DotNetNuke provides a large amount of functionality right out of the box, but we also realize
that each one is going to have separate business requirements that DotNetNuke may not meet.
Fortunately, DotNetNuke provides developers and third-party independent software vendors
(ISVs) to extend the core framework by developing modules.
This chapter focuses on the architecture of one of those specific modules, namely, the Events mod-
ule. Chapters 10 through 12 cover various other aspects of module development. This chapter
starts out with setting up DotNetNuke to interface with your module development in Visual
Studio .NET 2003. In addition to configuring DotNetNuke to interface with the development,
it also discusses some issues when configuring your development environment.
Planning Your Module Project
Of course to succeed in any project, you should plan out that project before you start writing even
one line of code. You’re going to have to ask yourself or project team a few questions before begin-
ning your application development.
Can the development effort justify the savings that your application will provide?
Many factors may come into play: skills of in-house staff, costs associated with obtaining the skills,
and many others that you will have to account for. This leads into the next question — as with any
project, you may be confronted with the choice of developing in-house or outsourcing your project.
13_595636 ch09.qxd 5/10/05 10:02 PM Page 259
Can the module be purchased from a third party?
DotNetNuke has grown in popularity over the past couple of years, and the outlook is continued
growth. More independent software vendors are developing modules, so more than likely there is no
need to develop a module to accomplish a specific task; you can purchase it for very little cost. As of this
writing, more than 250 modules are currently available for sale, and many more are available as a free
download.
Is training required for developers?
Module development does require some additional skills. DotNetNuke module development is done
using the standard tools you would use to do any ASP.NET development, but knowing how to take
advantage of the interfaces available will require some insight into the inner workings of the framework.
Many resources are available for learning about DotNetNuke (in addition to this book you’re reading) if
you want to investigate further.
Should you hire an outside resource to do the development?
Training becomes less of an issue when you have your development done by an outside resource.
DotNetNuke’s popularity has increased at such a phenomenal rate that many solution providers are out
there specializing in module development.
What infrastructure issues are there?
How many developers are going to be working on the same code base? The more developers working
on the same code, the more there will be a need for source control. Scalability may also be something to
consider. In addition, if you have to access resources over the Web, you’ll need to read some of the appli-
cation settings configured at a host level in DotNetNuke.
Do we need to develop multiple data providers for the module?
What database are you going to use for the backend? DotNetNuke supports a Provider Model that
enables developers to abstract out the physical database interaction, allowing the actual DotNetNuke
core and module logic to be separate from the database logic. DotNetNuke supports SQL Server out of
the box, but a provider can be developed for basically any database backend. How many physical
databases you need to support will determine how many providers you will need to develop. Refer to
Chapter 7 on DotNetNuke architecture to learn more about abstraction and the Provider Model. Module
development closely mirrors the DotNetNuke architecture, and you should create a provider for each
platform you wish to support. If you’re going to distribute your module on various DotNetNuke installs
with different databases like SQL Server, Oracle, or MySQL, then you will need to develop a provider to
support those individual databases.
Do we need to support different versions of DotNetNuke?
DotNetNuke is becoming a mature product with several versions released. There have been many major
architectural changes going from version 1.x to 2.x and to 3.x. If your module needs to be available on
these various versions of DotNetNuke, you will need to determine this and manage the various code
bases to accommodate all the required versions.
260
Chapter 9
13_595636 ch09.qxd 5/10/05 10:02 PM Page 260
What resources are needed for ongoing support of the module?
This may not be as much of an issue for modules purchased or developed by an outside party. You may
be able to obtain adequate support from the vendor. If you developed in-house you’ll need to set aside
resources to provide ongoing support of the module.
Of course this list of sample questions is not all-inclusive. You’ll have to determine this for your own
application.
Ready Your Resources
Now that you have decided to begin module development, you will need to ready your development
environment. The entire source and project files are available in the DotNetNuke distribution file that
you can download from
www.dotnetnuke.com. Just as you installed DotNetNuke on the production
server in Chapter 2, you will need to configure a development machine with the source code. Again,
this process is the same as it would be for configuring a production machine as in Chapter 2.
Ensure that your development environment is configured with Visual Studio .NET 2003, SQL Server
2000, or MSDE (or your specific data provider). In addition, if you are working with your source files in
a location other than the DotNetNuke default (c:/dotnetnuke), you may need to change the solution file
(dotnetnuke.sln) and the web information contained within the solution (dotnetnuke.webinfo). By mak-
ing the changes within these files to point to the location of the virtual directory for your environment,
you will ensure that you can open the solution correctly in Visual Studio .NET.
You may want to consider installing Visual Source Safe, or some other source control to ensure integrity of
your project source code. Installing Source Safe is beyond the scope of this book, but it is recommended
that you use some sort of source control to protect your development.
Another item to note is the publishing process from your development environment to your production
environment. Because DotNetNuke is ASP.NET-compiled into several assemblies, the most it takes to
publish to production is simply copying the development assemblies, user controls, the associated aspx,
and resource files to production. Ensure that you compile as release mode in Visual Studio .NET before
placing into production.
In many environments, an extra stage in the development process is added in by placing a sandbox or
testing server in between development and production. This testing server should mirror your produc-
tion environment as closely as possible; you should then install your module to the testing server and
test first. Once the business units review the functionality and ensure it is according to specifications, it
gets published out to the production servers.
Starting Development
We have covered some topics that will lead you to your development decisions, and it’s time to begin
developing your module. In this example, you are going to work with the Events module that is
included in the DotNetNuke distribution. This chapter and the next three chapters provide an in-depth
study of this module and the code to make it work.
261
Beginning Module Development
13_595636 ch09.qxd 5/10/05 10:02 PM Page 261
Configuring Your Visual Studio .NET Project
DotNetNuke is broken down into several solutions; the primary solution located in the root directory of
the distribution file contains all the projects that make up the entire core. This includes any controls, web
forms, class files, and any other files required for the core application. With the release of DNN 3, we
have changed the solution organization to break them up into more manageable pieces for each specific
section of DotNetNuke. For module developers there is the module solution located within the <approot>
\Solutions\DotNetNuke.DesktopModules directory. Open the DotNetNuke.DesktopModules.sln file to
open the module solution in Visual Studio .NET. You will see a solution containing approximately 30
projects. These projects are the individual modules that make up DotNetNuke.
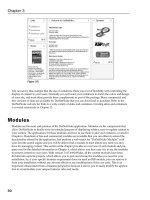
When you open the solution you should see the project listings shown in Figure 9-1.
Figure 9-1
Create Your Project
In order to begin module development you will need to create a module project within the
DesktopModules solution. Several projects are already included in the solution, and in this example you
will be using the Events module. To create your own project, step through the following process:
262
Chapter 9
13_595636 ch09.qxd 5/10/05 10:02 PM Page 262
1. With the Visual Studio .NET DotNetNuke.DesktopModules solution open, right-click the solu-
tion at the top of the Solution Explorer. Select Add ➪ New Project from the context menu. This
brings up the Add New Project dialog.
2. Select Class Library from the Templates section, provide a name for your module in the Name
text box, and click Browse to pick a location for the project files. For module development select
<approot>\DesktopModules\ for the project directory (see Figure 9-2). You should now see
your module listed at the bottom of the Solution Explorer.
Figure 9-2
3. Notice BuildSupport project within this solution. This project is what helps you to compile your
assemblies to the bin directory of the main DotNetNuke project. By compiling to the bin direc-
tory of the main DotNetNuke core project, any time you make a change in your development
code and compile, those changes will be displayed within your module when you view it
within your portal in a web browser. This eliminates the need to copy the dll file into
DotNetNuke’s bin directory every time you make a change and recompile. You accomplish this
by adding a reference to your module project to the BuildSupport project as in Figure 9-3.
4. As you can see in Figure 9-3, a reference is created to each of the module projects in DNN.
For the example used in this and the next three chapters, you can see a reference to the Events
module — SQLDataProvider (more about this in the next chapter).
Once your module project has been created, you will need to follow the same procedure in order to cre-
ate your SQLDataProvider project. The only difference for the Data Provider project is the name, which
will be ModuleName.SQLDataProvider (depending on your physical provider; if you were using
Access, it would be AccessDataProvider). It is generally acceptable to place the Data Provider project
in a subdirectory off of your module, so the full path would be <approot>\DesktopModules\Module
Name\Providers\DataProviders\SQLDataProvider\. You would then create a directory for each physi-
cal database you plan on supporting for your module.
263
Beginning Module Development
13_595636 ch09.qxd 5/10/05 10:02 PM Page 263
Figure 9-3
Add Controls
Now that your project has been created, you need to add some controls for your users to interface with
and some classes for data operations.
There is a limitation with Visual Studio .NET in adding user controls in class projects, user controls
(ascx) cannot be added to a class project. In many cases developers will copy an existing ascx control
from another module project and then paste it into the newly created project.
For most modules you will need to create three controls:
❑ View Control: This is the default view users will see when they first access your module.
❑ Edit Control: This is for updating the data contained in the module’s tables within the database.
❑ Settings Control: This is for specifying unique values for a particular instance of a module.
264
Chapter 9
13_595636 ch09.qxd 5/10/05 10:02 PM Page 264