Programming Linux Games phần 2 doc
Bạn đang xem bản rút gọn của tài liệu. Xem và tải ngay bản đầy đủ của tài liệu tại đây (298.72 KB, 46 trang )
24 CHAPTER 2
Using the Make Utility
Most game development projects consist of multiple source files, for the simple
reason that it is impractical to manage thousands of lines of code in a single file.
Since a large project can involve many source files, it would be wasteful to
recompile everything if only one file had been changed since the program was
last compiled. This happens, however, if all of the files are given to gcc at once
on the command line. For instance, the Linux version of Civilization: Call To
Power consists of more than 500,000 lines of C++ code in well over 100 files, and
a full recompile of the entire source tree takes nearly an hour (whereas a partial
rebuild assisted by Make usually takes 15 to 20 minutes).
The Make utility speeds up software development by automatically determining
which files actually need to be recompiled after changes have been made. Make
also eliminates the need to type long command lines to rebuild programs, since it
stores all of the required commands and invokes them as needed.
Although Make has a lot of functionality, its basic usage is quite simple. It is
based on targets, which are sets of directions for maintaining the components
(object files, libraries, and so on) of a program. Targets specify the name of the
component to track, the source files and other targets that the component
depends on, and the commands for rebuilding the target. The instructions for
building a component are called rules, and the list of files that a component
depends on are called dependencies. When make is invoked upon a certain target,
it checks that target’s dependency list first. If any of the dependencies have been
changed since the target was last rebuilt, the target’s rules are executed. Make
also recursively rebuilds any out-of-date targets in the dependency list. This is
extremely convenient for large, modular programming projects.
Creating Makefiles
Make looks for targets and rules in a file called Makefile or makefile. This file
can contain any number of targets. If Make is started with no command-line
options, it automatically attempts to rebuild the first target it encounters.
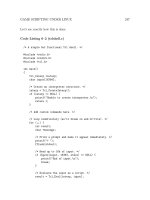
Consider the following makefile:
program: file1.c file2.c graphics.a
gcc -c file1.c file2.c
gcc file1.o file2.o graphics.a -lSDL -o program
LINUX DEVELOPMENT TOOLS 25
graphics.a: graphics.c draw.c
gcc -c graphics.c draw.c
ar rcs graphics.a graphics.o draw.o
ranlib graphics.a
This file describes how to build an executable called program and a static
library called graphics.a. (Don’t worry about the commands for building the
library—we’ll discuss libraries later in this chapter.) program depends on
file1.c, file2.c, and graphics.a. If any of these have been modified since
program was last built, Make will rebuild program. graphics.a is also a target,
and it depends on graphics.c and draw.c. The indented lines under each target
are rules. If program needs to be rebuilt, Make will execute the two rules that
have been provided. These lines must be indented with tab characters; spaces
will not work. Make is rather particular about syntax.
Variable Substitution
The Make utility provides convenient access to environment variables. Makefiles
can set, combine, and retrieve environment variables as text strings and can
include these variables in targets and rules. It is common to use the variable CC
to represent the C compiler command (which in our case is gcc), CFLAGS to
represent the standard set of command-line options to pass to the compiler, and
LDFLAGS to represent the options to pass to the linker (which is normally just the
C compiler but is sometimes explicitly invoked with the ld command). For
example, the previous makefile can be rewritten as follows to take advantage of
variable substitution:
CC=gcc
CFLAGS=-O2 -W -Wall -pedantic
LIBS=-lSDL -lpthread
program: file1.c file2.c graphics.a
$(CC) $(CFLAGS) -c file1.c file2.c
$(CC) file1.o file2.o graphics.a $(LIBS) -o program
26 CHAPTER 2
graphics.a: graphics.c draw.c
$(CC) $(CFLAGS) -c graphics.c draw.c
ar rcs graphics.a graphics.o draw.o
ranlib graphics.a
As you can see, variables are substituted into the makefile with the $(VARNAME)
notation. This is a literal text substitution, and it takes place before the rule is
otherwise processed. What if you want to add to the end of a variable without
destroying its old contents? You might try something like this:
FOO=bar
FOO=$(FOO) baz
FOO=$(FOO) qux
At a glance, it would appear that the FOO variable would end up with the value
bar baz qux. However, Make does not normally evaluate variables until they
are used (in targets), so FOO actually ends up with the string $(FOO) qux. There
are two solutions to this problem. GNU Make (the default Make on Linux
systems) provides a := operator for assignments, which causes its right-hand side
to be evaluated before the variable is assigned. It also provides a += operator for
directly appending to variables. A more portable solution would be to assign
bar, baz, and qux to three different variables and to combine them all at once:
BAR=bar
BAZ=baz
QUX=qux
FOO=$(BAR) $(BAZ) $(QUX)
This (hacked) solution allows the variable FOO to be constructed correctly when
it is used in a rule. It is a rather ugly way to do so, however, so we suggest using
the GNU Make extensions.
Although the use of variables might lengthen a makefile, they can provide a nice
bit of abstraction. Variables make it easy to modify the options used throughout
the build process without changing the whole makefile.
LINUX DEVELOPMENT TOOLS 27
Implied Rules
Since C files are almost always compiled with the cc command (which is a
symbolic link to the gcc command on Linux machines), there is really no need to
specify build rules for each source file in the project. Make allows for implied
build rules. That is, if a target is followed by no rules and does not specify any
dependencies (or it simply does not exist), Make will attempt to use a default
build rule based on the target’s file extension.
For example, let’s say that foo.c is a C source file containing the function bar
and that main.c is a C source file containing a main function that calls bar.
The following makefile will build the program. Notice that there is no target for
foo.o—it is referenced by the foo target, and Make assumes that it should create
the target by compiling the file foo.c. (Actually, Make knows of several different
source file types, C being perhaps the most common.) When Make automatically
invokes the C compiler, it adds the CFLAGS variable to the command line.
CFLAGS=-O2 -W -Wall -pedantic
foo: foo.o main.c
gcc foo.o main.c -o foo
Phony Targets
Programmers often use Make for purposes other than building executables. It’s
really a general-purpose project management tool. For instance, I’m currently
using a makefile so that I don’t have to delete a bunch of files and then run
L
A
T
E
X, MakeIndex, and dvips every time I want a preview of this book. Consider
the following makefile:
foo: foo.c
gcc foo.c -o foo
clean:
rm *.o
rm foo
The clean target has no dependencies and is therefore built only when it is
specifically requested on the command line. The command make clean causes
28 CHAPTER 2
all object files as well as the executable foo to be deleted and therefore serves to
force a complete rebuild of the project. Programmers commonly include a clean
target in their makefiles for convenience.
In a more general sense, Make is often used as a simple interface to complex
commands. Targets used for this purpose do not actually describe a build
process but rather a set of commands to be executed when the target is
requested. But what happens if such a “phony” target has the same name as a
file in the current directory? For instance, what if there is a file called clean?
Make would detect that this file exists and would decide not to build the target.
Make provides a special pseudo-target called .PHONY for this purpose. .PHONY
takes a dependency list, just as other targets do, but no build rules. .PHONY’s
dependencies are marked as phony targets and will always be built when
requested, regardless of any existing file by the same name. Here is the previous
makefile, rewritten to use the .PHONY target.
foo: foo.c
gcc foo.c -o foo
.PHONY: clean
clean:
rm *.o
rm foo
Error Handling
In the event of an error, Make immediately stops and prints an error message (in
addition to whatever was printed by the command that failed). Make detects
errors by the return codes of the rules it executes: a return code of zero indicates
success, and anything else indicates an error. Most UNIX commands follow this
convention. If there is a syntax error in the makefile itself, Make will complain
about it and exit.
LINUX DEVELOPMENT TOOLS 29
Working with Libraries
Libraries provide a way to package code into reusable binary modules. Linux
software can use two types of libraries: static and shared. A static library is
simply a collection of object files that have been archived into one file with a
symbol table. Static libraries have a file extension of .a, and they can be linked
into programs as normal object files. A shared library is similar to a static
library, except that it permanently resides in a separate file and is never directly
linked into an application. Shared libraries are linked at runtime by the
operating system’s dynamic linker.
Static Libraries
Static libraries are extremely simple to create and use. Once you have created
the object files you wish to package as a library, combine them with the ar utility:
$ ar rcs something.a file1.o file2.o file3.o
ar is a simple archiving utility. The r option specifies an operating mode: it tells
ar to add the given files to the archive, replacing any existing files with the same
names. The c option specifies that the archive should be created if it does not
already exist. Finally, s informs ar that this is an archive of object files (that is,
a static library) and that a symbol table should be added. Optionally, you can
leave out the s flag and use the ranlib utility to add the symbol table; the
resulting file will be equivalent.
To use a static library, pass it to gcc just as you would pass a normal object file.
gcc will recognize the .a file extension as an archive of object files.
Shared Libraries
Shared libraries are a bit more complex to manage than static libraries, but they
are often worth the extra effort. Shared libraries are not stored in executables
that use them; they are independent files that are linked into executables at
runtime. In many cases shared libraries can be updated without recompiling the
programs that depend on them. It is possible for the operating system to load a
shared library into memory once, for use by multiple applications.
30 CHAPTER 2
Shared libraries follow a very specific naming scheme designed to keep
incompatible versions separate. Each shared library should be given a unique
base name (or soname) of the form libFooBar.so.n, where n is a major release
number. The major release number should be incremented whenever backward
compatibility is broken. Minor version and release numbers (indicating slight
revisions that shouldn’t affect compatibility) are added to the end of the base
name, so that the final name looks something like libFooBar.so.2.1.3.
The ldconfig utility imposes sanity upon the various versions of a library that
might exist. It searches for libraries in a certain set of directories, usually
specified in /etc/ld.so.conf or the environment variable LD LIBRARY PATH. For
each library it finds with a name in the form libSomething.so.m.n.r , it
creates a symbolic link for libSomething.so.m. If two libraries have the same
base name, ldconfig creates a symbolic link to the later version. Applications
reference these symbolic links rather than the full names of the libraries. If a
new release of a library is installed, ldconfig updates the symbolic link, and all
applications that use the library will automatically reference the new version.
Creating Shared Libraries
Shared libraries are simple to create. First, compile your sources into object files
with the -fPIC flag. This causes gcc to output position-independent code, which
is more palatable to the dynamic linker. Then link with gcc’s -shared flag. You
will also need to inform the linker of the soname you wish to use. To see how
this is done, take a look at the following example:
$ gcc -fPIC -c foo.c bar.c
$ gcc -shared -Wl,-soname,libFooBar.so.1 foo.o bar.o -o \
libFooBar.so.1.1.1
$ su
Password:
# install -m 0755 libFooBar.so.1.1.1 /usr/lib
# ldconfig
# ln -s /usr/lib/libFooBar.so.1 /usr/lib/libFooBar.so
# exit
The first command produces the object files foo.o and bar.o, and the second
creates the shared library. Note the use of the -Wl flag to send options directly
LINUX DEVELOPMENT TOOLS 31
to the linker. The library is then installed to the standard location with a
reasonable set of permissions (note: this step will require write permission to
/usr/lib), and ldconfig is executed to set up the proper symbolic link. Finally,
another symbolic link is created to the base name of the library. This allows the
library to be linked into a program with the -lFooBar gcc option.
Using Shared Libraries
Shared libraries are extremely versatile. Once they are linked into an
application, they act as part of the program, except that the actual linking is
done at runtime. Shared libraries can also be manually loaded and accessed via
the dlopen C interface.
To link a properly installed shared library into an application, use gcc’s -l
option. For instance, to link with /usr/lib/libFooBar.so (which is a symbolic
link to /usr/lib/libFooBar.so.1), specify -lFooBar. If the library resides in a
nonstandard directory (such as the X libraries in /usr/X11R6/lib), use the -L
option (-L/usr/X11R6/lib). When the application is run, the runtime linker
attempts to locate the library (by name) and match its symbols with the
symbols the application thinks it should have. If any symbols are missing, the
linker reports an error, and the application fails to load. Otherwise, the shared
library becomes part of the application.
dlopen/dlsym is another approach to using shared libraries. This interface
allows you to manually open and access shared object files. For example,
suppose that libfoo.so is a shared object file containing a function bar. The
following example will open the file and call the function:
#include <dlfcn.h>
/* dlfcn.h provides the dlopen() interface */
int main()
{
void *handle;
void (*bar)(void);
/* Open the library and save the handle */
handle = dlopen("libfoo.so",RTLD_NOW);
if (handle == NULL) {
32 CHAPTER 2
/* dlerror() returns an error message */
printf("dlopen failed: %s\n",dlerror());
return 1;
}
/* Attempt to find the address of bar() */
bar = dlsym(handle,"bar");
if (bar == NULL) {
printf("dlsym failed: %s\n",dlerror());
return 1;
}
/* Good, we found bar(), so call it */
bar();
/* Close libfoo.so */
dlclose(handle);
return 0;
}
The RTLD NOW flag in dlopen indicates that dlopen should attempt to resolve all
symbols that the shared library depends on immediately. (Shared libraries can
depend on other libraries, so this is a serious concern.) The other option is
RTLD LAZY, which instructs the dynamic linker to resolve symbols as it
encounters them.
Sometimes a dynamically loaded library needs to access symbols in the parent
application. To allow these symbols to be resolved, compile the application with
the -rdynamic option and the export-dynamic linker option. (The correct
syntax is -wl, export-dynamic.) The -rdynamic option allows unresolved
symbols in a shared library to be matched with symbols in the parent
application, and the export-dynamic option instructs the linker to generate
extra symbol information suitable for this purpose.
Linux Linker Quirks
The Linux linker, GNU ld, is a complex but quirky tool. Although a complete
discussion of ld is far beyond the scope of this book, here are some hints that
might make your life easier.
LINUX DEVELOPMENT TOOLS 33
ld (and therefore gcc) is sensitive about the order in which libraries and object
files are specified on the command line. If libfoo.so depends on libbar.so, you
must specify libfoo.so first (as counterintuitive as this may be). The reason is
that ld keeps track only of unresolved symbols as it links. If libfoo.so and
libbar.so depend on each other, one of the libraries will have to be specified
twice (for example, -lfoo -lbar -lfoo). This is different from the behavior of
Visual C++’s linker, and it causes headaches when porting games from Windows.
If the linker can’t find a symbol but you’re sure that you’ve given it the right
libraries, double-check the order in which they’re specified on the command line.
The Linux runtime linker does not respect the LD LIBRARY PATH environment
variable with setuid root executables. This is a bit annoying, but it is important
for security; consider the implications of allowing users to modify the library
search path for executables that are run as the root user.
Name collisions are annoying, especially because they can be extremely hard to
trace. The -warn-common flag causes a warning to be printed whenever symbols
(global variables, for instance) are combined between object files.
Finally, keep in mind that some Linux distributions (notably Red Hat, at least
as of the time of this writing) do not recognize /usr/local/lib as a library
directory, and hence any libraries placed there will not be accessible. You can fix
this by editing /etc/ld.so.conf. Remeber to run the ldconfig program after
editing the library path list.
Debugging Linux Applications
Linux’s programming environment provides support for interactive debugging.
The gcc compiler can generate symbol information for debugging, and several
debuggers are available. We will begin by demonstrating how to add debugging
information to an executable and then take a brief tour of two popular
debugging environments for Linux.
Compiling for Debugging
In order for a debugger to analyze an executable’s behavior in a way that is
useful to humans, it needs to determine the exact locations of the program’s
34 CHAPTER 2
variables and function entry points. This requires a bit of help from the
compiler; applications must be specifically compiled for debugging, or symbolic
debuggers will be useless. To compile a program with the necessary debugging
support (and in particular, support for the gdb debugger), use the -ggdb flag:
$ gcc -ggdb foo.c -o foo
It is a good idea to disable optimization when debugging (that is, do not use the
-On compiler option). Although gcc and gdb allow you to debug optimized
executables, the results might be a bit surprising (since optimization, by
definition, changes the internals of a program).
Although programmers sometimes use the -fomit-frame-pointer compiler
option in the hope of improving performance, this option is incompatible with
debugging in most cases. (It causes the compiler to omit the instructions that
usually keep track of an important piece of position information.) Compiling an
executable for debugging will increase its size and most likely decrease its
performance; executables intended for public release should not be compiled for
debugging.
gdb
The GNU debugger, known as gdb, is the primary debugger for Linux. It allows
you to single-step programs, inspect variables while programs are running, and
analyze core files (memory dump files, usually named core, generated
automatically when applications crash, affectionately dubbed “core pies”). gdb
is an extremely powerful tool, but its interface is likely to throw beginners for a
loop.
gdb is a text-based interactive debugger. Once a program is loaded into the
debugger, gdb accepts commands to direct the program’s operation. There are
lots of commands, but there is also a nice online help facility. Simply type help
for an index.
LINUX DEVELOPMENT TOOLS 35
A Trivial Example
The following program is supposed to print the numbers from 0 to 9. However, it
has a bug. There is an extra semicolon after the for loop, which causes the
printf statement to be separated from the loop. This is a fairly common error,
simple to fix but often hard to locate. gdb is great for pinpointing this type of
error, since it lets you see exactly what’s happening in the program.
#include <stdio.h>
int main()
{
int i;
for (i = 0; i < 10; i++);
printf("Counter is now %i\n",i);
return 0;
}
First, we compile the program and test it:
$ gcc -ggdb buggy.c -o buggy
$ ./buggy
Counter is now 10
Yikes! That shouldn’t have happened—we’ll use gdb to figure out what’s going
on. To load a program into gdb, pass the name of the program on the command
line:
$ gdb buggy
GNU gdb 4.18
Copyright 1998 Free Software Foundation, Inc.
license notice removed
This GDB was configured as "i386-redhat-linux" }
gdb is now ready to accept commands. We will set a breakpoint (a position at
which gdb suspends the process for inspection) and then start the program:
36 CHAPTER 2
(gdb) b main
Breakpoint 1 at 0x80483d6: file buggy.c, line 6.
(gdb) r
Starting program: /home/overcode/book/test/buggy
Breakpoint 1, main () at buggy.c:6
6 for (i = 0; i < 10; i++);
The b command (short for breakpoint) sets a breakpoint at the specified function
name. We also could have specified a line number or an actual memory address.
In this case, gdb reports that breakpoint #1 has been successfully added for line
6 of the source file buggy.c. The r command starts the program’s execution.
Since we have set a breakpoint on the function main, gdb immediately suspends
the program and prints the current line (which happens to be the for loop with
the error). We will now use the n (next) command to single-step the program:
(gdb) n
7 printf("Counter is now %i\n",i);
The n command runs the program until it reaches a different line of code, so this
is the expected result. After executing this line of code, the program should
continue through the loop. Let’s see what happens:
(gdb) n
Counter is now 10
8 return 0;
That’s not good—the program moved on to line 8, meaning that the loop is no
longer running. It is now fairly obvious that line 7 is not part of the loop. We
can take a quick look at the source code with the l (list) command:
(gdb) l
3 int main()
4 {
5 int i;
6 for (i = 0; i < 10; i++);
7 printf("Counter is now %i\n",i);
8 return 0;
9 }
LINUX DEVELOPMENT TOOLS 37
Hopefully, at this point the programmer would notice the extra semicolon and fix
the problem. (One would hope that the programmer would have found it before
the gdb session, but we all make dumb mistakes.) gdb doesn’t eliminate the need
to study the source code for errors—it just helps you focus on the right areas.
Accessing Data
gdb can report the value of any variable that is accessible from the current scope
in the program. It can also modify variables while the program is running. To
view a variable, use the p (codeprint) command. p foo would report the current
value of foo (if foo is visible from the current location in the program). There is
also a printf command, which behaves much like its C namesake. To modify a
variable, use the set var varname=value command.
Programmers frequently need to track variables as they change throughout the
program. With gdb, you can define a list of variables to display each time the
program is suspended. The display command adds variables to this list, and
the undisplay command removes them.
gdb’s watchpoints are useful for tracing variable corruption. A watchpoint is a
hardware trap placed on a memory location. If that memory location is read
from or written to, gdb will catch the access and pause the program for
inspection. Since watchpoints are independent of the semantics of a particular
programming language, they can be used to trace memory corruption from
misplaced pointers. There are three types of watchpoints: write-only, read-only,
and access. Write-only watchpoints detect modifications but not reads, read-only
watchpoints detect reads but not modifications, and access watchpoints detect
any type of access to the given memory address. The watch, rwatch, and
awatch commands correspond to these types of watchpoints. These three
commands take a symbol name as an argument. Use the enable and disable
commands to toggle watchpoints. info breakpoints prints a list of all
breakpoints and watchpoints.
Viewing the Stack
It is often useful to examine the call stack. Programs often crash because of
invalid data passed to the C library (notably the free function), and a normal
38 CHAPTER 2
gdb crash report will list the name and memory address only of the function
where the crash actually occurred. This is essentially useless in a typical
program that makes hundreds of calls to these functions; the bewildered
programmer would have no idea where the erroneous library call took place. For
instance, the following is the late-night programmer’s worst nightmare (other
than a copy of eggdrop found running in an unknown account):
Program received signal SIGSEGV, Segmentation fault.
0x401371eb in free () from /lib/libc.so.6
This message indicates a crash in the C library itself, resulting from an invalid
call to free. This information is almost useless to us, since most nontrivial C
programs make hundreds of calls to free. Since the segmentation fault occurred
in a function outside of our program (and, more importantly, in one that does
not contain debugging information), gdb cannot simply tell us the line number of
the crash location.
gdb solves this problem with its backtrace command. When a program crashes
under gdb, backtrace will display the names of all functions that are currently
active on the stack. In this particular program, backtrace provides us with the
following information:
(gdb) backtrace
#0 0x401371eb in free () from /lib/libc.so.6
#1 0x804b85e in ParseSurf (f=0x8112568, buf=0xbfffd6f0 "SURF 0x10")
at ac3dfile.c:252
#2 0x804c71f in ParseObject (scene=0x8112620, f=0x8112568,
buf=0xbfffe34c "OBJECT poly") at ac3dfile.c:545
#3 0x804c7c3 in ParseObject (scene=0x8112620, f=0x8112568,
buf=0xbffff380 "OBJECT world") at ac3dfile.c:559
#4 0x804cb74 in AC3D_LoadSceneFile (filename=0xbffff957 "crash.ac")
at ac3dfile.c:829
#5 0x804d7a2 in main (argc=3, argv=0xbffff7e4) at ac3dembed.c:15
Aha! The invalid free call occurred while the program was executing line 252 of
ac3dfile.c, in the function ParseSurf. We now know exactly where the
erroneous call to free was made, and we can use standard debugging techniques
to figure out why this particular line caused a crash. (A hint, in case you find
LINUX DEVELOPMENT TOOLS 39
yourself in this situation: crashes in free are usually due to heap corruption,
which can result when a program overruns allocated memory buffers.)
backtrace’s output will be useless if the program has corrupted the stack in
some way. If this happens, you’re in for a challenge, but at least you’ll know to
look for memory accesses that might cause stack corruption. If you’re feeling
particularly adventurous, you can try setting a watchpoint on an address in the
stack, but it could easily be triggered by legitimate accesses as well as bugs.
Remote Debugging
Linux is a network-enabled multiuser operating system, and it makes remote
debugging extremely easy. Remote debugging (that is, debugging from a
different console than the one on which the program is running) is useful when
you’re dealing with applications that take over the screen or keyboard (as is
frequently the case with games). Anyone who has had to debug a full-screen
OpenGL game can attest to the importance of remote debugging.
gdb supports two types of remote debugging. It provides support for debugging
over a serial connection, which is useful for kernel debugging but probably
overkill for game development. Serial debugging is important when one cannot
count on the stability of the operating system itself (and therefore the stability
of the debugger). gdb also has the ability to attach to programs that are already
running. You start the buggy application (compiled for debugging) normally and
launch gdb via a remote login from a second computer. You then attach gdb to
the buggy application. Now you can use the debugger without fear of losing
control of the console. Note that gdb is running on the same computer as the
application; it is just controlled from a remote terminal.
To attach gdb to a running program, first use the file command with the name
of the executable you want to debug:
(gdb) file foo
Reading symbols from foo done.
gdb is now ready to attach to a running copy of foo. Use the attach command
with the process ID of the running application:
40 CHAPTER 2
(gdb) attach 3691
Attaching to program: /home/overcode/test/foo, Pid 3691
Reading symbols from /usr/X11R6/lib/libX11.so.6 done.
Reading symbols from /lib/libc.so.6 done.
Reading symbols from /lib/ld-linux.so.2 done.
0x4016754e in __select () from /lib/libc.so.6
The debugger has suspended foo, and you can now use the normal gdb
debugging commands, just as if you had started foo under gdb directly.
Debugging Multithreaded Applications
Games frequently use multiple threads of execution to smoothly coordinate the
various parts of the game engine. Unfortunately, multithreading has always been
a thorn in the side of source-level debuggers. gdb can debug multithreaded
applications locally, but it cannot attach to more than one thread of an
application that is already running. This is because threads under Linux are
implemented as separate processes that share an address space, and each thread
has a separate process ID. gdb needs to catch threads as they are created in
order to debug them.
When gdb suspends a multithreaded application, it suspends all of its threads at
once. This allows you to switch between threads and examine the program
without the fear that something will change in the background. Keep in mind,
however, that single-stepping a multithreaded application may result in more
than one line of code being executed in some threads; gdb only directly controls
the execution of one of the threads.
Working with threads in gdb is not particularly difficult. The info threads
command prints a list of threads owned by the application, and the thread id
command switches between threads. gdb assigns its own thread IDs to a
program’s threads; these are listed in the leftmost column of the info threads
display. To apply a gdb command to one or more threads, use thread apply
ids, where ids is a list of thread IDs or “all.”
Unfortunately, multithreading causes problems with watchpoints. gdb can
reliably detect memory changes only within the current thread; it might fail to
detect a change caused by another thread. Watchpoints can still be useful in
multithreaded applications, but you will have to determine which thread is
causing the change on your own.
LINUX DEVELOPMENT TOOLS 41
Screen shot of ddd
ddd
Many people find the gdb interface hard to live with, and so several front ends
have been created. Perhaps the best-known front end is the Data Display
Debugger, or ddd. This program adds a nice interface to gdb, perhaps limiting
its usefulness to hardcore gdb fans but certainly making life considerably easier
for beginners.
ddd requires only a minimal introduction, because it closely mirrors the
functionality provided by gdb (and with good reason; it is gdb, inside a GUI
wrapper). To begin a debugging session with ddd, choose Open Program from
the File menu. You may then set breakpoints and control execution with ddd’s
toolbar and menus. ddd allows you to attach to running programs after the
corresponding executables have been opened. If you need a piece of functionality
provided by gdb but not ddd, you can send commands directly to gdb with the
console at the bottom of the screen.
42 CHAPTER 2
Bug Tracking
A very important but often overlooked aspect of debugging is keeping track of
the information pertaining to identified bugs. A game development team might
easily receive hundreds of bug reports during the course of a game’s development
and beta test, and it is essential to organize these reports so that the developers
can easily verify and resolve the bugs. Bug-tracking software is every bit as
important to a serious game development operation as the debugger itself.
The Mozilla project’s Bugzilla has emerged as one of the best and most widely
used bug-tracking systems. Bugzilla is a Web-based system written in Perl and
designed for use with the popular Apache Web server and MySQL database
server. With it, users can report bugs, check to see if a reported bug has been
resolved, and browse through other bugs that have been reported. Bugzilla is
covered under the Mozilla Public License, and it can be freely used and modified.
It is relatively simple to install if MySQL and Apache are already configured. To
see Bugzilla in action, visit .
Project Management with CVS
Collaboration is the only way to accomplish a large programming task in any
reasonable amount of time, but coordination can become difficult even with only
two or three developers working on a project. In particular, care must be taken
to ensure that one programmer’s work does not overwrite another’s. It is also
important to keep development and release versions of a piece of software
separate.
These problems are addressed by version control software. The capabilities of
these tools vary, but we will discuss the most popular tool, the Concurrent
Version System (CVS). CVS is a tool for managing repositories, which are
simply directory trees of source code with a bit of extra control information.
Each project in a repository is called a module. Modules are initially imported
into the repository, and additional files can subsequently be added. Individual
developers can check out modules, make changes, and commit the updated files
back into the master source repository when they are finished. CVS keeps a
record of the changes made to each file and allows individual files or entire trees
to be tagged with version designations. Developers can also create separate
LINUX DEVELOPMENT TOOLS 43
branches of a source tree if they intend to make substantial and possibly
dangerous modifications. Successful branches can later be merged back into the
main source tree.
What if two developers make (conflicting) modifications to the same file? Some
version control systems physically prevent this with “strong” file locking, but
CVS allows it. In the case of a conflict, CVS will prevent the most recent
modification from being committed to the repository. Instead, it will provide the
developer with a reject file listing the source code lines in question. The
developer must then merge the two sets of changes by hand and then recommit
the file. This would obviously be a continuous hassle without a bit of
coordination between developers; CVS does not replace communication and
management. It is best to avoid conflicts in the first place, but they are
sometimes inevitable.
CVS is a free tool, a fact that has played a role in its almost universal
acceptance in the Linux development community. Free software would not be
where it is today without CVS.
A Brief Tutorial on CVS
We will now work through a complete example of using CVS to manage a small
project. Suppose that we have four files: Makefile, foo.c, foo.h, and main.c.
These constitute a small programming project, but their contents are not
relevant for our purposes. We would like to create a CVS module out of these
files so that other developers can join in. For now we’ll assume that all
developers have local access to the machine hosting the repository, though it is
possible to use CVS remotely.
Creating a CVS Module
The first step is to create a repository, if one does not already exist. A repository
can host any number of modules, and it is common for software teams to use one
central repository for all of their projects (this facilitates routine backups, among
other things). To create a repository, set the CVSROOT environment variable to a
suitable location and issue the command cvs init. This will create the CVS
repository directory and initialize several important control files. The location of
44 CHAPTER 2
CVSROOT is not especially important, but make sure that your account has write
access to it. If a repository already exists, make sure the CVSROOT environment
variable is set to the repository’s location.
$ export CVSROOT=/home/overcode/cvs
$ cvs init
Warning
Do not create a CVS repository in the same directory as a project you
wish to add to the repository. This would result in an infinite loop.
CVS is remarkably brain-dead about some things, but it’s a useful tool
nonetheless.
Now we need to import the initial set of source files to the repository. Assuming
that we are in the project’s directory and that CVSROOT is set correctly, we use
the command cvs import -m "Some descriptive comment" projname
vendor label, where projname is the name of the project (“foobar” for now),
vendor is the name of the organization responsible for the project (which doesn’t
matter too much to us), and label is an indication of the software’s progress,
such as initial or start. This command will copy the project’s files into the
CVS repository under the given project name. The project is now controlled by
CVS, and the original files can safely be deleted.
For the purposes of our tutorial, the correct import command is cvs import -m
"CVS Example" example xyz start. This command must be executed from the
directory containing the four source files, and CVSROOT must point to the
initialized repository.
$ cvs import -m "CVS Example" example xyz start
N example/foo.h
N example/foo.c
N example/main.c
N example/Makefile
No conflicts created by this import
LINUX DEVELOPMENT TOOLS 45
Working with a CVS Project
Once a project is in CVS, multiple developers can safely access the project’s files
without too much fear of colliding with one another. Each developer should
make his or her own working copy of the project (with the cvs checkout
projname command). For our tutorial, switch to a new directory and type cvs
checkout example. CVS will copy the four example files to a new directory
called example. You can now make any modifications you like to the files, and
other developers can join in by checking out their own copies of the project.
Warning
Try to avoid editing files in a CVS repository directly. Doing so defeats
the whole purpose of CVS, and it is sure to cause massive headaches for
the next person to commit a working copy to the repository.
CVS-controlled files are marked read-only to help prevent this from
happening. CVS is not designed to be a nuisance (quite the opposite,
actually), but it requires a bit of cooperation from its users.
When you have finished making modifications to a project’s files, you should
commit them back into the repository for everyone else to use. For example,
suppose that we have corrected an error in foo.c, and we want to integrate this
modification back into the master source tree. From the directory containing our
working copy, we would type cvs commit -m "Description of changes".
$ cvs commit -m "Fixed a typo."
cvs commit: Examining .
Checking in foo.c;
/home/overcode/testcvs/example/foo.c,v < foo.c
new revision: 1.1; previous revision: 1.0
done
What if someone has made conflicting modifications to the master copy of
foo.c? It would be bad to simply overwrite those changes; that person may have
spent a lot of time on them. CVS obviously doesn’t know how to rewrite source
code to integrate changes (beyond a certain, very limited capability), so we must
intervene and merge the changes ourselves. The transaction might look
something like this:
46 CHAPTER 2
$ cvs commit
cvs commit: Examining .
cvs commit: Up-to-date check failed for ‘foo.c’
cvs [commit aborted]: correct above errors first!
This response indicates that somebody else has modified foo.c, and so this file
requires special attention. To correct the problem we need to perform a CVS
update, which will compare our modified version with the one on the server and
produce a list of conflicts.
$ cvs update
cvs update: Updating .
RCS file: /home/overcode/testcvs/example/foo.c,v
retrieving revision 1.4
retrieving revision 1.5
Merging differences between 1.4 and 1.5 into foo.c
rcsmerge: warning: conflicts during merge
cvs update: conflicts found in foo.c
C foo.c
The file foo.c now contains diff-like information showing which lines need to be
merged. We should edit the file, decide how to resolve the conflicting lines of
code, remove CVS’s information, and perform another cvs commit. Unless more
modifications have been made to the master file, CVS will accept the second
commit.
CVS Revision Numbers
CVS automatically assigns revision numbers to the files in a source
repository. These numbers are incremented after each successful
commit. They are intended for reference within the CVS system, and
they generally do not correspond to a product’s actual version numbers.
Adding and Removing Files
To add a file to a CVS module (that is, to ask CVS to start controlling a newly
added file from your working directory), use the cvs add command. For
LINUX DEVELOPMENT TOOLS 47
instance, to add a file named qux.c to the foo module, you would use the
command cvs add qux.c. You can specify wildcards, but be careful when doing
so. To add a directory to a CVS module, simply add one or more files within
that directory.
Removing files from CVS is a bit trickier. There is a cvs remove command, but
it can be used only if the file in question no longer exists. For example, suppose
that you erroneously added qux.c to CVS. To remove it, you would first have to
delete or rename your working copy of qux.c and then run the cvs remove
command. This is truly annoying, but it does at least make you think twice
before ripping a file out of the source tree. CVS never actually deletes these files;
instead, it stores them in a special directory called Attic, from which they can
usually be recovered.
Branching Source Trees
Developers often have great ideas, but they’re sometimes risky or difficult to
implement. CVS allows developers to create branches of source trees so that
they can test these ideas without jeopardizing everyone else’s work. If these
experimental branches work out, CVS can merge them back into the main source
tree. Branches are also good for creating release snapshots of a source tree so
that individual releases can be maintained while the main development process
continues. For instance, if the Linux kernel team were to use CVS (which it does
not), the “cutting edge” kernel would probably be in the main tree, while each
major release (2.2, 2.4, and so on) would have its own branch for continued
maintenance (such as security patches and driver backports).
To branch a source repository, use the cvs rtag (remote tag) command with the
-b (branch) option. This will create a new branch of the current source tree and
tag it with a name. For example, suppose we want to add a gltweak branch
(presumably for OpenGL tweaking) to the example tree:
$ cvs rtag -b gltweak example
cvs rtag: Tagging example/foo.h
cvs rtag: Tagging example/foo.c
cvs rtag: Tagging example/main.c
cvs rtag: Tagging example/Makefile
48 CHAPTER 2
Most CVS commands allow you to select a branch with the -r option. To check
out the new gltweak branch, use cvs co -r gltweak example. (Likewise, you
would use cvs update -r gltweak example to update an already checked-out
source tree to a new copy of the branch.) Once you’ve checked out a tagged
branch, all further updates and commits from that directory will automatically
refer to the branch rather than to the master source tree. It is possible to merge
a branch back into the main tree with the cvs update -j branchname
command (of course, this is likely to produce conflicts, just as any other merge
might).
You may have noticed that the cvs rtag command operates on the CVS
repository rather than on a checked-out copy of the code. You can tag an
existing directory just as easily (in which case the branch will actually be created
whenever it is committed). This might be useful if you decide that things are
getting out of hand halfway into a major hacking session. The command for this
is simply cvs tag.
Branching is certainly useful, but use it with care. It’s easy to make a mess of a
source repository unless you manage this sort of thing carefully.
Accessing CVS Remotely
CVS is well suited to the Internet’s massively distributed environment. It
supports remote access with its client/server mode. Setting up a CVS server is
not too difficult, but it is beyond the scope of this section.
6
However, it is
important to know how to access remote CVS servers, since they are frequently
used for Linux-related projects on the Internet.
CVSROOT normally points to a directory on the local machine, but it may also
specify a remote CVS site. The general syntax of a remote CVSROOT is
:pserver:username@hostname:path
6
SourceForge () offers free remote CVS repositories to open
source developers.