ECLIPSE WEB TOOLS PLATFORM developing java web applications PHẦN 8 docx
Bạn đang xem bản rút gọn của tài liệu. Xem và tải ngay bản đầy đủ của tài liệu tại đây (7.98 MB, 75 trang )
Figure 10.55 Web Services Explorer—Query Results Page
Figure 10.56 Web Services Explorer—Service Details Page
Iteration 6: Discovering and Publishing Web Services 499
500 CHAPTER 10 • Web Services
Figure 10.57 Web Services Explorer—WSDL Service Details Page
Figure 10.58 Web Services Explorer—WSDL Binding Details Page
8. The Invoke a WSDL Operation page is displayed (see Figure 10.59). This
page lists the inputs for the selected operation. View the operation details.
Click the Add link and enter a stock symbol. Click the Go button.
Iteration 6: Discovering and Publishing Web Services 501
Figure 10.59 Web Services Explorer—Invoke a WSDL Operation Page
9. The Web Services Explorer invokes the operation and displays the result in the
Status pane (see Figure 10.60). View the result of the operation in the Status
pane. Double-click on the title of the Status pane to maximize it. Click the
Source link to view the request and response SOAP messages.
WSIL
As you can see from the preceding exercise, UDDI is very complex. WSIL is a
much simpler way to publish information about Web services. WSIL is an XML
format that you publish on your Web site to advertise available Web services.
WSIL documents can refer to WSDL, UDDI, and other WSIL documents. By
convention, the root WSIL document for a Web site is named
inspection.wsil.
It can directly list all the Web services or point to subordinate WSIL documents.
In the future, Web service crawlers might search the Web for
inspection.wsil
files and automatically index them in UDDI or other registries.
WSIL was jointly developed by IBM and Microsoft, but Microsoft still uses
the precursor DISCO format to publish Web service information. There is not a
lot of WSIL deployed at present. However, XMethods supports it and several
other Web service publication technologies.
In this part of the iteration you will use the Web Services Explorer to view a
WSIL document published at XMethods. You will also use WTP to create your
own WSIL document to publish the League Planet Web services. Do the following:
1. Open a Web browser and surf to
The XMethods home page is displayed (see Figure 10.61). Look at the
Programmatic Interfaces section, which lists UDDI, WS-Inspection, DISCO,
RSS, and SOAP. These are the ways that XMethods publishes Web service
information. Click the Access link.
2. The Programmatic Interfaces to XMethods page is displayed
(see Figure 10.62). View the many access methods supported by
XMethods. Copy the WS-Inspection link, which gives the URL to the
inspection.wsil document.
502 CHAPTER 10 • Web Services
Figure 10.60 Services Explorer—GetQuoteResponse
Figure 10.61 XMethods Home Page
Figure 10.62 Programmatic Interfaces to XMethods
503
504 CHAPTER 10 • Web Services
Figure 10.63 Web Services Explorer—WSIL Page
3. Click the WSIL Page icon (the page with globe) at the top right corner
of the Web Services Explorer to open the WSIL page in the Navigator
pane (see Figure 10.63). Paste in the XMethods WSIL URL
select WSDL Services, and click the Go button.
4. The List All WSDL Services page is displayed (see Figure 10.64). View the
list of WSDL services registered at XMethods.
5. You are now going to create your own WSIL document for League
Planet. Use the New File wizard to create a new
inspection.wsil file in
the
IceHockeyService/WebContent folder (see Figure 10.65).
6. You will now use WTP to generate WSIL files for the two League Planet
Web services and then merge them into the root
inspection.wsil file.
Select
QuerySOAPPort.wsdl and execute the Web Services ᭤ Generate WSIL
command to create the
QuerySOAPPort.wsil file. Repeat this for
Update.wsdl. Merge the contents of these two generated WSIL files into
inspection.wsil and add abstracts to describe them. Import
IceHockeyService/WebContent/inspection.wsil
Iteration 6: Discovering and Publishing Web Services 505
Figure 10.64 Web Services Explorer—List All WSDL Services Page
Figure 10.65 New File—inspection.wsil
before proceeding (see Example 10.16). You now have a WSIL document
for the League Planet Web site.
Example 10.16 Listing of inspection.wsil
<?xml version="1.0" encoding="UTF-8"?>
<inspection xmlns=" />xmlns:wsilwsdl=" />xmlns:wsiluddi=" />xmlns:uddi="urn:uddi-org:api">
<service>
<abstract xml:lang="en-US">
This Web service lets you query the League Planet Web site
for schedule information.
</abstract>
<description
referencedNamespace=" />location="wsdl/QuerySOAPPort.wsdl">
<wsilwsdl:reference endpointPresent="true">
<wsilwsdl:referencedService
xmlns:impl=" />impl:QueryService
</wsilwsdl:referencedService>
</wsilwsdl:reference>
</description>
</service>
<service>
<abstract xml:lang="en-US">
This Web service lets you query the League Planet Web site
for game details and update the scores.
</abstract>
<description
referencedNamespace=" />location="wsdl/Update.wsdl">
<wsilwsdl:reference endpointPresent="true">
<wsilwsdl:referencedService
xmlns:impl="">
impl:UpdateService
</wsilwsdl:referencedService>
</wsilwsdl:reference>
</description>
</service>
</inspection>
7. Enter the URL
http://localhost:8080/IceHockeyService/inspection.wsil
in the Web Services Explorer WSIL page, select WSDL Services and click Go
(see Figure 10.66).
8. The List All WSDL Services page is displayed (see Figure 10.67). View the
WSDL services available at League Planet. Click the
QuerySOAPPort.wsdl
link.
506 CHAPTER 10 • Web Services
Iteration 6: Discovering and Publishing Web Services 507
Figure 10.66 Web Services Explorer—Open WSIL for League Planet
Figure 10.67 Web Services Explorer—List All WSDL Services for League Planet
508 CHAPTER 10 • Web Services
Figure 10.68 Web Services Explorer—WSIL Service Details for QuerySOAPPort.wsdl
9. The WSIL Service Details page is displayed (see Figure 10.68). View the
QuerySOAPPort.wsdl details.
Summary of Iteration 6
In this iteration you used the Web Services Explorer to view information published
in a UDDI registry and in WSIL documents. You also used WTP to create a
WSIL document for League Planet.
Summary
In this chapter you have covered all the major functional areas of Web service
development that are available in WTP. You created Web services using both the
Top-Down and Bottom-Up approaches, generated a Java client proxy to access a
Web service, developed a Web application that invoked the client proxy using
the JAX-RPC programming model, validated Web services for WS-I compliance,
tested Web services using both the Web Services Explorer and the JSP test client,
viewed information published in both UDDI and WSIL, and created your own
WSIL. Your are now ready to use Web services in your own applications. For
further details about the tools, consult the WTP Help and Web site.
CHAPTER 11
Testing
Quality is not an act, it is a habit.
—Aristotle
Your focus in the preceding chapters has been on getting the League Planet site
up and running. In this chapter you’ll switch gears and focus on testing it.
It seems that testing is one of those activities that most developers would rather
avoid and that many simply do not perform. Those who do not test usually cite
time constraints as the primary factor. Those who do test typically perform ad hoc
testing by running through some quick, informal, manual tests to verify that their
application works as designed. This methodology often breaks down because of
the lack of breadth of test coverage and the difficulty in creating repeatable results.
It’s clear that, unfortunately, many developers do not see the value of testing. Refer
to JUnit Test Infected [Beck2002] by Kent Beck, Erich Gamma, and David Saff for
an excellent brief account of the importance of testing.
Testing should not be considered optional. Inadequate testing fails to
uncover latent problems with your code that can have serious ramifications. In
some safety-critical applications, poor testing is simply irresponsible since errors
can be both dangerous and expensive. The Therac-25 radiation overdoses,
Ariane 5 space shuttle explosion, and Airbus A320-211 plane crash were all
caused by faulty software and led to fatalities [Dubrova2005].
Even without looking at dramatic examples, not testing your application
tends to require more time than actually testing it in the first place. Maintenance
now accounts for roughly half of a developer’s time and more than half of the
development budget [Stark1996]. Not having enough time is simply not a valid
excuse. There are frameworks that provide the facility to easily automate your
tests. These frameworks reduce the time requirements for testing and the weight
of the “not enough time” argument against testing. And, as any seasoned devel-
oper will tell you, there is never enough time anyway regardless of the amount of
it you spend testing.
509
Another misconception is that developers do not need to test because there
are test teams. Test teams are very useful, and you should applaud the people on
these teams for finding bugs in your code, but these teams do not excuse you
from testing your own code. Test teams perform blackbox testing of your code.
That is, they test it without knowing all the details of the internals. Test teams
cannot test all of the key decisions you’ve made or defend all of your fixes
because they simply do not have the background that you have.
Still not convinced? Running tests produces tangible results, including:
❍ Proof that your application is functioning correctly. A test exercises a
specific part of your application, and regular passing results show that the
part of your application under test is still working regardless of changes to
it or other parts of the application.
❍ Recorded memory of decisions that you have made. It is generally very
difficult to understand code that you wrote even shortly after you wrote it!
Tests for your decisions will ensure that you don’t inadvertently make a
decision-breaking change in the future.
❍ Defense against regressions. This is similar to the previous benefit, but
we’ve listed it separately to showcase the benefits for changes you have
made to components you don’t own. For example, when a contributor
submits a fix to WTP, the contributor should also provide some automated
tests that exercise the fix. These tests are run with each build and serve to
defend the fix against possible future regression. Even though the contrib-
utor may not be able to regularly test the component himself, the
contributed automated tests do get run frequently.
There are several types of tests that are useful for testing the League Planet
site. These tests fall into two categories: those for functional requirements and
those for nonfunctional requirements.
There are three types of functional requirements tests: unit, integration, and sys-
tem. These three types of tests are commonly confused, likely because they can be
implemented using the same tools and frameworks. Each of these tests focuses on a
different conceptual level of the site. Unit tests exercise a specific piece of functional-
ity, typically a method or a class. Integration tests focus on the interaction between
components in your application, such as a servlet and the servlet container. System
tests look at the entire site from an end user perspective and are generally driven by
end-to-end scenarios. A comprehensive functional requirements test suite comprised
of these three types of tests is enough to prove that the site is working properly.
Nonfunctional requirements tests are also system-level tests since they cover
all aspects of the site—such as reliability, security, and speed—that are not covered by
functional requirements tests. One type of nonfunctional test commonly performed
510 CHAPTER 11 • Testing
for Web sites is performance testing. Performance tests are useful for a site like
League Planet in order to measure its response time under an expected load. If
the site is not performing as required, it can then be profiled in order to deter-
mine the source of the performance bottleneck.
Automated Testing
While automated test frameworks have been around for many years now, many
developers continue to use
System.out.println()
or equivalent calls to test their code. Printing out variable values can work for
small, manual test cases and debugging code but it is not a viable long-term
testing solution. Not only does printing out values generally mean only one per-
son understands the tests, but these tests cannot usually be run unattended with
every build of your site since they rely on someone to manually verify their
results. They also add a lot of clutter to your production code and are generally
very brittle. For example, changes to the code can often move a test print statement,
thereby changing the expected output value.
Automated testing allows you as a developer to assign the task of testing
large parts of your application to the automated test harness. The extreme
programming (XP) methodology even states that developers should create all of
their tests up front, before the application is written. By creating tests in advance
of your code, you confirm that your application is complete after all of your
tests pass. Following the XP methodology, this chapter could have appeared
much earlier in the book. However, because this book does not focus on XP, this
chapter comes at the end of the development cycle as is typical for other devel-
opment processes such as iterative design and waterfall. While you still must do
some manual testing, especially of user interface components, much of your code
can be reliably tested both quickly and often using automated tests.
Automated testing of your applications provides you with substantial bene-
fits, including:
❍ Robustness: The test cases are separated from your development code and
are therefore not subject to breakage caused by moving development code
around.
❍ Automation: Your tests can be run on demand before you check in your
code and as part of your build.
❍ Readability: The tests are located in separate classes with clear, measurable
objectives. This not only keeps your development code clean and readable
but also allows others to more easily understand your tests.
Automated Testing 511
❍ Time Savings: Automated tests save you time by reducing the amount of
manual, labor-intensive testing you have to do. Having automated tests
allows you to always do the safe thing and test your code before
committing a change, even when under heavy time pressure.
❍ Simplicity: Once you understand the automated test framework it is
generally very easy to create and maintain your tests.
Overview of Iterations
In this chapter you’ll test the League Planet site in the following iterations:
❍ In Iteration 1 you develop a unit test for the User.java class with the JUnit
test framework.
❍ In Iteration 2 you develop an integration test for the LoginServlet.java
servlet with the Cactus test framework.
❍ In Iteration 3 you develop a system test for the League Planet site with the
HttpUnit test framework.
❍ In Iteration 4 you run a performance test on the update game results
request mechanism of the League Planet site with the Eclipse Test and
Performance Tools Platform (TPTP).
❍ In Iteration 5 you profile the update score page of the League Planet site
with TPTP.
Iteration 1: Unit Testing with JUnit
A unit test isolates and tests a small, defined piece of functionality. In Java this
typically translates to a method of a class [Abran2004].
To unit test a method you create a series of tests that cover the interesting
inputs. Interesting inputs test boundary or edge cases. For example, when testing
a parameter that requires a String, along with testing expected input strings you
should test the empty string and null. You then isolate each test by creating stub
objects for any foreign objects referenced by your code. A good check to see if
you have properly isolated a unit test is to count the number of classes the test
imports. If the test imports classes from many other places in your code it is
probably not a good unit test. Each test then asserts that the results returned and
any exceptions thrown from the method are as expected for its inputs.
JUnit is the de facto standard automated test framework for Java. It is an
Open Source framework hosted on SourceForge, bundled with the Eclipse IDE,
and available from
512 CHAPTER 11 • Testing
The JUnit Web site describes JUnit as a “regression testing framework.” We
can’t say it any more succinctly. JUnit is a powerful test harness that gives you a
way to run automated, and therefore repeatable, tests of your Java code. It also
simplifies test authoring, allowing you to quickly write new tests and contribute
them to your existing test suite.
There are two main components in JUnit: test cases and test suites. Test cases
contain the code for all of your unit tests. Test suites are collections of test cases.
A test suite can contain individual test cases or other test suites.
When running your tests, you can either run a specific test case or a test
suite. This is useful for debugging a single test failure since you do not have to
run the entire suite, which may take some time. Typically a master test suite is
created that contains all the other test cases and test suites for the application.
This master test suite provides a convenient way to run all the tests for the appli-
cation, which is useful when running the tests as part of your build. The JUnit
Web site contains a list of articles that can assist you in configuring JUnit to run
this master test suite in a variety of settings, including your build.
We’ve already established that your time is limited, so you will want to focus
your testing effort on the most useful areas of your code. This means that simple
methods such as getters and setters are not usually unit tested unless they do
some special processing. And, specifically for Java Web applications, unit tests
are not appropriate to test methods that interact with a servlet or Java EE 5 con-
tainer. These classes should be tested by integration tests, as we’ll discuss in the
next iteration.
In this iteration, you will perform the following tasks:
1. Create and configure a separate test project in your workspace.
2. Create a JUnit test case that unit tests
User.java.
3. Create a JUnit test suite that includes your test case.
Creating a Test Project
One of the benefits of automating your tests with JUnit is that you can keep your
tests physically separated from your production code by storing them in a separate
project. This eliminates the chance that the tests will be accidentally deployed
along with your production code. Although your unit tests will not be deployed
to a server, creating a new dynamic Web project to hold your tests will allow you
to continue to work in the J2EE perspective.
Here you create a new test project by doing the following:
Iteration 1: Unit Testing with JUnit 513
1. In the Project Explorer view, use the New Dynamic Web Project wizard
to create a project named
IceHockeyWebTest. For detailed information on
creating Web projects, refer to the Creating Web Applications section in
Chapter 6. Select
None as the target runtime since you will not deploy this
project to a server.
2. Click Next. The Project Facets page is displayed. The Java version set on the
IceHockeyWebTest project needs to be the same as the version set on the
IceHockeyWeb project. Ensure that the Java version is set to the same level as
the
IceHockeyWeb project. The level will be the same as the Tomcat JDK.
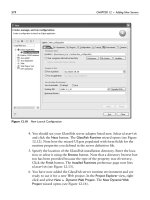
3. Accept defaults for other options and click Finish. WTP creates the project
in your workspace.
4. To test the contents of the
IceHockeyWeb project, you need to declare a
dependency on that project. Right click on the
IceHockeyWebTest project
and select Properties. The Properties window for
IceHockeyWebTest opens.
Select Java Build Path from the menu on the left if it is not already selected.
Select the Projects tab on the Java Build Path page. Click the Add button. The
Required Project Selection dialog opens. Select the
IceHockeyWeb project and
click OK. The dependency is added to your project (see Figure 11.1).
514 CHAPTER 11 • Testing
Figure 11.1 The IceHockeyWebTest Project Dependencies Page
5. Click OK in the properties window to close the window and save your
changes.
You have now created a dynamic Web project named
IceHockeyWebTest
that will be used to house your tests. Next you’ll add a JUnit test case to
this project.
JUnit Test Case
You will now create a JUnit unit test for the class
User.java
that you have already created (see Example 7.13 in Chapter 7). To create the
test, do the following:
1. In the Project Explorer view, right click on the
IceHockeyWebTest project
and select New
᭤ Other. The New wizard opens. Select Java ᭤ JUnit ᭤ JUnit
Test Case and click Next. The New JUnit Test Case wizard opens.
2. It is good practice to create tests in the same package as the class that is
under test. This promotes well-structured test suites that are easy to
understand and allows test classes access to protected methods and vari-
ables of the classes under test. It is a JUnit convention to name your test by
appending
Test to the name of the class under test. In this case you are
testing the
User class, so you will create a test class named UserTest.
Specify the package
com.leagueplanet and the class name UserTest.
3. JUnit provides two convenience methods for test cases: setUp and tearDown.
The
setUp method is run before each test method in the test case, and the
tearDown method is run after each test method. Select the checkboxes for
setUp and tearDown to create method stubs for both methods.
4. JUnit test cases require the JUnit libraries to be on your project’s classpath.
The New JUnit Test Case wizard provides you with a shortcut to add these
libraries to your project’s classpath. At the bottom of the wizard page there
is a warning that states that JUnit 3.8.1 is not on the build path, and there
is a link to add JUnit to the build path (see Figure 11.2). Click on the link.
The Properties window for
IceHockeyWebTest opens, showing that JUnit
has been added to the project’s libraries. Click OK to close the window.
5. Click Finish to close the wizard. The
UserTest class is added to your
project in the
com.leagueplanet package and is opened in the Java source
editor.
6. Edit
UserTest.java (see Example 11.1).
Iteration 1: Unit Testing with JUnit 515
516 CHAPTER 11 • Testing
Figure 11.2 New JUnit Test Case Wizard
Example 11.1 Listing of UserTest.java
package com.leagueplanet;
import junit.framework.TestCase;
public class UserTest extends TestCase {
private User user;
protected void setUp() throws Exception {
user = new User();
}
protected void tearDown() throws Exception {
user = null;
}
public void testLogInTypical() {
user.logIn("userid");
assertTrue("The user is not logged in.", user.isLoggedIn());
assertNotNull("The user Id is null after logging in.",
user.getUserId());
}
public void testLogInEmpty() {
user.logIn("");
assertTrue("The user is not logged in.", user.isLoggedIn());
assertNotNull("The user ID is null after logging in.",
user.getUserId());
}
public void testLogInNull() {
user.logIn(null);
assertTrue("The user is not logged in.", user.isLoggedIn());
assertNotNull("The user ID is null after logging in.",
user.getUserId());
}
public void testLogOut() {
user.logIn("userid");
user.logOut();
assertFalse("The user is logged in after logging out.",
user.isLoggedIn());
assertEquals("The user ID is not the empty string.", "",
user.getUserId());
}
}
There are two methods in the User class that are tested: logIn and logOut.
The rest of the methods are not tested since they have trivial implementations
and are invoked by these methods.
The
logIn method takes a String parameter as input. As we stated earlier,
you should create tests for the boundaries or edge cases of the input
parameters. In this case the
userId parameter is tested in three separate
tests with a typical value of
userid, the empty string and null. In all cases,
the tests assert that the user id set on the user object is not null and the
logged in value is set to true.
The
logOut method is simpler in that it does not have any parameters. For
this method the test asserts that when a user is logged in, this method will
successfully log the user out by changing the user name to the empty string
and setting the logged in value to
false.
As the test methods show, assert statements are used by JUnit to verify test
results. One failing assertion will cause an entire test to fail. Each assert state-
ment allows you to specify a description that will be displayed if the test fails.
It is good practice to provide a description; otherwise, a failing test will only
display its name and provide a stack trace, which may not be enough infor-
mation to start debugging.
UserTest employs the assertEquals, assertFalse,
assertNotNull, and assertTrue methods. The JUnit framework provides
many additional assert statements for various types of assertions.
UserTest also contains two convenience methods: setUp and tearDown.
setUp is run before and tearDown is run after each test in the test case.
They allow you to factor out common test configuration and initialization,
Iteration 1: Unit Testing with JUnit 517
and therefore help keep your test cases clean and easy to read. In UserTest
these methods create a new user object before each test and destroy it
when the test is complete.
7. The test class is now ready to run. Right click on the
UserTest.java class
and select Run As
᭤ JUnit Test. The JUnit view opens with the test results
(see Figure 11.3).
518 CHAPTER 11 • Testing
Figure 11.3 UserTest Results Displayed in the JUnit View
There are three types of results from a JUnit test: passed, failed, and error.
Passed and failed are as you’d expect. Error indicates that there is a prob-
lem with the test case itself. The JUnit view will display a green bar if all
tests pass and a red bar if there is even one failure or error. In this case the
bar is green because all the tests passed.
You have now created a JUnit test case
UserTest. Next you’ll add this test
case to a test suite.
JUnit Test Suite
JUnit test suites are a way to group related tests, such as those for a package or
your entire application, so they may be run easily in one shot. To create a test
suite for the
IceHockeyWeb unit tests, do the following:
1. In the Project Explorer view, right click on the
com.leagueplanet
package in the IceHockeyWebTest project and select New ᭤ Other. Select
Java
᭤ JUnit ᭤ JUnit Test Suite. Click Next. The New JUnit Test Suite wizard
opens.
2. The package field is prepopulated with the value
com.leagueplanet, the
name is set as
AllTests, and the UserTest class is selected (see Figure 11.4).
Accept all of these default values and click Finish.
3. The AllTests.java class is added to your project and opened in the Java
source editor (see Example 11.2).
Example 11.2 Listing of AllTests.java
package com.leagueplanet;
import junit.framework.Test;
import junit.framework.TestSuite;
public class AllTests {
public static Test suite() {
TestSuite suite = new TestSuite("Test for com.leagueplanet");
//$JUnit-BEGIN$
suite.addTestSuite(UserTest.class);
//$JUnit-END$
return suite;
}
}
The generated class is very short. It contains one method, suite, that cre-
ates a new JUnit test suite; adds the
UserTest class to the suite; and returns
the suite. Adding test cases to this suite simply requires additional calls to
the addTestSuite method on the suite object.
Iteration 1: Unit Testing with JUnit 519
Figure 11.4 The New JUnit Test Suite Wizard
4. The test suite is now ready to run. Right click on the AllTests.java class
and select Run As
᭤ JUnit Test. The JUnit view opens with the test results
(see Figure 11.5). These results look similar to the results displayed when
running the test case, but are now grouped by test suite instead of only
test case.
520 CHAPTER 11 • Testing
Figure 11.5 AllTests Results Displayed in the JUnit View
Summary of Iteration 1
In this iteration you created a new project to hold your tests. You then created a
new JUnit test case to test the
User.java class and a JUnit test suite to bundle
your test case.
In the next iteration you’ll create an integration test with Cactus for the
project.
Iteration 2: Integration Testing with Cactus
Integration testing takes a step up from isolated test cases to concentrate on
the interactions between two or more components. The preferred strategy for
integration testing is usually an incremental strategy. In this way the interac-
tion between two or a few components is tested first and additional compo-
nents are added to the test mix after the current components under test have
been proven to function correctly. The incremental test strategy is in contrast
to the big bang test strategy where all the components are tested together at
once [Abran2004].
JUnit supports testing stand-alone Java classes very well. When creating tests
for Java EE 5 applications you have the added difficulty of ensuring that your code
functions properly when run inside of a servlet or Java EE 5 container. (In this sec-
tion, when we refer to a servlet container we mean either a servlet or a Java EE 5
container.) For example, you will have difficulty creating a JUnit test for
com.leagueplanet.LoginServlet
since JUnit provides no easy way to modify the session information or the
information submitted to your servlet.
When using the incremental approach for integration testing it is often
necessary to create stub or dummy objects for those components that have not yet
been included in the test mix. When testing servlets, creating dummy objects can be
a problem for two reasons. First, you may have to create many dummy objects to
mimic the behavior of the servlet container. Creating many dummy objects can be
very time consuming. Second, creating many dummy objects is itself error prone,
which defeats the purpose of creating the dummy objects in the first place.
Cactus is an automated testing framework that extends JUnit and runs inside
your servlet container. Like JUnit, Cactus is an Open Source project. It is hosted
at Apache, bundled with WTP, and available from
/>Cactus can be used to run unit tests on your servlet and functional tests on
your application, but neither of these uses is a strength of the Cactus framework.
For simplicity of your unit tests you are better off creating JUnit tests. For your
functional tests you will find it easier to create the tests using a test framework,
such as HttpUnit, that can handle end-to-end scenarios within your application.
(We’ll discuss HttpUnit in the next iteration.) Also, servlet tests that involve the
servlet container are really integration tests since they test your code working
with the servlet container module. Remember, integration testing your servlets
still requires that you unit test the appropriate methods of your servlets. This
will help you catch any integration problems with the servlet container, which
you likely will not have written.
The benefit of the Cactus framework is that it allows your tests to interact
with the artifacts produced by the servlet container. Cactus gives you access
to several instance variables that a regular JUnit test does not have access to.
These instance variables, detailed here, can be very useful when testing your
servlet:
❍ The request instance variable gives your test access to and lets it set
request parameters passed to your servlet. This variable allows you to
mimic the input to your servlet from HTML forms or other requests. For
example, using this variable your test can pass different login credentials
to the League Planet login servlet.
The request object extends
javax.servlet.http.HttpServletRequest.
It has three additional methods that allow you to set its properties. Their
function should be self-evident:
setRemoteIPAddress, setRemoteHostName,
and
setRemoteUser.
Iteration 2: Integration Testing with Cactus 521
❍ The response instance variable gives your test access to the response object
on which your servlet will set properties. You can use this variable to test
the results returned by your servlet.
❍ The config instance variable provides your test access to the servlet
configuration and allows it to set additional configuration parameters.
This allows your test to dynamically change the configuration of the
servlet without restarting the application.
The
config variable extends javax.servlet.ServletConfig. It has two
additional methods that allow your test to set some of its properties:
setInitParameter and setServletName.
In addition to these methods, when the
getServletConfig method is
called, a special servlet context is returned, which extends
javax.servlet.ServletContext.
Like the
config variable, this servlet context allows you to dynamically
change the configuration of the servlet container without restarting the
container. It contains two additional methods:
getLogs, which returns the
information logged by the
log method, and setInitParameter, which sets
a parameter as though it had been set in your application’s deployment
descriptor.
❍ The session instance variable gives your test access to all the session
properties for which your servlet has access. It extends
javax.servlet.http.HttpSession.
522 CHAPTER 11 • Testing
Warning: If you are using an IBM 1.4.2 JDK, you may run into problems using Cactus.
We recommend you use an IBM 1.5 SDK for the integration tests. You can download
the 1.5 SDK from
/>After installing the runtime you will need to change the runtime of both your server
and the
IceHockeyWeb project. You can change the server runtime by editing the
server on the Server Preferences page.The
IceHockeyWeb runtime can be changed
by right clicking on the project in the Project Explorer and selecting Properties. Select
Java Build Path. Select the Libraries tab and then select the JRE System Library and
click Edit.
In this iteration, you will create an integration test for
LoginServlet.java in
the
IceHockeyWeb application (see Example 7.14 in Chapter 7). To create the test,
do the following:
1. Cactus is both a server- and client-side framework. This means that your
test will execute on the server side as well as the client side. Java Web
applications have strict class loading rules, and therefore your tests
cannot be separated into a different project as was the case with JUnit for
unit tests. For servlet integration tests your test cases must be contained
within the same Web module that contains the servlets. You will add the
servlet test case to the
IceHockeyWeb project that contains
LoginServlet.java. However, you can still separate your test code from
your production code by using a separate source folder for the servlet
tests. This will allow you to easily remove the tests before deploying your
application.
In the Project Explorer view, right click on the
IceHockeyWeb project and
select New
᭤ Source Folder. The New Source Folder wizard opens. Enter
the folder name
testsrc and click Finish. The testsrc source folder is
added to the
IceHockeyWeb project. This folder will be used to hold the
IceHockeyWeb servlet integration tests.
2. Create a new servlet integration test by right clicking on the servlet to be
tested,
LoginServlet.java, and selecting New ᭤ Other. The New wizard
opens. Select Java
᭤ JUnit ᭤ Servlet Test Case.
A question dialog opens indicating that the
IceHockeyWeb project is miss-
ing the Cactus dependencies and asking if you want to add them. These
dependencies are required to run Cactus tests. Click Ye s . The Cactus
libraries are added to the
IceHockeyWeb/WebContent/WEB-INF/lib
folder. Make a note of this folder. These libraries should be removed
before deploying the
IceHockeyWeb application into a production
environment.
The New Cactus Test Case wizard opens.
3. The New Cactus Test Case wizard is similar to the New JUnit Test Case
wizard but has a couple of extra Cactus-specific options for generating
beginXXX and endXXX method stubs. These methods work like the setUp
and tearDown methods except they will be executed on the client side
instead of the server side. You won’t make use of these methods as your
test does not require them.
The source folder that’s prepopulated is incorrect. You want to use the
testsrc folder. Click Browse next to Source folder and select the testsrc
folder.
Iteration 2: Integration Testing with Cactus 523